

1.PURPOSE
WC Shop Sync can assist you to migrate & synchronize your merchandise between Square & WooCommerce with all the product details. Not simply that you can even integrate Square Payment Gateway at WooCommerce checkout, facilitating the method of merchandising.
With the professional version, all product knowledge may be synchronized between WooCommerce and Square POS like Price, Stock, categories, images, variations, order total, discounts.
Auto Synchronization feature helps to cut back the task, making it time efficient and make things easier. With this plugin, even refunds can be managed from Square POS to WooCommerce.
Keeping the testing innovative mind we’ve integrated the latest Sandbox Support in the payment gateway, with the latest Square API integration making it developer-friendly.
Looking for a way to get your merchandise orders synchronized from Square to WooCommerce, This plugin will exactly do that.
2.FEATURES
➤ SYNC PRODUCTS/ITEMS TO BOTH PLATFORMS
Synchronize Products/Items from Square to WooCommerce or vice versa with all the product/item detail.
➤ AUTO AND MANUAL SYNCHRONIZATION
Set the synchronization to be done automatically with defined time parameters or synchronize Products/Items manually in real-time.
➤ REAL-TIME PRODUCT/ITEM DETAIL SYNC
Any Product/Item being edited, updated in Square will be reflected in WooCommerce and the same goes for WooCommerce to Square in Real-Time.
➤ SUPPORT DIFFERENT PRODUCT/ITEM TYPE
May Product/Item be a simple or variable, having any Product/Item detail it will be synced according to its type and having all the Product/Item details synced properly.
➤ SYNC VARIATION ACCORDING TO ATTRIBUTES
Variations created and depending on Global and Custom attributes can be synced with all the Variations being fetched by the plugin and synced between both Platforms.
➤ INTEGRATE SQUARE PAYMENT GATEWAY
Another perk from WC Shop Sync is that it integrates Square payment gateway for WooCommerce checkout.
➤ NEW SANDBOX API INTEGRATED
Test the payment gateway with new Square API integrated, which enables to send test transactions from Sandbox Mode and reflect them in the Square Sandbox Account with all the details of the transactions.
➤ POS ORDER SYNC
Orders charged through Square Point of Sale will be synced with WooCommerce and can be seen through the WooCommerce order tab.
➤ SYNC REFUND ORDERS
Refunds given through Square POS will be synced with WooCommerce.
➤ CUSTOMER SYNCHRONIZATION
Synchronize customers from woo to square and vice versa.
➤ TRANSACTION INFORMATION
Displays a transaction note about the order in the square account.
➤ CARD INFORMATION
Displays saved credit card(s) at checkout.
➤ GOOGLE PAY
Enable your customers to make payments through Google Pay.
➤ SQUARE GIFT CARD
Enable your customers to make payments through Square Gift cards.
➤ SQUARE MODIFIERS
Create and sync square modifiers linked with products from Square to WooCommerce or vice versa.
➤ AFTER PAY
Enable your customers to make payments through After Pay.
➤ CASHAPP CARD
Enable your customers to make payments through CashApp Card.
➤ STOCK SYNC TO WOOCOMMERCE VIA WEBHOOKS
Stock Sync is a Square feature that allows you to synchronize product stock automatically without manually synchronizing. Update the stock count in the Square, it will automatically update the stock count in WooCommerce.
➤ Variation Image for variable products from WooCommerce to Square and vice versa
Variation Image for variable products from WooCommerce to Square synchronization and vice versa
➤ Compatibility with PHP version 8.0
WC Shop Sync is now compatibility with PHP version 8.0
➤ Square Credit Card with FunnelKit Funnel Builder
➤ WooSquare with Square Terminal
3.REQUIREMENTS
General Requirements:
Server Requirements:
- RAM 2 or 4GB
- Atleast Processor 2 Core
- Storage 40GB
- Bandwidth 2TB
- SSL certified
- max_execution_time should be 0 or 899
- php_admin_value[max_input_time] = 0
4.INSTALLATION
- After you have downloaded the plugin you will now need to install it on your WordPress system.
- Log in to your WordPress admin panel.
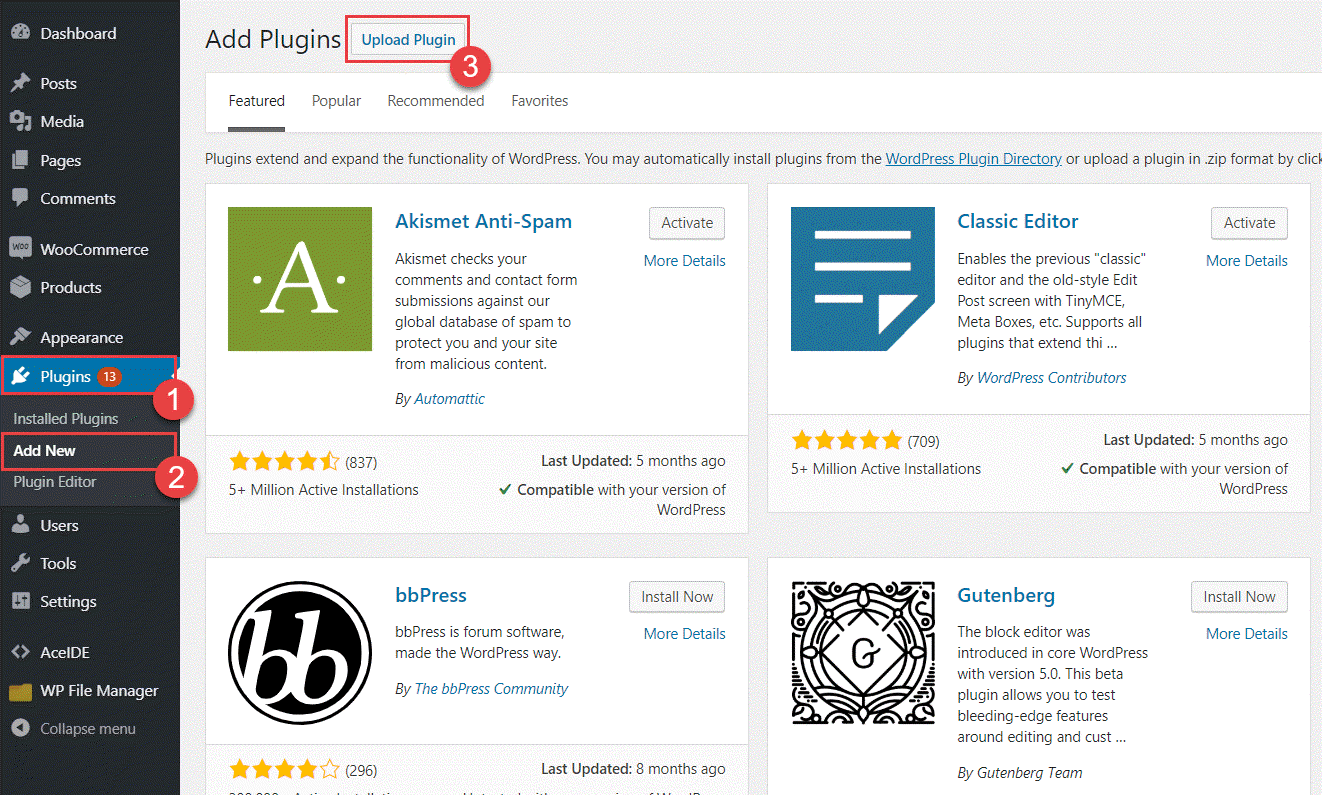
- Click on the Plugins tab on the left side menu.
- Click Add New.
- At the top of the page, you will see an Upload Plugin button, click that.

- Click Choose file button in the box that appears below, Select the woosquare-plus.zip file from your directory.
- After the file has been selected, click install now.

- When the zip file has finished uploading click the Activate Plugin button. That’s all. You will now see WC Shop Sync tab on your admin panel.
5.GETTING STARTED
Connecting Square with WC Shop Sync:
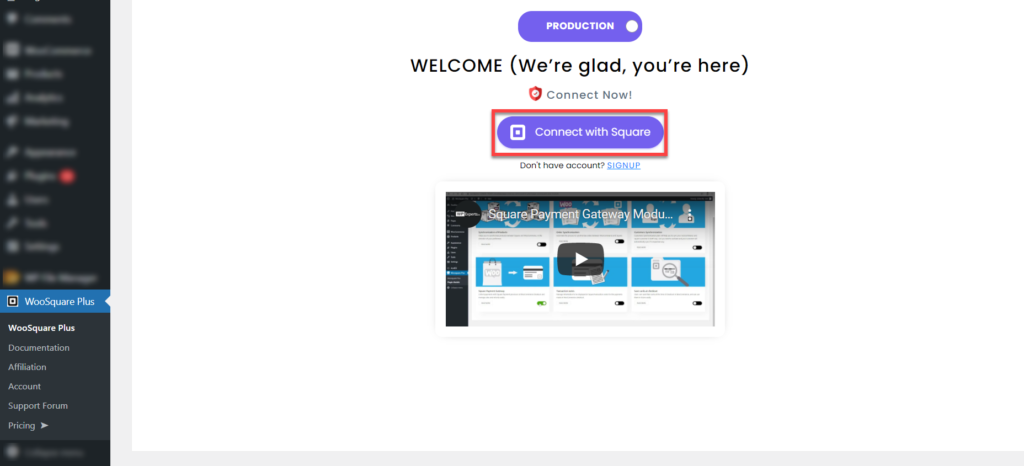
- After the plugin has been activated, WC Shop Sync Tab will be visible on the dashboard menu, goto the WC Shop Sync tab.
- Click on the Connect with Square button to connect your Square account with your website. If you don’t have a Square account click on the SIGNUP button or Click here to SignUp.
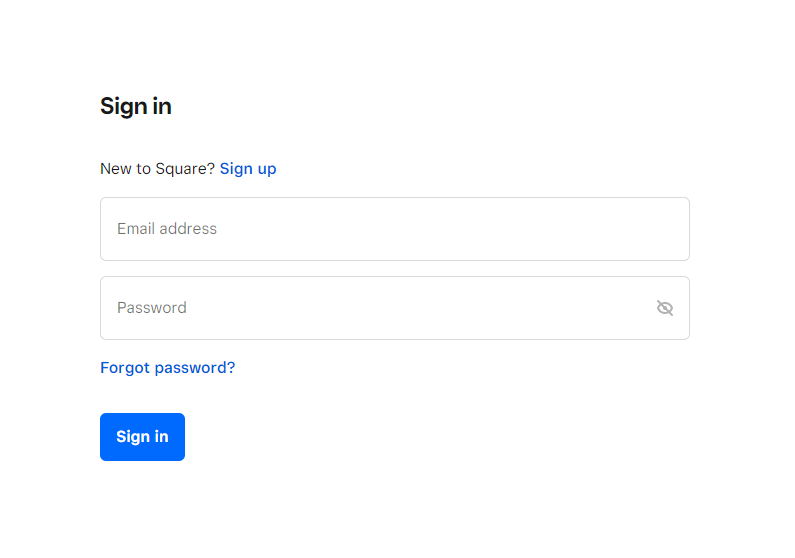
- If you’re not logged in to your Square account then you’ll be redirected towards the Square login page.
- Enter the credentials of your Square account and click sign in.
- If you’re already logged in to your Square account then an authentication page will appear.
- After achieving login, a permissions page will be prompted, click allow to authorize permissions for different functionalities that plugin has to retrieve from the square account.

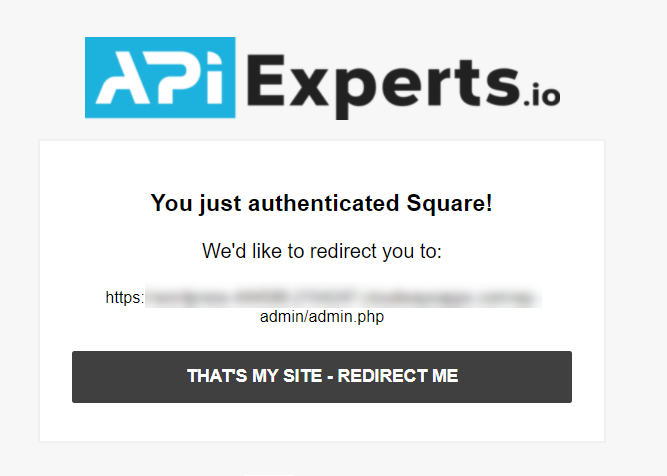
- Once done, click on the THAT’S MY SITE – REDIRECT ME button to redirect to the site and complete authorization with square.

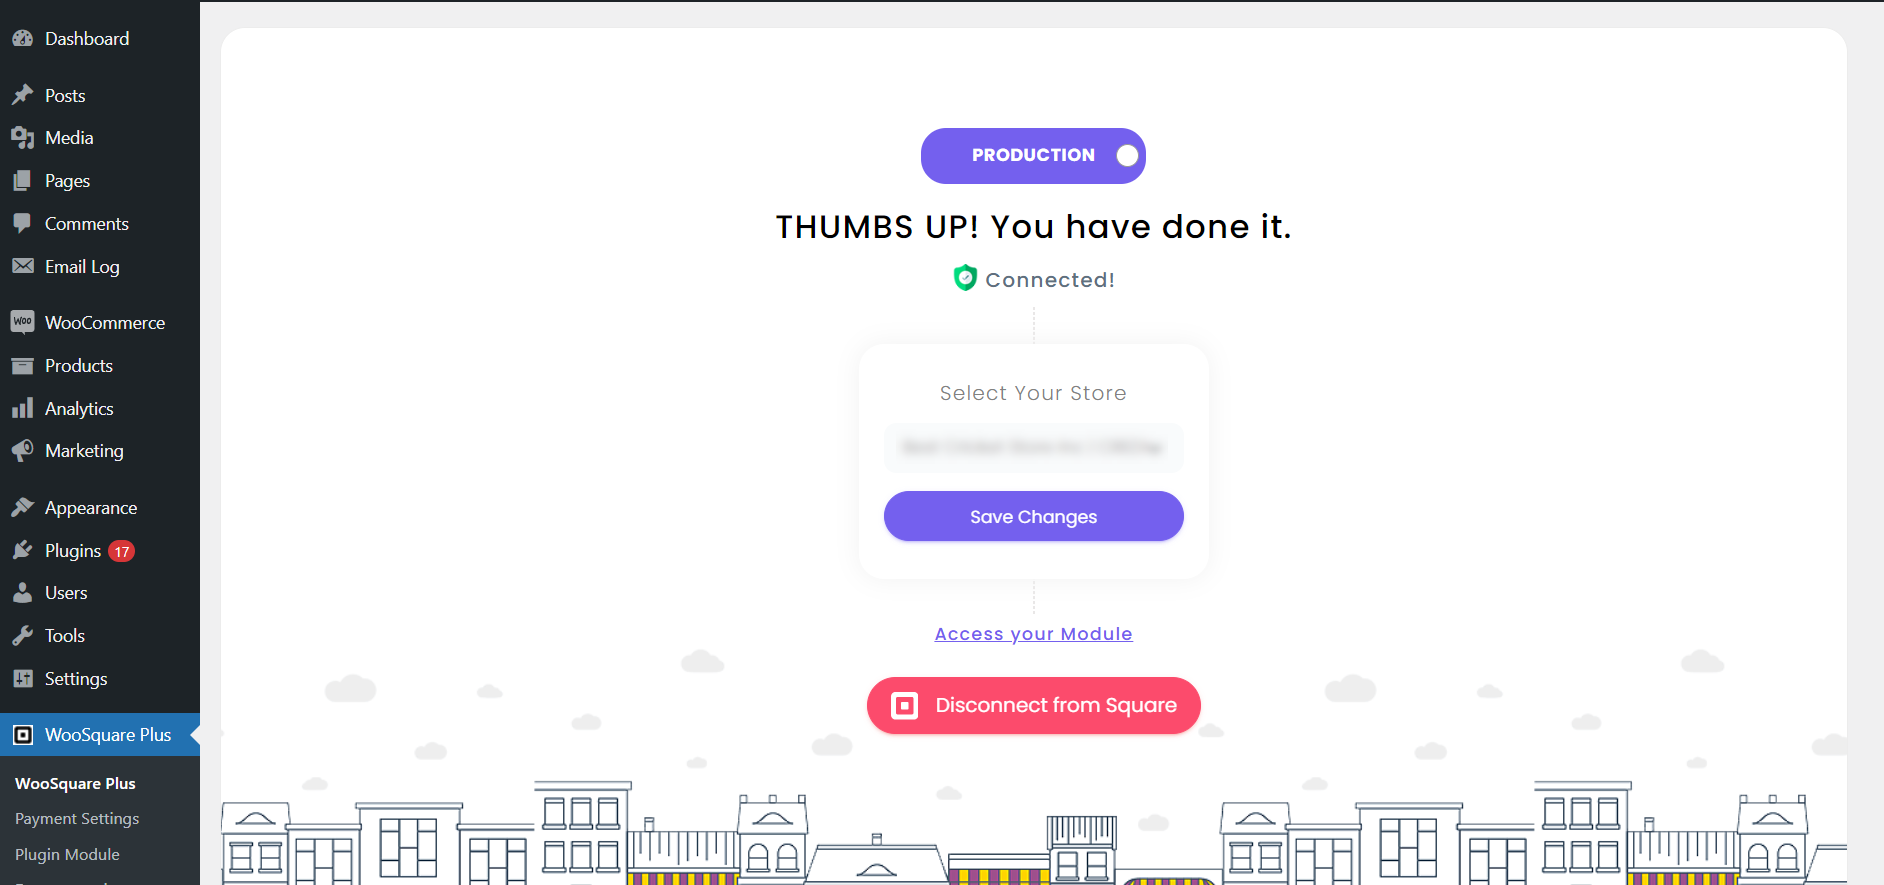
- After OAuth has been achieved, select your location from the dropdown menu.
- Click Save Changes button to save the settings.
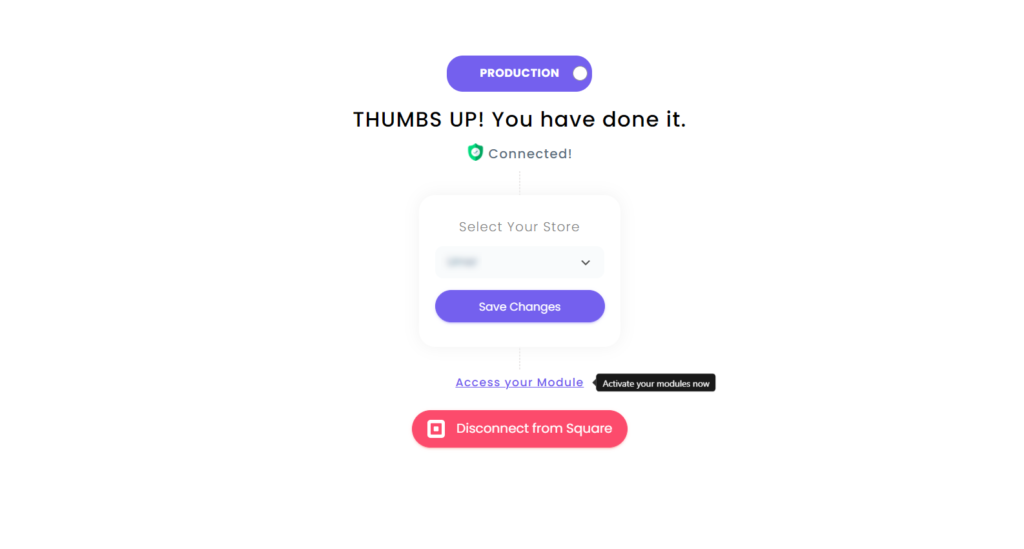
- Click Access your Module to activate the plugin modules tab.
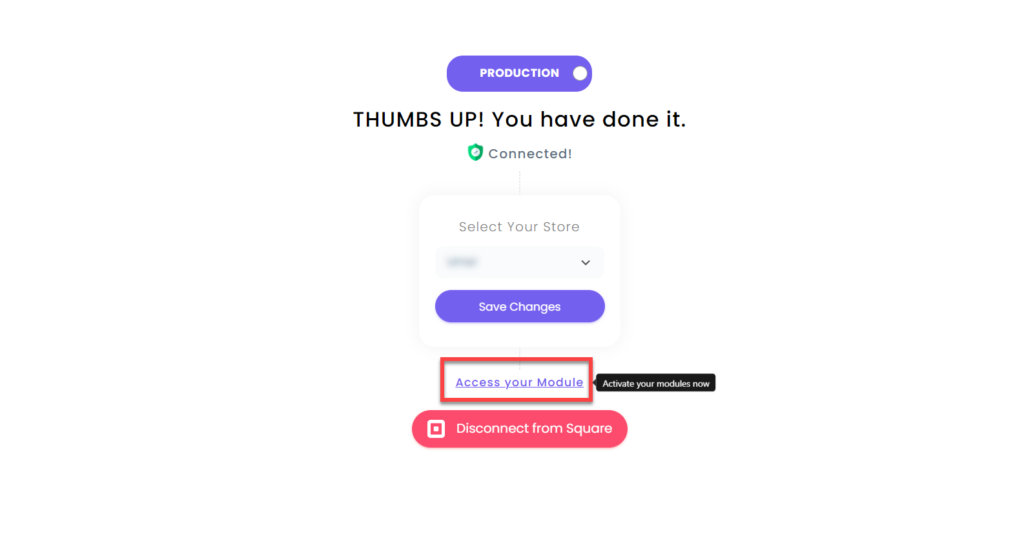
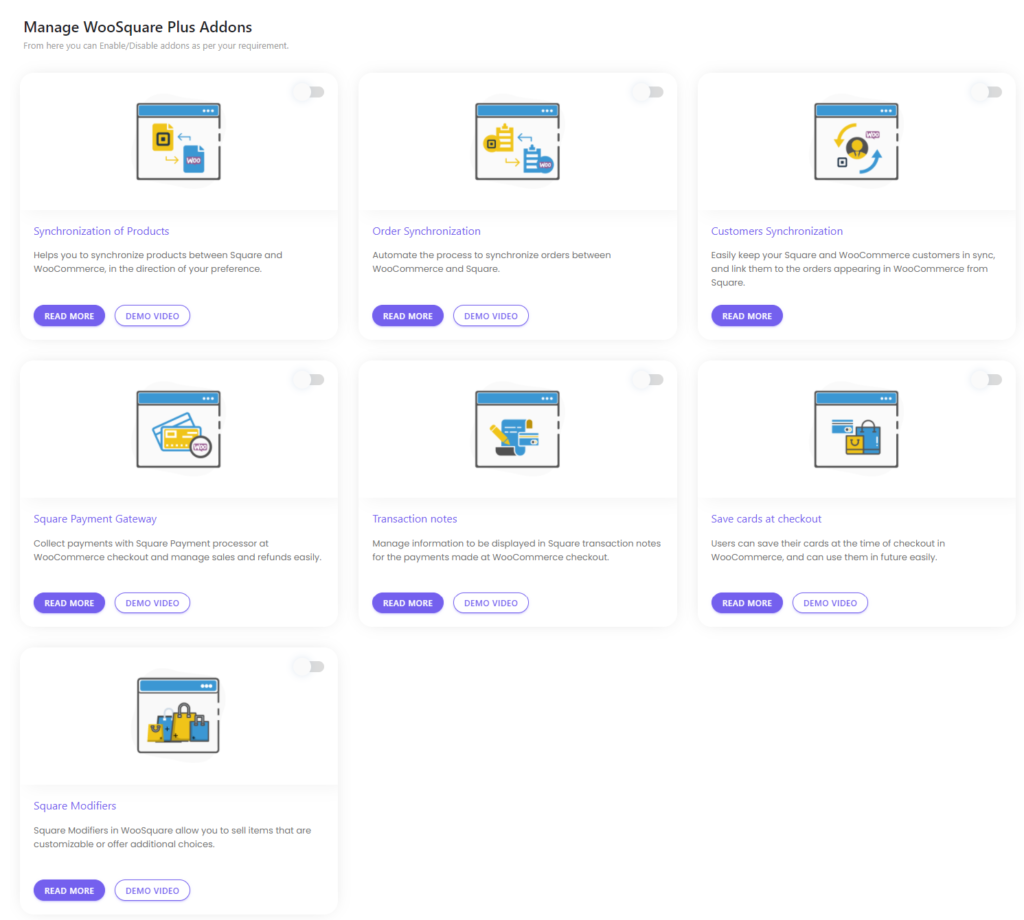
- WC Shop Sync Modules displayed.
6.SQUARE PAYMENT GATEWAY
- For using the Square Payment Gateway on checkout and also to use Square Sandbox, a plugin module has to be activated which enables it to connect with square sandbox.
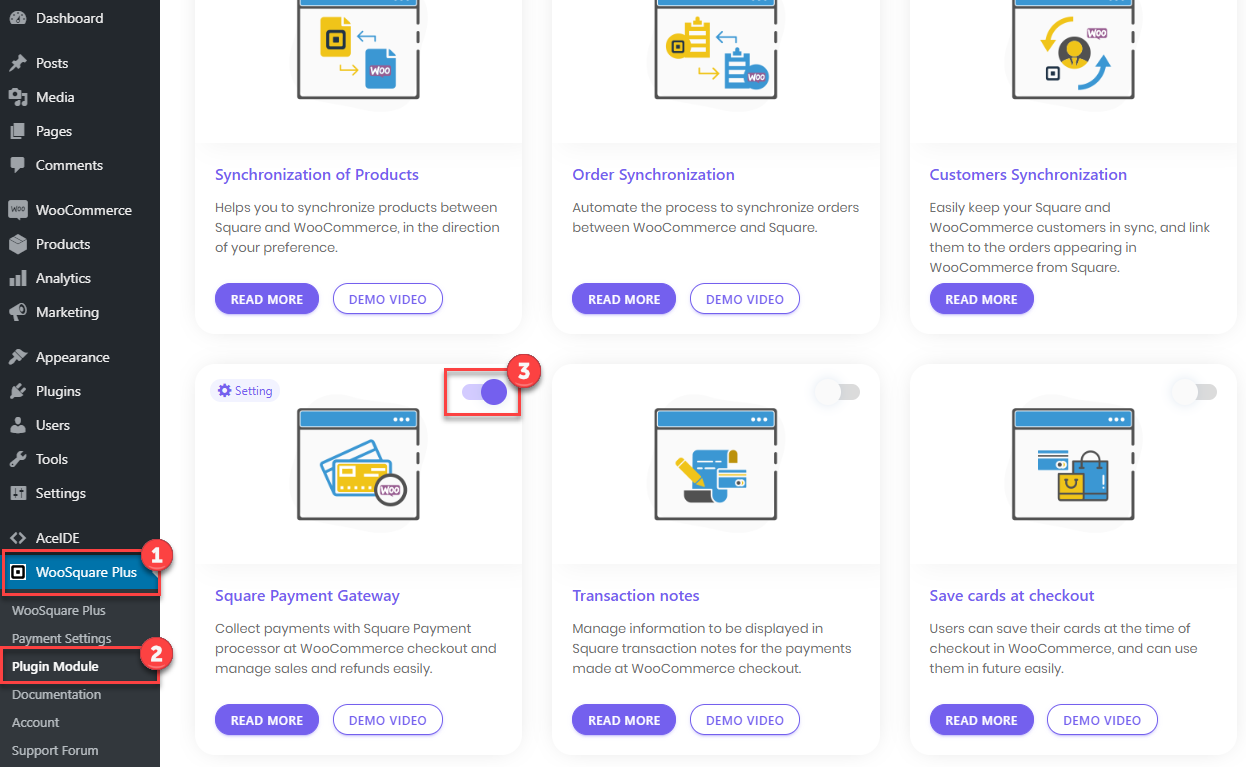
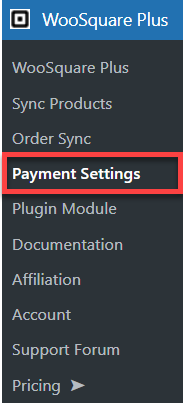
- To activate the module, go to the WC Shop Sync tab.
- Navigate to the plugin module tab.
- Enable Square Payment Gateway.
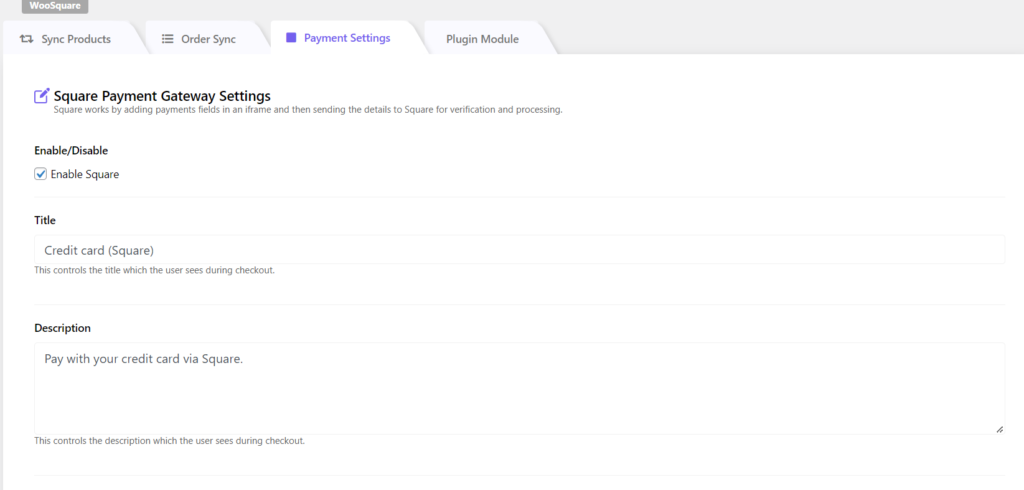
- As the module is enabled, a sub-tab for Payment Settings will be displayed inside the WC Shop Sync tab, click this tab to access the square payment gateway settings.
- As the settings are displayed there are multiple options that have different functionalities if enabled.
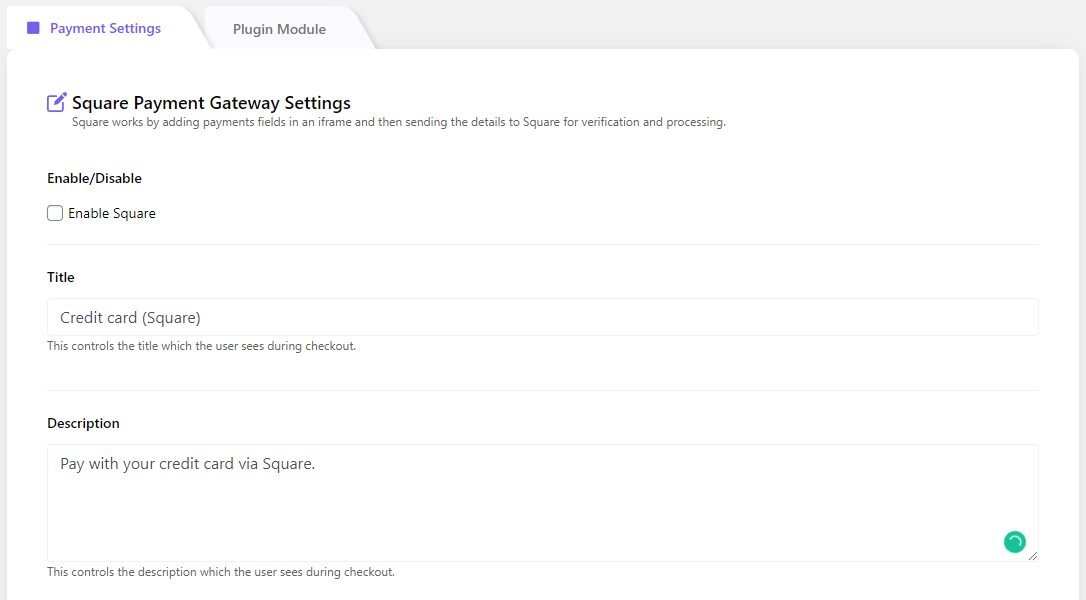
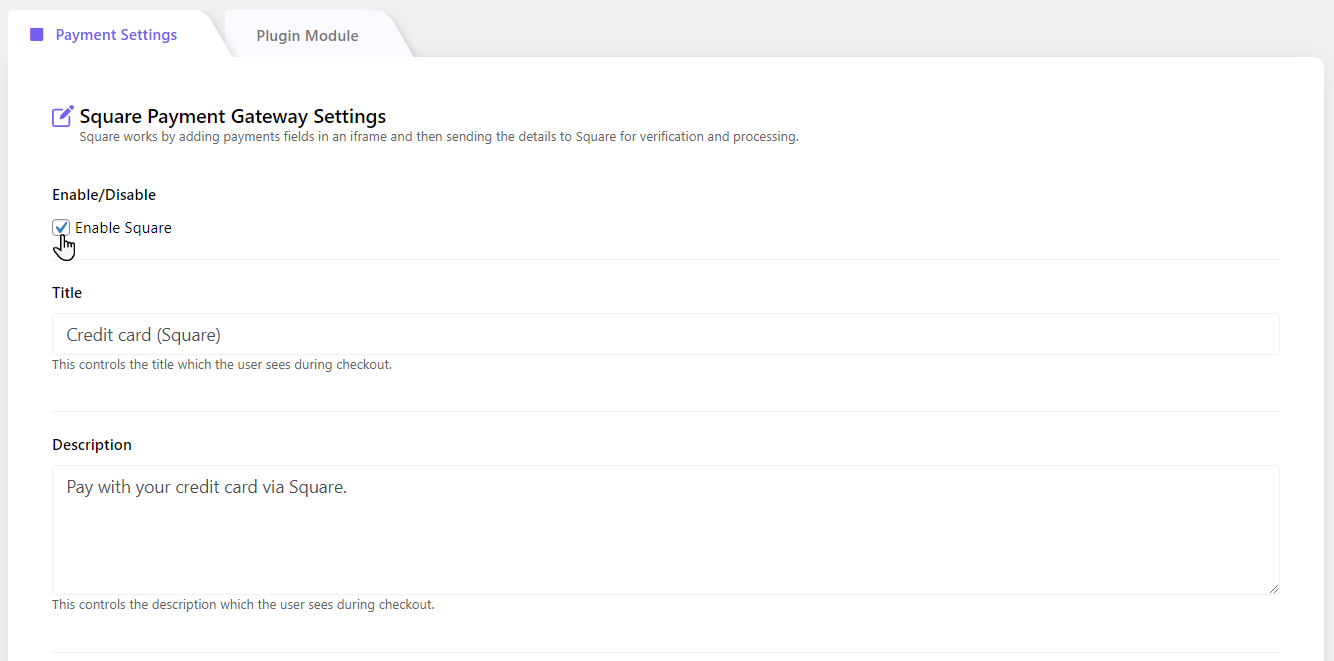
ENABLE/DISABLE
To enable the payment gateway on WooCommerce checkout, click this checkmark.
TITLE
Set the title of the card, which will display as title outside the credit card field.
DESCRIPTION
The description will display before the credit card fields, any specific instructions can be given through this option.
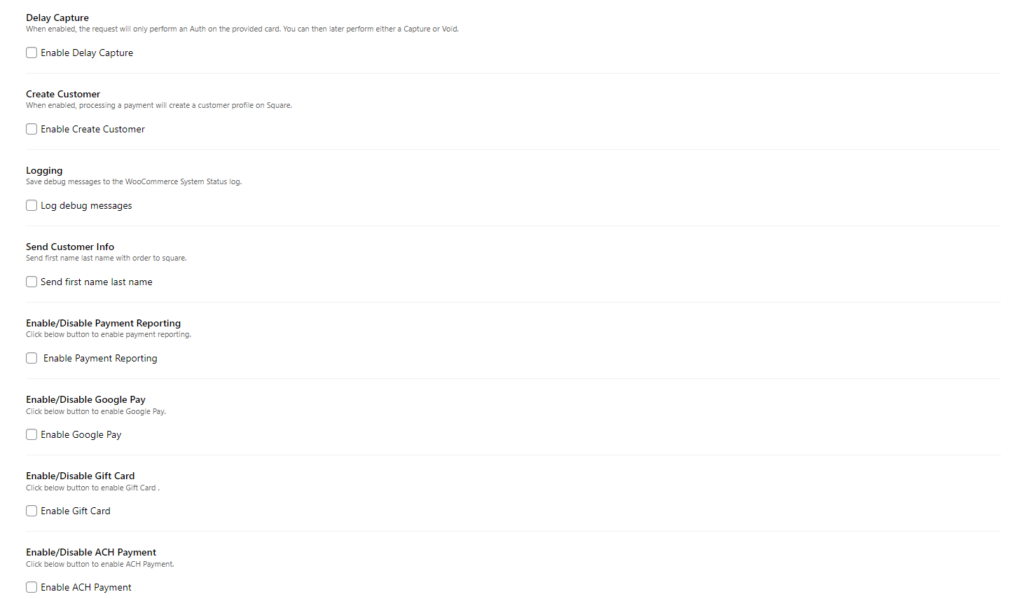
DELAY CAPTURE
Delay capture can be used when a customer makes an in-store purchase from a merchant, the merchant may want to authorize funds at the time of purchase, and capture funds when the item ships from the warehouse, this can be done through delay capture of all card payments in a transaction.
CREATE CUSTOMER
By enabling this option, the plugin will create a customer profile in Square, this profile will hold all the data of the specific customer like orders, transactions, etc.
LOG DEBUG MESSAGES
If selected this setting will record debug messages in the WooCommerce System Status log.
SEND CUSTOMER INFO
The Admin can checkmark the Send first name last name checkbox to enable it. This will send the first name, last name, with an order to square.
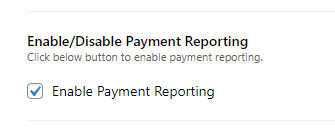
ENABLE/DISABLE PAYMENT REPORTING
Payment Reporting is a new feature that shows complete order details in Square Orders including tax/shipping values and you will also be able to see individual item sales in the Square Reports section, whenever there is a square transaction on Woocommerce checkout.
ENABLE/DISABLE GOOGLE PAY
Enable your customers to make payments through Google Pay.
ENABLE/DISABLE GIFT CARD
Gift Card feature will allow the customer to avail the discount offer or free shopping opportunity.
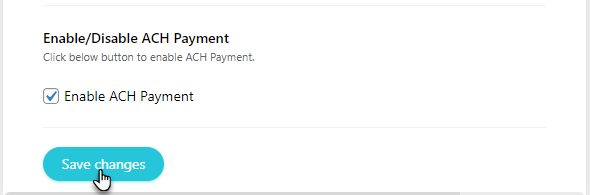
ENABLE/DISABLE ACH PAYMENT
ACH Payment allows the user to pay with their Bank Account on the checkout page.

ENABLE/DISABLE APPLE PAY
Enable your customers to make payments through Apple Pay.
7.SANDBOX SETTINGS
- You can also connect to Square sandbox for making test payments. In sandbox mode no live transactions are made.
- Just click the toggle button on top, it will take you to Sandbox mode.
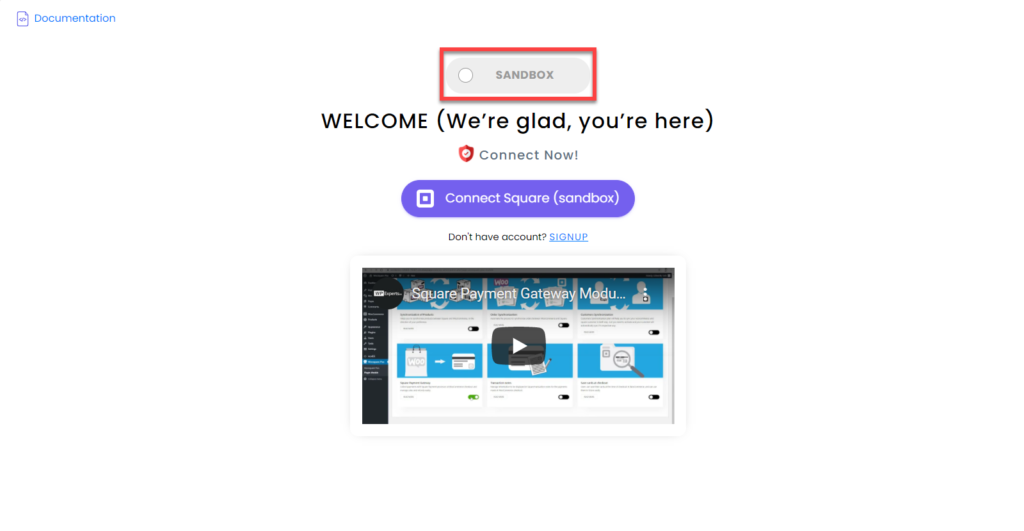
- Make sure Square Sandbox Dashboard is opened in another tab of your browser.
- Click on the ‘Connect Square (sandbox)’ button.
- Once done, click on the THAT’S MY SITE – REDIRECT ME button to complete the connection.
- Select Location and click on the Save Changes button.

8.AUTO PRINT SQUARE RECEIPT
Note: For this feature to work, the Order sync module must be enabled.
Payment Reporting is a new feature that shows complete order details in Square Orders including tax/shipping values and you will also be able to see individual item sales in the Square Reports section, whenever there is a square transaction on Woocommerce checkout.
- To enable this feature, go to the Payment settings tab.
- Enable Payment Reporting checkbox.
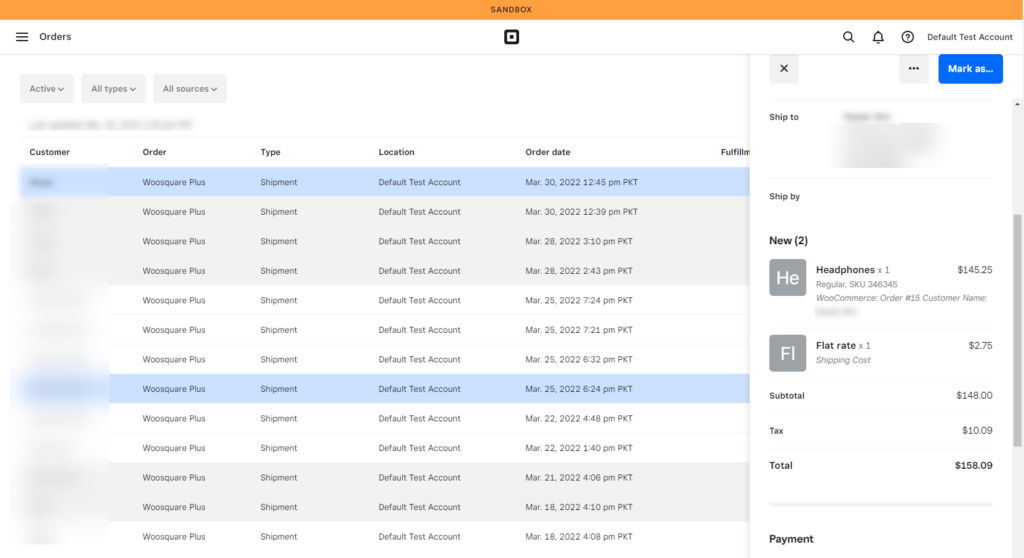
- To test this functionality, make a payment on Woocommerce checkout via Square, then check order and reports in your Square account.
Order Shown in Square Orders
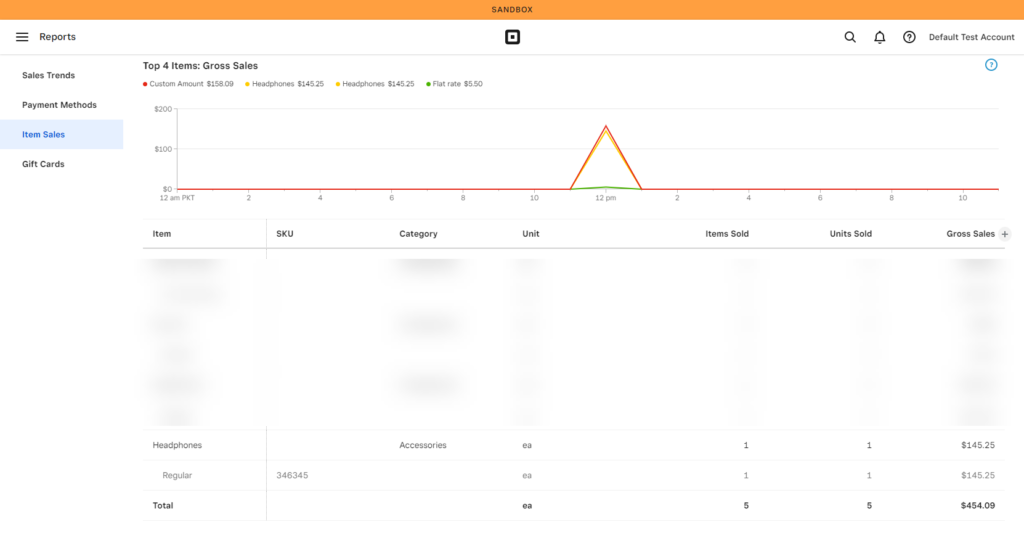
Item Sales Section in Square Reports
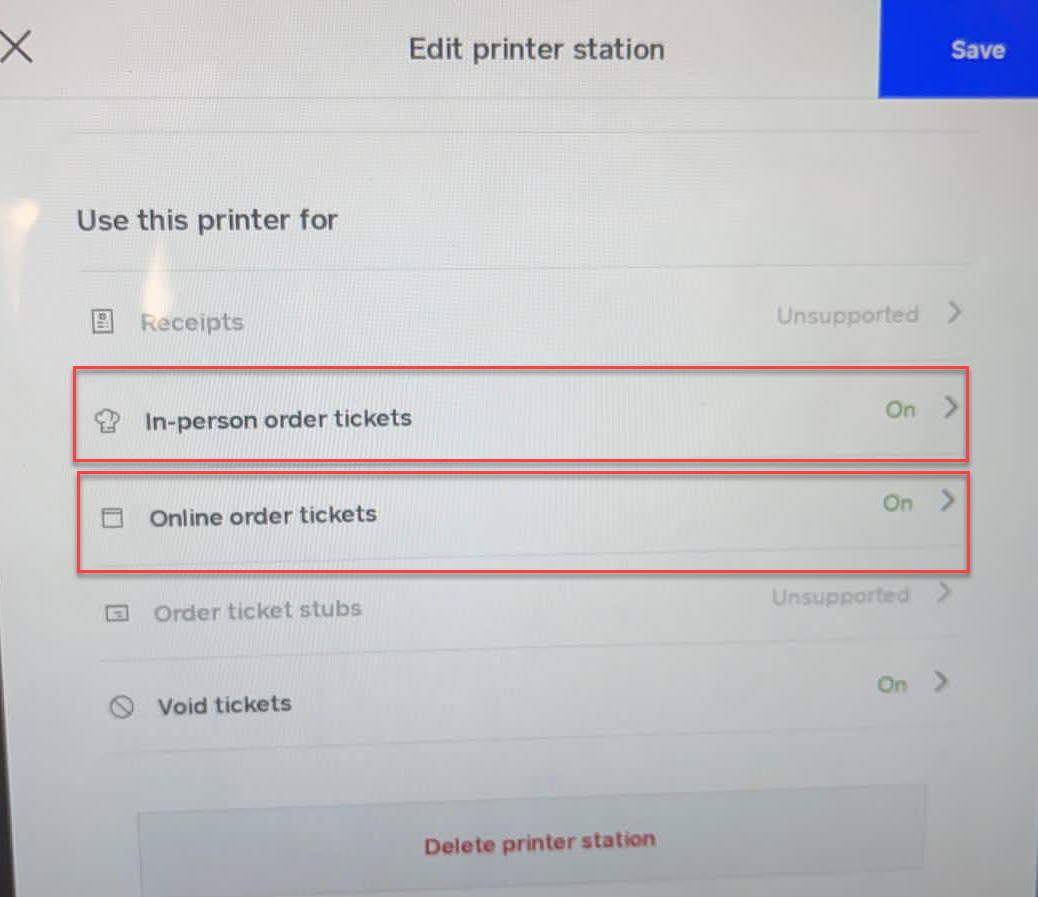
In Person and Online Order Tickets
Note: In order to use this functionality, Printer must be connected to respective system with respective settings i.e In-person order tickets and Online order tickets must be turned on.
Printer Settings on Square Dashboard
Client Sample Video For Generating Print Receipt of WC Shop Sync Orders
- One of our client is happily availing above mentioned feature i.e In-Person order tickets and Online order tickets. Below is the sample video of our client.
9.GOOGLE PAY
Back-End Configuration
- Go to Admin Dashboard → WC Shop Sync → Payment Settings.

- Now you’re on the Square Payment Gateway Settings page.
- Go to the Google Pay option.
- Checkmark the Enable Google Pay checkbox to activate this functionality.
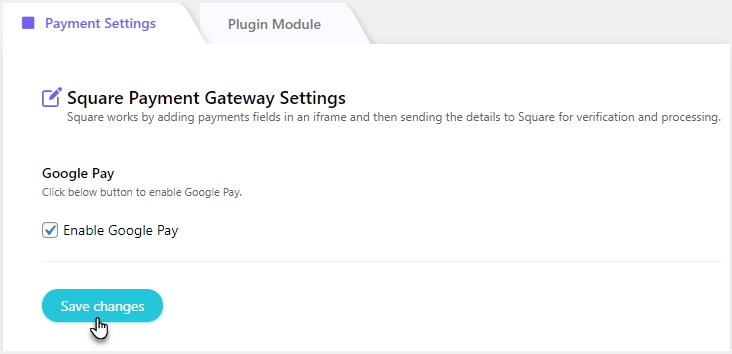
- Click on the Save Changes button.
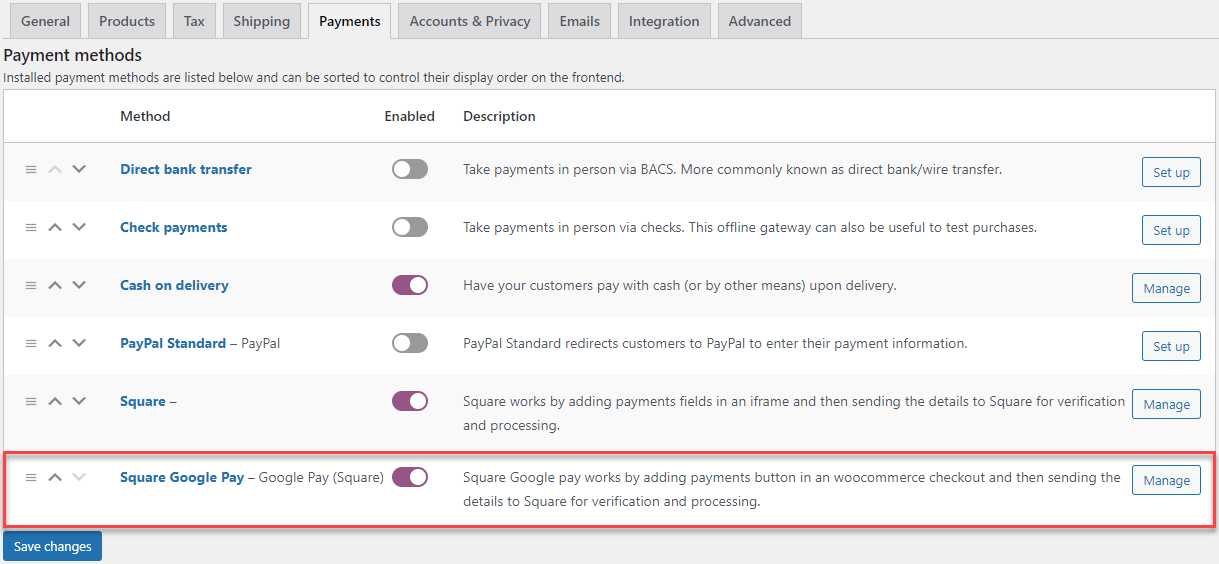
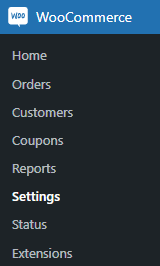
- Now navigate to the Go to Admin Dashboard → WooCommerce → Settings.

- Go to the Payments tab.
- All the Payment methods are present in this tab.
- Click on the Square Google Pay option or click on the Manage/ Setup button (Present at the right side of every respective payment option).
- Now you’ll be on the Square Google Pay settings page
- Enter the Title.
- Enter the Description.
- You can also enable the Delay Capture and Logging option according to your requirement.
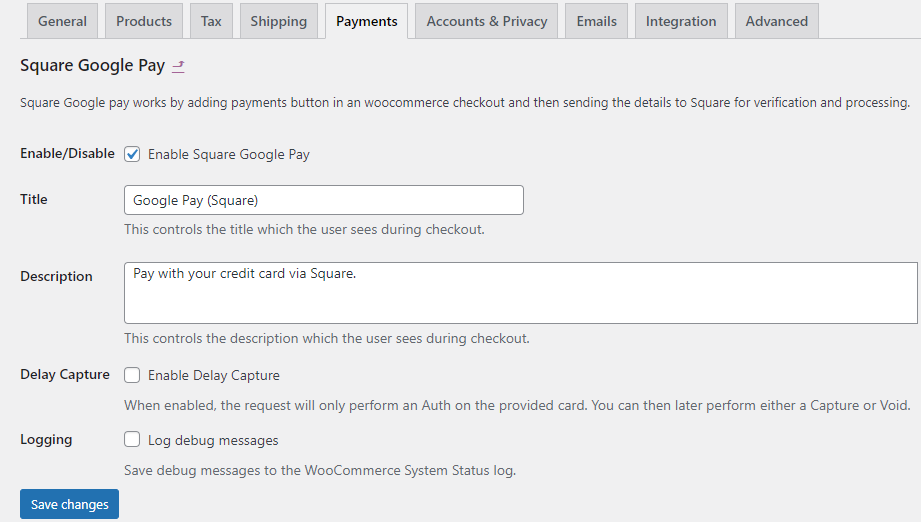
- Once done, click on the Save Changes button.
Front-End Impact
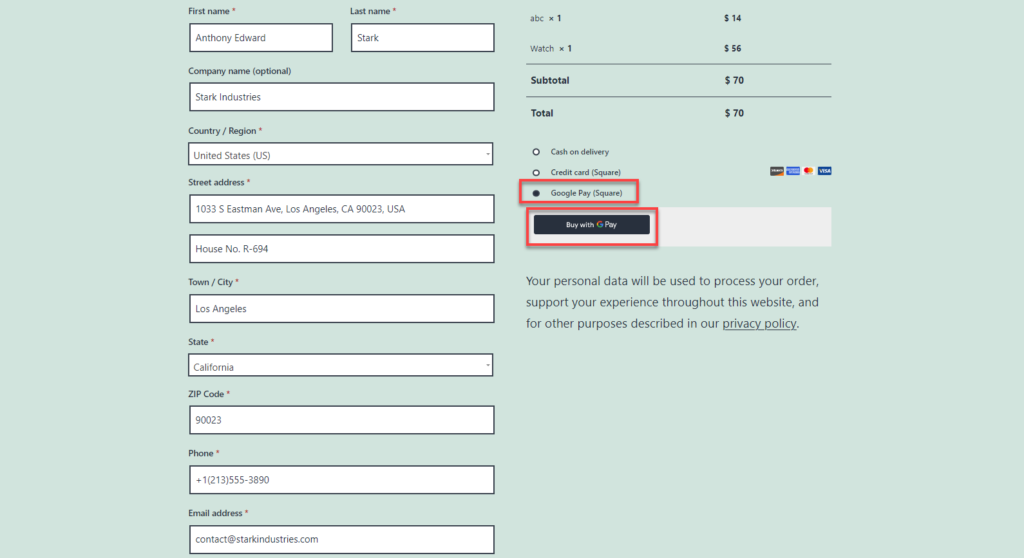
- Go to your Store
- Select an item and complete the process to move towards the Checkout page
- Select the Google Pay payment method
- Click on the Buy with G Pay button.
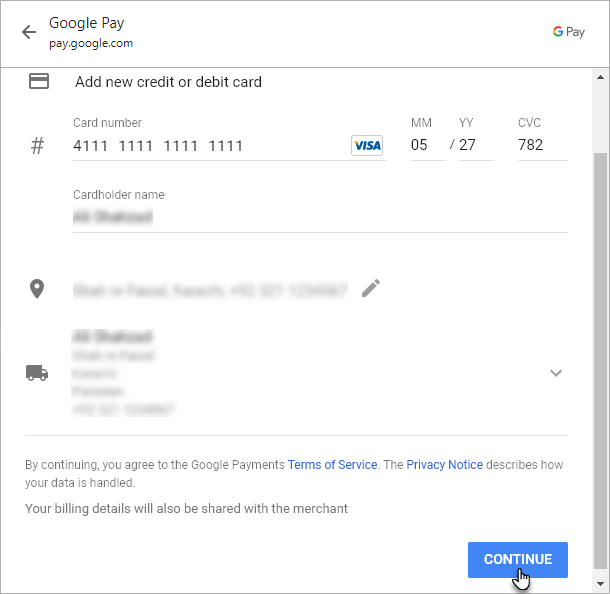
- Once done, a popup will appear.
- Enter all the required credentials and click on the CONTINUE button to complete the process.
10.SQUARE GIFT CARD
Back-End Configuration
- Go to Admin Dashboard → WC Shop Sync → Payment Settings.

- Now you’re on the Square Payment Gateway Settings page.
- Go to the Gift Card option.
- Checkmark the Enable Gift Card checkbox to activate this functionality.
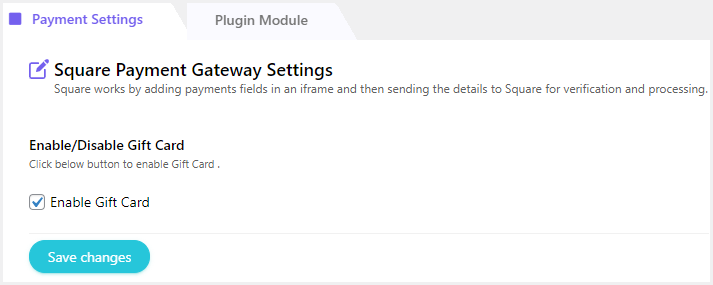
- Click on the Save Changes button.
Front-End Impact
- Go to your Store
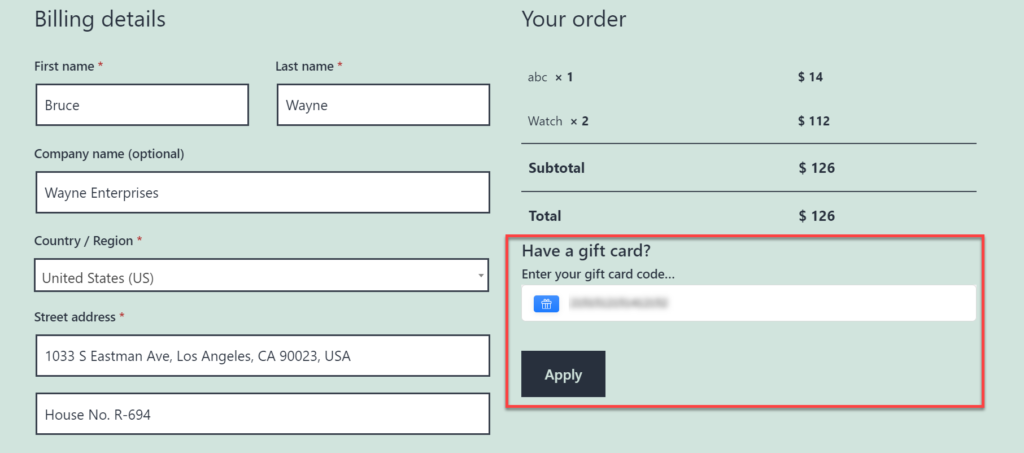
- Select an item and complete the process to move towards the Checkout page.
- On the right side of the page we can see there’s a section of Gift Cards.
- Enter your Gift Card Code.
- Once done, click on the Place order button.
11.ACH PAYMENT
WooSquare ACH Payment is a new feature allows the user to pay with their Bank Account on the checkout page. The user has to select their desired bank and login credentials after selecting the bank. This module has been enabled in the WooSquare Free version. This will work by adding a payment button in the WooCommerce checkout page and then sends the details to Square for verification and processing.
- Navigate to the WC Shop Sync → Payment Settings.
- Now, you’re in the Square Payment Settings.
- Scroll down to the Enable/Disable ACH Payment.
- Click on the Enable ACH Payment checkmark.

- Click on the Save Changes button.
WooCommerce Settings
- After saving the changes, navigate to the WordPress Admin Dashboard → WooCommerce → Settings.
- In the Settings, go to the Payments tab.
- In the Payments tab, all the payment methods are available.
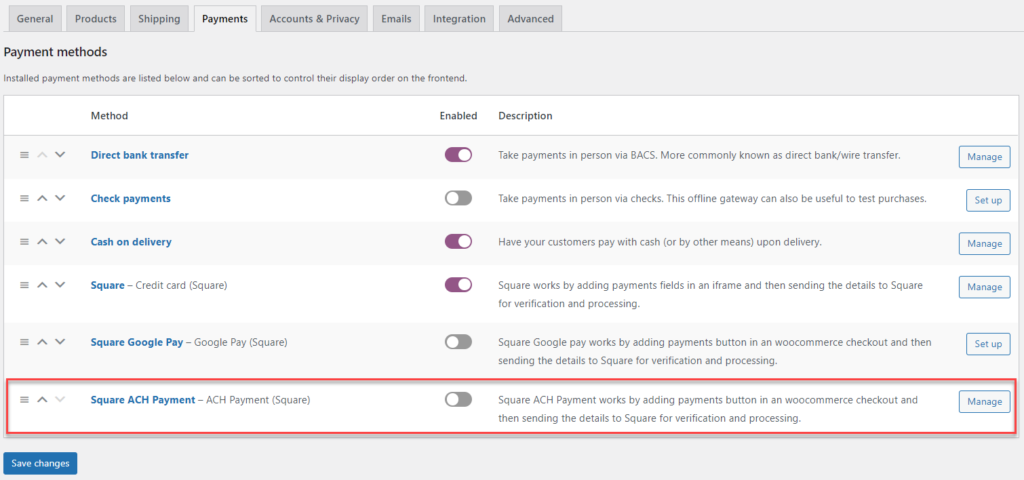
- Navigate to the Square ACH Payment and click on the toggle button to enable the Payment Method.
- Now, click on the Square ACH Payment option or click on the Manage/ Setup button located on the right side of every respective payment option.
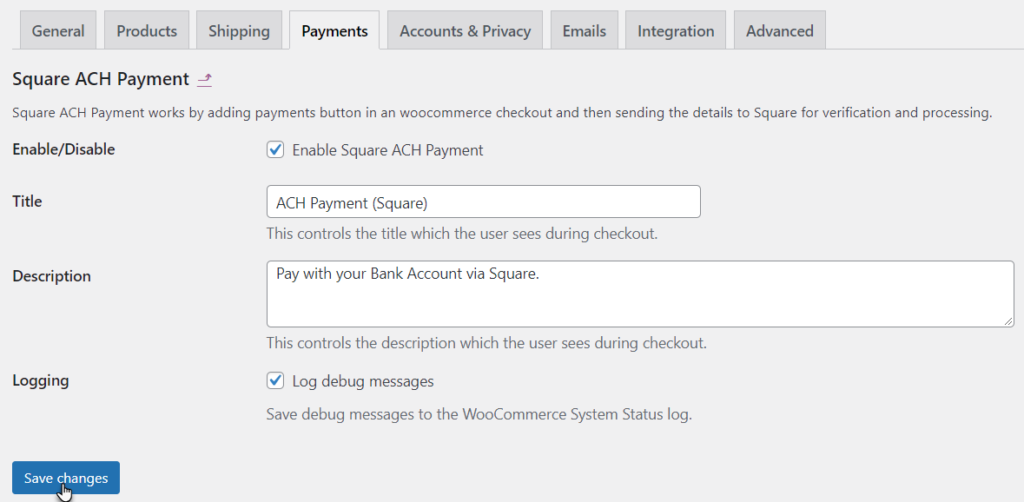
- In the Square ACH Payment section, there are various options.
- You can also Enable/Disable Square ACH Payment from here.
- Change the Title of the payment method which will be displayed on the checkout page.
- Enter the Description of the payment method which will be displayed on the checkout page.
- Click on the Save Changes button.
Frontend Impact
- Go to your Store.
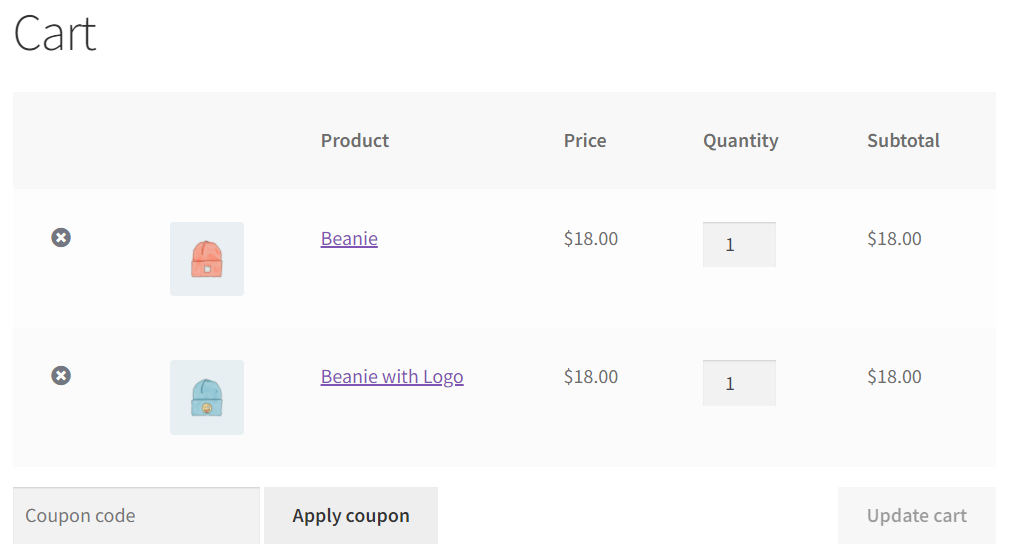
- Select products that you would like to purchase.
- Add the products to the Cart.
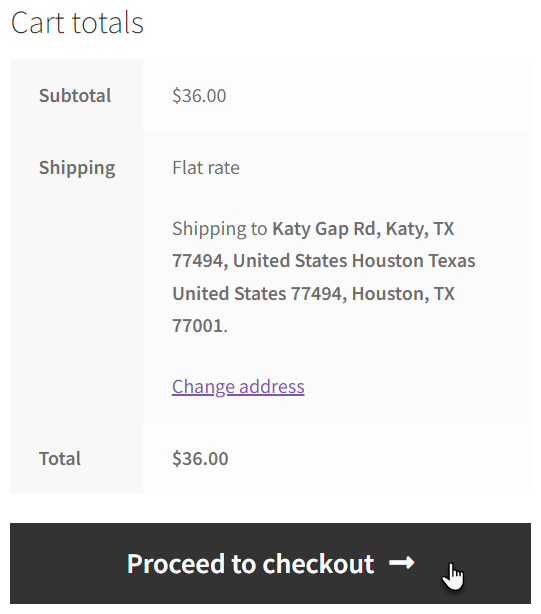
- Proceed to the checkout page.
- Now you are in the Checkout page.
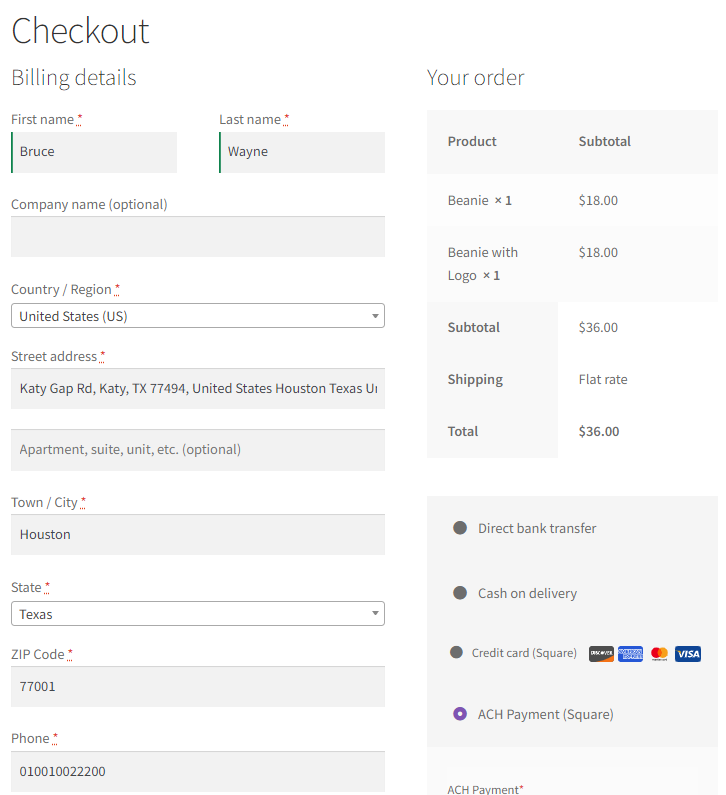
- Go to the payment options.
- Click on the ACH Payment(Square) option.
- Click on the Pay with Bank Account button.
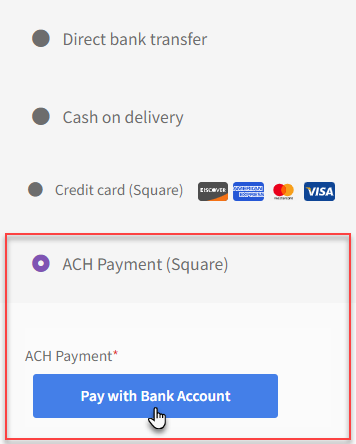
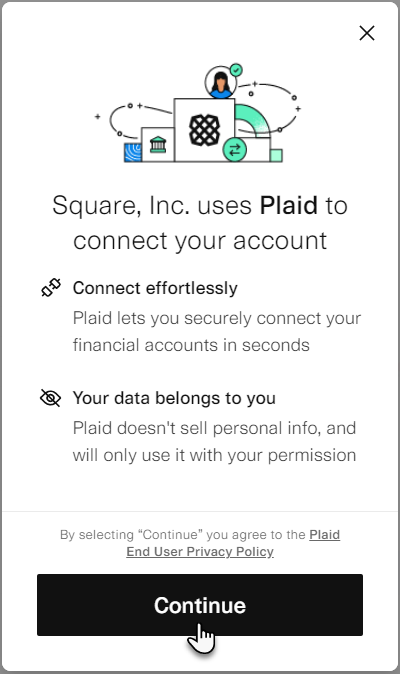
- After clicking on the Pay with Bank Account button, a popup will appear.
- Click on the Continue button to proceed.
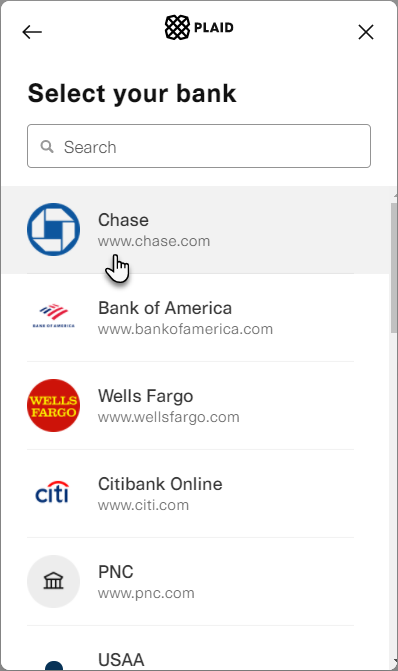
- Now, select your bank from the given list of banks.
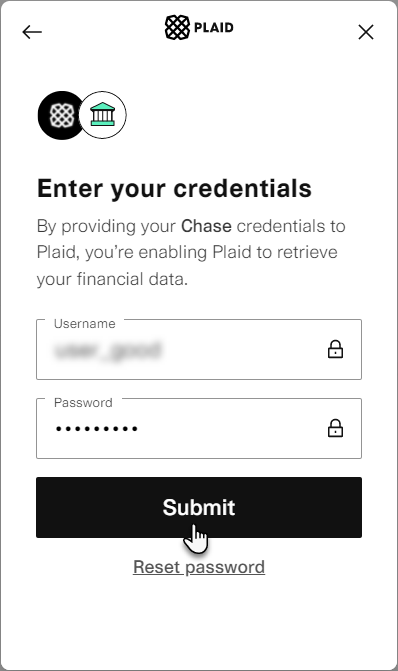
- Next it will ask for your Bank Credentials.
- Provide your Username and Password.
- Click on the Submit button to proceed.
- After submitting your credentials, it will start verifying your account.
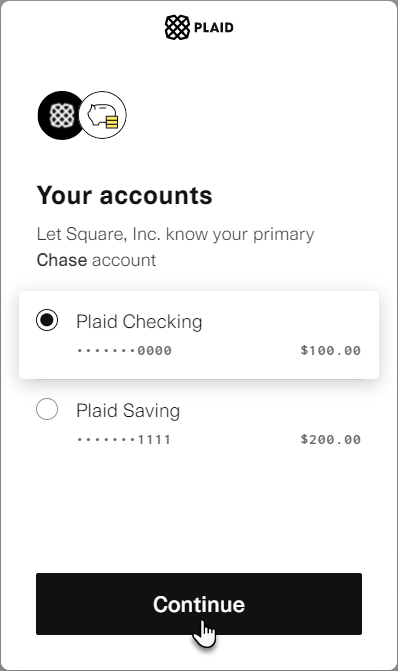
- If you have multiple accounts, it will ask you to select your primary account.
- Select your primary account and click on the Continue button to proceed.
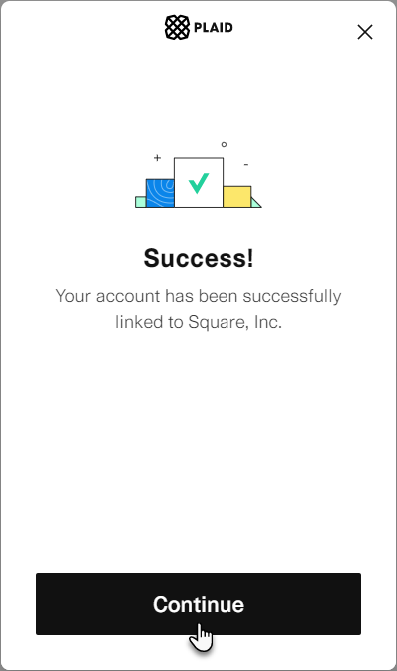
- Your account will be successfully linked with Square.
- Click on the Continue button to proceed.
- You will be redirected to your store.
12.Apple Pay
Back-End Configuration
- Go to Admin Dashboard → WC Shop Sync → Payment Settings.
- Now you’re on the Square Payment Gateway Settings page.
- Go to the Apple Pay option.
- Checkmark the Enable Apple Pay checkbox to activate this functionality.
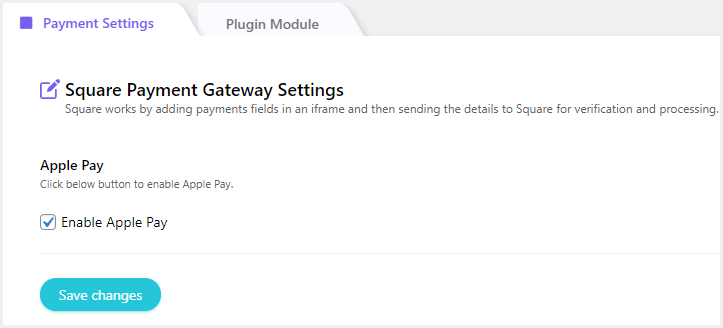
- Click on the Save Changes button.
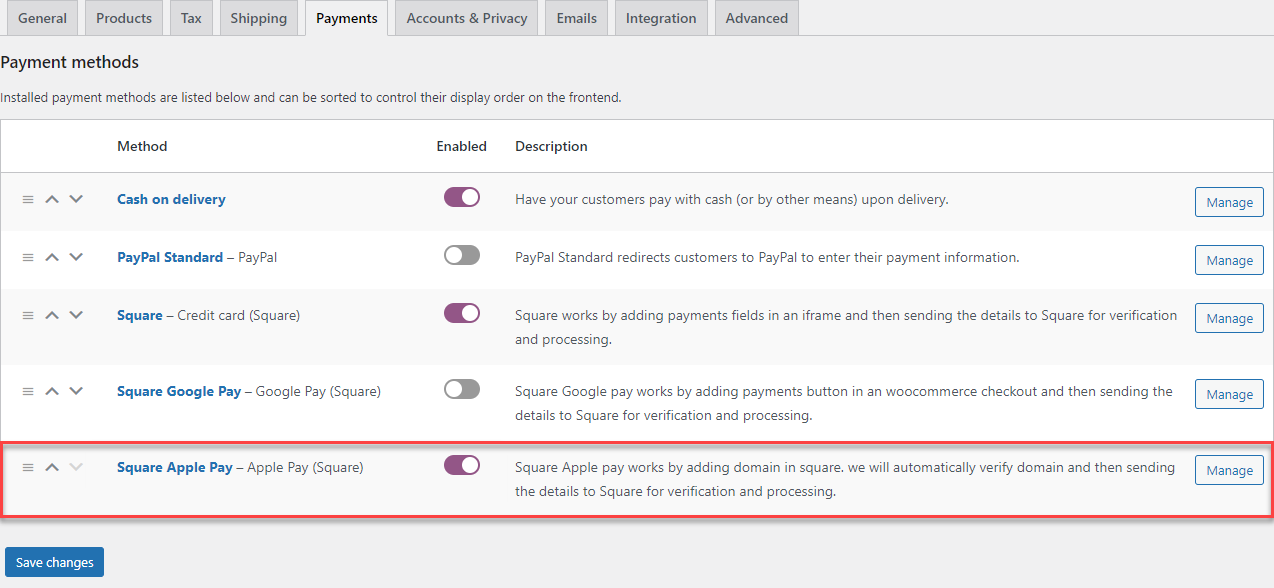
- Now navigate to the Go to Admin Dashboard → WooCommerce → Settings.
- Go to the Payments tab.
- All the Payment methods are present in this tab.
- Click on the Square Apple Pay option or click on the Manage/ Setup button (Present at the right side of every respective payment option).
- Enter the Title.
- Enter the Description.
- Enable the Domain Verified checkbox.
- You can also enable the Delay Capture and Logging option according to your requirement.

- Click on the Save Changes button.
NOTE: Square Apple Pay will only function on the Safari browser for live payments.
13.After Pay
Back-End Configuration
- On the Payment Settings page, navigate to the After Pay option.
- Checkmark the Enable After Pay checkbox to activate this functionality.
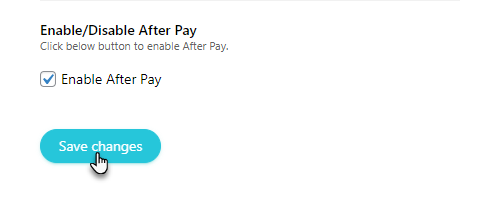
- Click on the Save Changes button.
- Navigate to the WordPress Admin Dashboard → WooCommerce → Settings.
- Go to the Payments tab. All the Payment methods are present in this tab.
- Click on the Square After Pay option or the Manage/ Setup button (Present on the right side of every respective payment option).
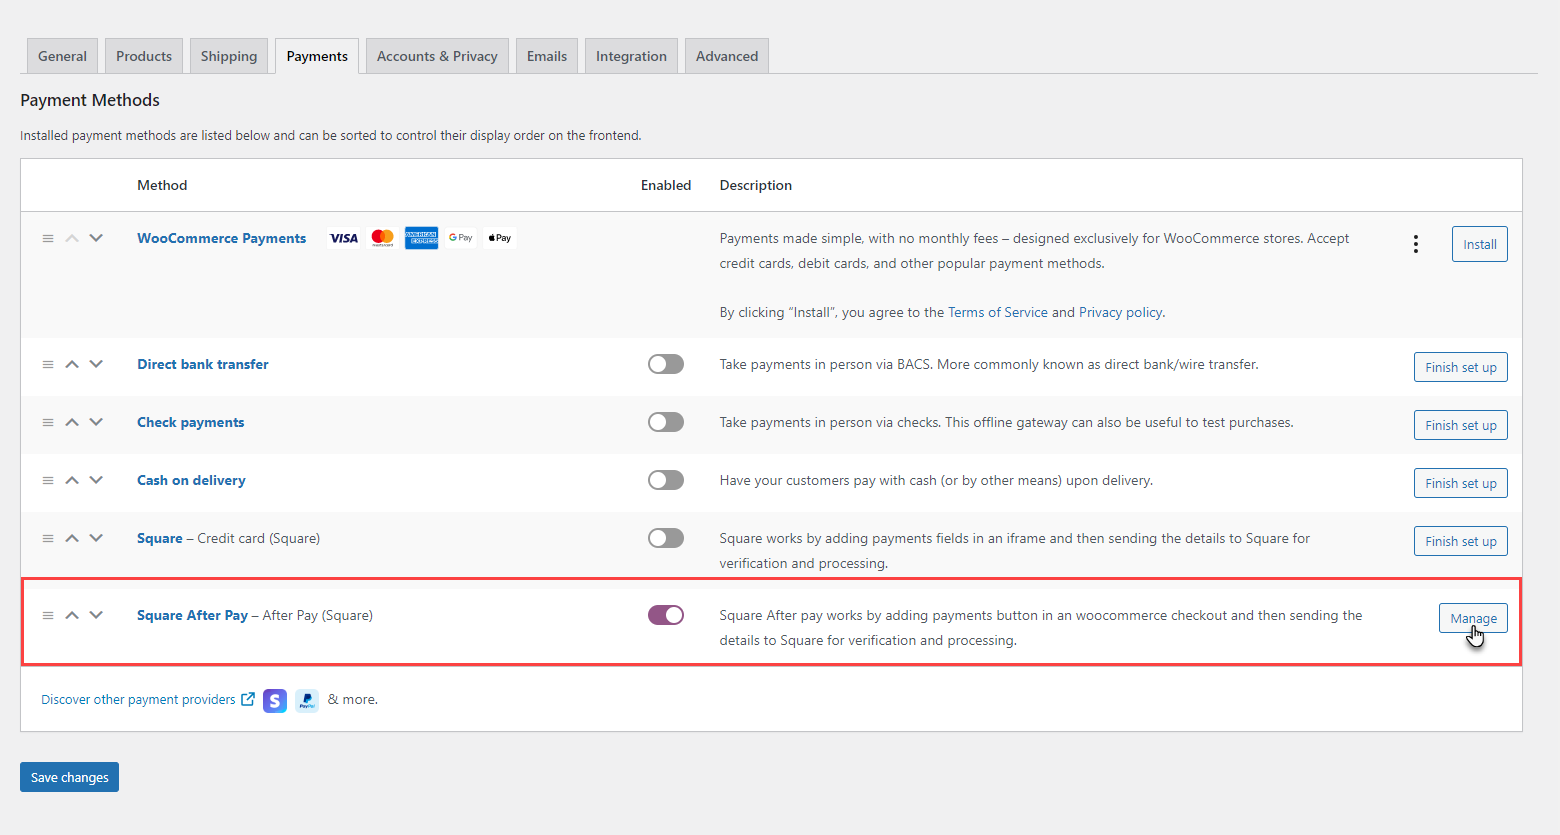
- Now you’ll be on the Square After Pay settings page.
- Enter the Title.
- Enter the Description.
- You can also enable the Delay Capture and Logging option according to your requirement.
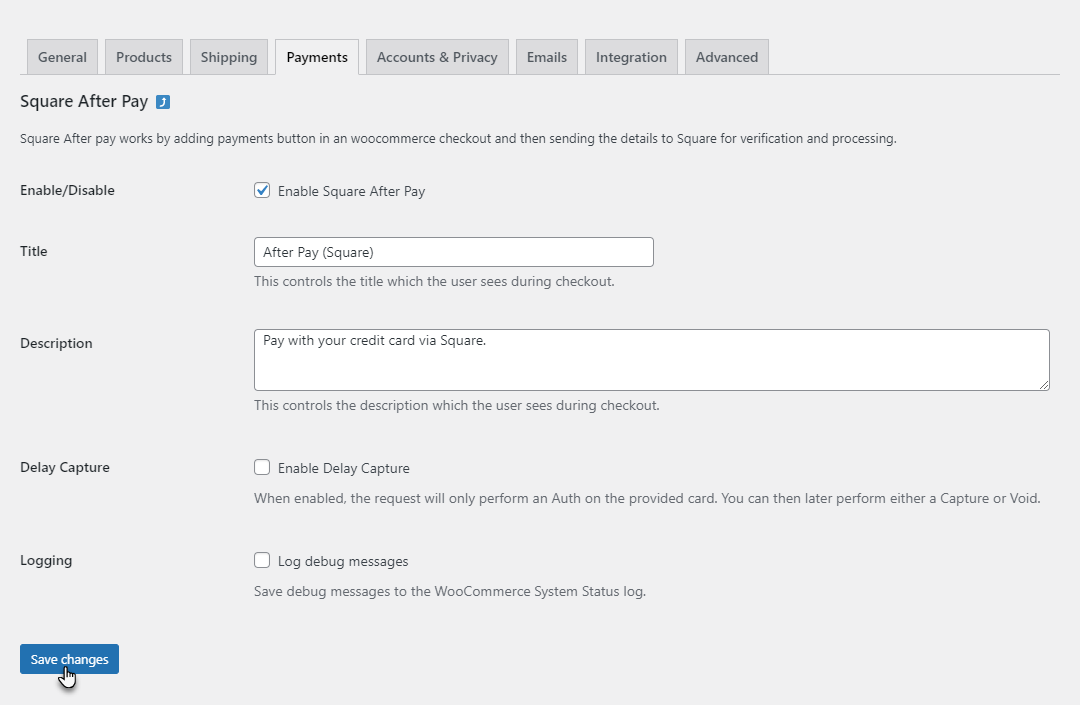
- Once done, click on the Save Changes button.
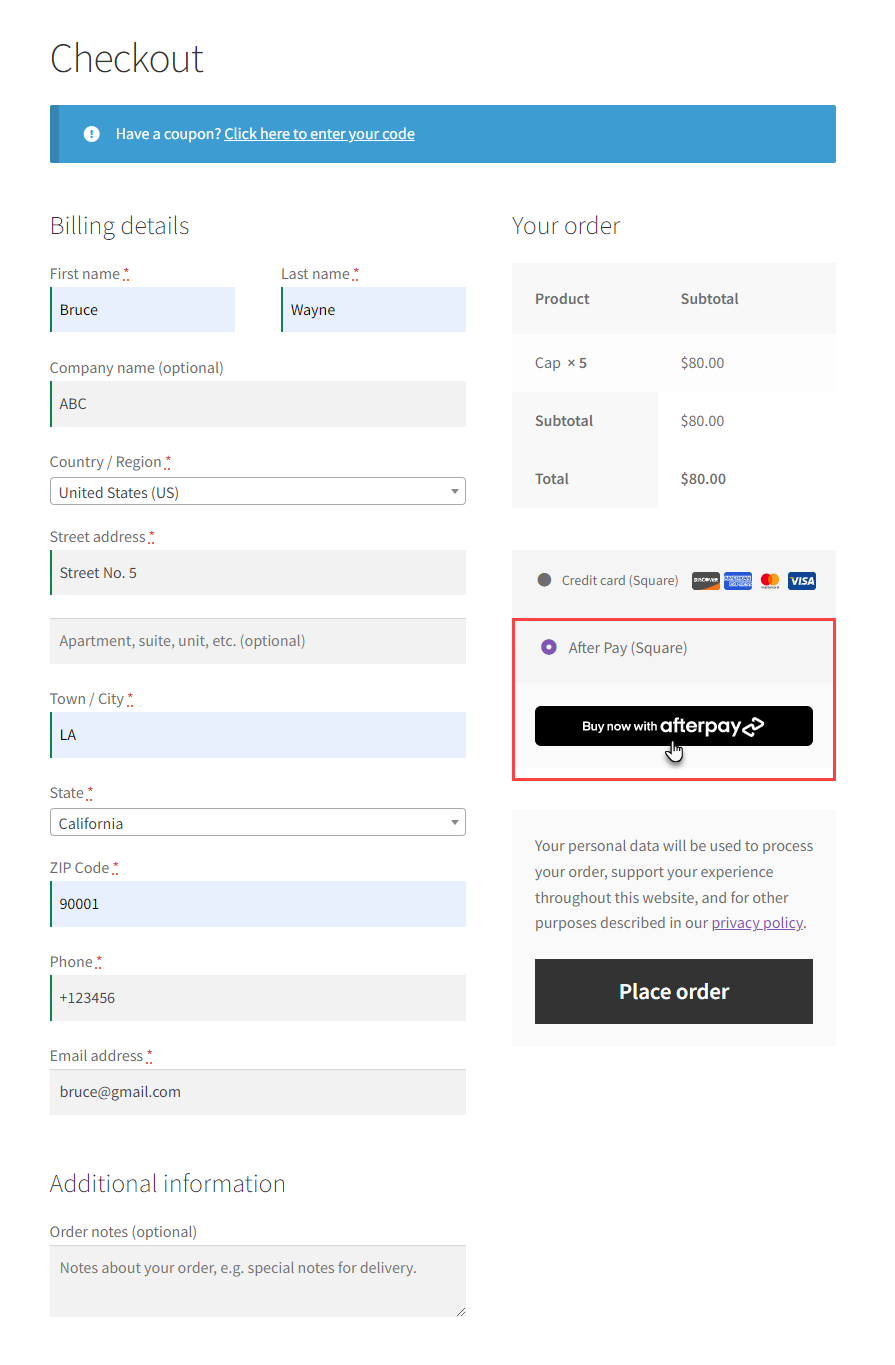
Front-End Impact
- Go to your Store
- Select an item and complete the process to move toward the Checkout page.
- Select the After Pay payment method.
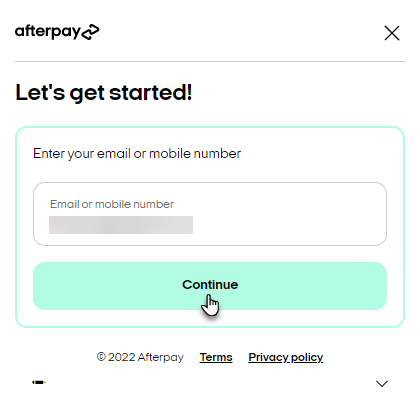
- Click on the Buy now with afterpay button.
- Enter your email or mobile number.
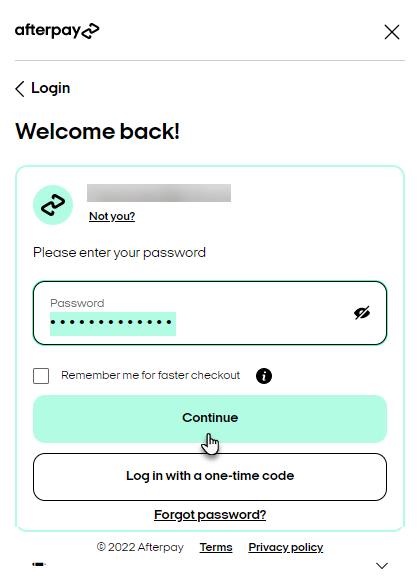
- Enter your password and then click on the Continue button.
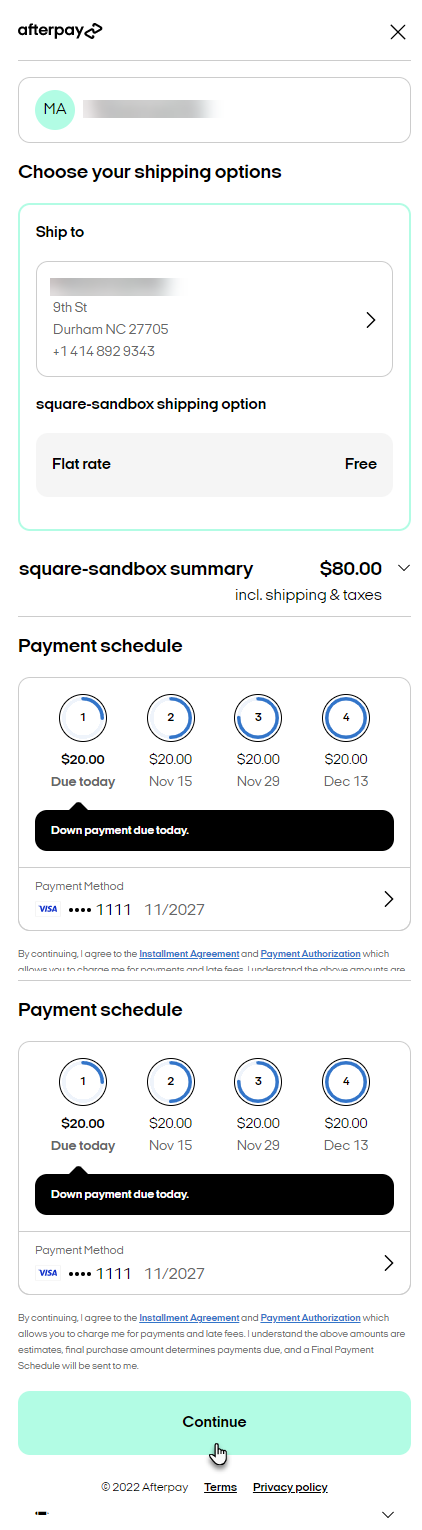
- Once logged in, click on the Continue button to proceed with the transaction.
- The transaction is in process, don’t close the screen.
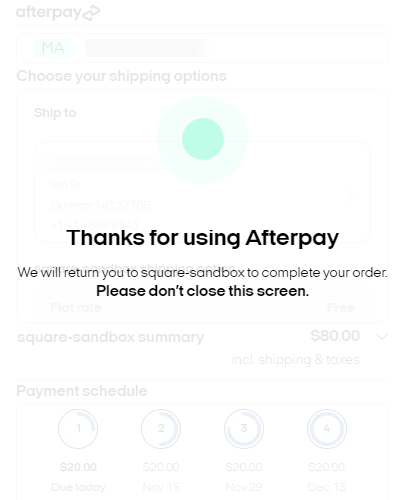
- The order is placed successfully.
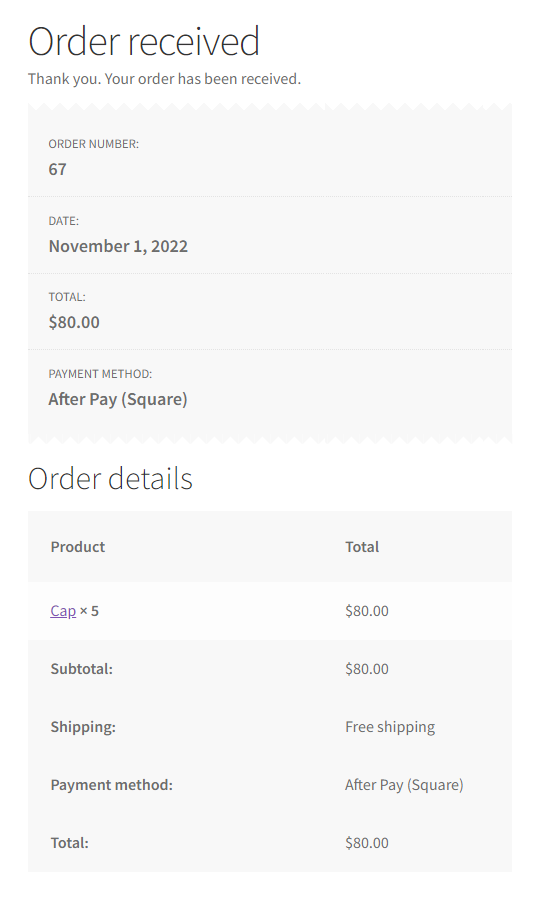
- Navigate to the WordPress Admin Dashboard → WooCommerce → Orders.
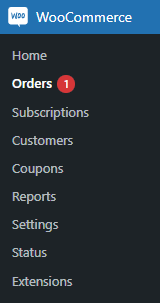
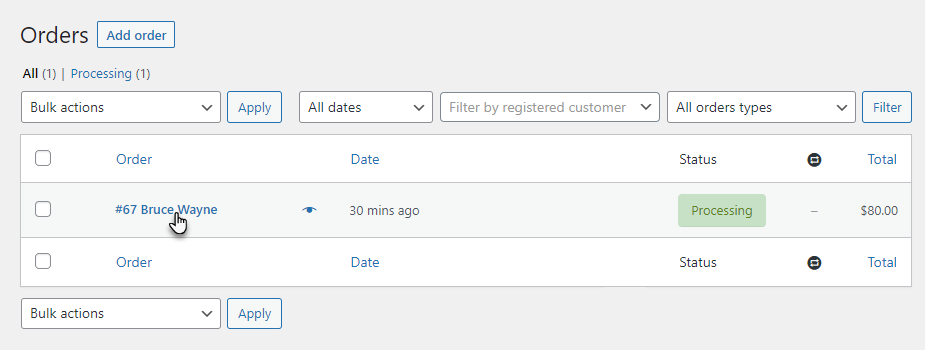
- Now you’re on the Orders page.
- Click on the order to view details.
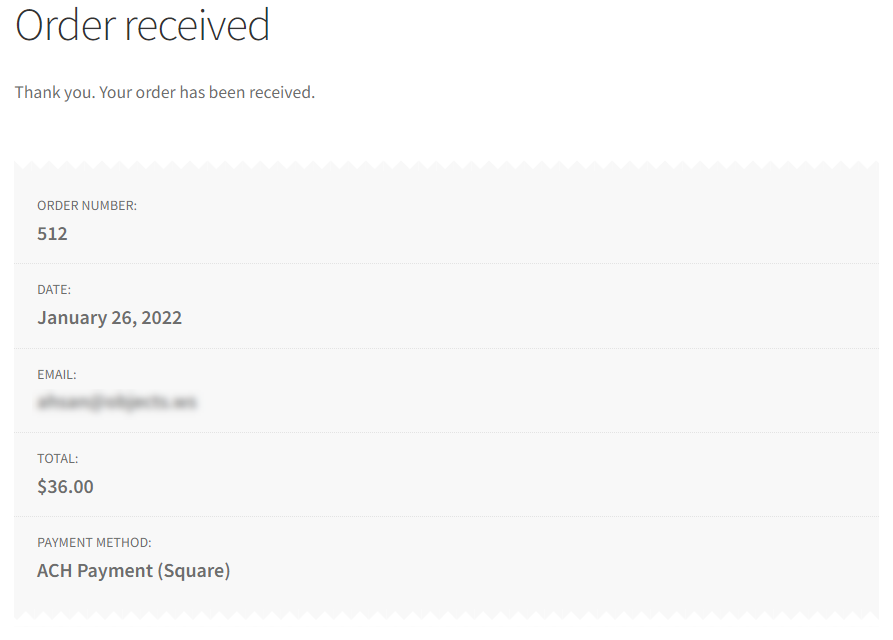
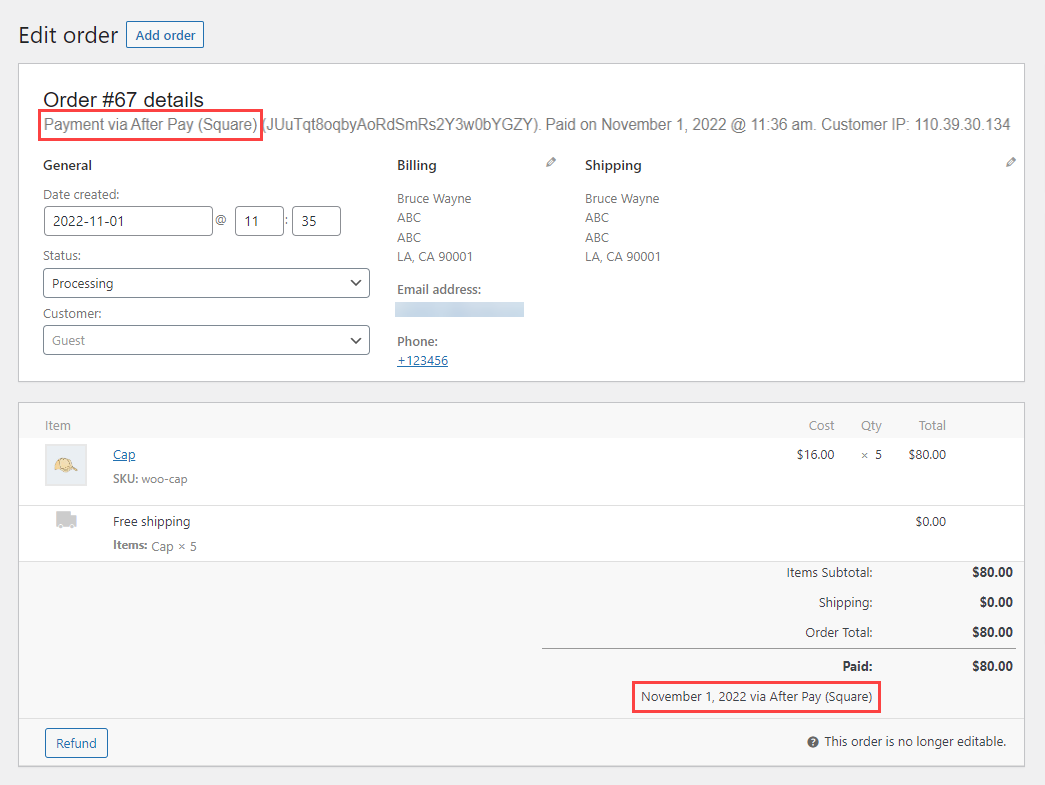
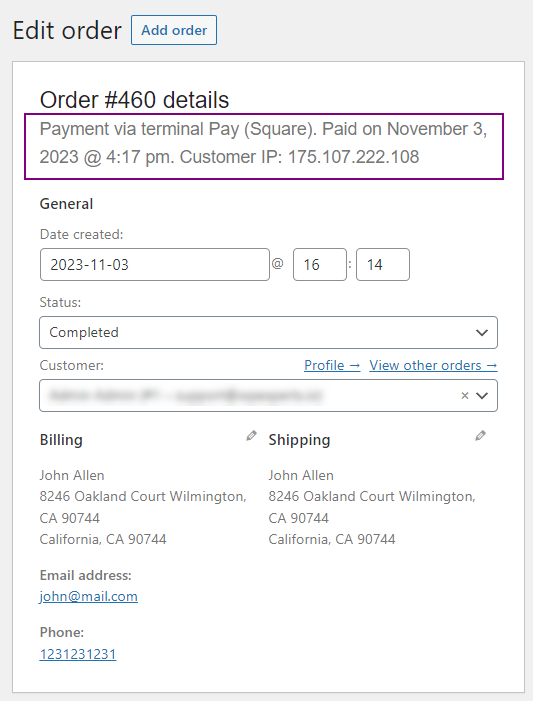
- Now you’re on the Edit order page.
- We can see that the Payment method is mentioned as After Pay.
14.CashApp Pay
Back-End Configuration
- On the Payment Settings page, navigate to the CashApp Pay option.
- Checkmark the Enable CashApp Pay checkbox to activate this functionality.
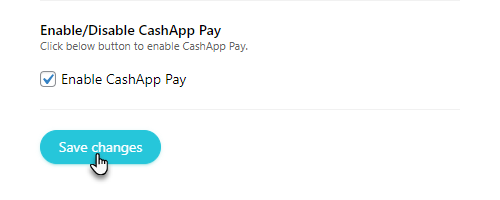
- Click on the Save Changes button.
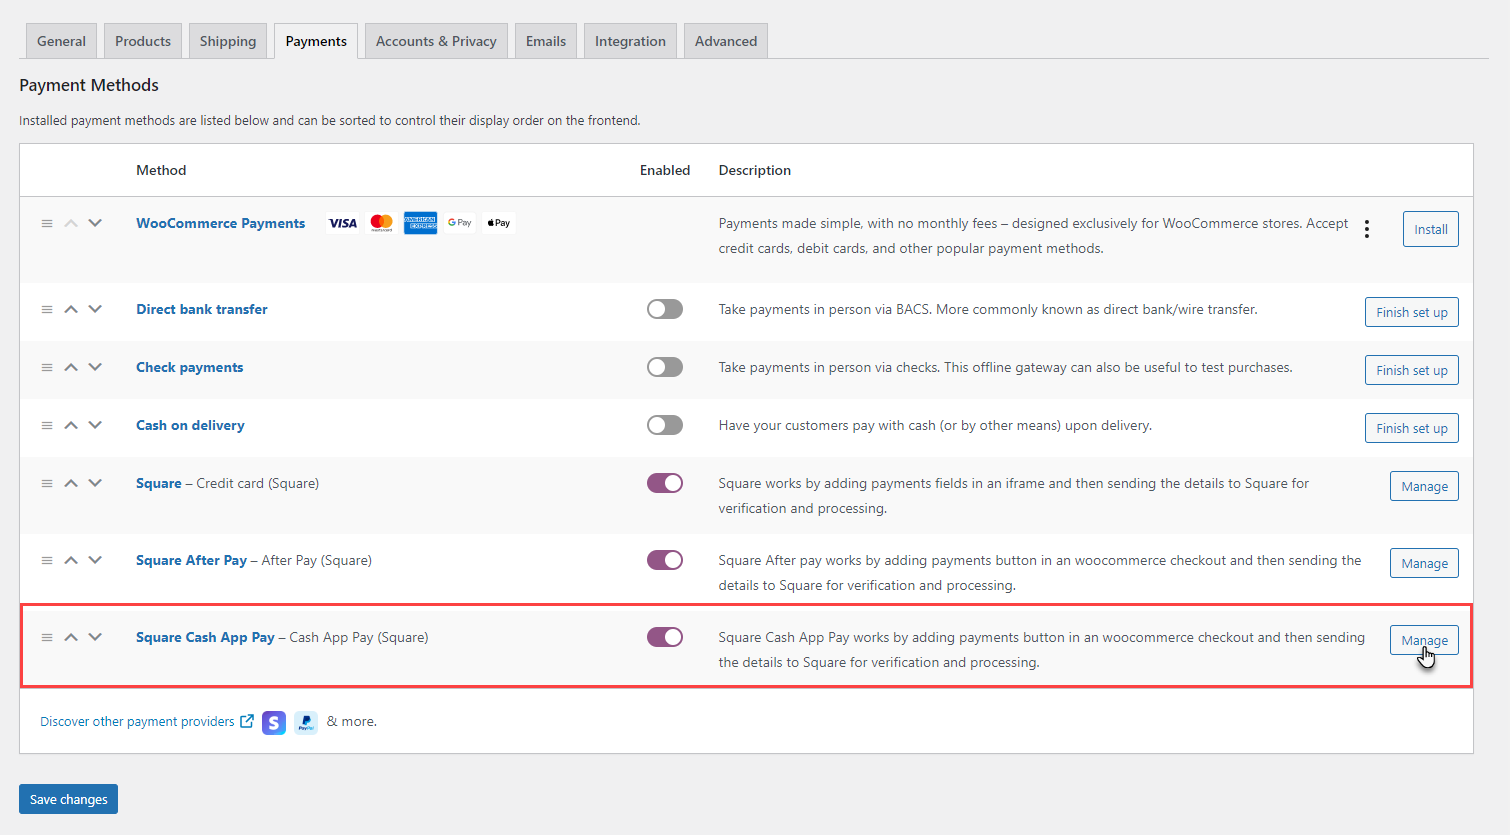
- Navigate to the WordPress Admin Dashboard → WooCommerce → Settings.

- Go to the Payments tab. All the Payment methods are present in this tab.
- Click on the Square Cash App Pay option or click on the Manage/ Setup button (Present on the right side of every respective payment option)
- Now you’ll be on the Square Cash App Pay settings page.
- Enter the Title.
- Enter the Description.
- You can also enable the Delay Capture and Logging option according to your requirement.
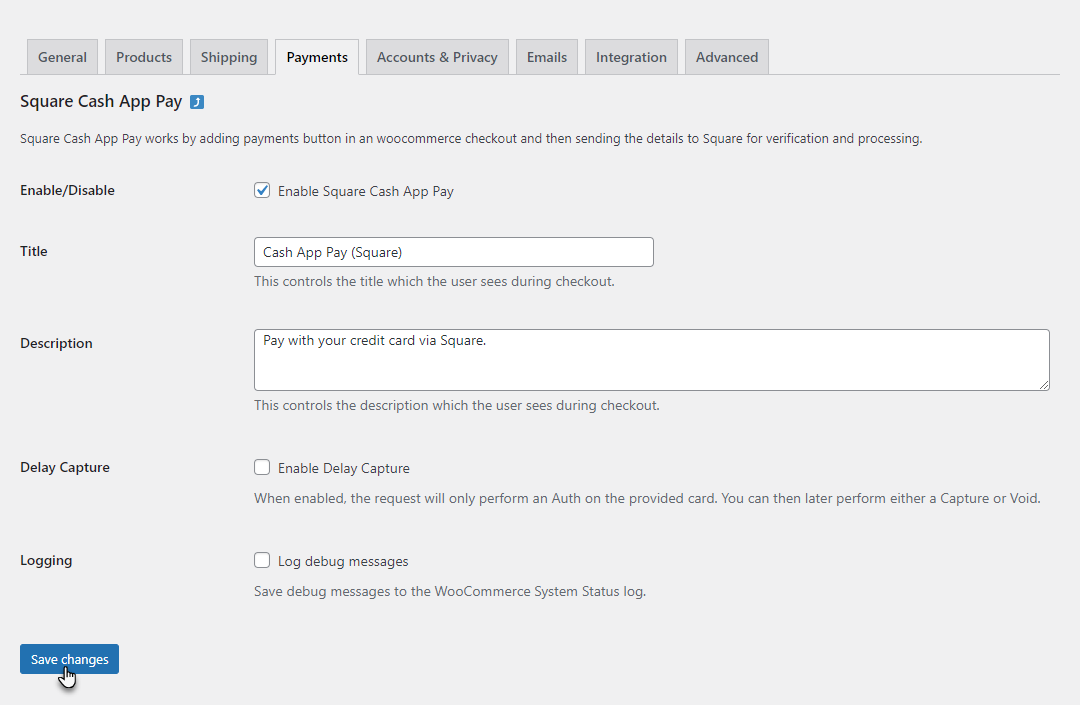
- Once done, click on the Save Changes button.
Front-End Impact
- Go to your Store
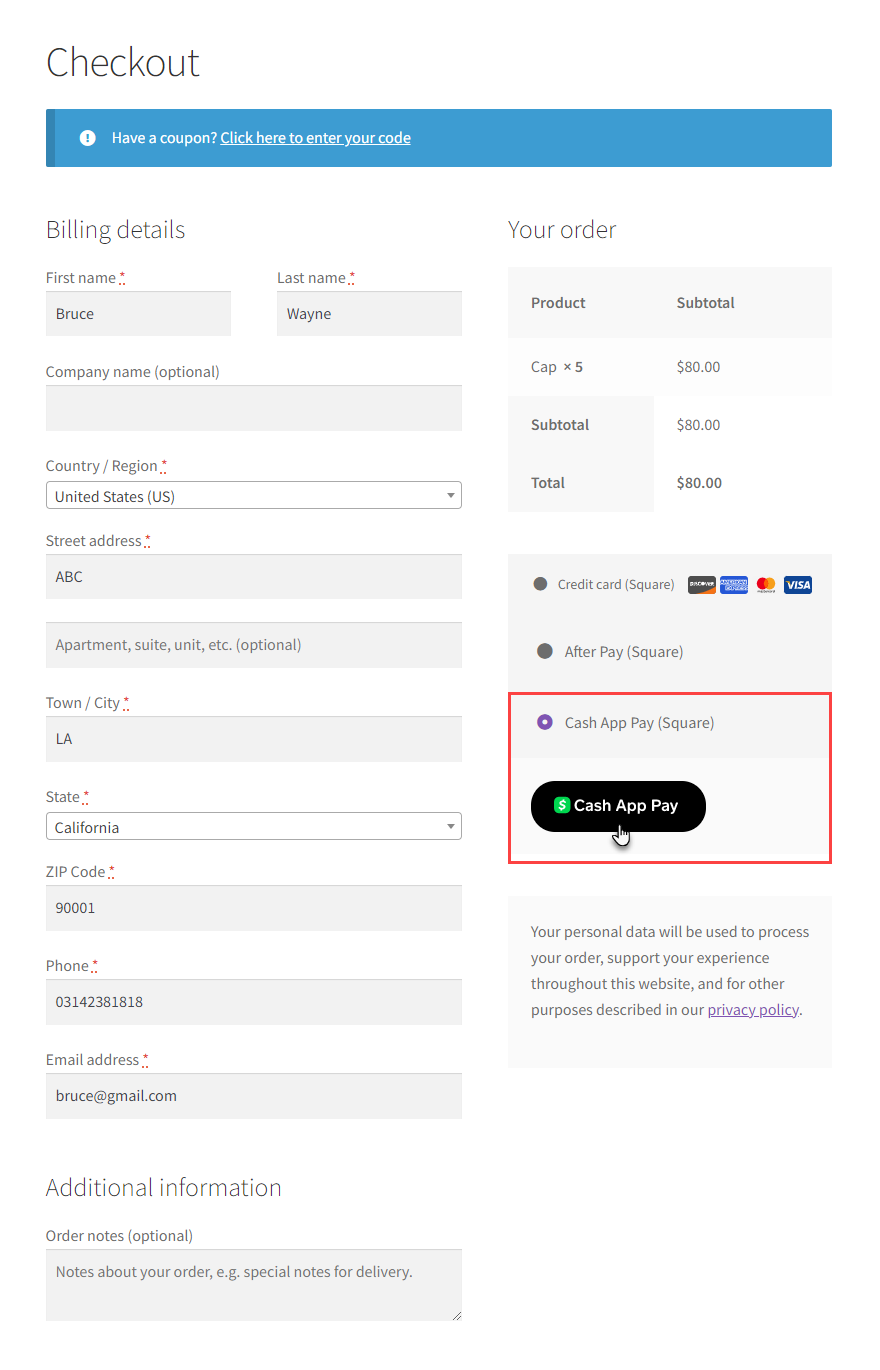
- Select an item and complete the process to move toward the Checkout page.
- Select the Cash App Pay payment method.
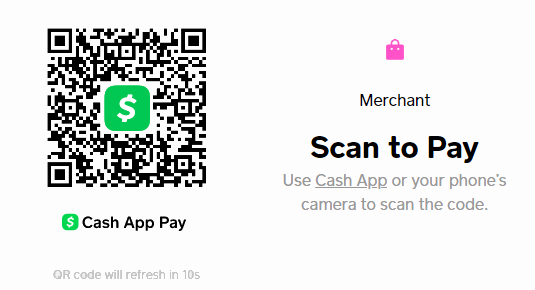
- Click on the Cash App Pay button.
- Once you click the Cash App Pay button, a window will appear with the QR Code.
- Scan the QR Code with your phone.
- A link will appear, click that link, and you will be redirected to the transaction status.
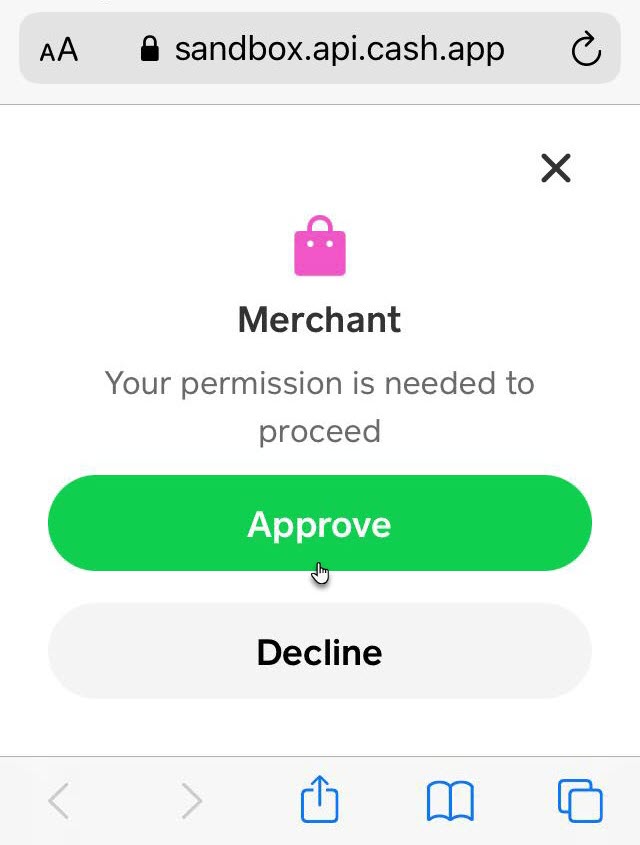
- If the Square is connected with the Test Payment, it will ask for approval.
- Click on the Approve button.
- Once approved, the transaction will proceed to the sandbox.
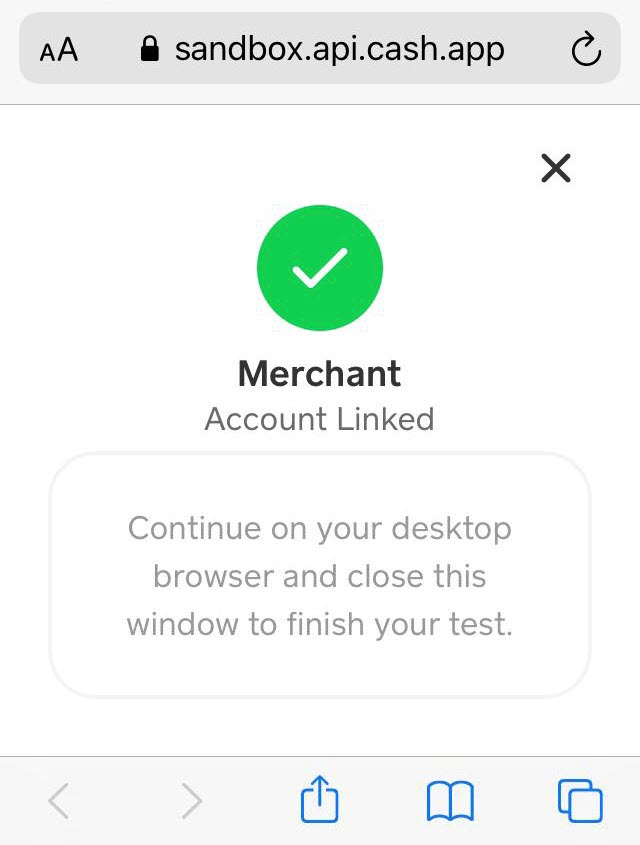
- The order will be completed.
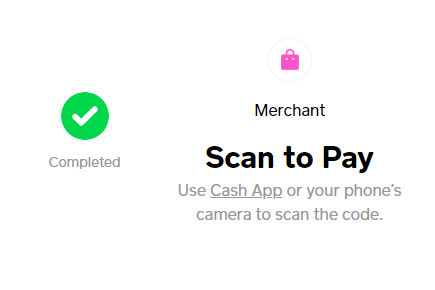
- All the details of the order will appear.

15.CONNECT WOOSQUARE WITH SQUARE TERMINAL
How to Connect WooSquare with Square Terminal?
WooSquare Payment Gateway Settings
- Navigate to the Woo-Square Plus Tab.
- Connect the Square Producton account.
-
- Now, navigate to the Woo-Square Plus → Payment Settings.
-
- In the Square Payment Gateway Settings, scroll down to Enable/Disable POS Pay.
- Click on the Enable/Disable POS Pay checkbox to enable the Square Terminal.
- Click on Save Changes to save the settings.
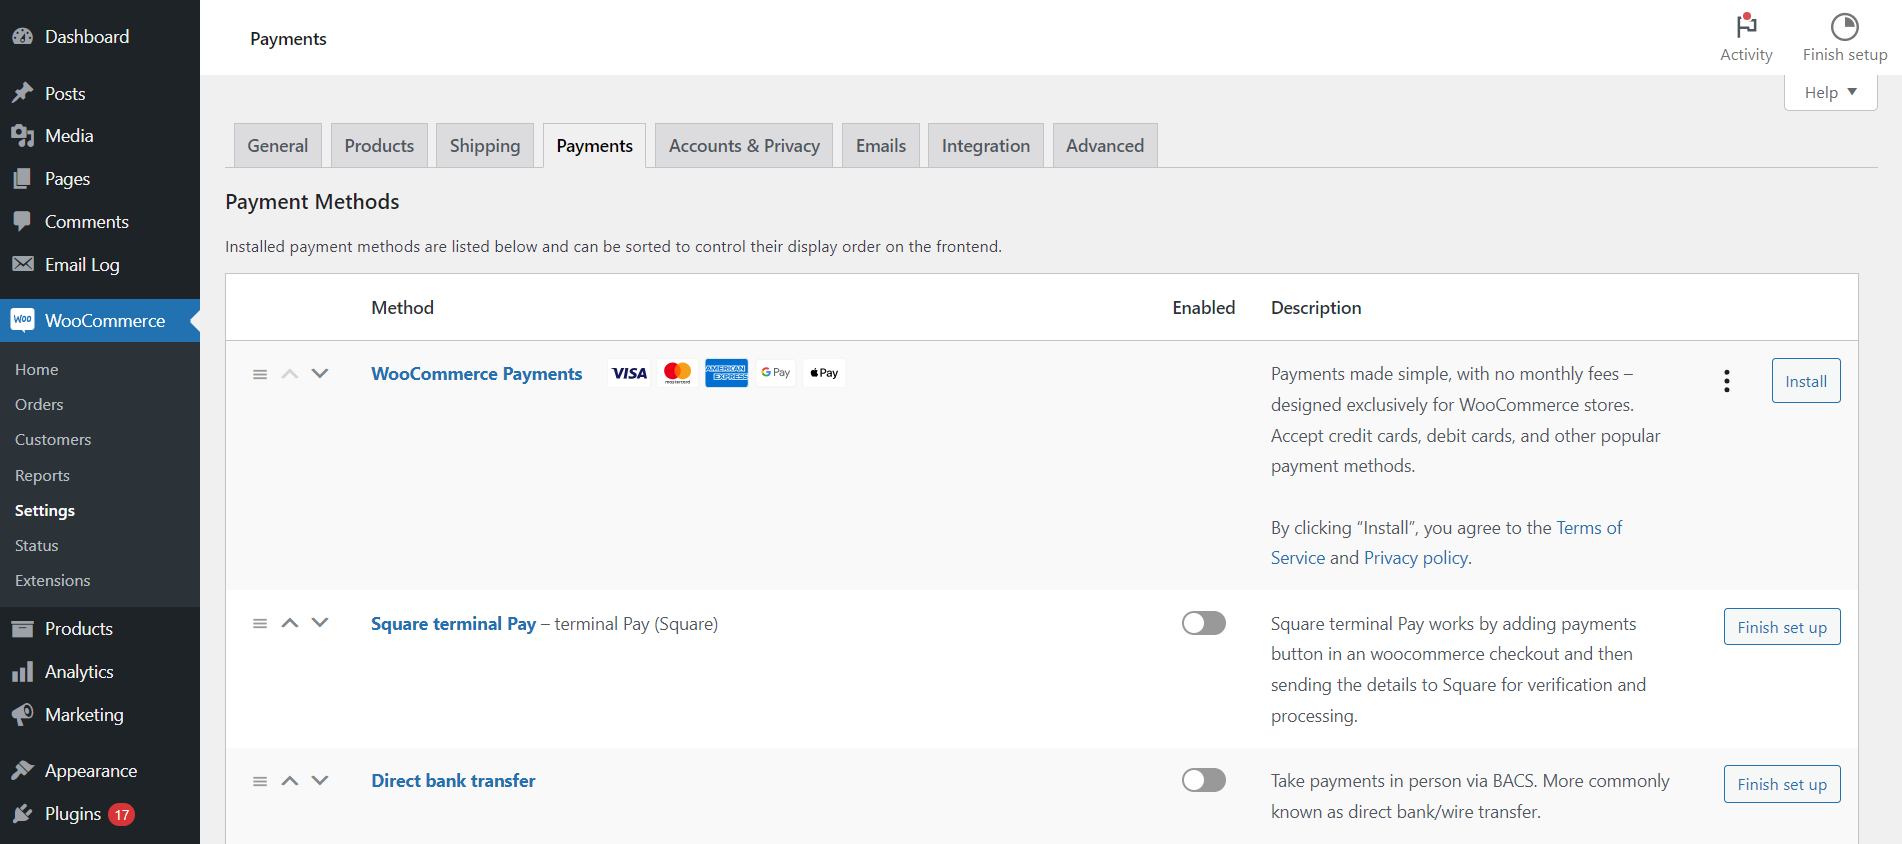
- After enabling the Square POS Pay from Square Payment Gateway Settings, navigate to the WordPress Admin Dashboard → WooCommerce → Settings.
- In the WooCommerce Settings, go to the Payments section.
- In the Payment Method, go to the Square Terminal Pay.
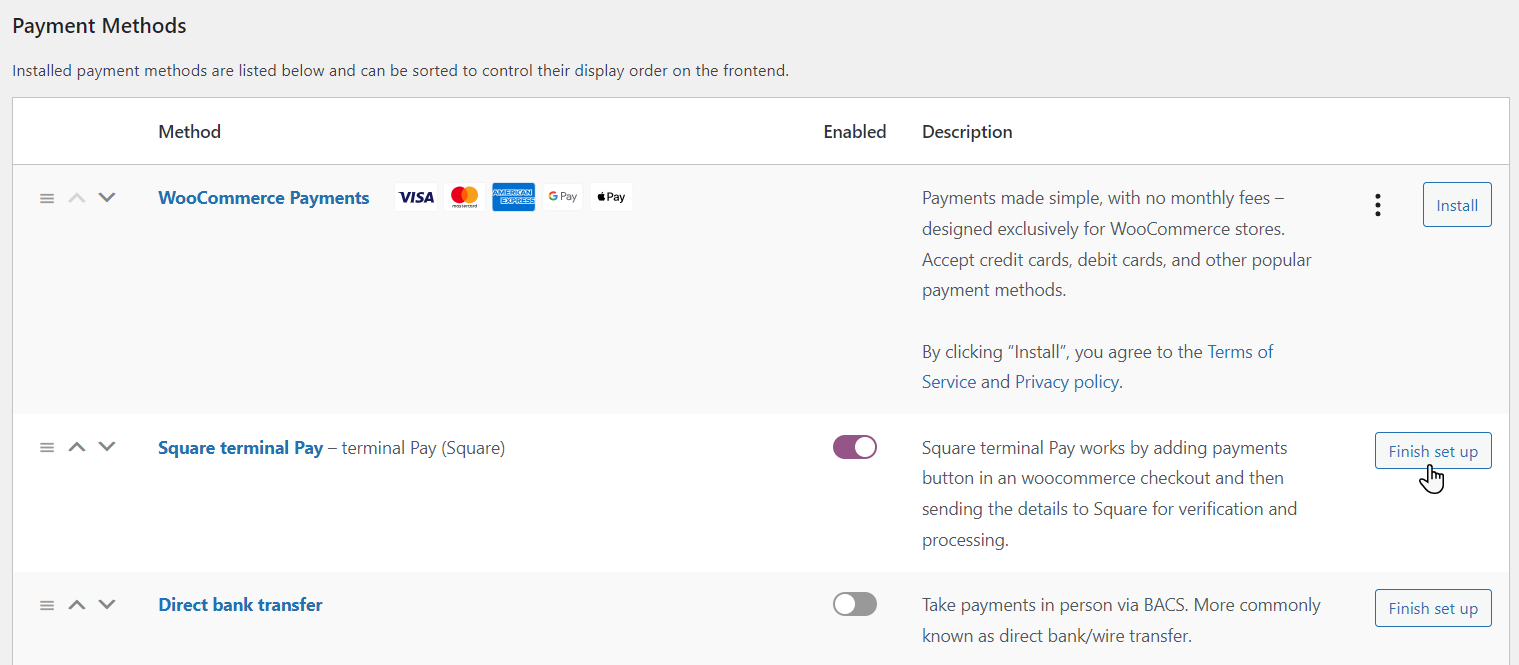
- Click on the toggle button to enable Square Terminal Pay.
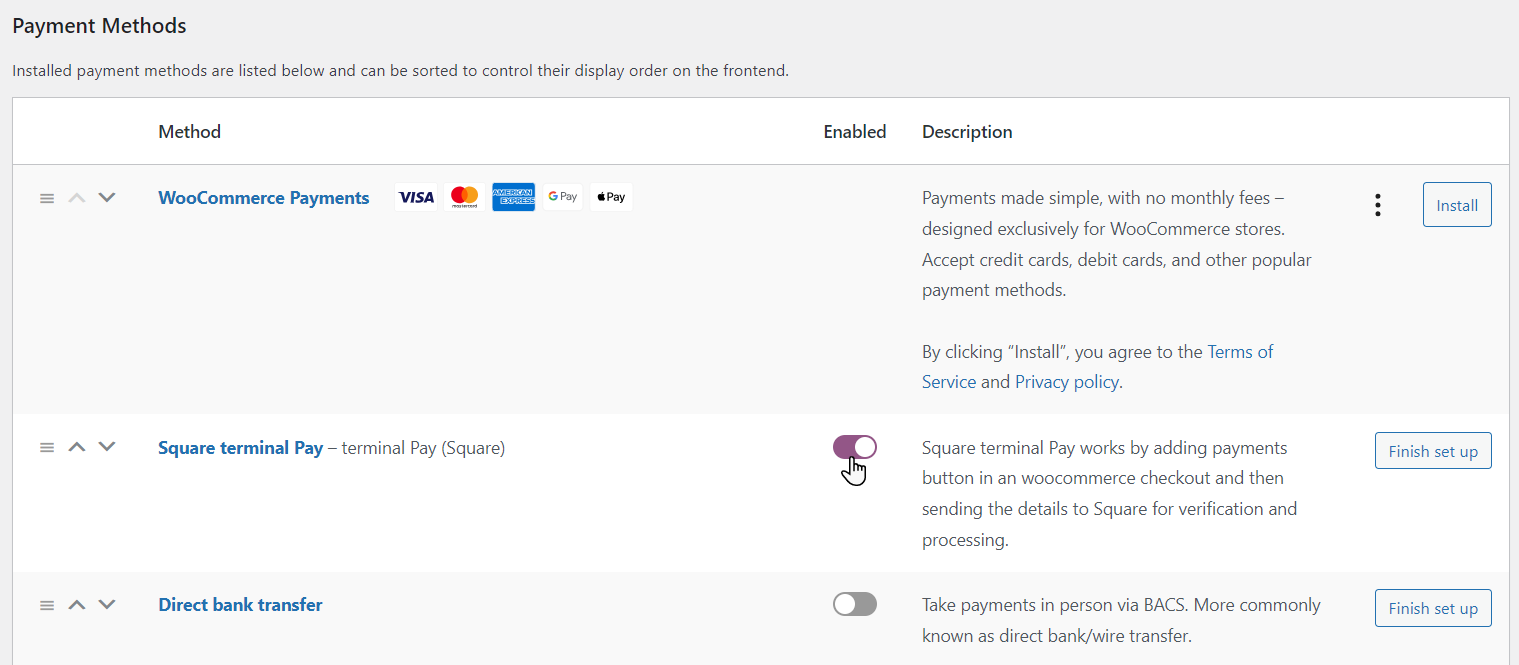
- Now, click on the Finish Setup button in the Square Terminal Pay to access Square Terminal Pay Settings.
- In the Square Terminal Pay, navigate to Create Device Code.
- Click on the Click here to generate code.
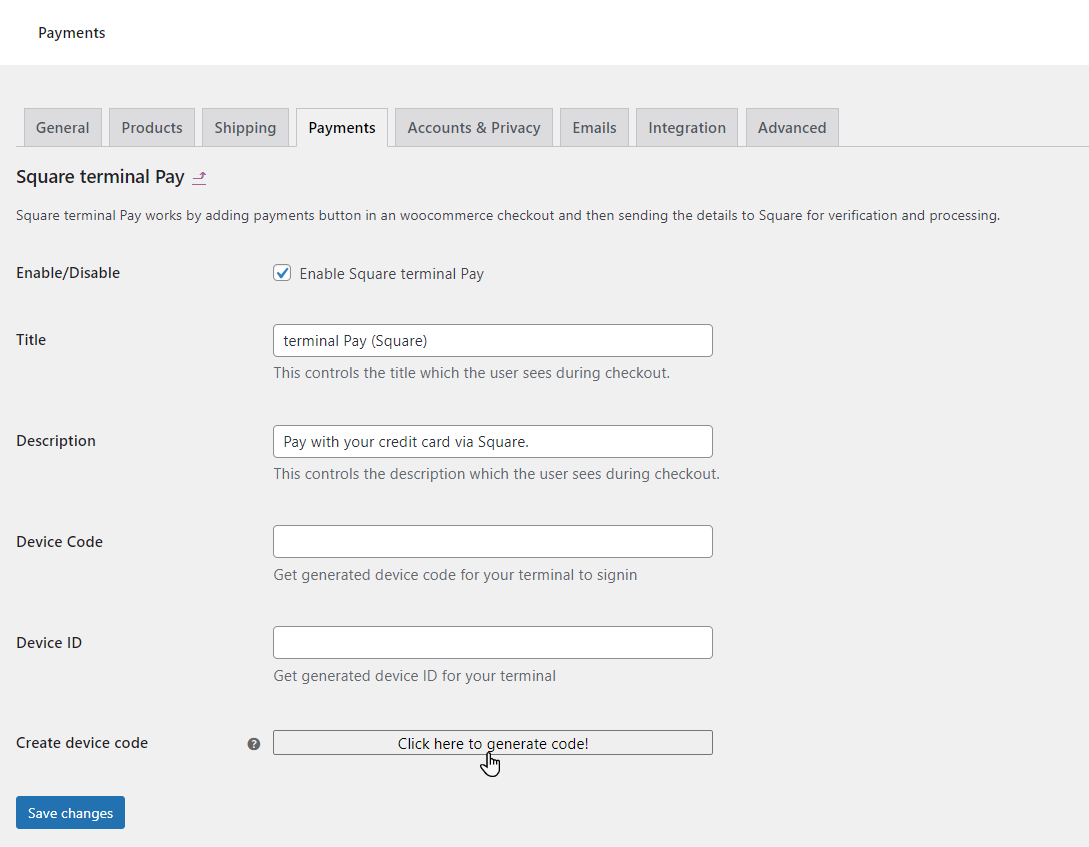
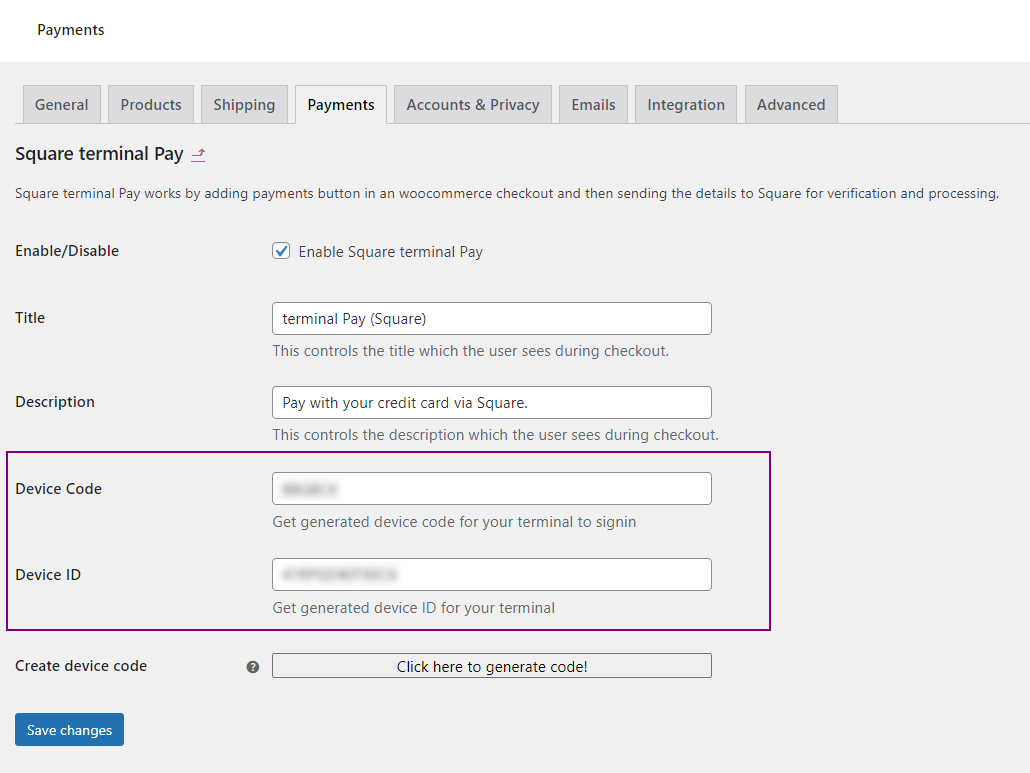
- This will generate the Device Code and Device ID.
- This Device Code will be used to Sign in to the Square Terminal Device via Use a device code.
Click on the Save Changes button to save the settings.
Square Terminal Device
Access the Square Terminal Device:
Turn on your Square Terminal device and ensure it is ready for use.
Initiate Sign In:
- On the Square Terminal device’s screen, locate and click on the “Sign In” option.
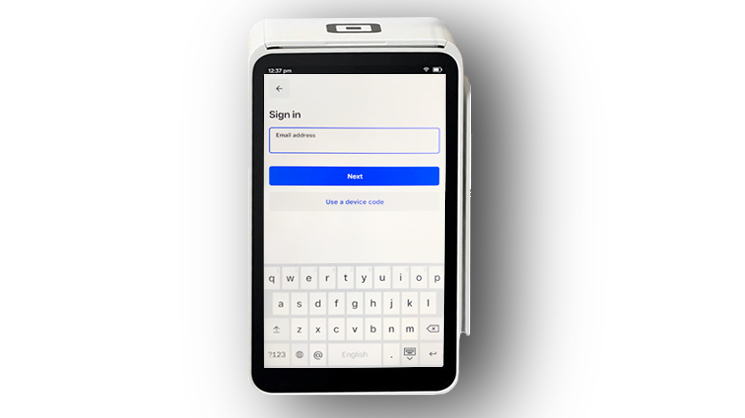
Choose Use a Device Code:
Once on the Sign In page, look for an option that says Use a Device Code and click on it.
Enter Device Code:
On the Square Terminal device, you’ll be prompted to enter the Device Code. Input the code you obtained from WooSquare.
![]()
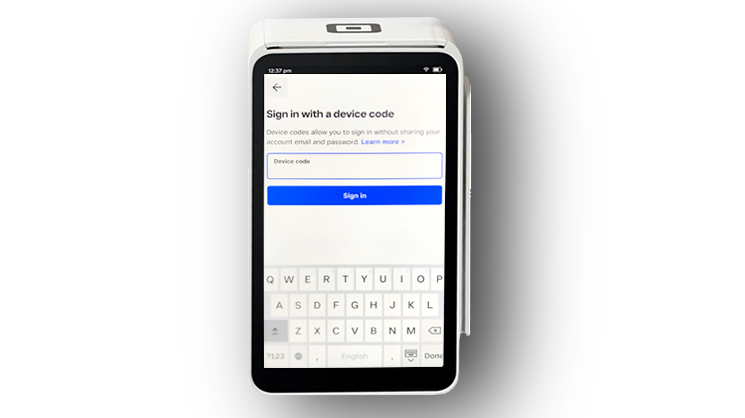
Complete Sign In:
After entering the Device Code, click on the Sign In button on the Square Terminal device’s screen.
Front-End Impact
- Go to the Shop page.
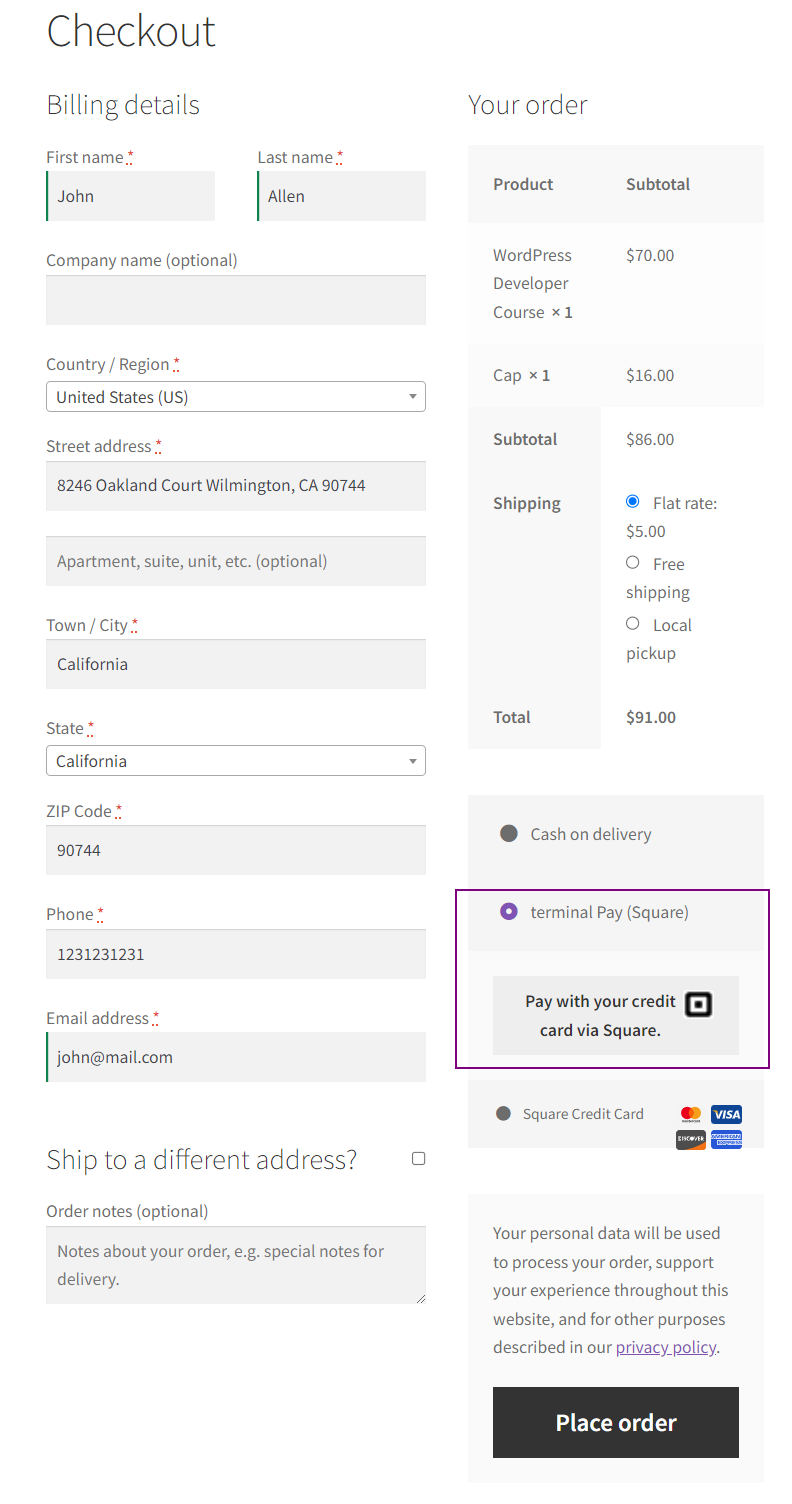
- Add products to the cart and proceed to the Checkout page.
- On the Checkout page, select Terminal Pay(Square) as the payment method.
- Click on Pay with your credit card via Square.
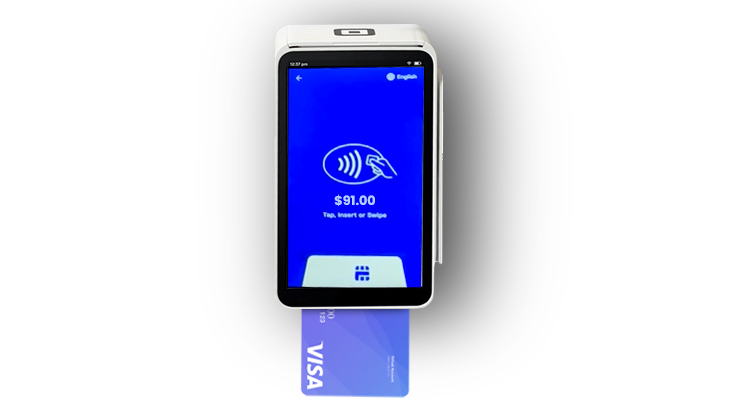
Initiate Payment:
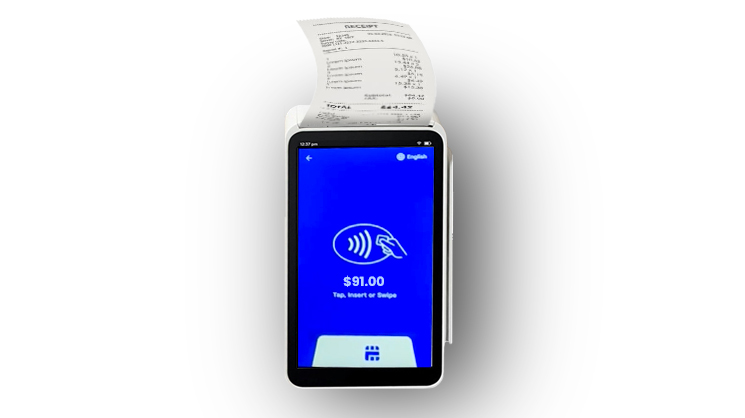
After selecting Terminal Pay, your Square Terminal device will display the total price of the transaction.
Payment Options Prompt:
The device will prompt you to “Tap,” “Insert,” or “Swipe” the credit card.
Insert Credit Card:
Follow the device’s instructions and insert the credit card into the designated slot.
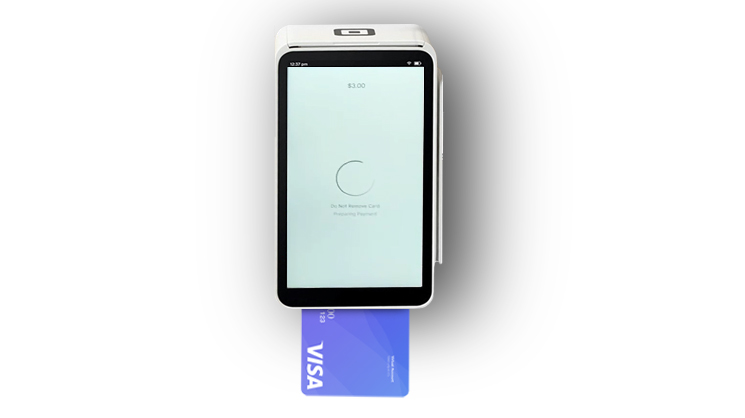
Payment Processing:
Once the credit card is inserted, the Square Terminal device will begin processing the payment. This process may take a few moments
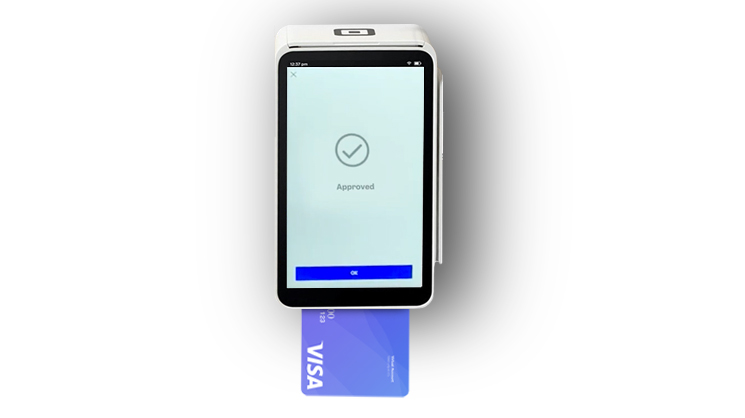
Payment Confirmation:
Upon successful completion of the payment transaction, both the Square Terminal device and your WooCommerce site will display notifications indicating the successful payment Approved.
Terminal Payment Slip:
The Square Terminal device will automatically generate a payment slip or receipt for the transaction. This slip contains details of the transaction amount.
WooCommerce Orders
- Navigate to the WordPress Admin Dashboard → WooCommerce → Orders.
- Click on the order to view the order details.
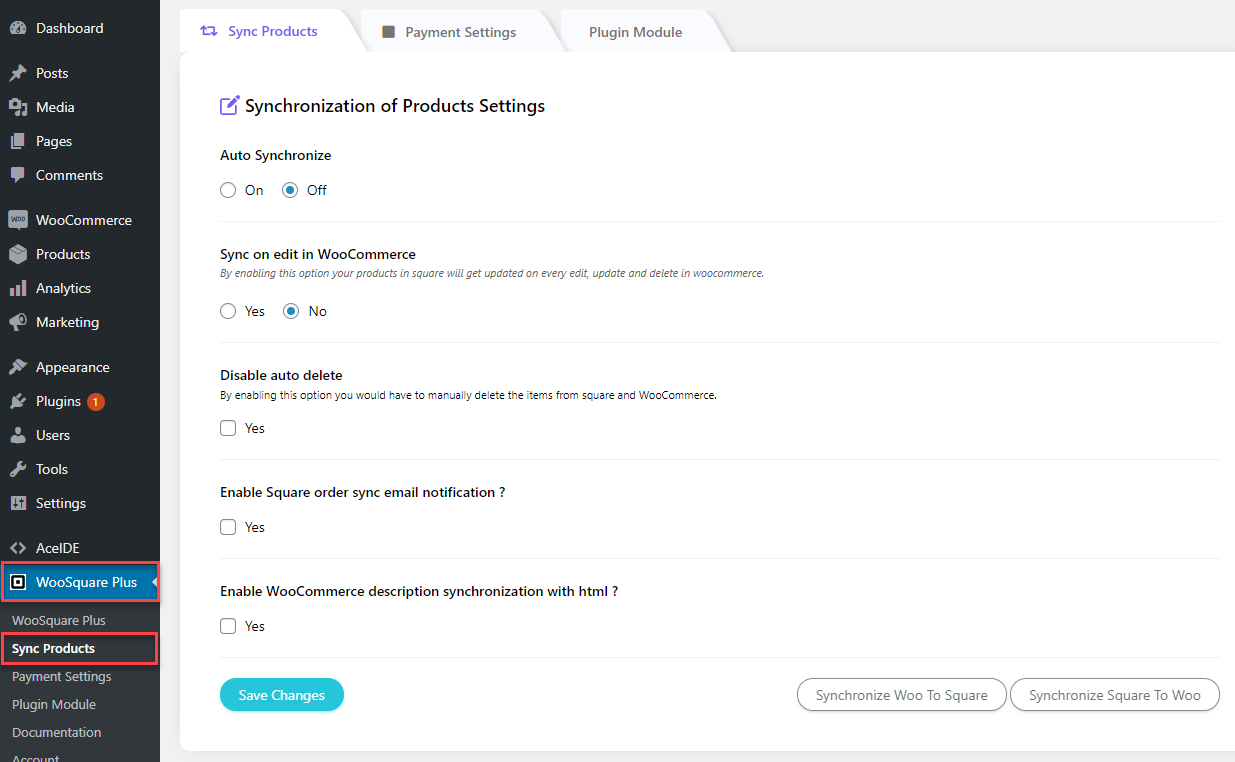
16.SYNCING OF PRODUCTS
- Synchronization of Products enables us to synchronize items between Square and WooCommerce.
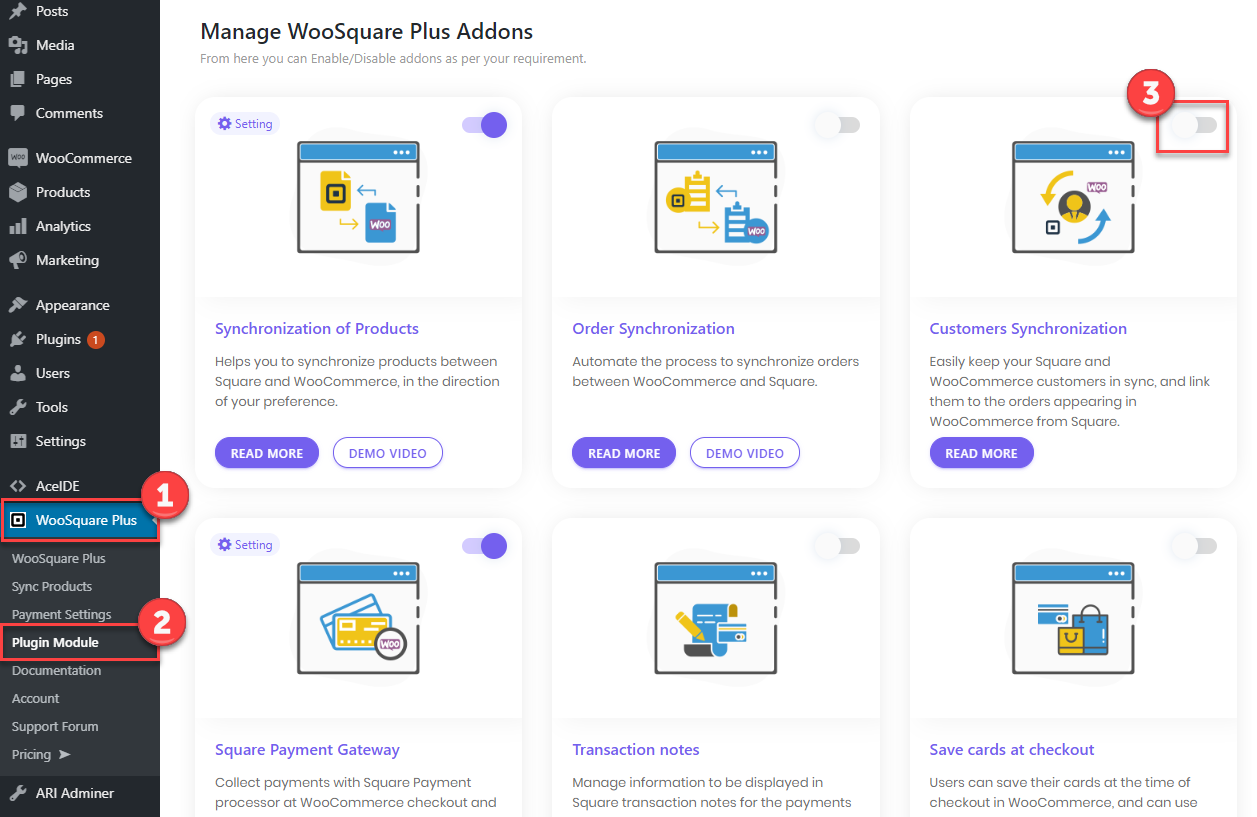
- To activate this module, it will have to be enabled from the Plugin module tab.
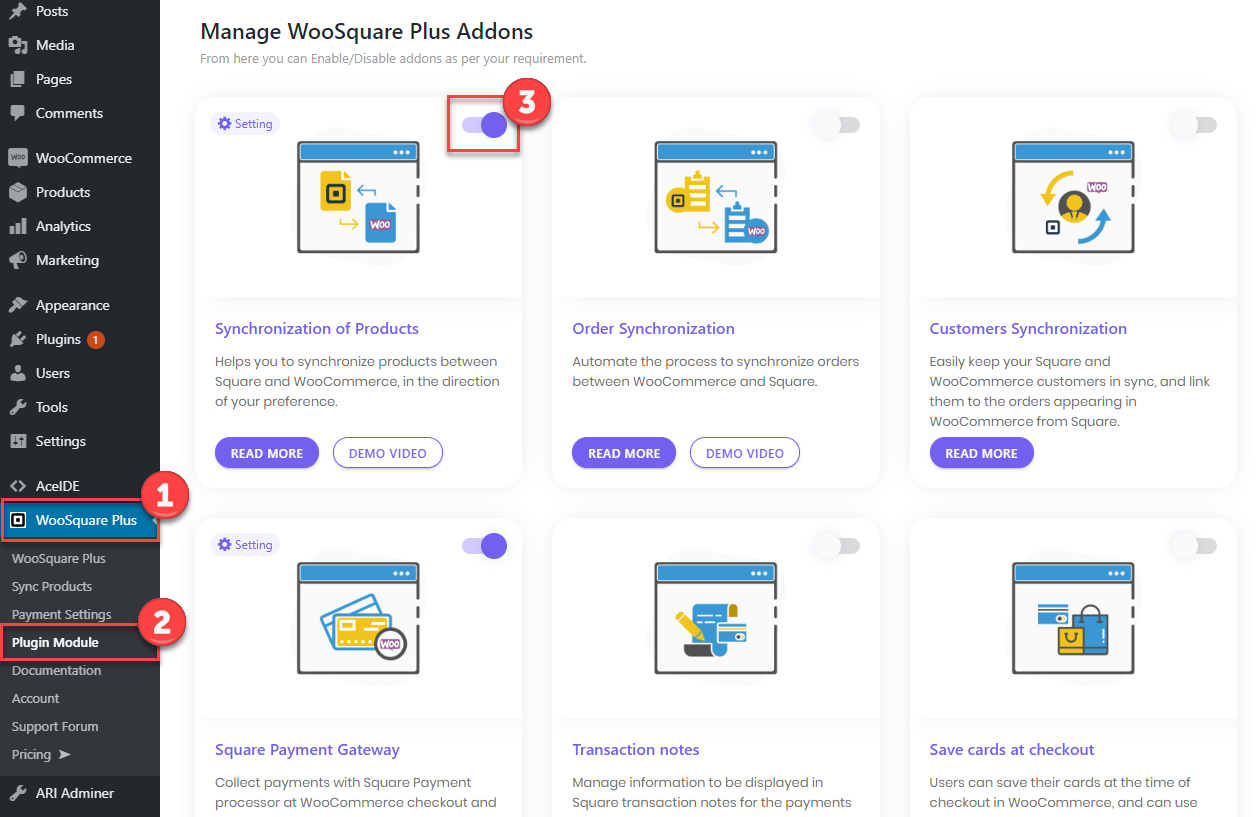
- To activate the module, go to the WC Shop Sync tab.
- Navigate to the plugin module tab.
- Enable Synchronization of Products module.
- After the module is enabled, a sub-tab of the Sync Products tab will be activated inside the WC Shop Sync tab.
- This tab will have all the settings that will help to synchronize items between both the platforms.
- The settings are used for auto-synchronization and manual-synchronization.
- There are a number of settings in this tab to address different functionalities as defined below.
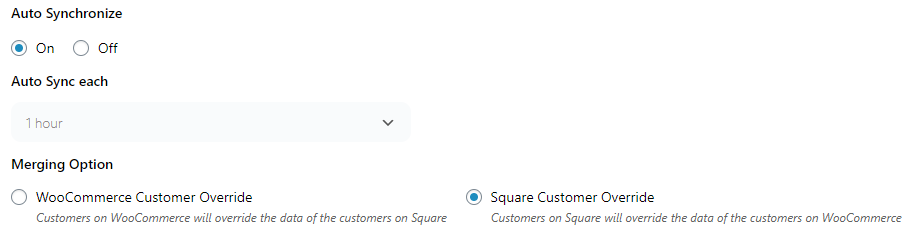
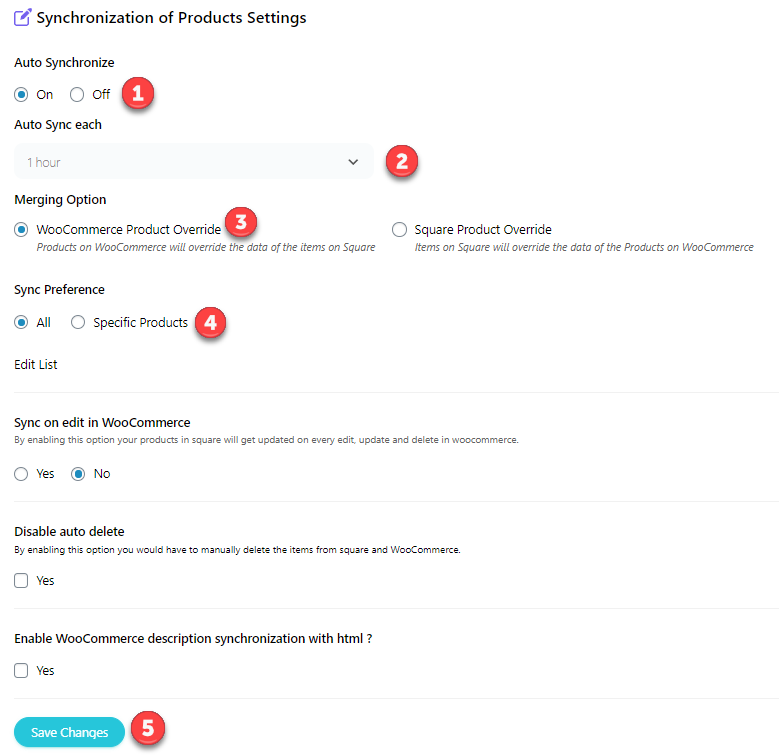
AUTO SYNCHRONIZE
- To automatically synchronize the items between both platforms set this option to on, the plugin will auto synchronize items.
- As this setting is set to on, another setting will be enabled for auto-sync time, the items can be auto-synced after 1 hour, 12 hours, and 24 hours.
- The time selected for the auto-sync, the plugin will auto-synchronize the items according to the set time interval.
MERGING OPTION
- This setting enables override/sync items between WooCommerce and Square.
- There are two options to choose from: WooCommerce product Override Square product and Square product Override WooCommerce product, the plugin will synchronize data according to the option selected.
- This setting works with auto-sync functionality.
SYNC PREFERENCE
- There are two options for auto-sync preference.
- By selecting All, each product and category will sync after the time interval.

- You can also select Specific Products only to sync products and categories of your choice to sync automatically after the time interval.
- Select the products and categories of your choice and click Update.
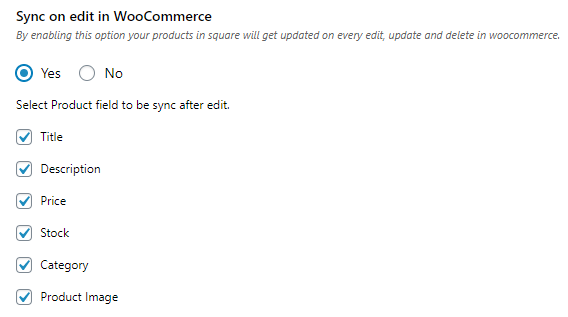
SYNCHRONIZE ON PRODUCT EDIT, UPDATE AND DELETE
- The plugin will edit, update, and delete the synchronized items if this option is selected.
- Editing, updating, and deleting can be done from WooCommerce to Square.
- Any item being edited, updated in WooCommerce will be reflected in Square.
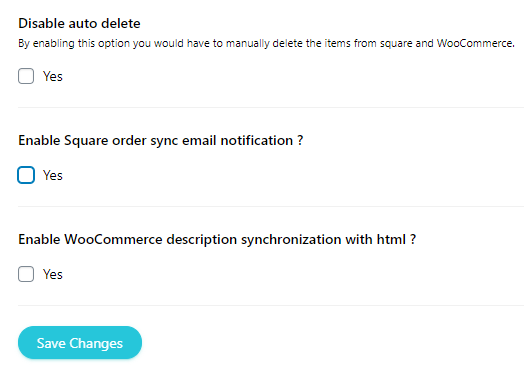
DISABLE AUTO DELETE
- You can check this option if you don’t want the product to be deleted automatically on the other side. For example, if you delete a product on Woocommerce it won’t be deleted on Square.
ORDER SYNC EMAIL NOTIFICATIONS
- To generate an email notification for order sync an option has been provided which can be enabled to achieve this functionality.
- Every time synchronization is being done an email notification will be initialized, that email will have details of the synchronization process.
DESCRIPTION SYNCHRONIZATION
- If selected, this option enables synchronizing product description between both platforms.
- Any changes made in the description of the product from one platform will automatically be tallied and will be visible on the other platform.
16.1.WOOCOMMERCE TO SQUARE SYNC
Auto-sync with the variable product and global/custom attributes
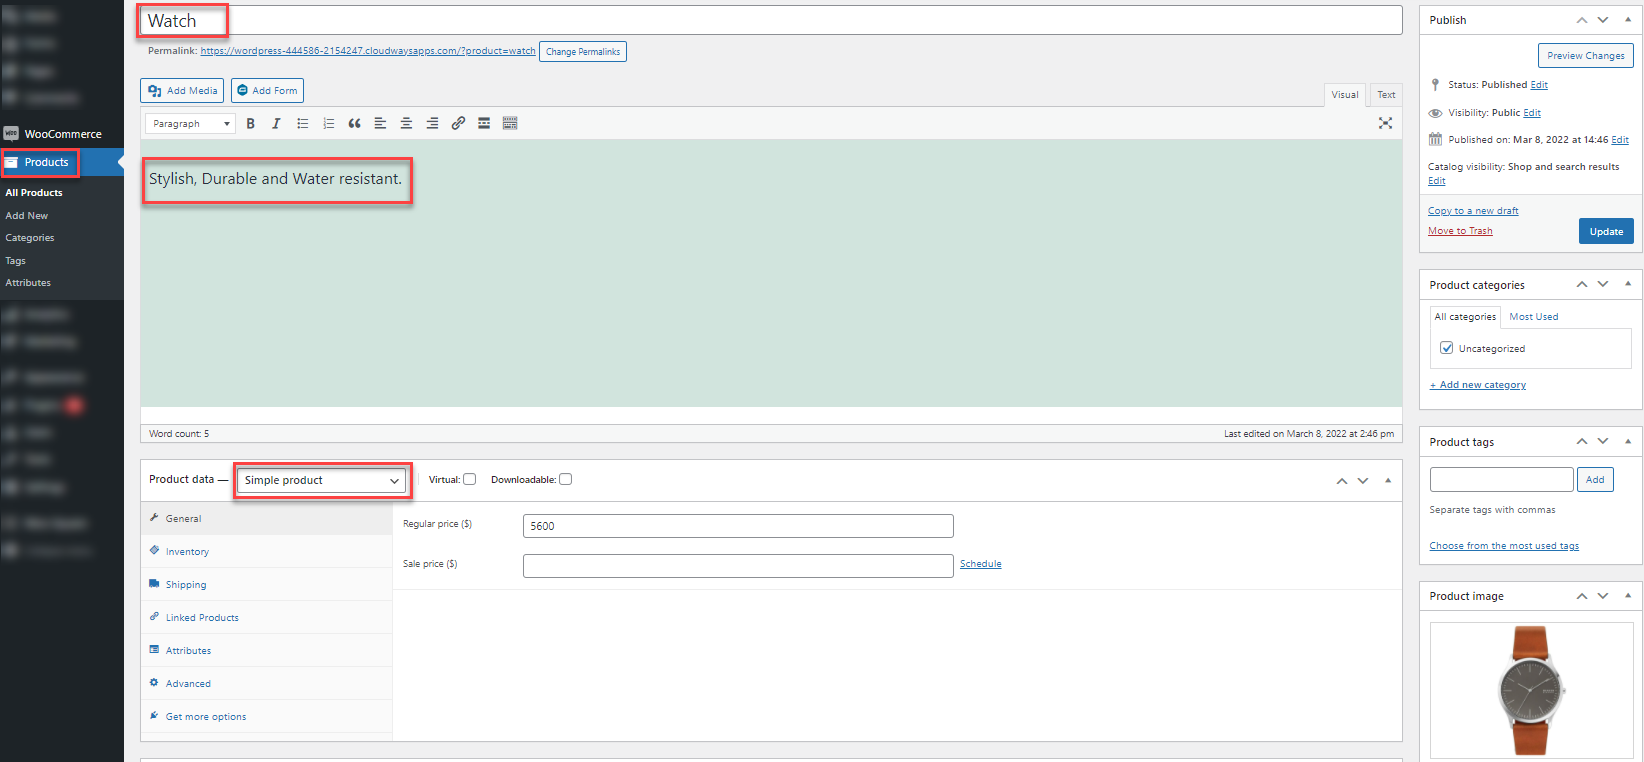
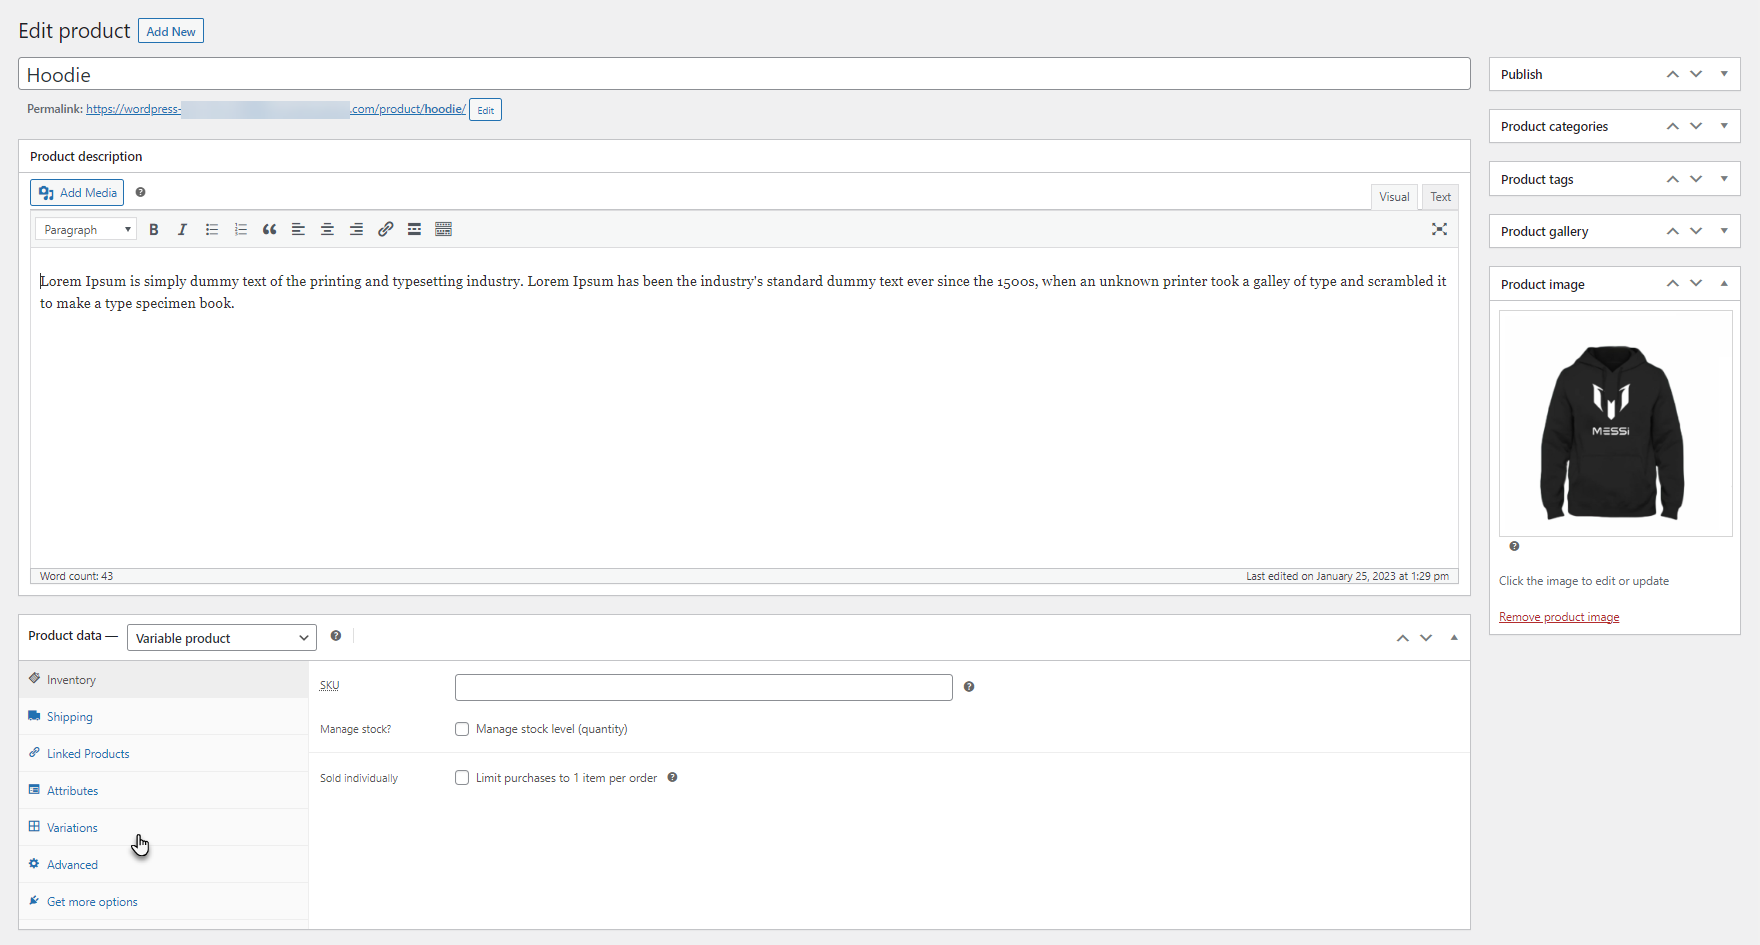
- Click the WooCommerce Product tab and navigate to Add new option and click it.
- A new page will open where a new product can be created in WooCommerce.
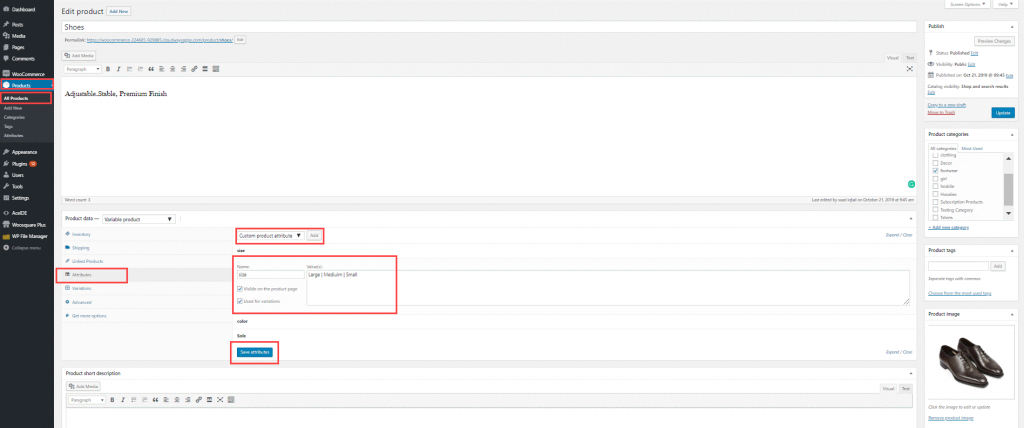
- Provide product details like Name, Description, Category, Image, define attributes for creating variations and click save attributes and publish the product.

- We can apply the global attributes to the product which are defined in attributes sub-tab in the WooCommerce products tab.
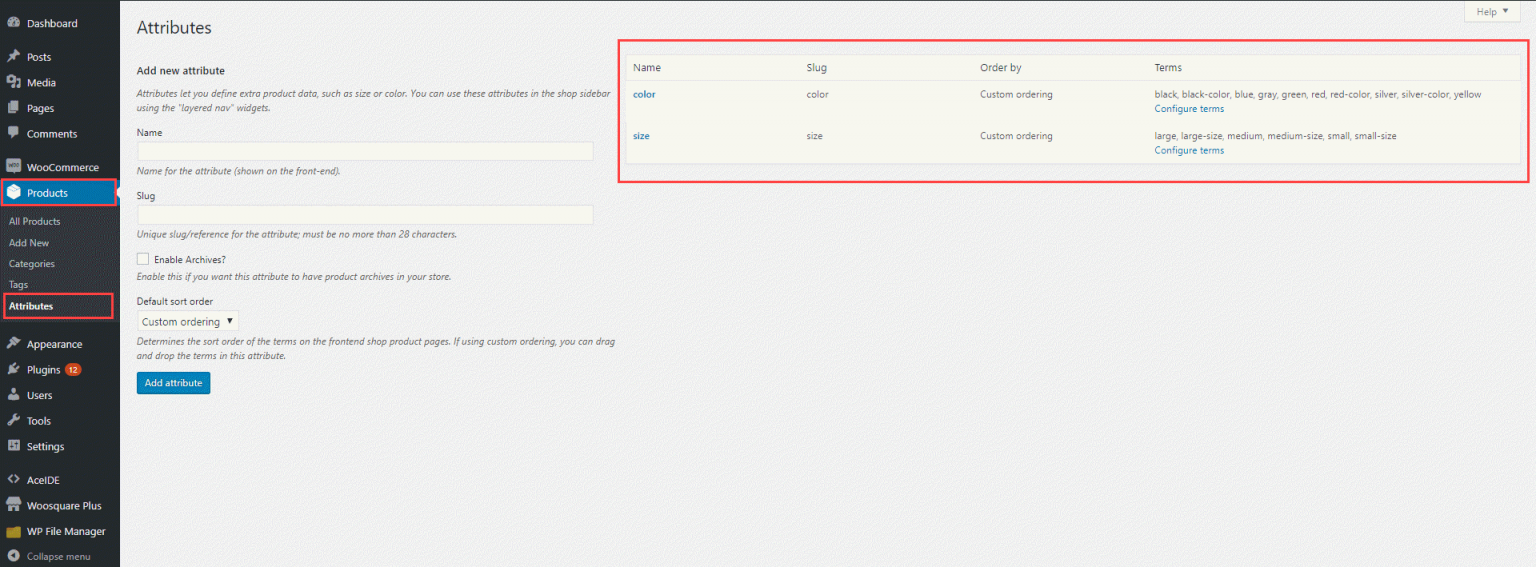
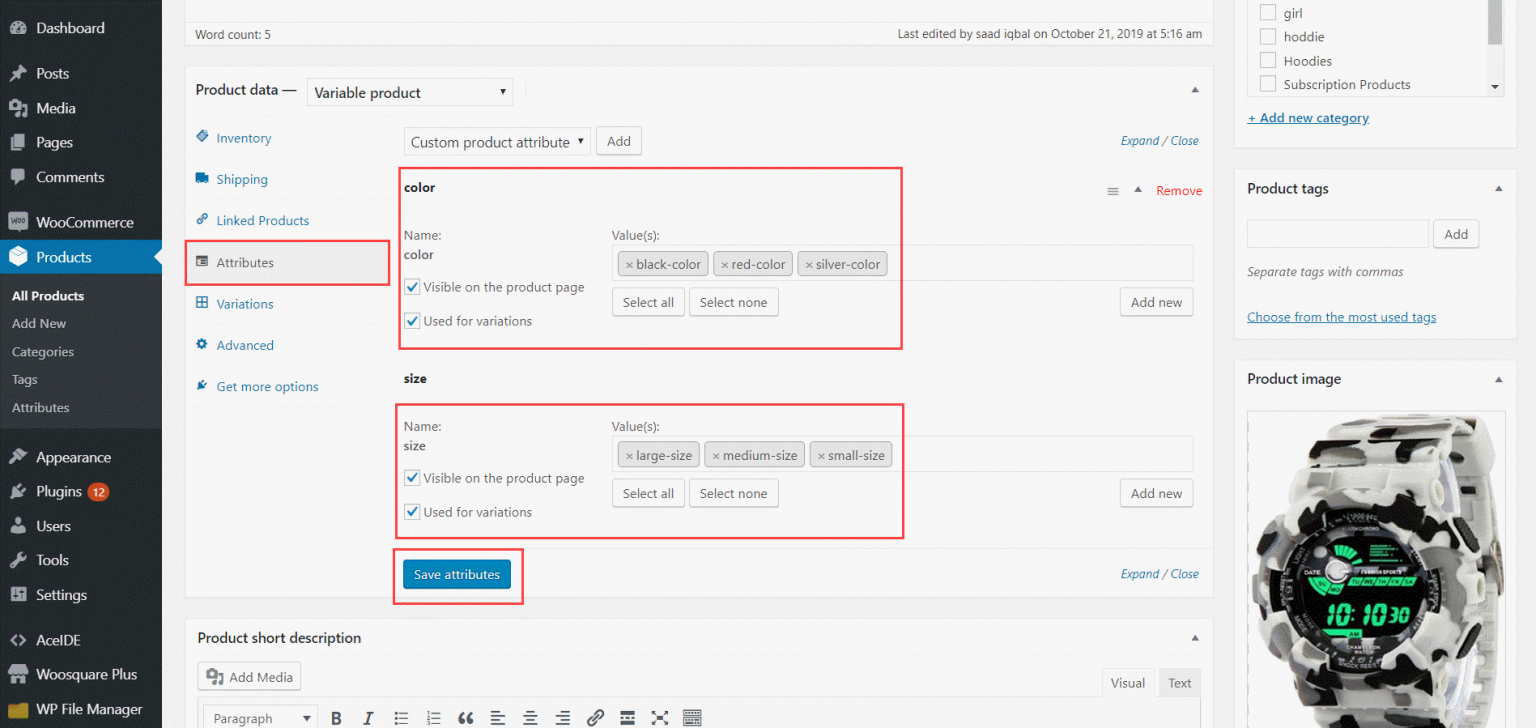
- To create the product variations depending on global attributes click on attributes.
- Click on the drop-down list to add attributes, if there will be global attributes that are already defined then they will be available to choose from here, in this case, color and size, add values, checkmark used for variations and click on save attributes.
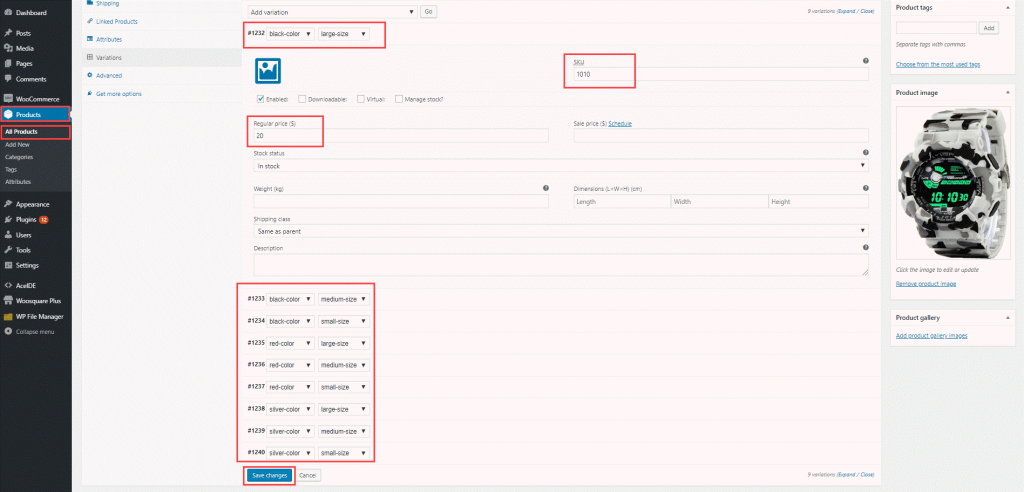
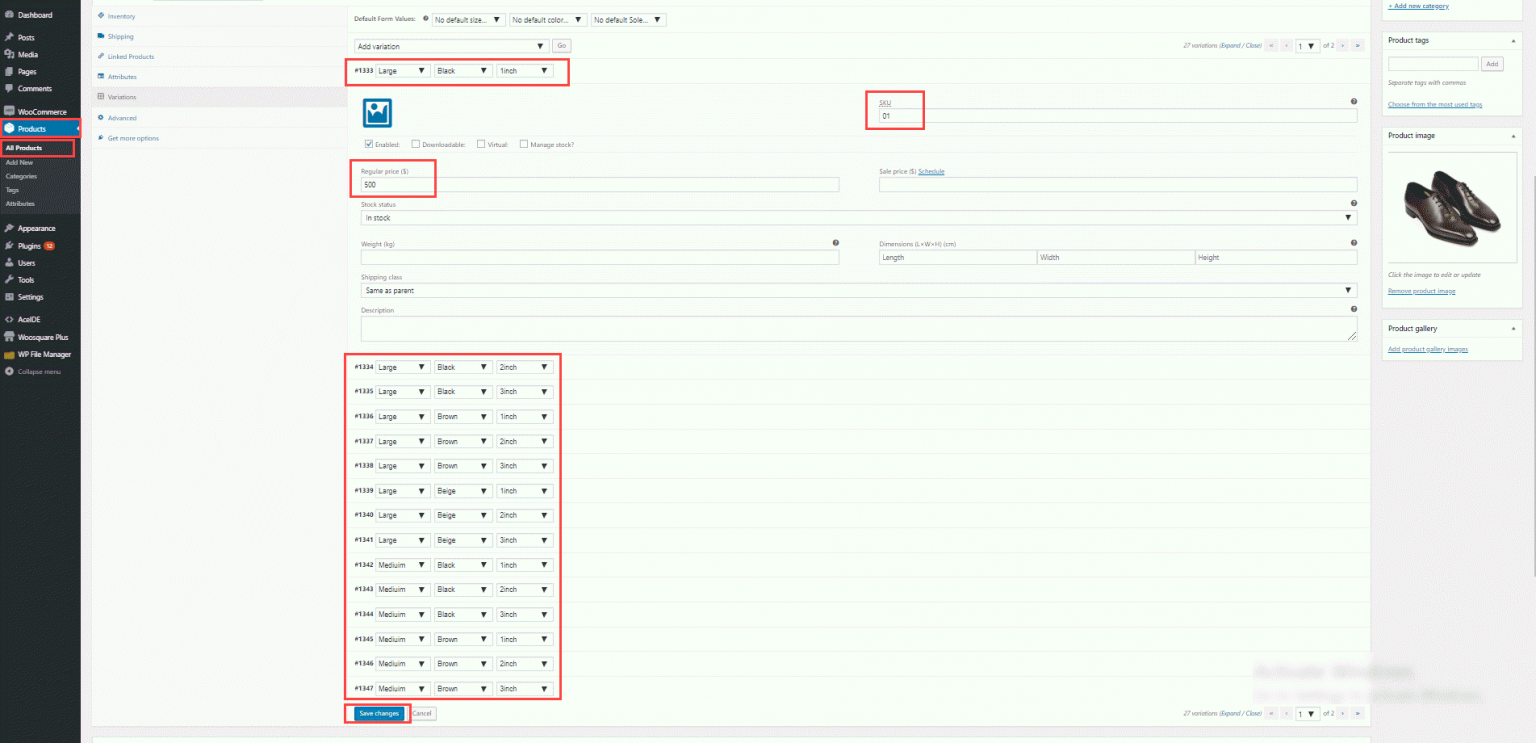
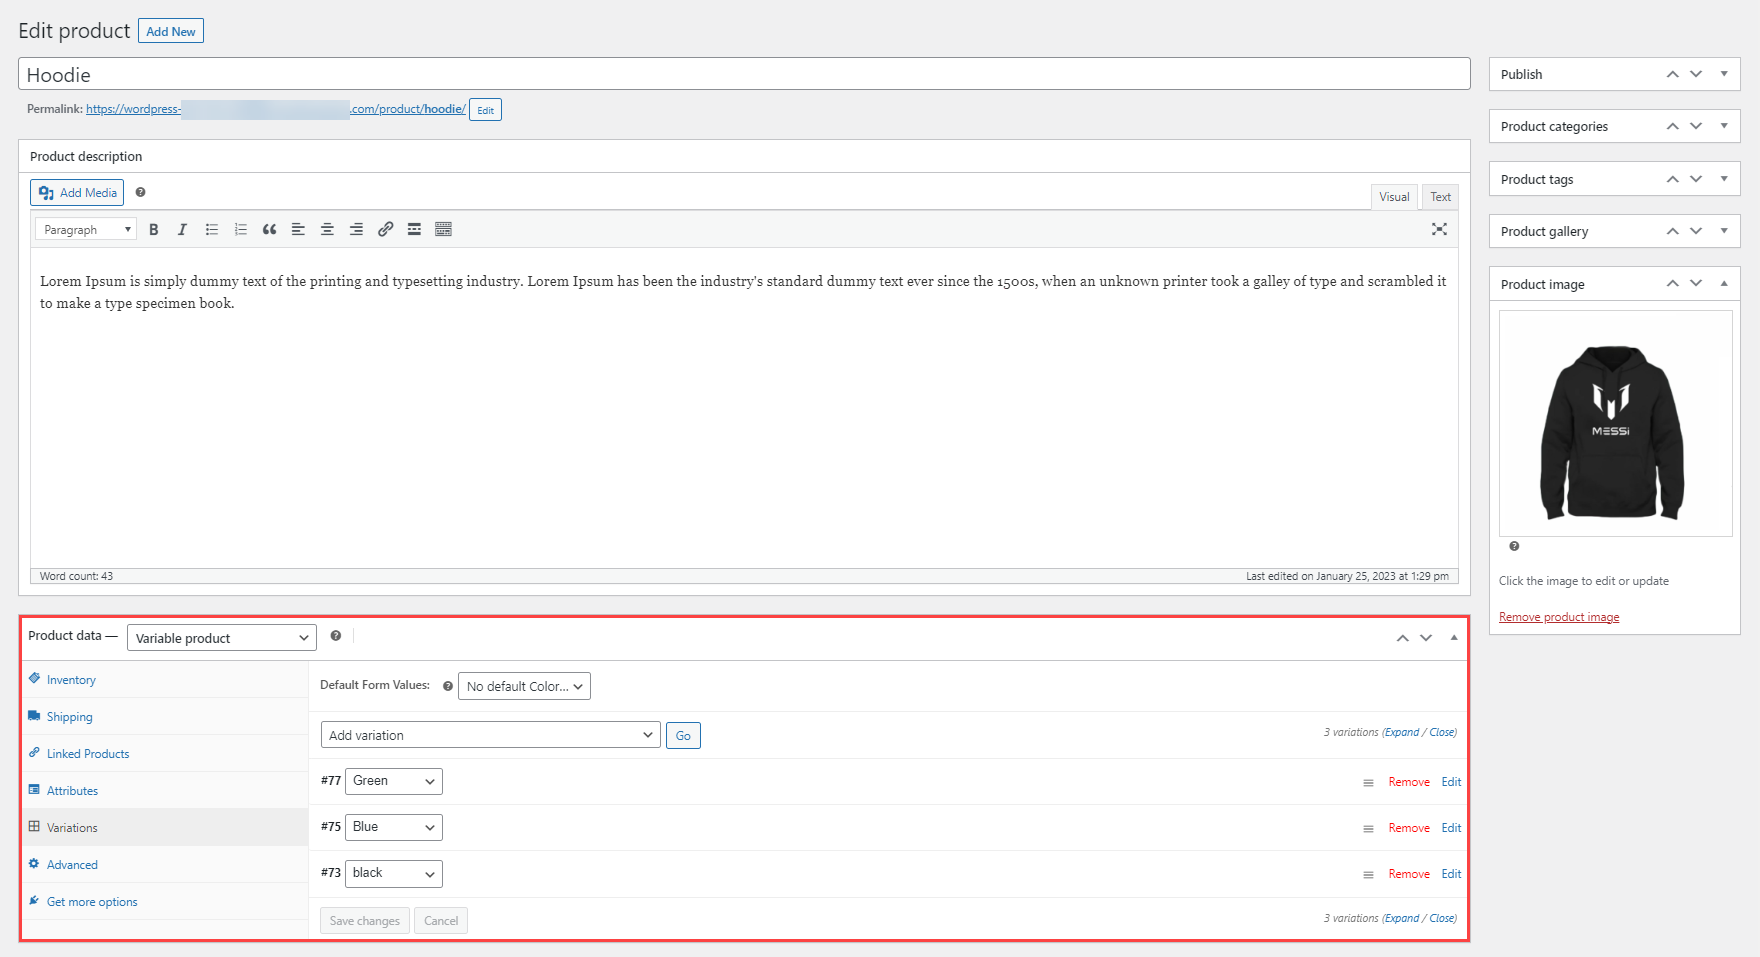
- To create variations from global attributes navigate to variations tab select Create Variations from all attributes from the drop-down list and click go, depending on the selected global attributes WooCommerce will automatically create variations.
- Define price and SKU in the respective variation.
- Click save changes.
- As the product is created it will be visible on the product list in All product tab of WooCommerce inventory.
-
- Now to Auto Synchronize the newly created product with square, navigate to the Sync Products tab.
- Set the auto to synchronize option to on.
- Set a time to synchronize items in.
- Make sure to select the WooCommerce Product Override Square Product option to synchronize WooCommerce product to Square
- If you are selecting sync preference for specific products make sure you include this product in your selected specific products then update.
- Click the save changes button.
- When the auto-synchronization is completed according to defined parameters.
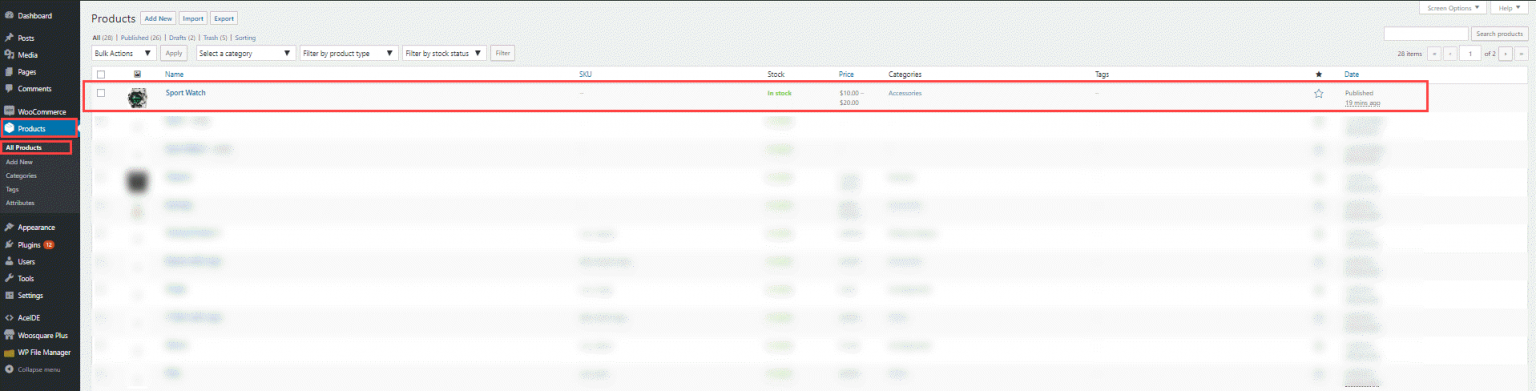
- The newly created product will be synchronized from WooCommerce to Square and will be visible in the item library tab in the Square account.
- The item will be synchronized from Square to WooCommerce with all the product details.
- As the product was created with variations in WooCommerce, so it will be synchronized with all its variations and attributes to Square.
Manual sync from woocommerce to square with global/custom attributes.
- To introduce custom attributes to a product, navigate to the Attributes tab and select the Custom Product Attribute from the drop-down menu, and click add.
- As the add button is clicked, a custom attribute field will be visible where the name of the attribute and its values can be defined.
- After defining the attribute name and its values checkmark use for variations and click the save attributes button.
- After defining custom attributes, click on variations tabs and select create variations from all attributes from the drop-down list and click go.
- Define price and SKU for the respective variations and click save changes.
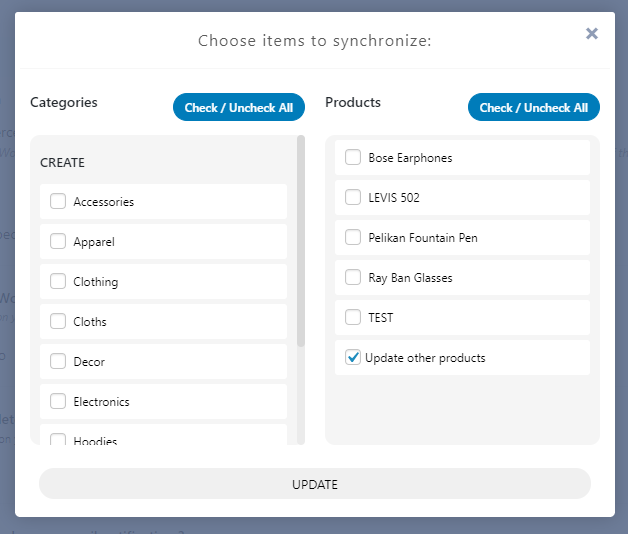
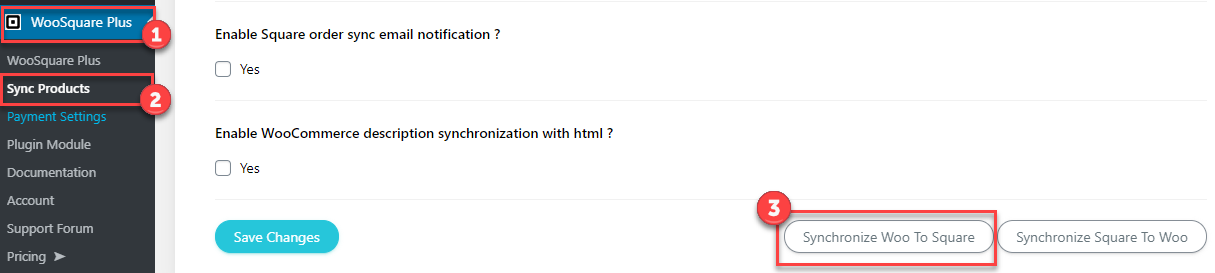
- For a product to be synchronized manually, the Sync Products tab has to be accessed.
- When the Sync Products tab opens there will be a button for Synchronize Woo to Square, Click that button.
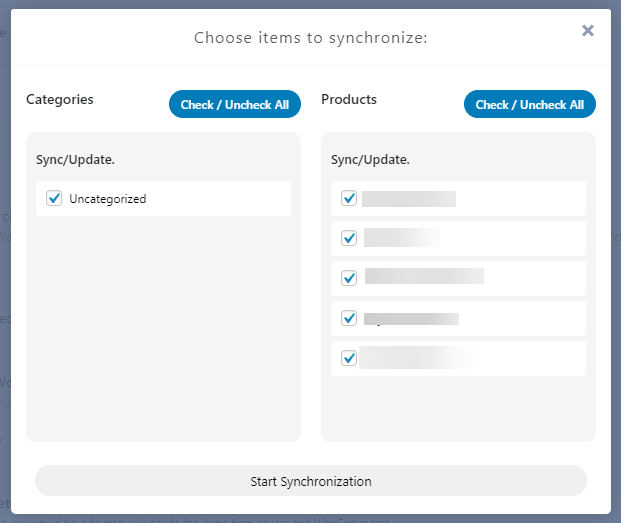
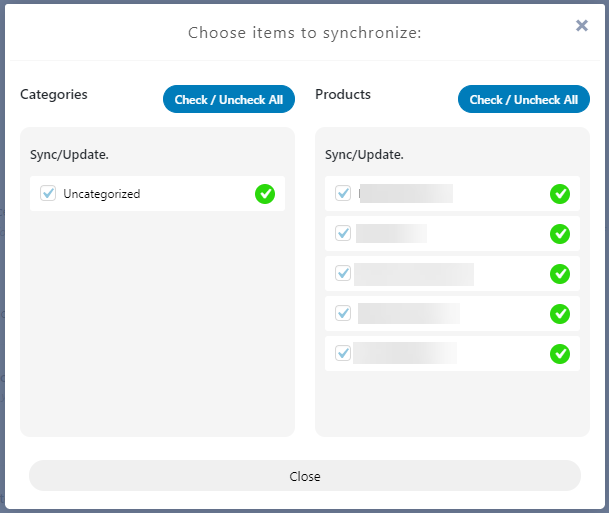
- As this button is clicked it will display a popup box, which will have the settings for synchronization then you can select the categories and products through selecting them by the checkmark.
- Click the start synchronize button to start the synchronization, the plugin will synchronize all selected categories and products one by one even detecting a new item, if a new item is found from WooCommerce Products, in this case, Shoes.
- When the synchronization is completed, product detail will be synced from WooCommerce to Square.
- The product will be visible in the item library or Square account.

- All the product details with variations created from custom attributes will be fetched and synchronized to Square from WooCommerce.
16.2.SQUARE TO WOOCOMMERCE SYNC
Creating a Product in Square
- Login to to Square Account.
- Navigate to seller dashboard.
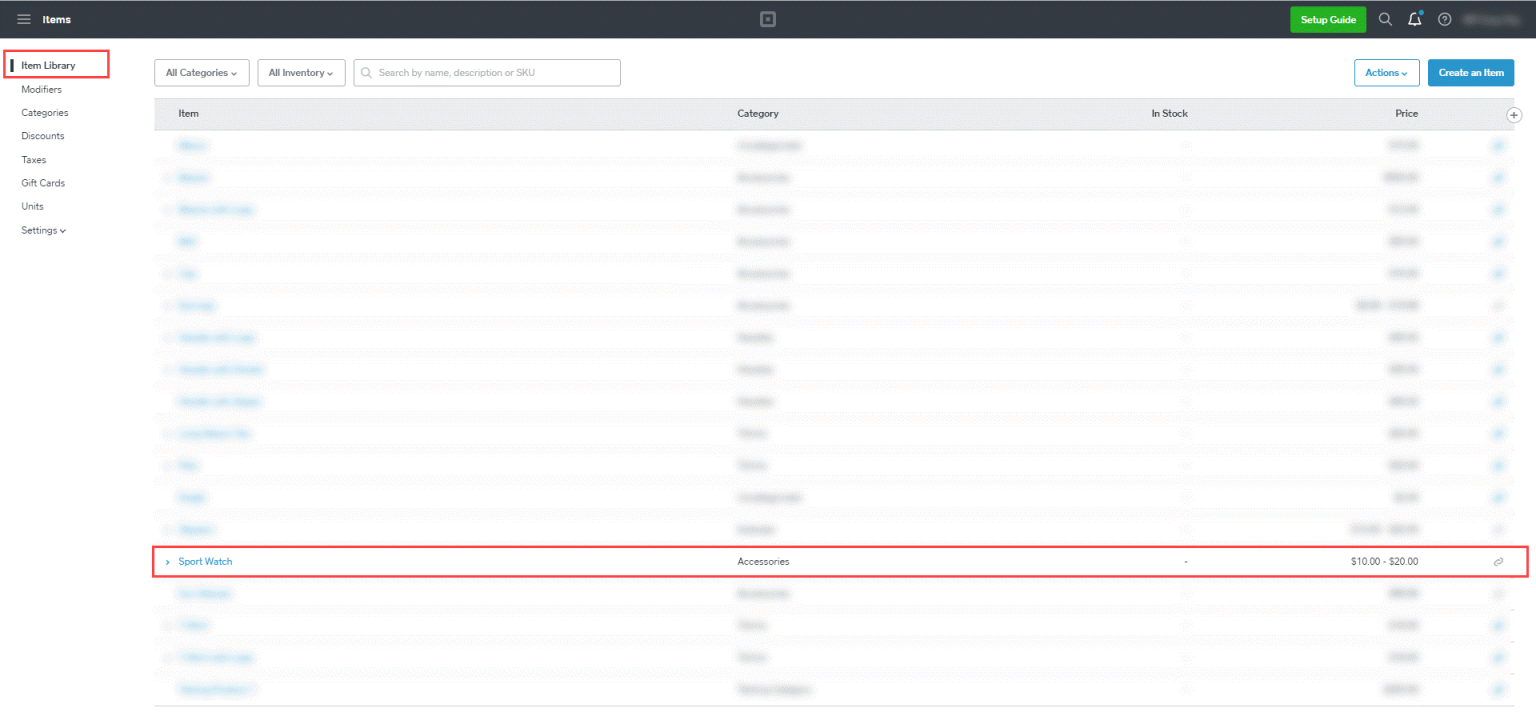
- After the dashboard has loaded, an option of items will be visible from the side menu. Click this option to excess the Square item creation and customization page.
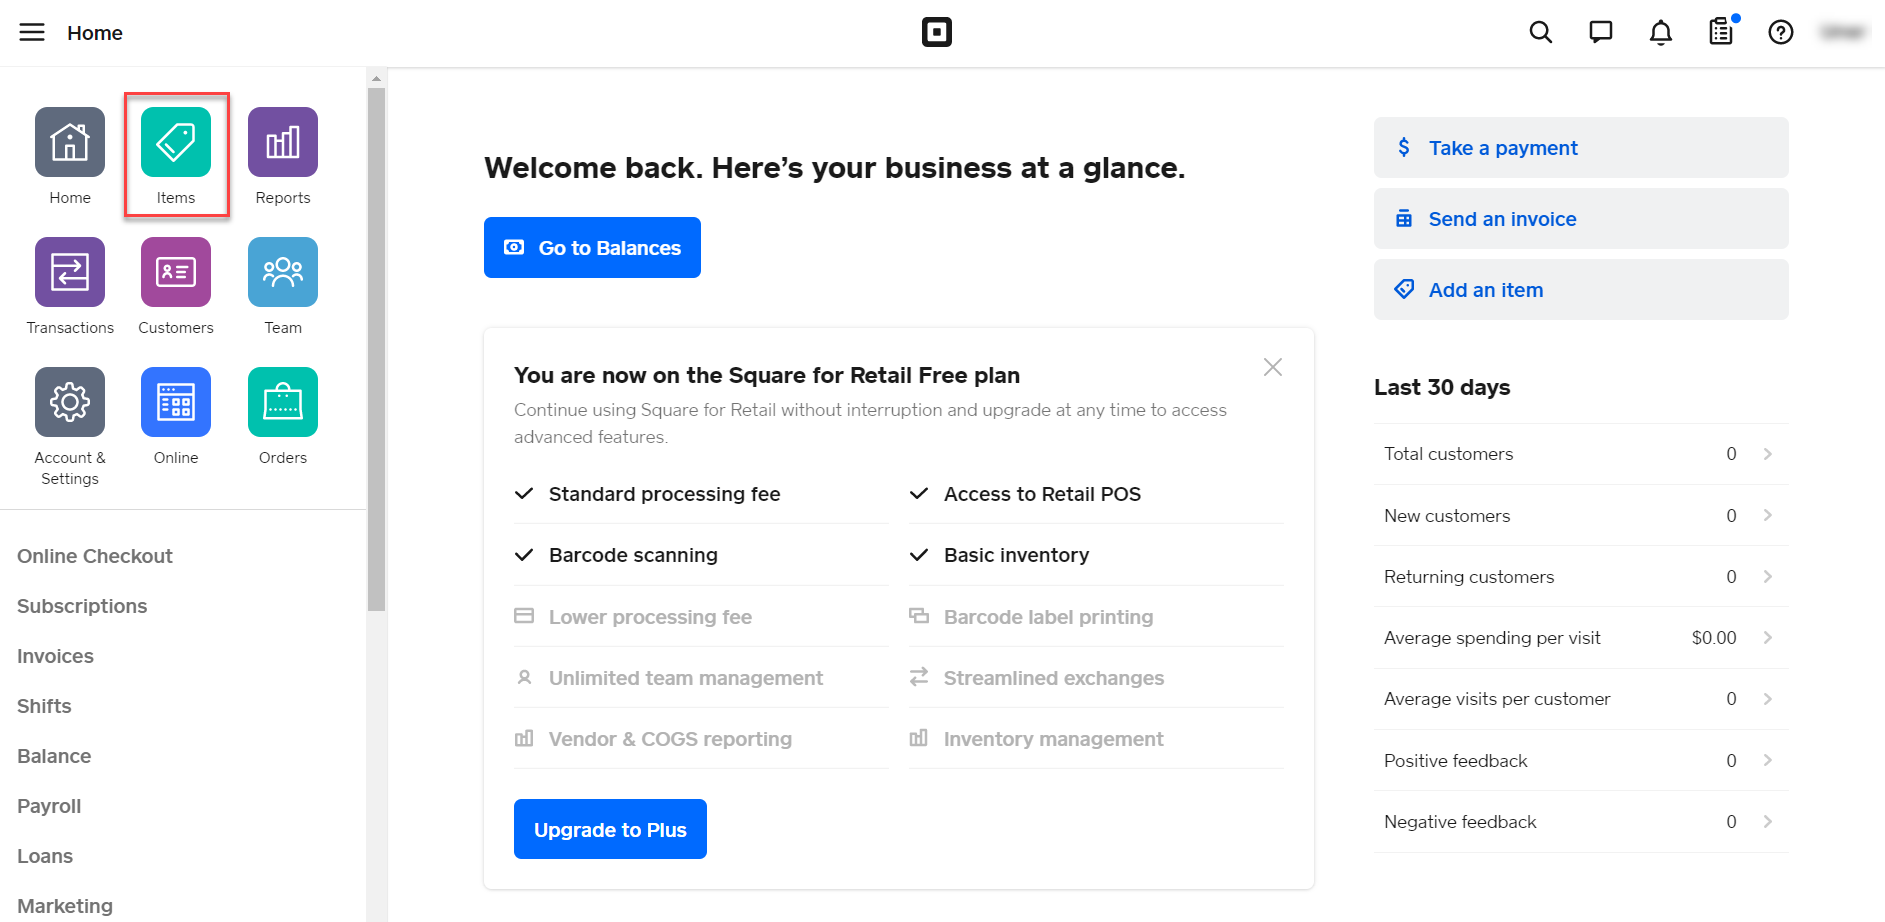
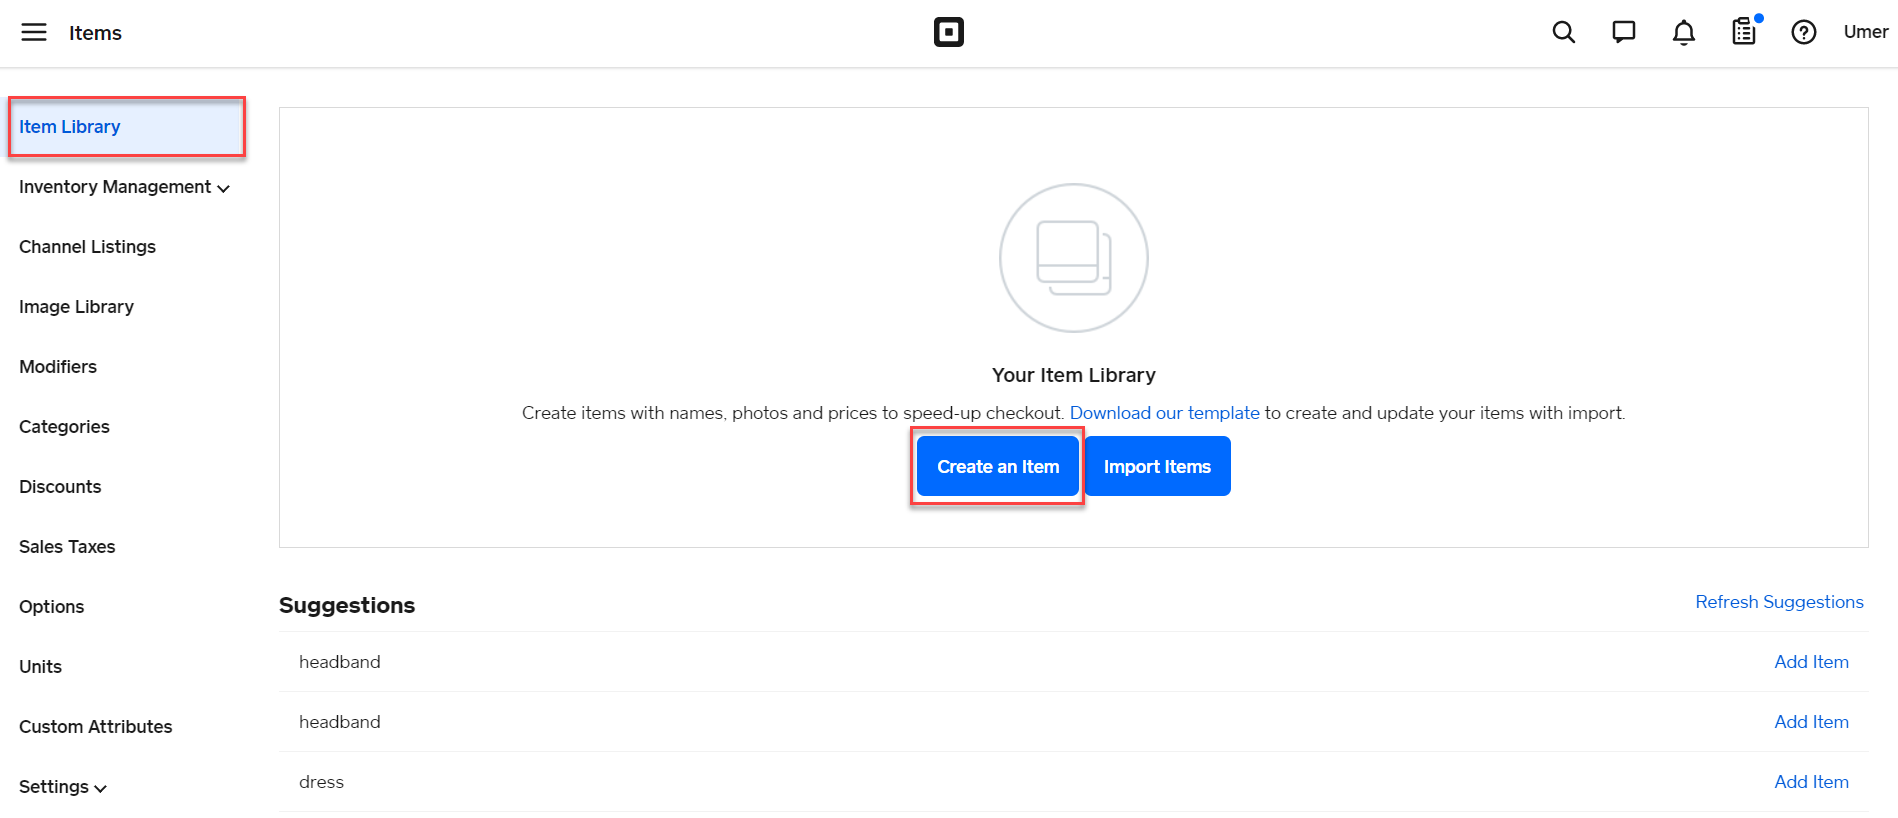
- After clicking Items, page will be redirected to Square item Library where items can be created or edited for Square store.
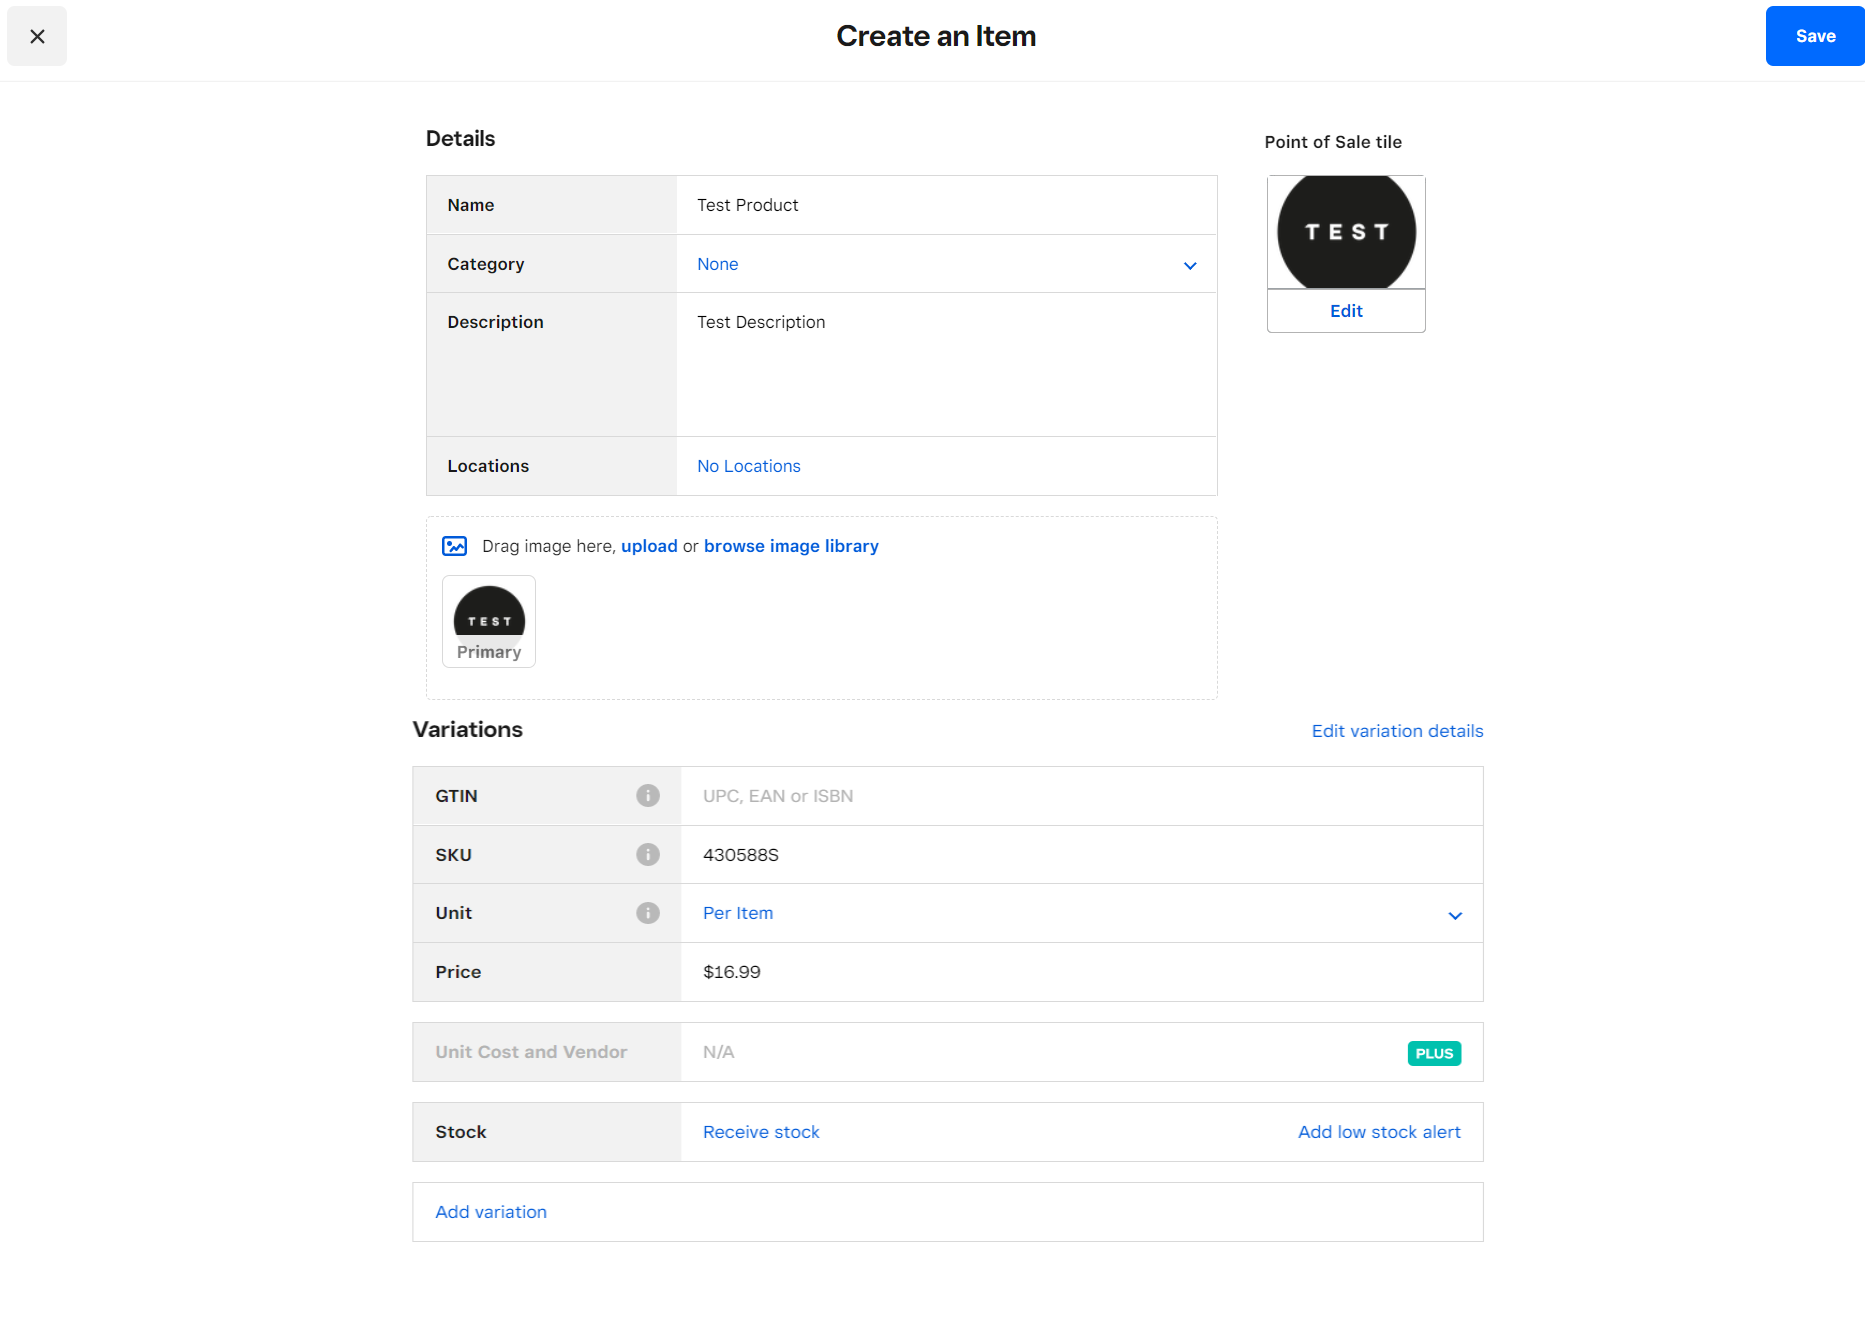
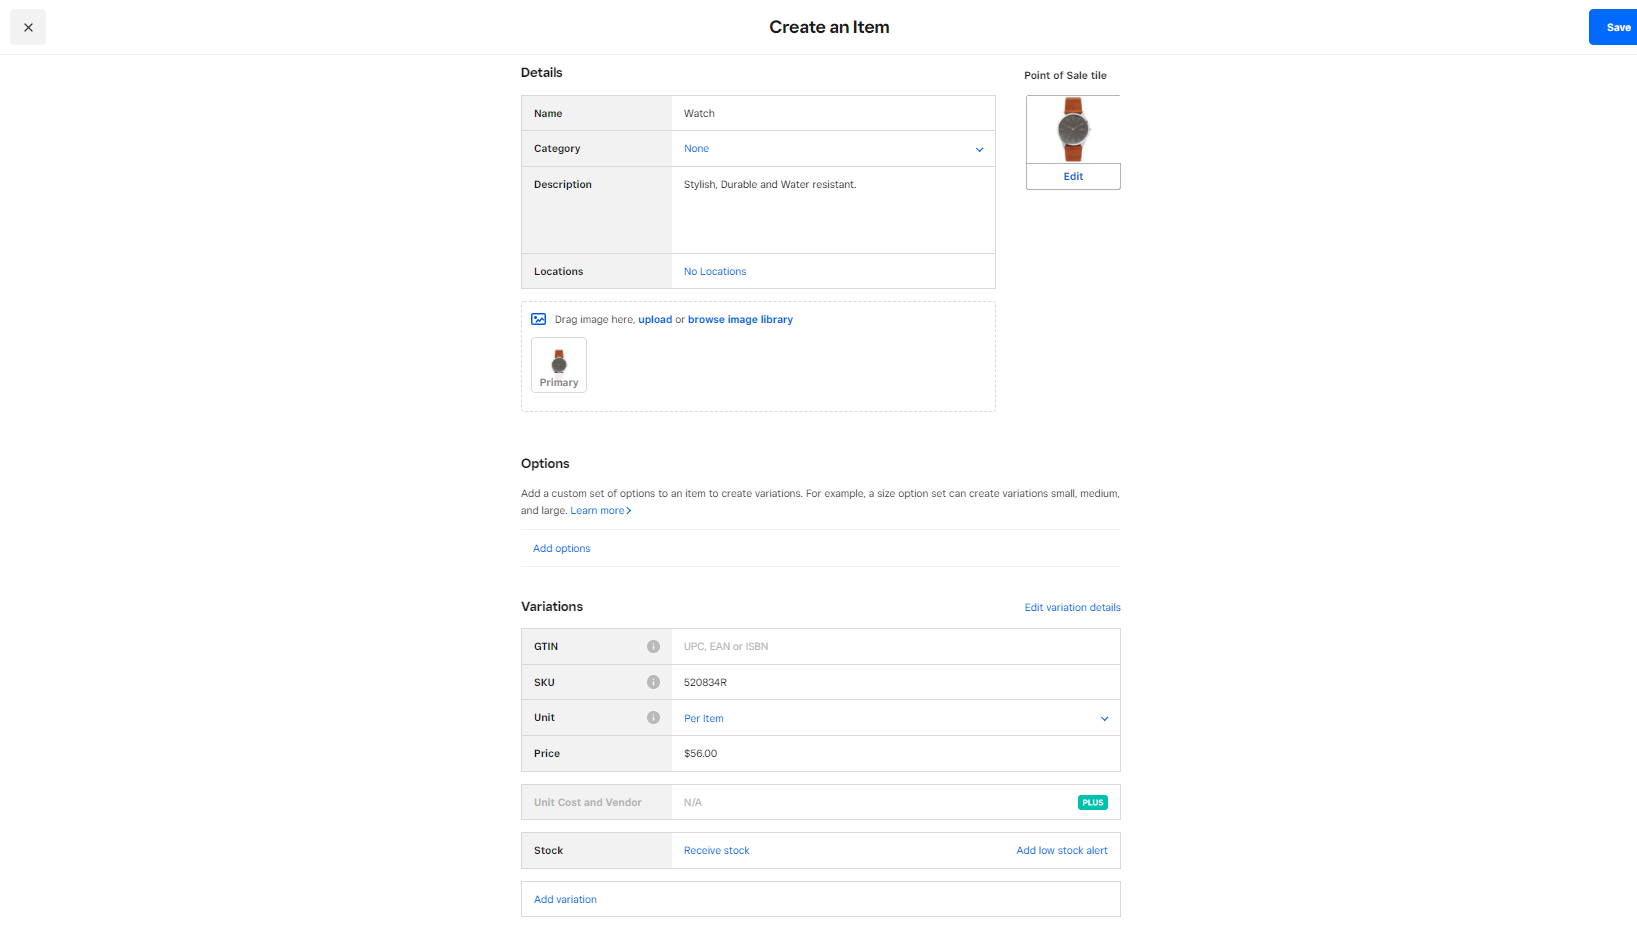
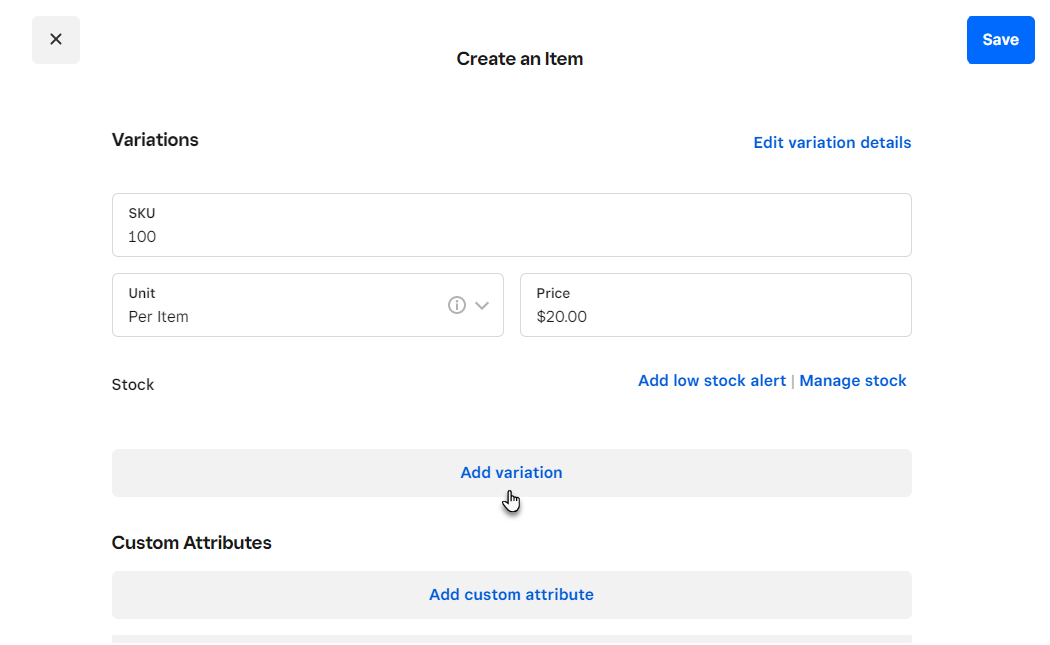
- To create item, click on create an item button.
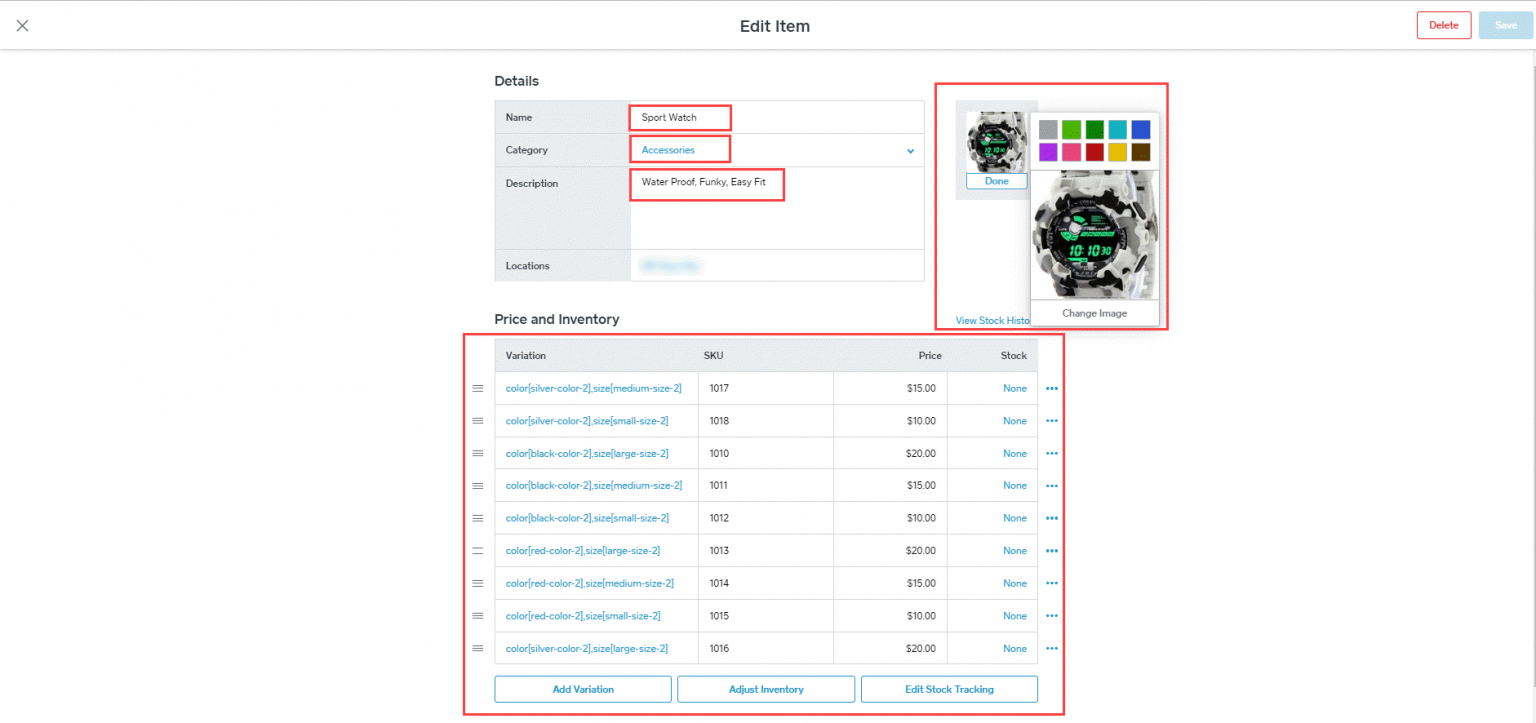
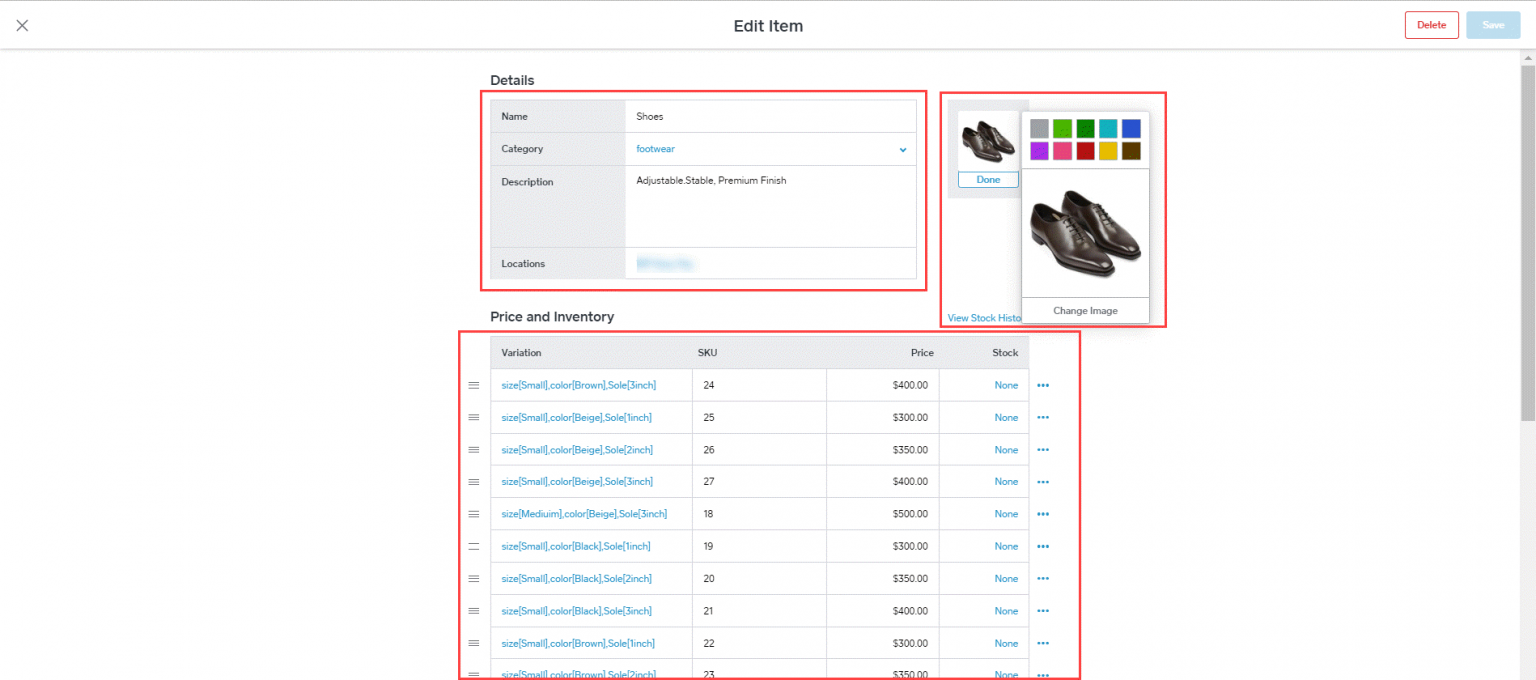
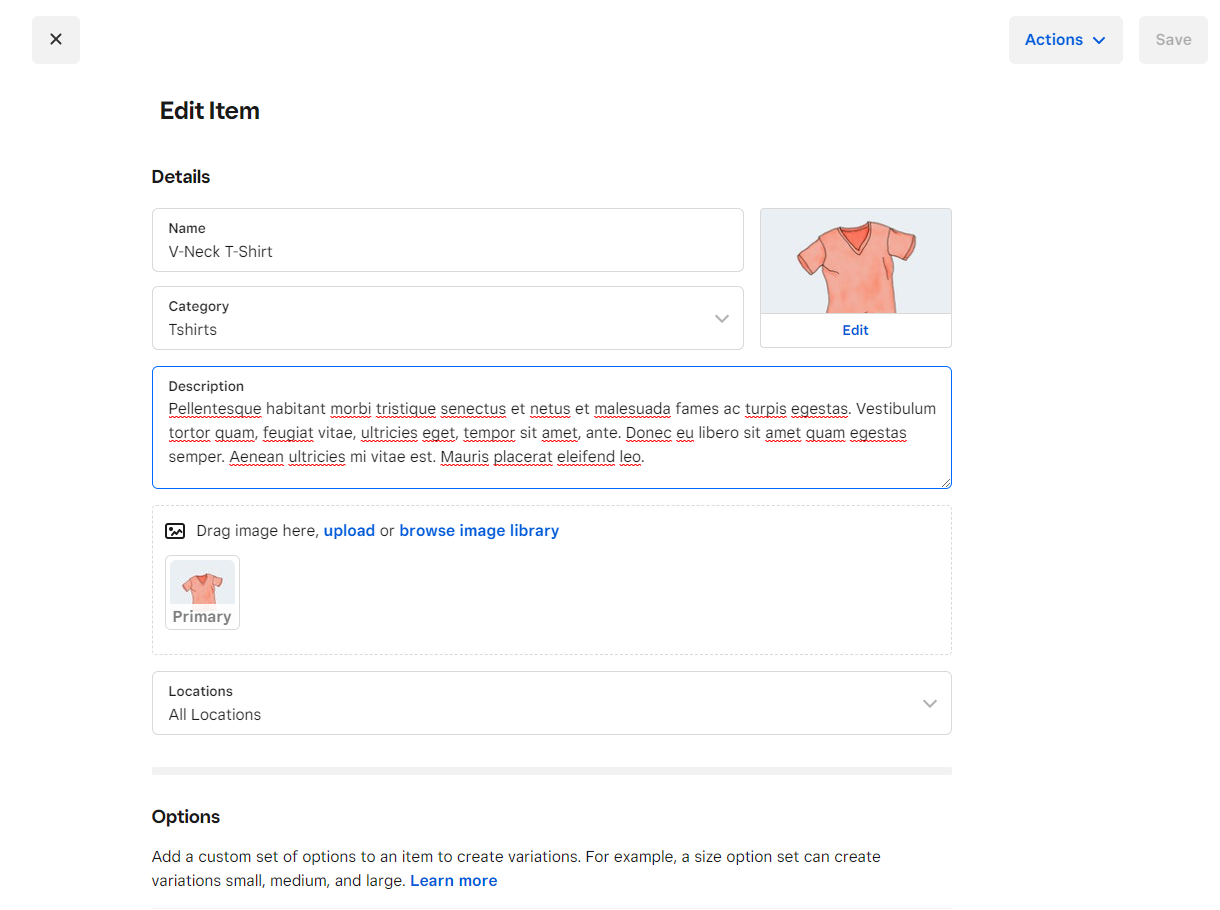
- After clicking on create an item button, page will be redirected where item details can be elaborate.
- Details like name, category, description, location, and image can be defined.
- Price and inventory details of the respective item can also be defined on this page, details can be set in Unit Type, Price, SKU, Stock, and Low Stock Alert.
- After you have entered the product details, click the save button.
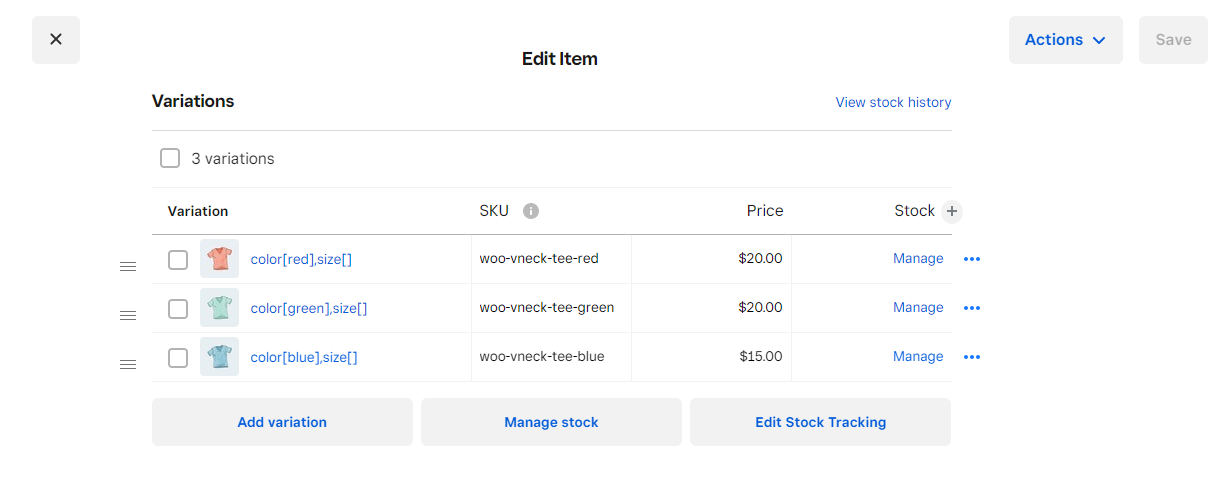
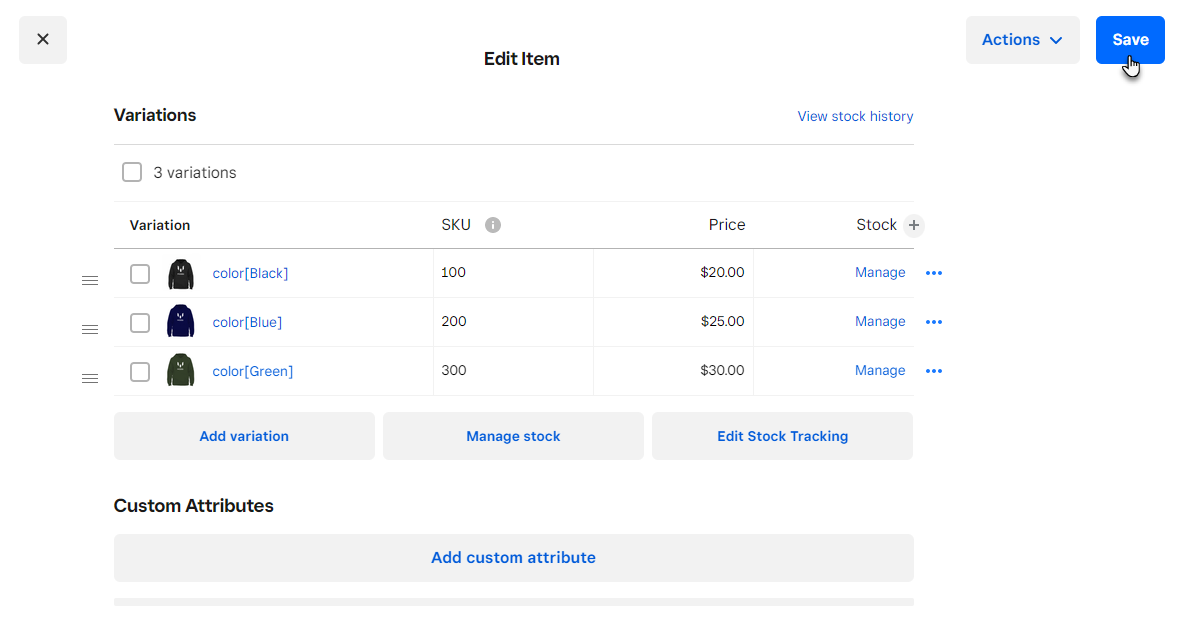
- Variations can also be added to the product by clicking on Add variation. Custom Variation Attributes will be provided for every individual variation being created, to create multiple variations click create and add another button .click done button after the required or preferred variations have been created.
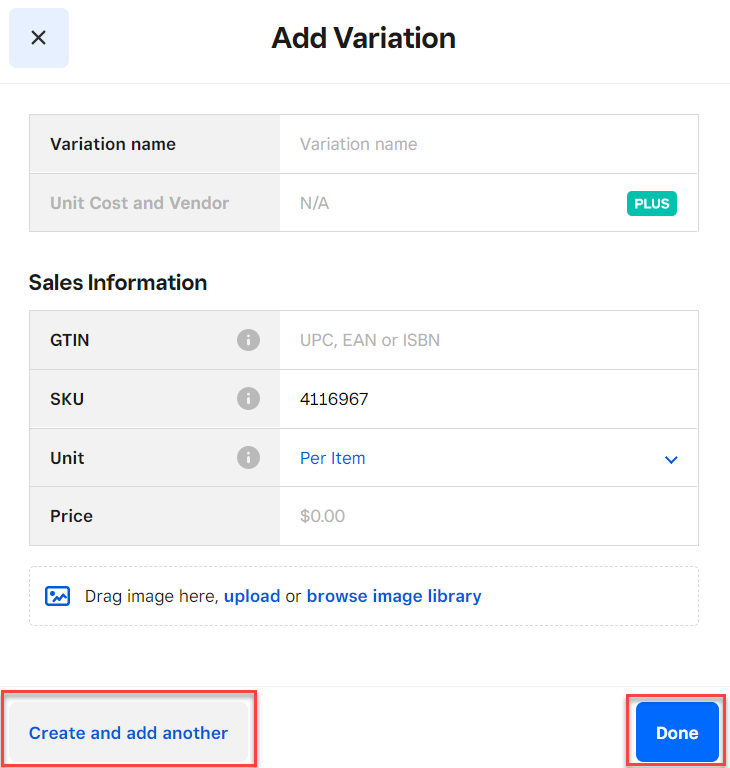
- After the variations have been created click the save button.
- Variations have to be created correctly. Example: color[blue], size[small].
- In the below example, size is the global attribute created in Woosquare Pro.
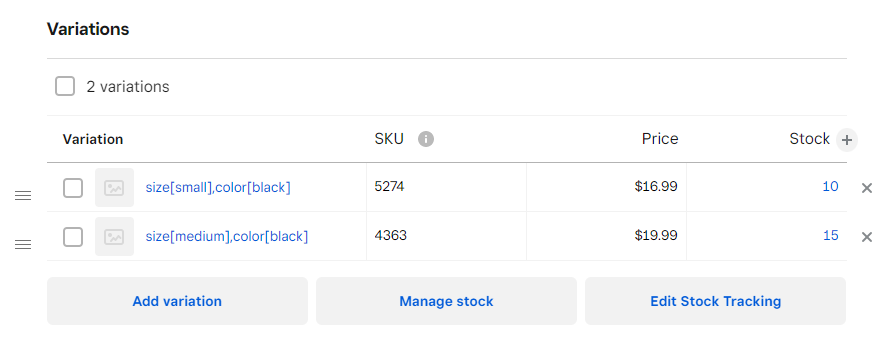
- Items will be created and listed in the item library page.

Synchronization from Square to Woo
To synchronize the product from Square to WooCommerce access the WooSquare item sync module and update the settings according to the requirements.
Goto→Woo Square→Sync Products
- Set auto synchronize to on.
- Make sure to select Square product override WooCommerce product option to synchronize Square products to WooCommerce.
- If you are selecting sync preference for specific products make sure you include this product in your selected specific products then update.
- Click the save changes button.

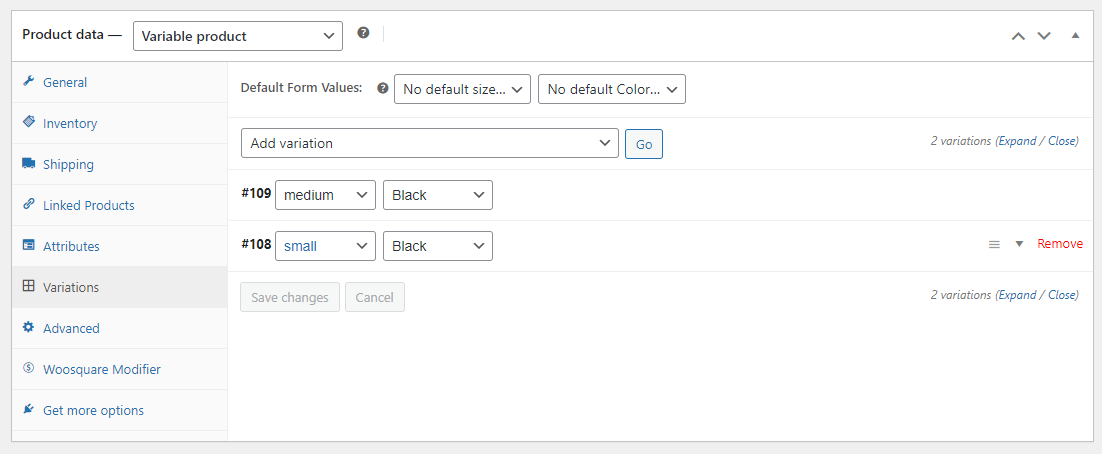
- When synchronization is completed, item will sync in WooCommerce products with all product details. If the item is created with variations, it will be automatically synchronized with all its variations and as a variable product in Woocommerce.
Manual synchronize with simple/variable product and global/custom attributes
- For the product to be synchronized manually, the Sync Products tab has to be accessed.
- When the Sync Products tab opens there will be a button for Synchronize Square to Woo, Click that button.
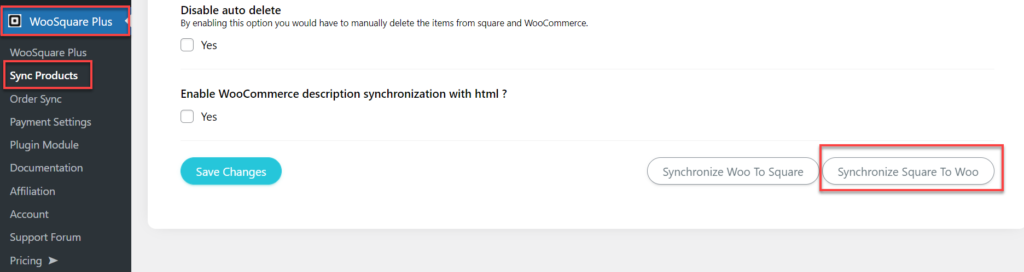
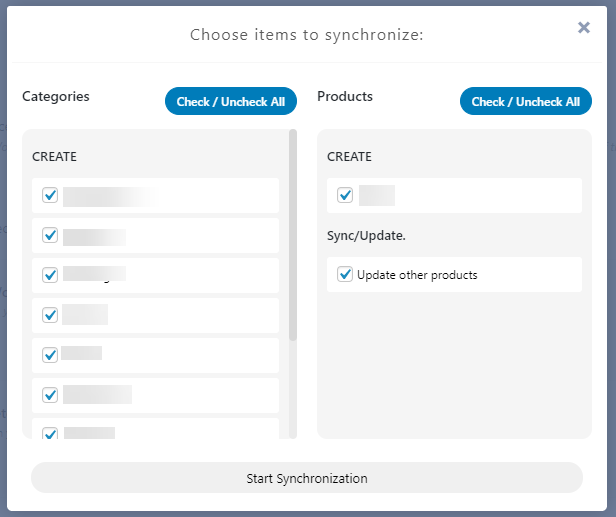
- As this button is clicked it will display a popup box, which will have the settings for synchronization then you can select the categories and products through selecting them by the checkmark.
- Click the start synchronize button to start the synchronization, plugin will synchronize all selected categories and products one by one even detecting a new item in WooCommerce if a new item is found from Square inventory.
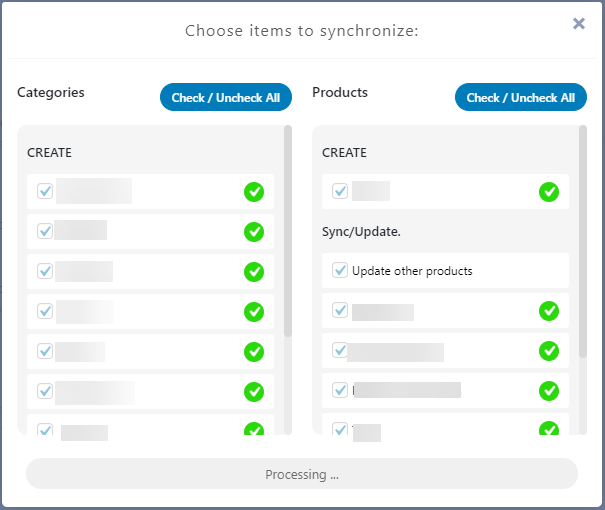
- All the product detail is fetched from Square and being synced to WooCommerce in real-time.
- The product created and used for synchronization is a simple product i.e. without any variations, the product will automatically be synchronized as a Simple Product in WooCommerce.
16.3.Stock Sync to Woocommerce via Webhook
Back-End Configuration
- Stock Sync is a Square feature that allows you to synchronize product stock automatically without manually synchronizing.
- Update the stock count in the Square, it will automatically update the stock count in Woocommerce.
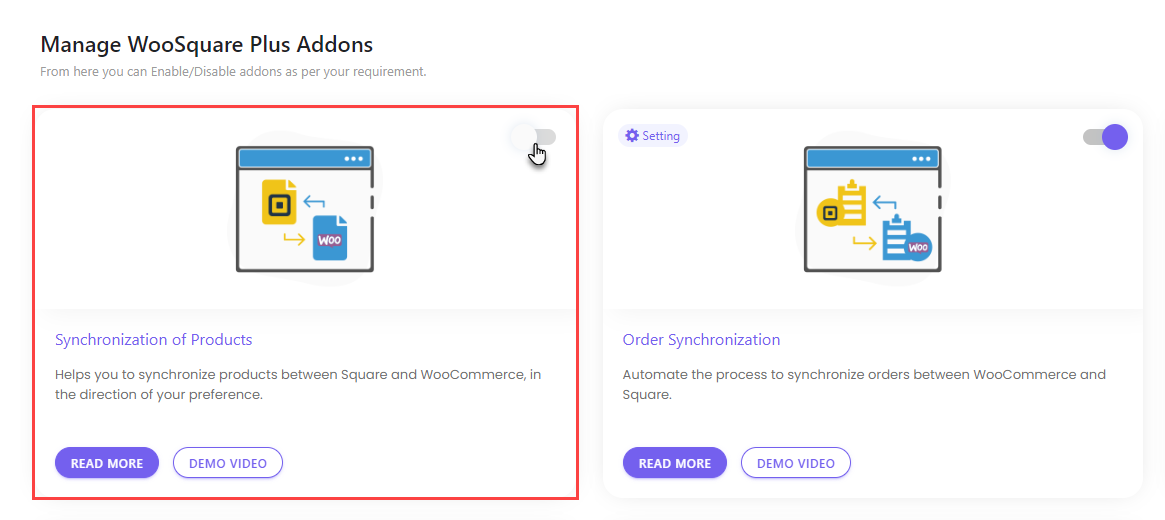
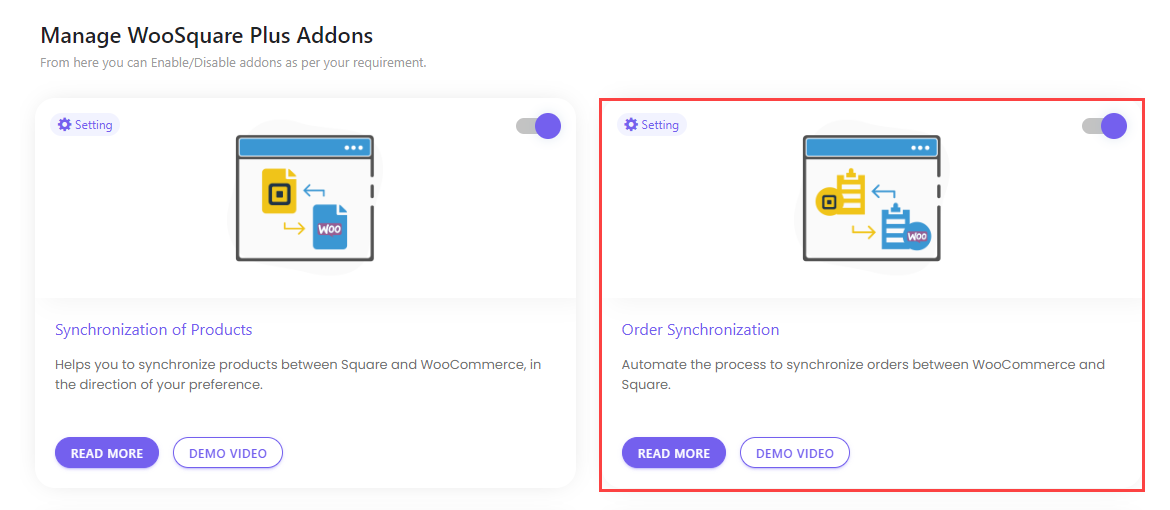
- Navigate to the WordPress Admin Dashboard → WC Shop Sync → Plugin Module to activate your modules.
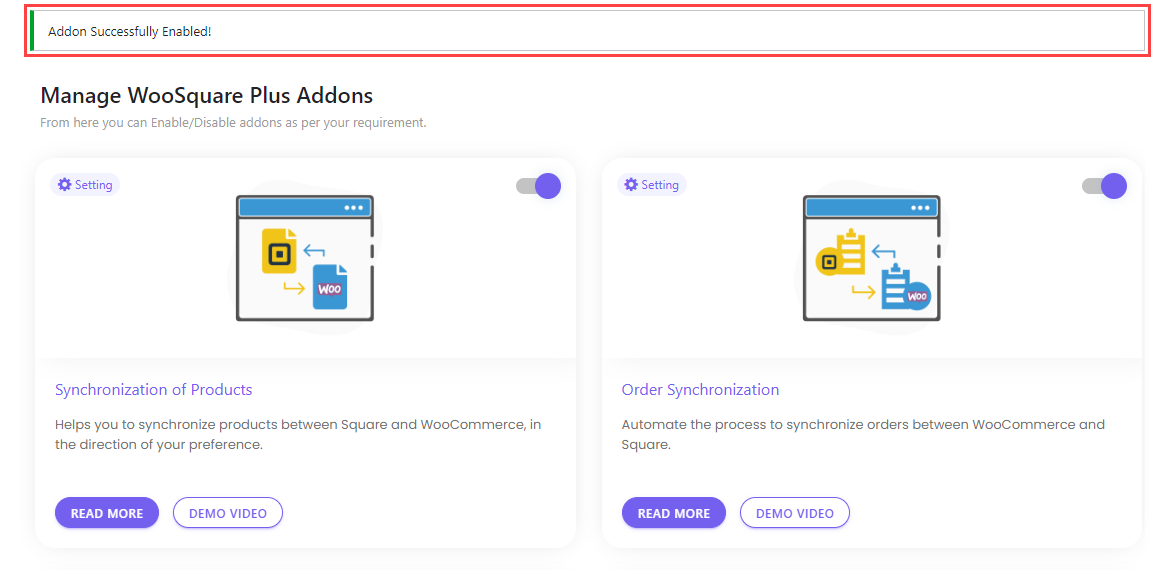
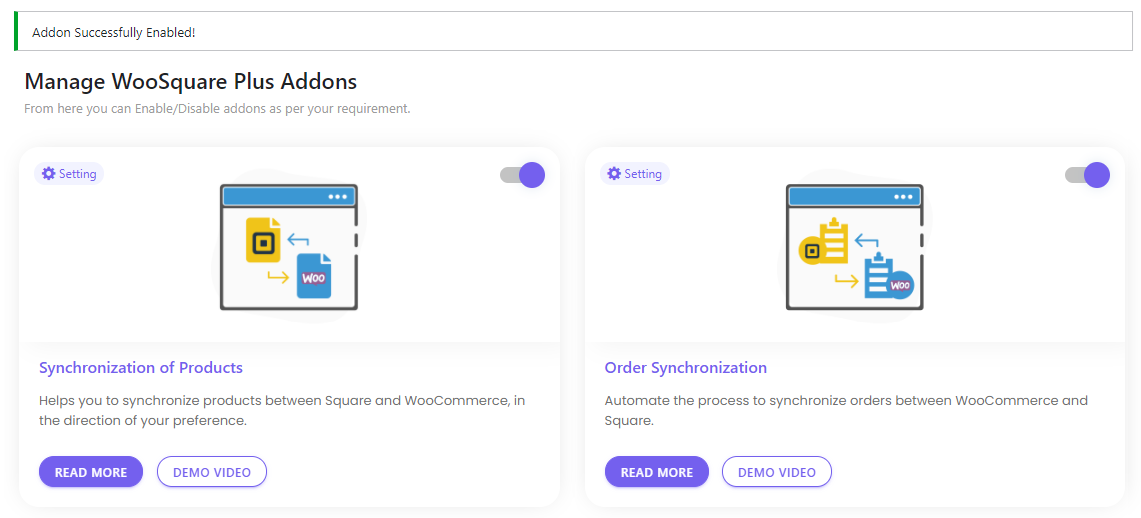
- Once you’re on the Manage WC Shop Sync Addons page, navigate to the Synchronization of Products module and enable it.
- Once done, a notification will appear at the top of the page “Addon Successfully Enabled!”.
- Once the Synchronization of Products module is enabled, an option titled Sync Products is added to the WordPress Admin Dashboard.
- Navigate to the WordPress Admin Dashboard → WC Shop Sync → Sync Products.

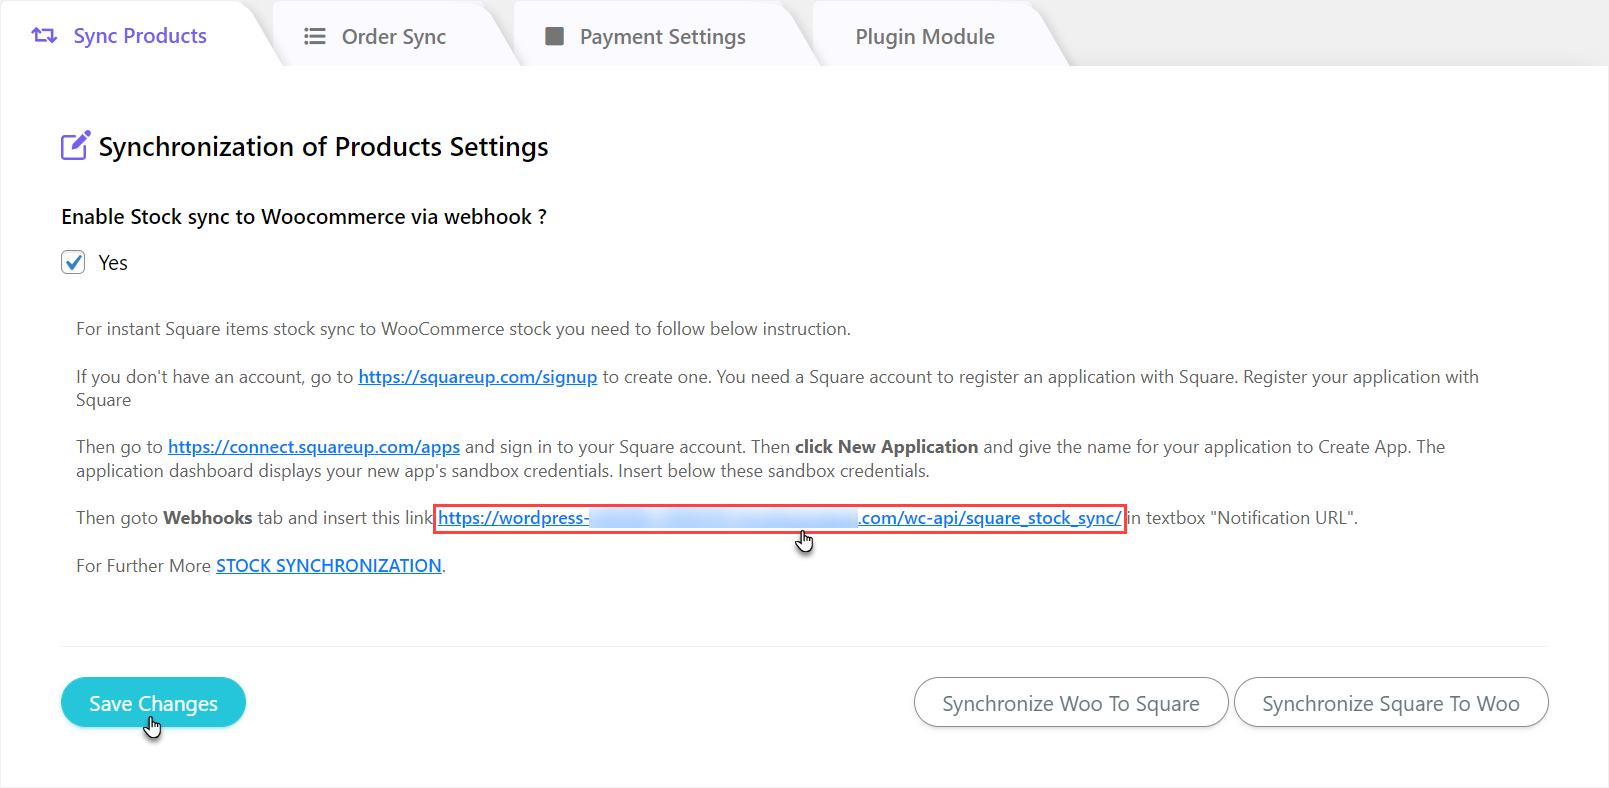
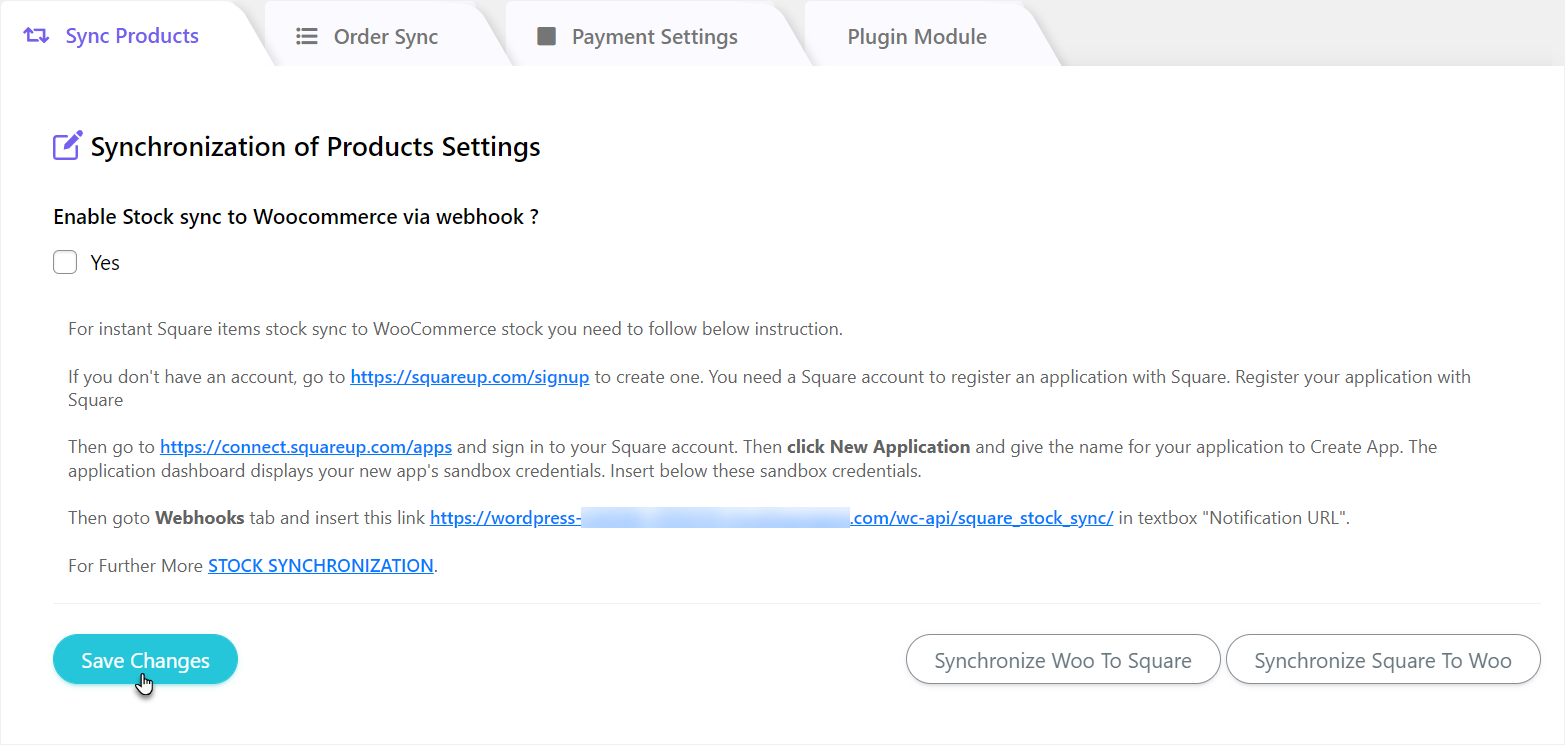
- Now you’re in the Synchronization of Products Settings tab.
- Navigate to the Enable Stock sync to Woocommerce via webhook? option and checkmark the Yes checkbox.
- Copy the link highlighted in the image below. This link will be used in the Notification URL field while creating the Webhook.
- Click on the Save Changes button.
- Once done, a notification will appear at the top of the page “Settings updated successfully!”.
NOTE: In order to use this feature, Sync on edit in WooCommerce option should be disabled.

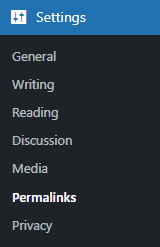
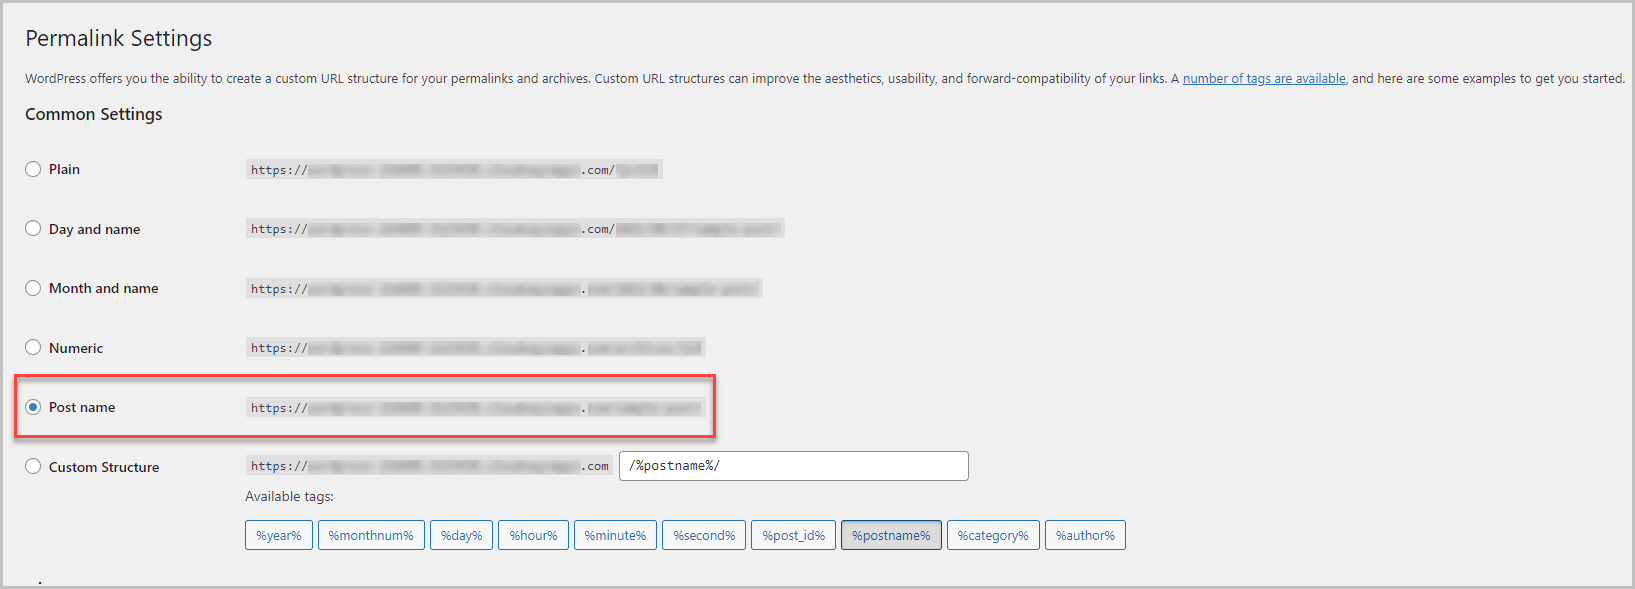
- Navigate to the WordPress Admin Dashboard → Settings → Permalinks.

- Now you’re on the Permalink Settings page.

- In the Common Settings section, select the Post Name radio button.
- Click on the Save Changes button.

- Once done, a notification will appear at the top of the page “Permalink structure updated.”.’
- Now log in to your Square account.
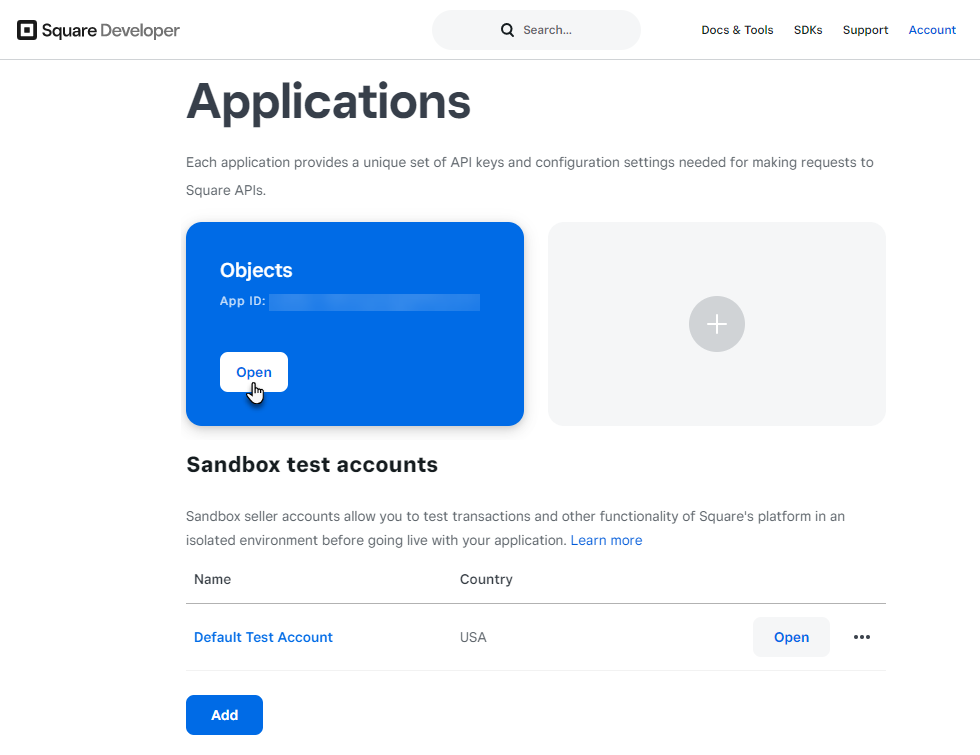
- Open https://developer.squareup.com/.
- Click on the Open button on the application.
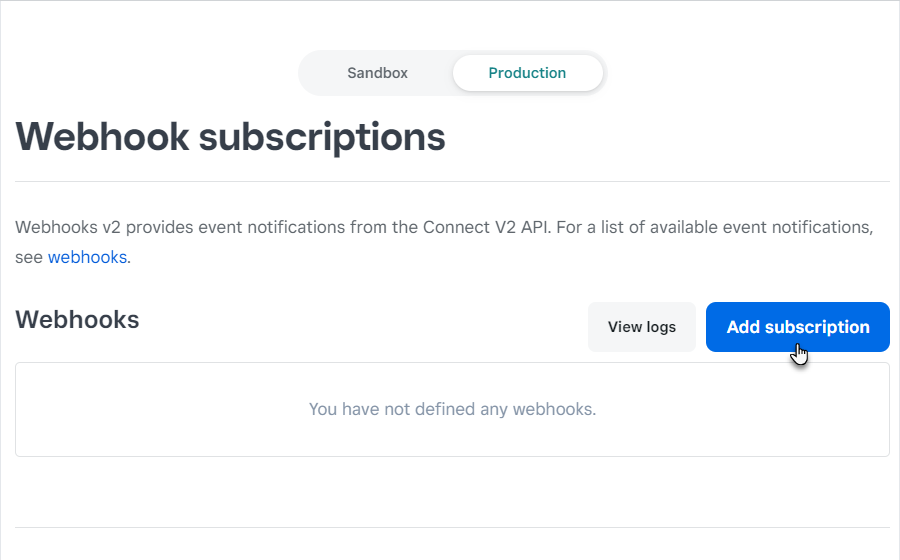
- Navigate to the Webhooks → Subscriptions on the dashboard.
- Click on the Add subscriptions button.
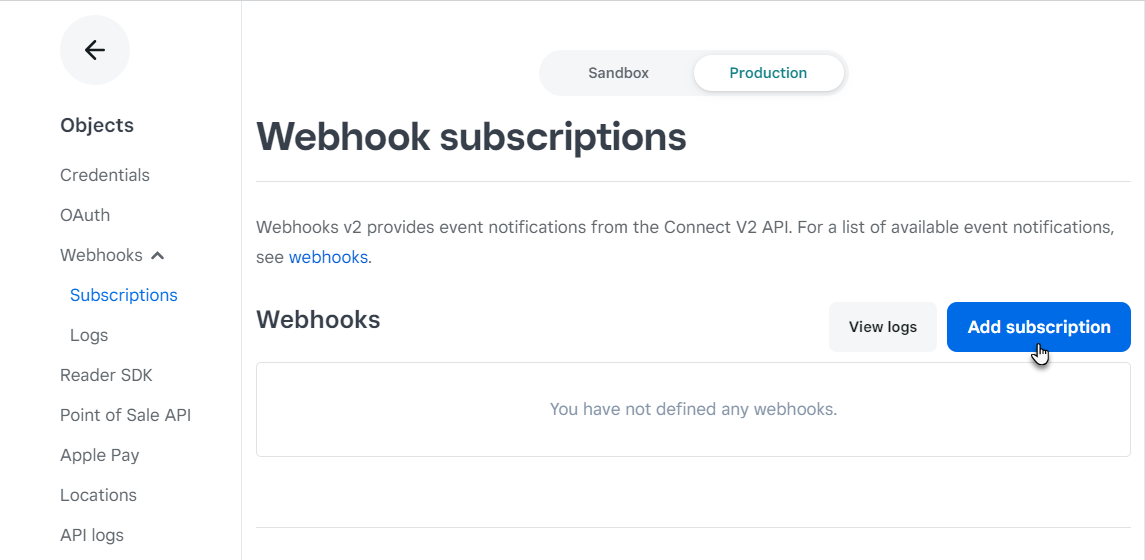
- Click on the Add subscriptions button.
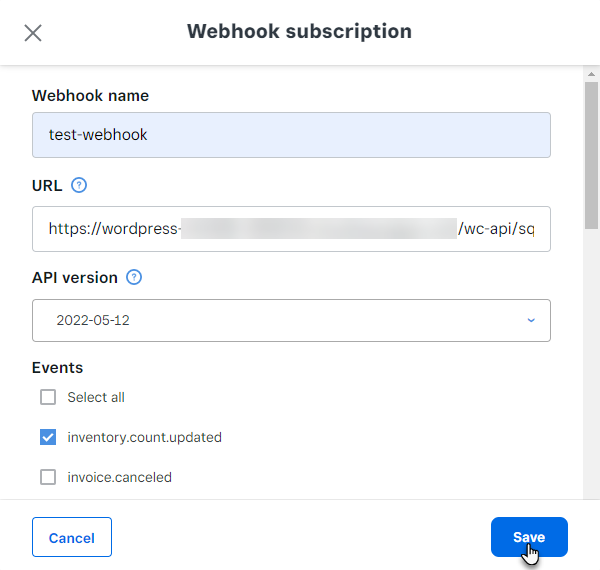
- Set the name of the Webhook.
- Enter the URL that we copied in the Enable Stock sync to Woocommerce via webhook? option.
- Select the API Version.
- Select the inventory.count.updated event in the Events section.
- Click on the Save button.
- Once done, the webhook will be successfully created.
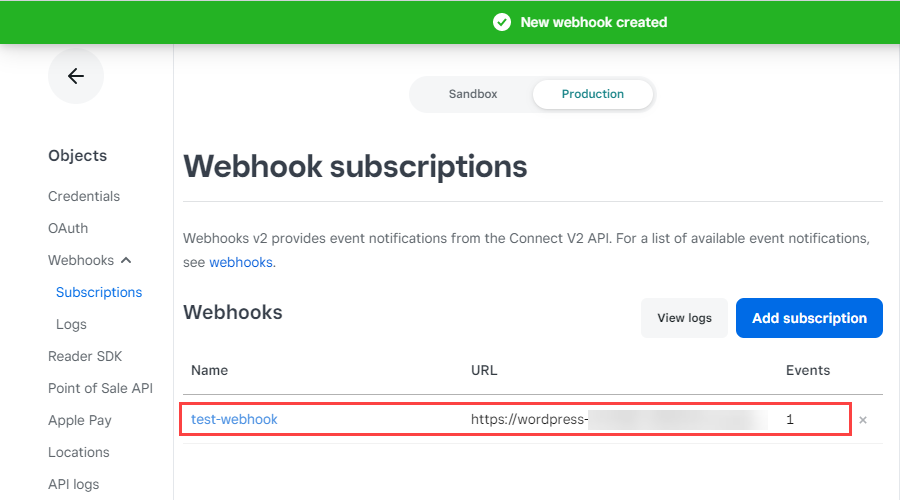
- Click on the webhook to view the details of the webhook.
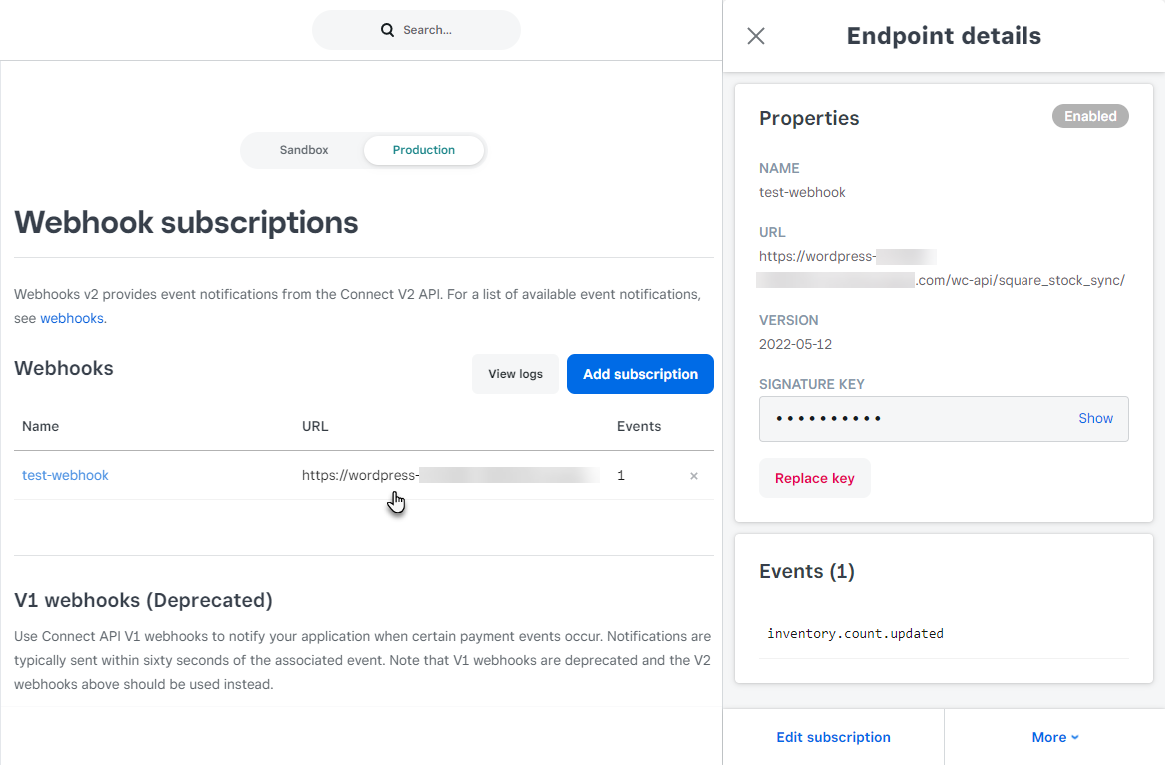
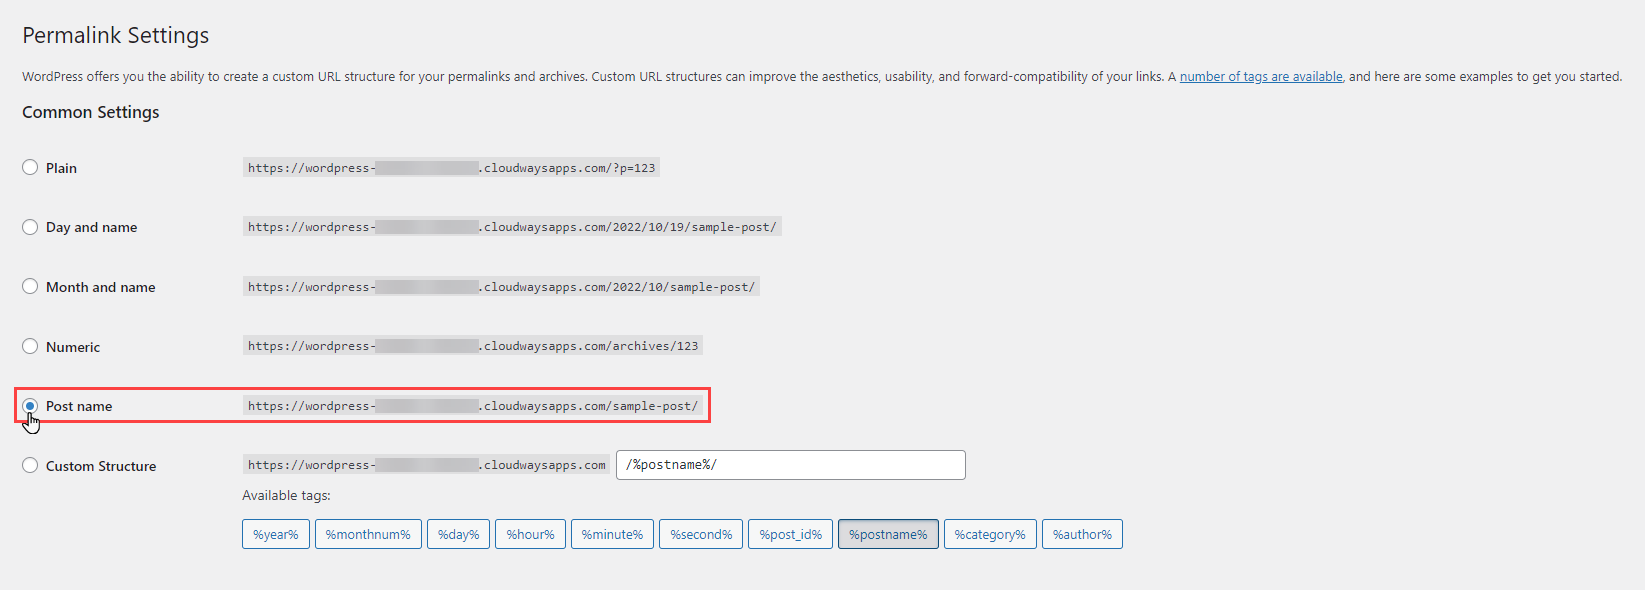
- Navigate to Account → Seller Dashboard.

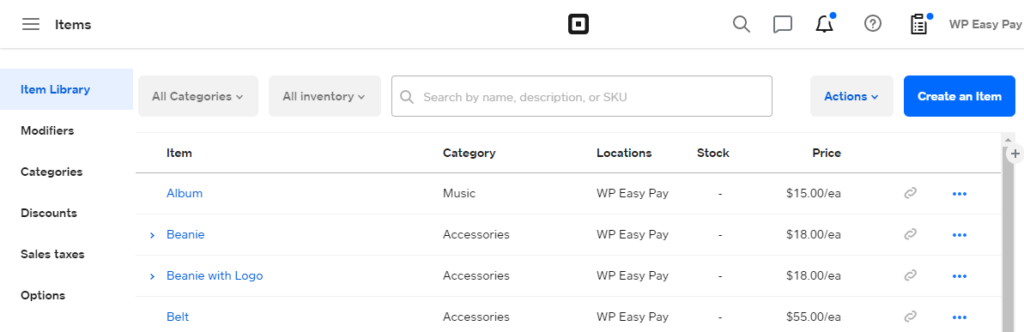
- On the left-hand side, a Quick access dashboard is present, navigate to the Items section.
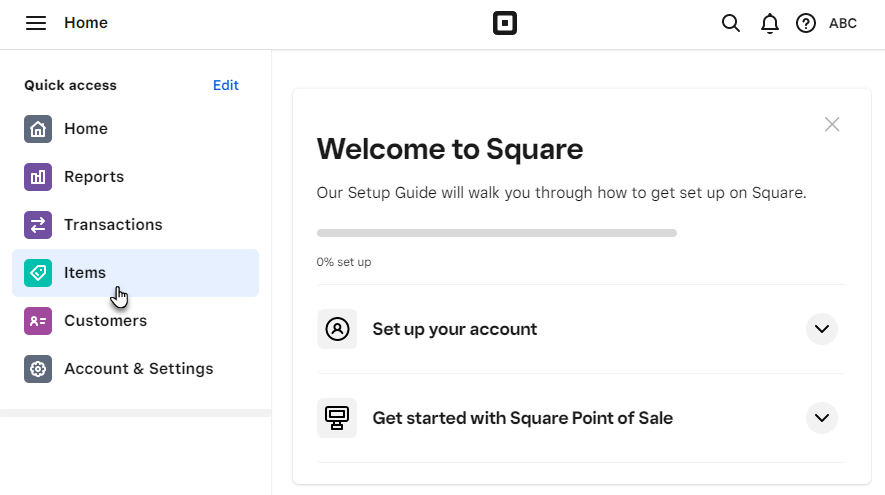
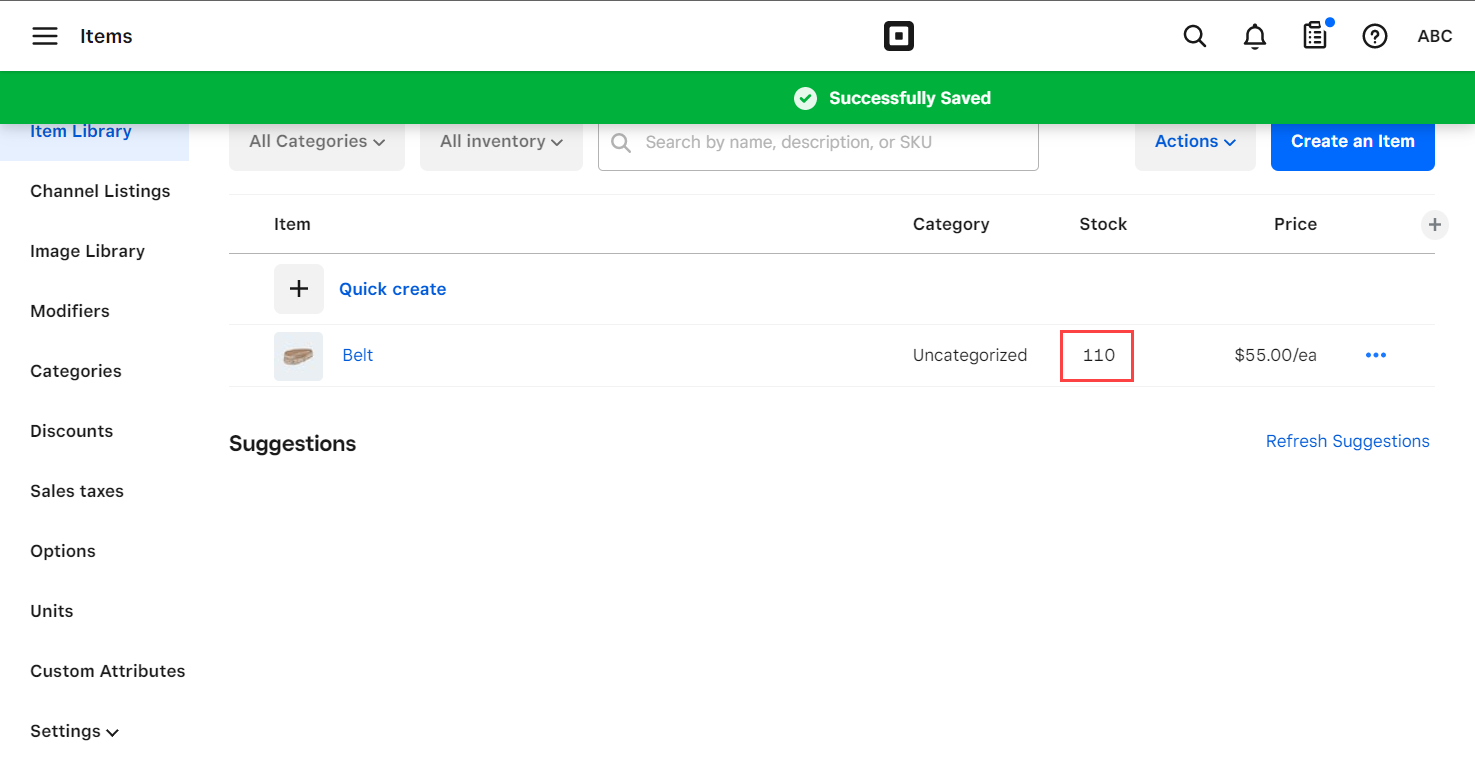
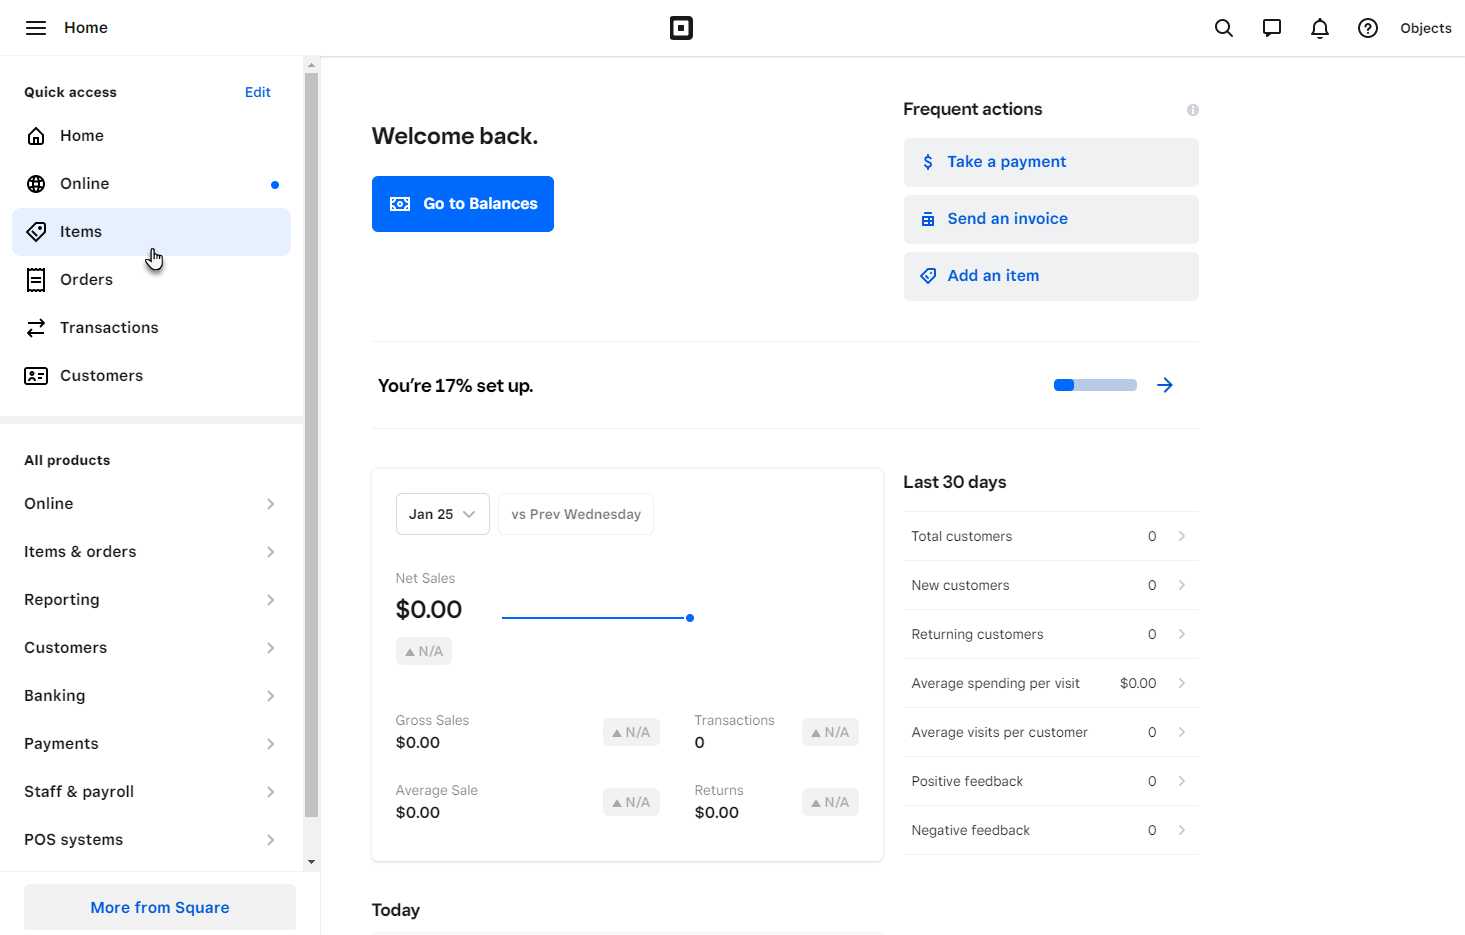
- Now you’re in the Item Library section.
- All the Items will appear in this section with details like Category, Stock, and Price.
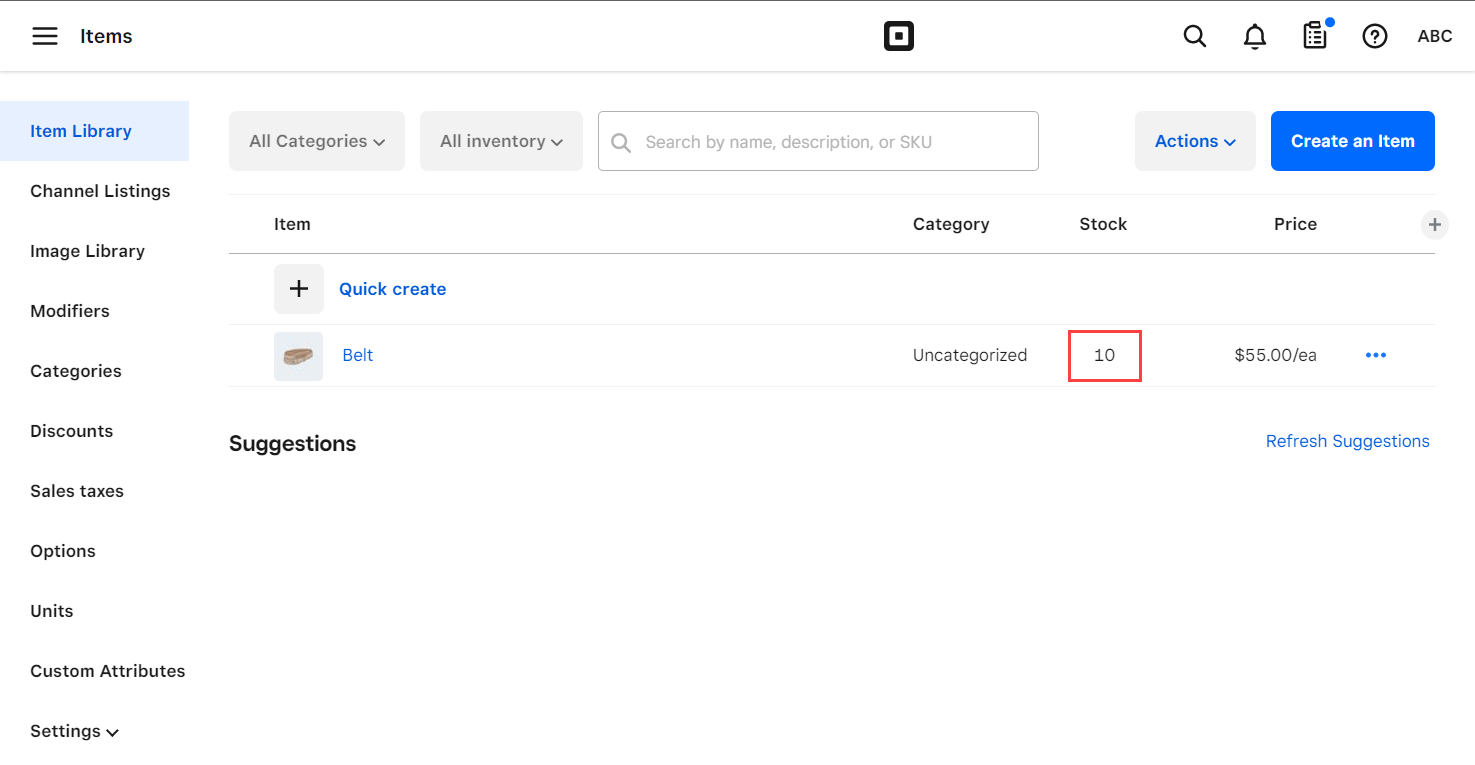
- Click on any specific item to open its configuration.
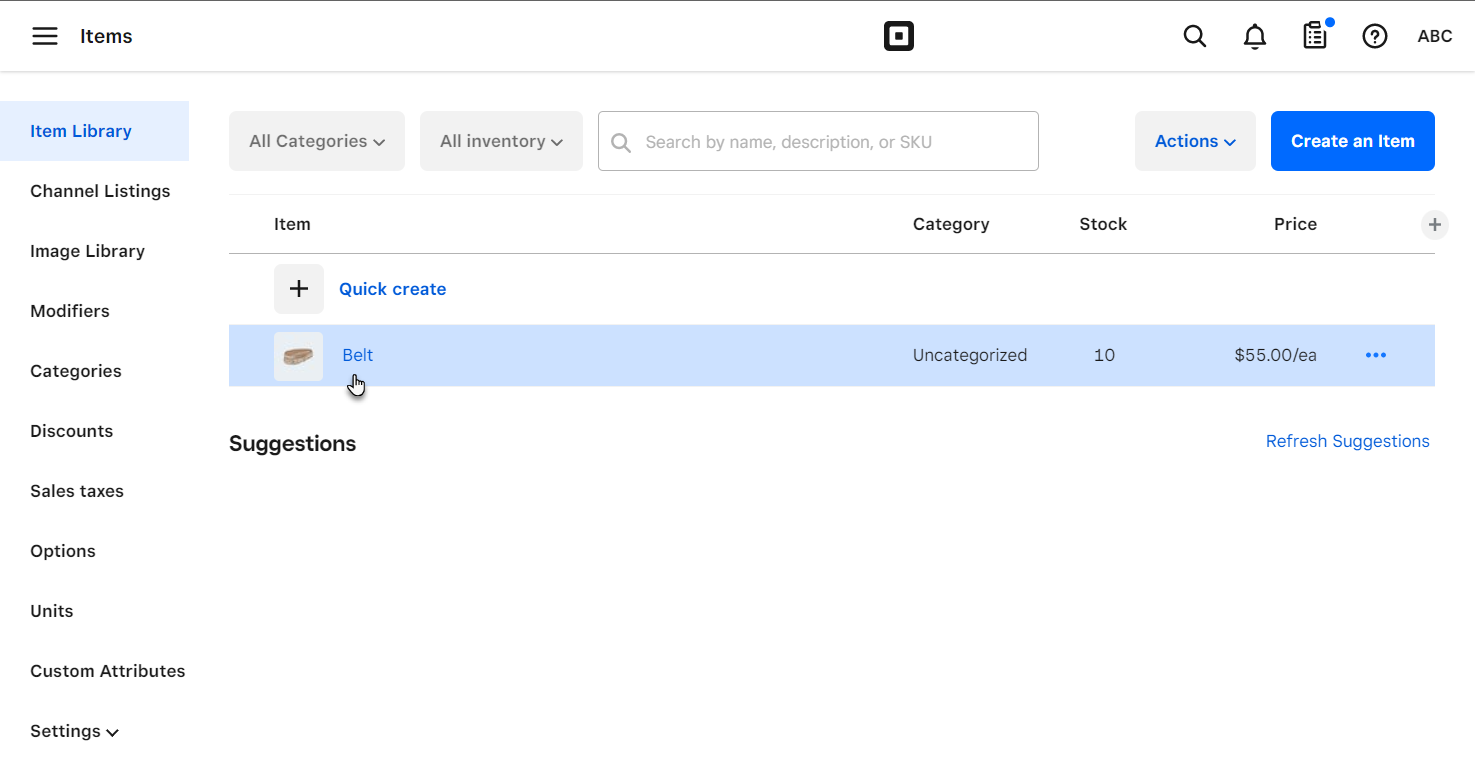
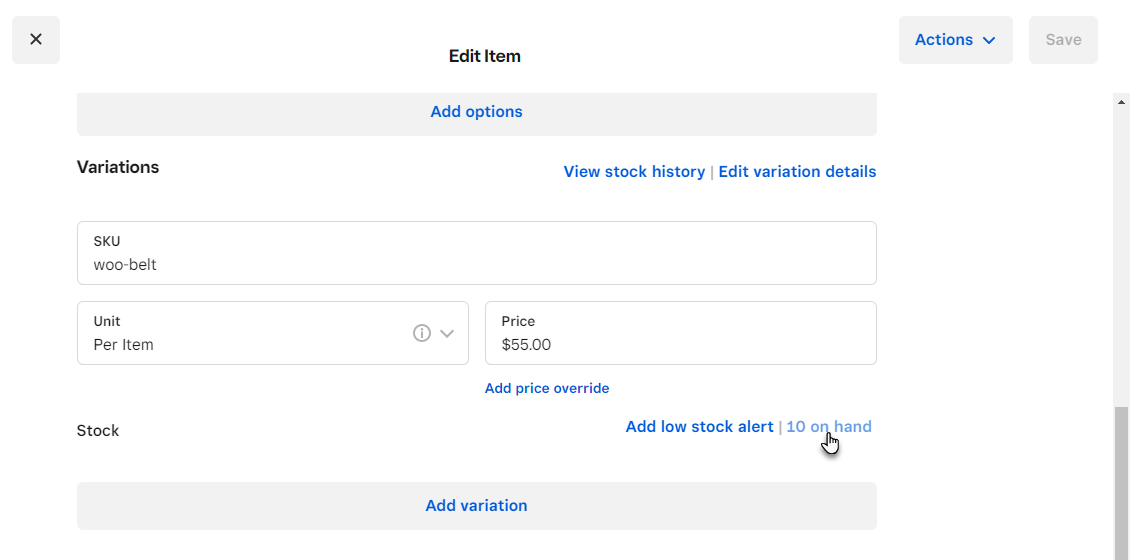
- Now you’re on the Edit Item page.
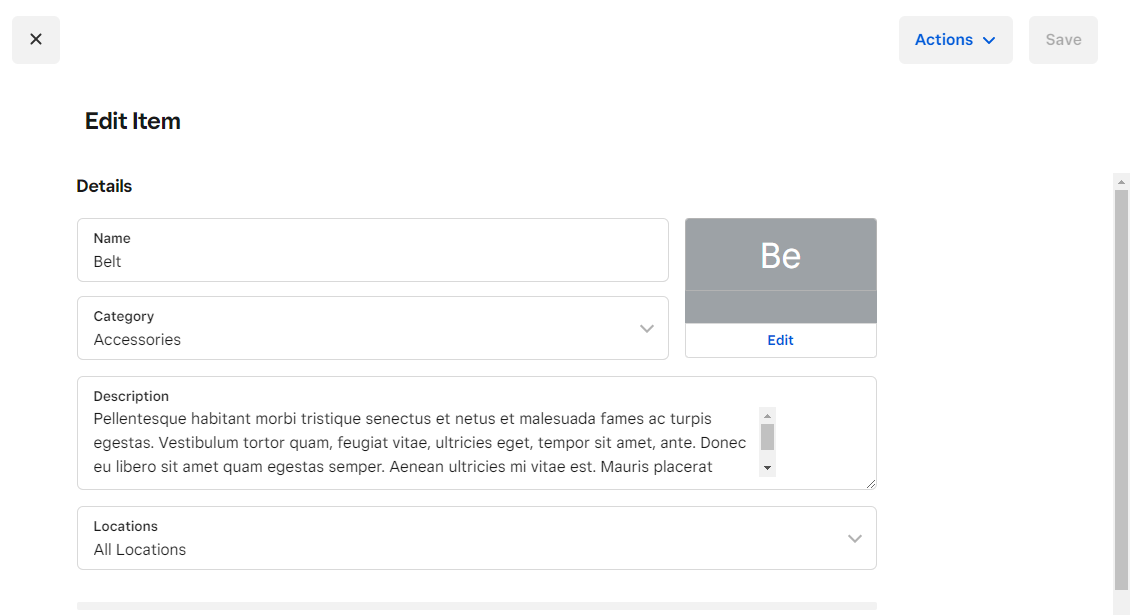
- Scroll down and navigate to the Stock section.
- A on hand section will appear which will highlight the number of items present in stock. The current stock of this item is 10 so it will appear like 10 on hand.
- Click on the 10 on hand button.
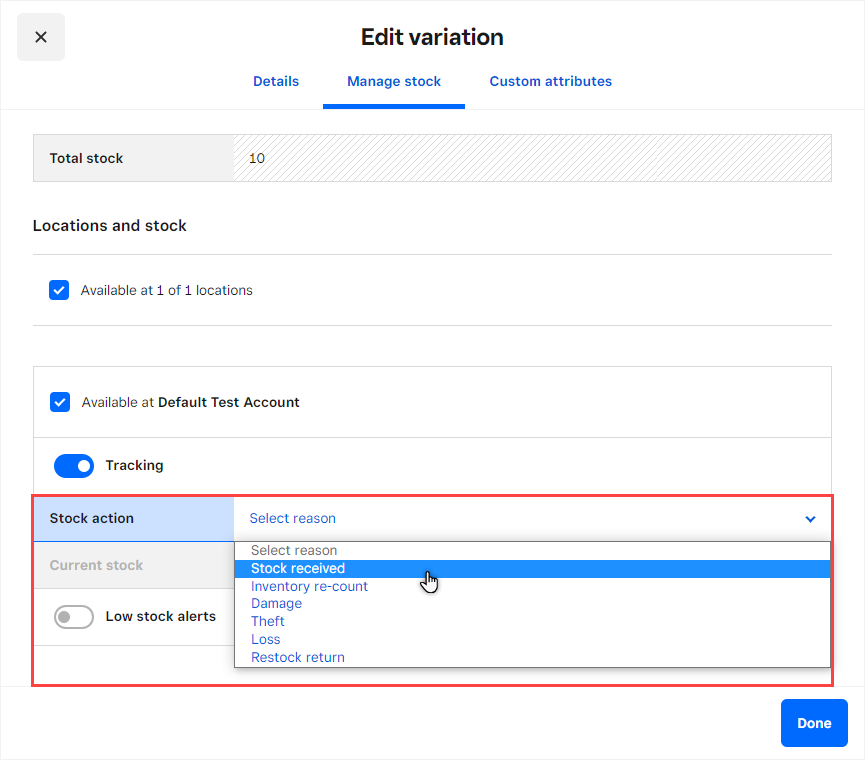
- In the Stock action section, click on Select reason and then select any option from the dropdown menu.
- Once the reason is selected, adjust the stock according to your requirement and then click on the Done button.
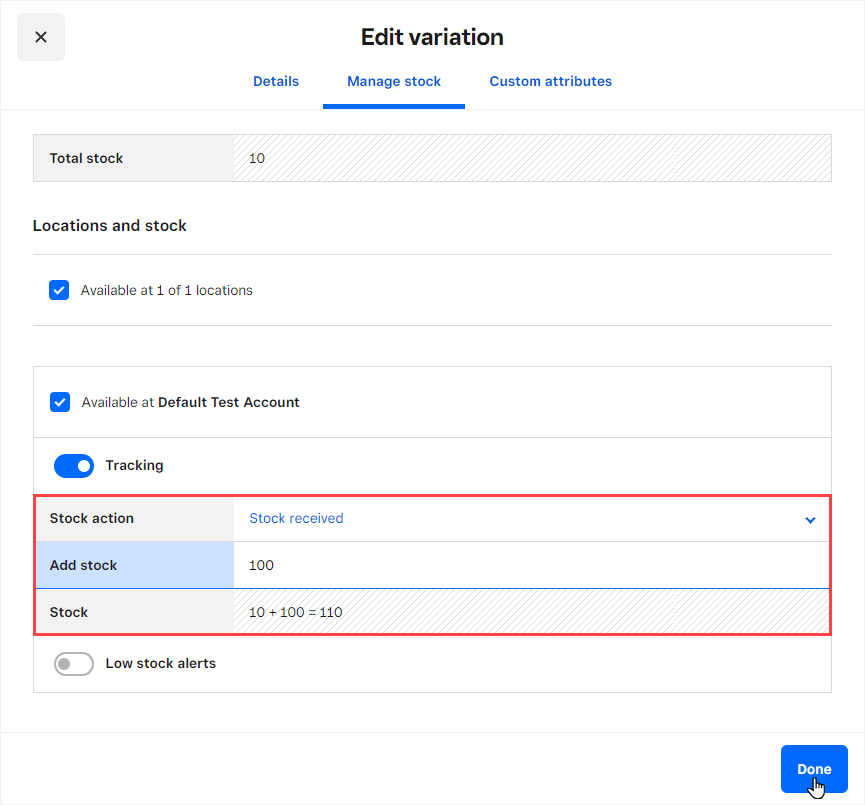
- The on hand button will be updated. The current stock of this item is 110 so it will appear like 110 on hand.
- Click on the Save button.
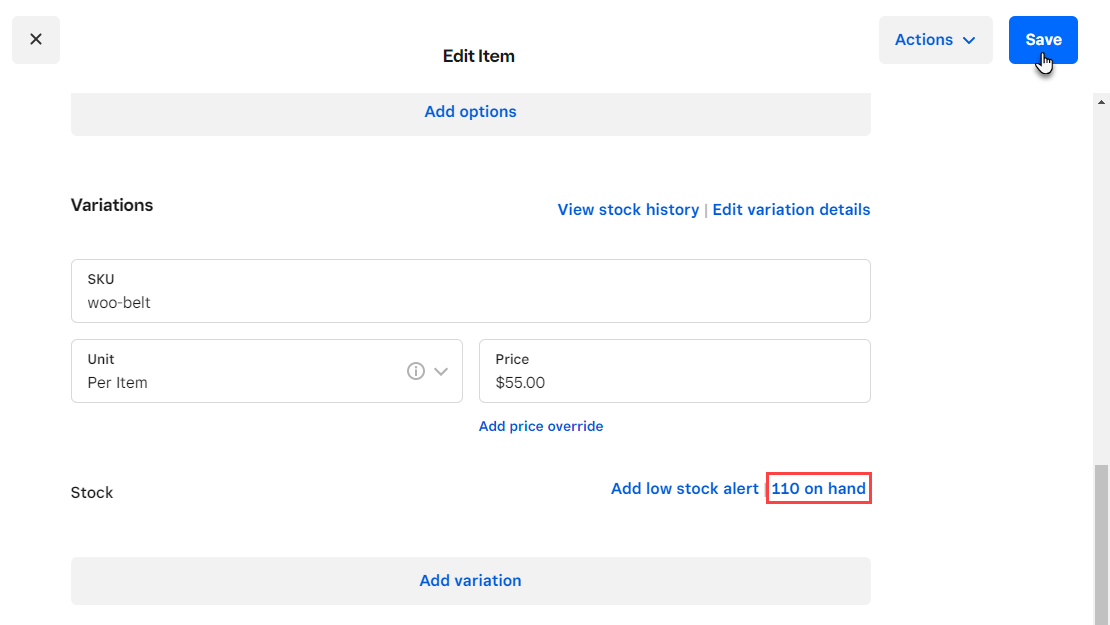
- The stock is updated on the Square platform.
- Now go back to the WooCommerce platform.
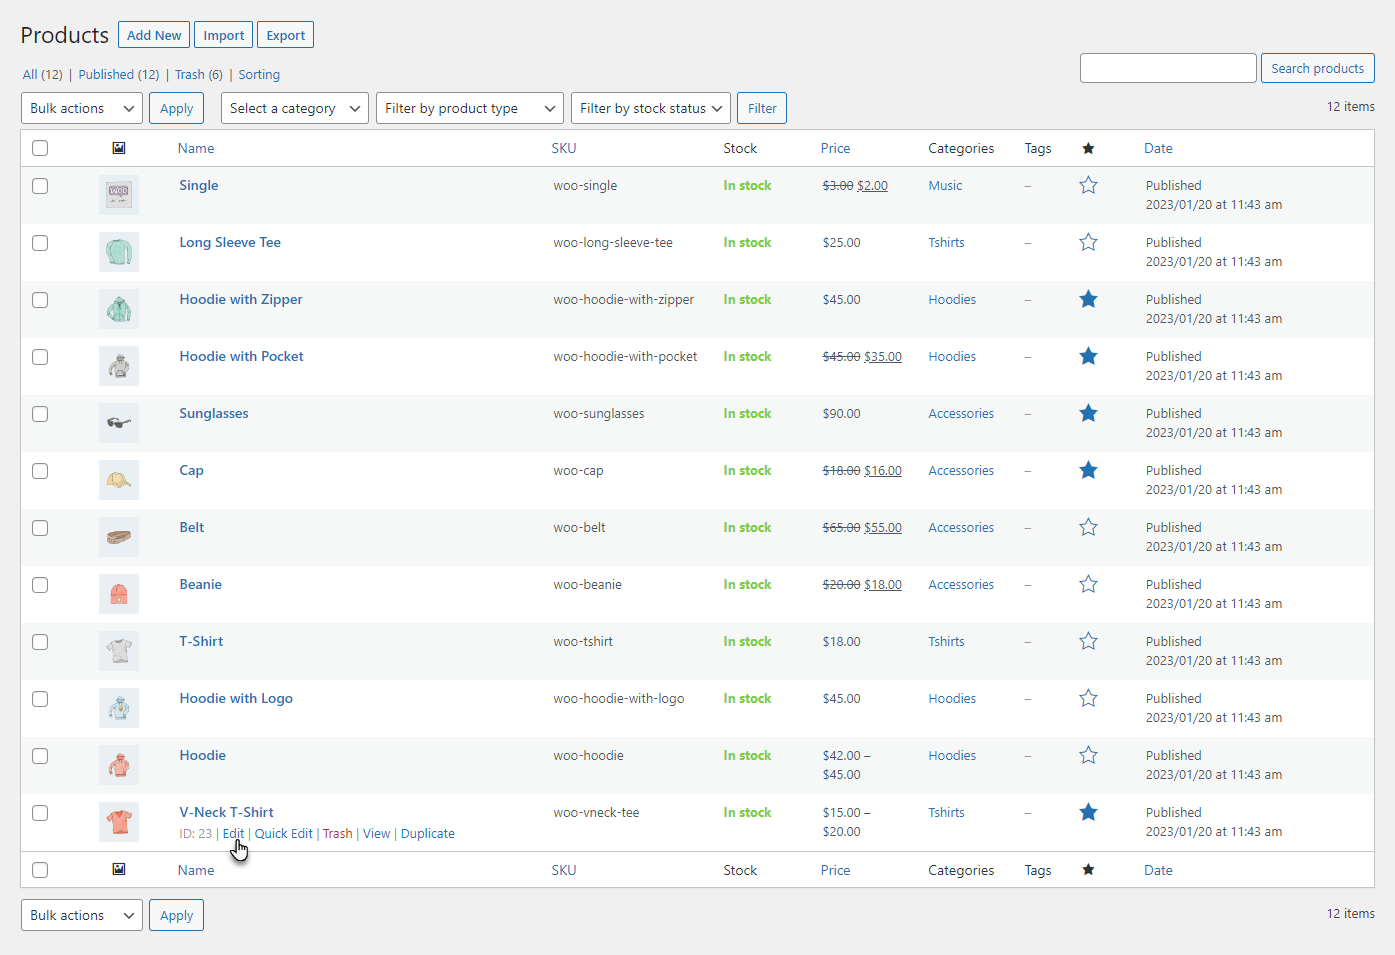
- Navigate to the WordPress Admin Dashboard → Products → All Products.
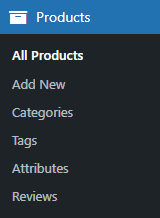
- Now you’re on the Products page.
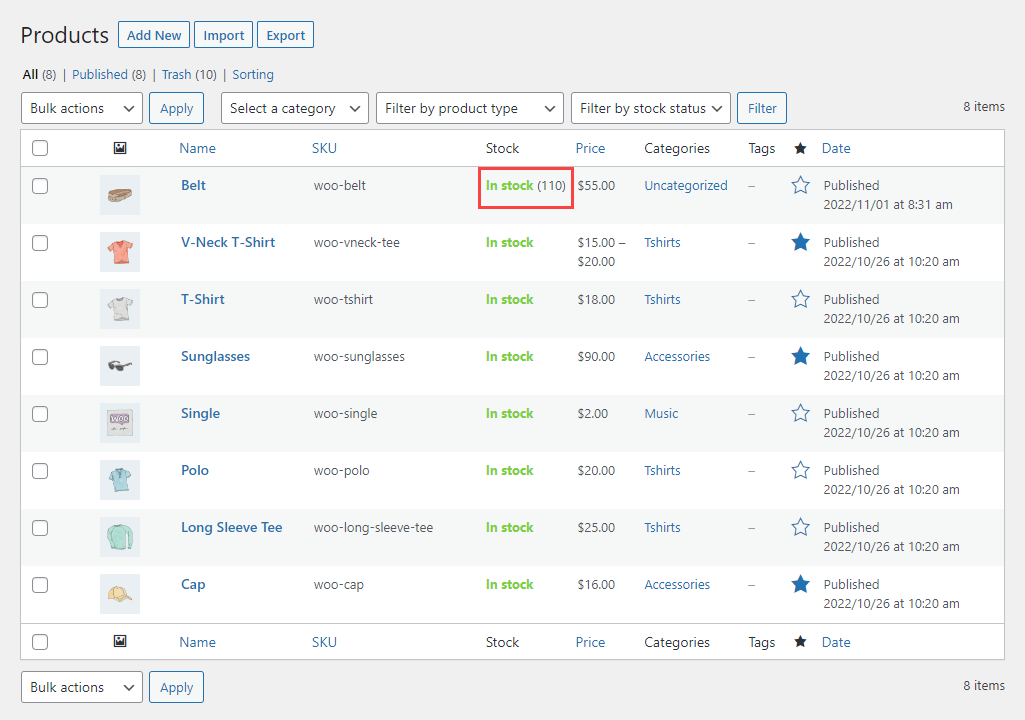
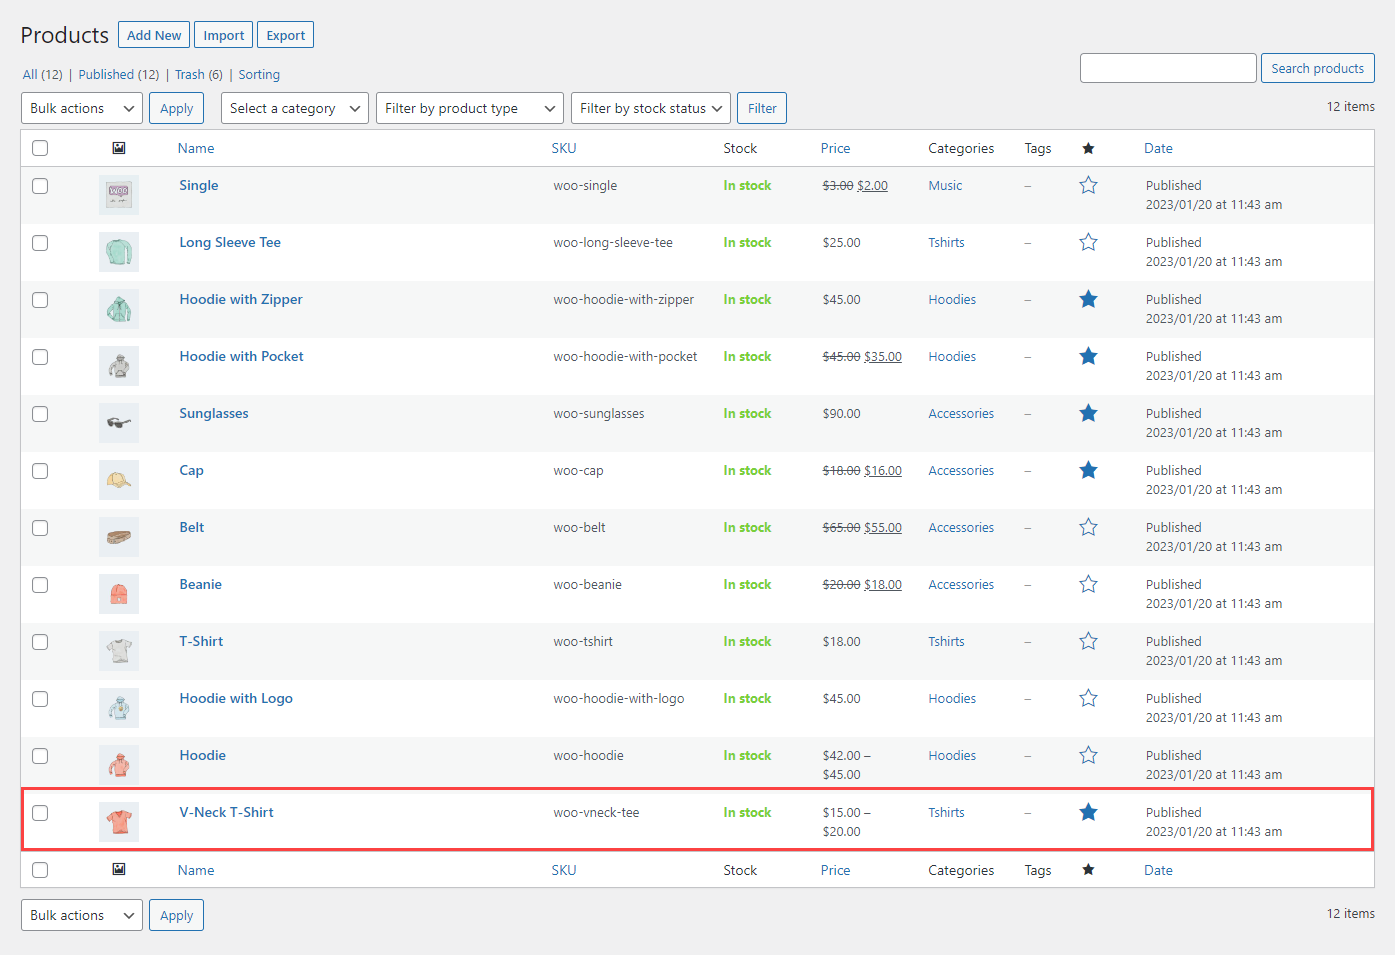
Product page – Before the Stocks were updated in the Square platform

Product page – After the Stocks were updated in the Square platform
17.Variation Image for Variable Products
In the Square platform, the images of each variation will now appear in the variable products.
17.1.Synchronize Woo To Square
Navigate to the WordPress Admin Dashboard → WC Shop Sync → Sync Products.

- Now you’re on the Products page.
- Now navigate to the variable product.
- Hover over the variable product to view suboptions.
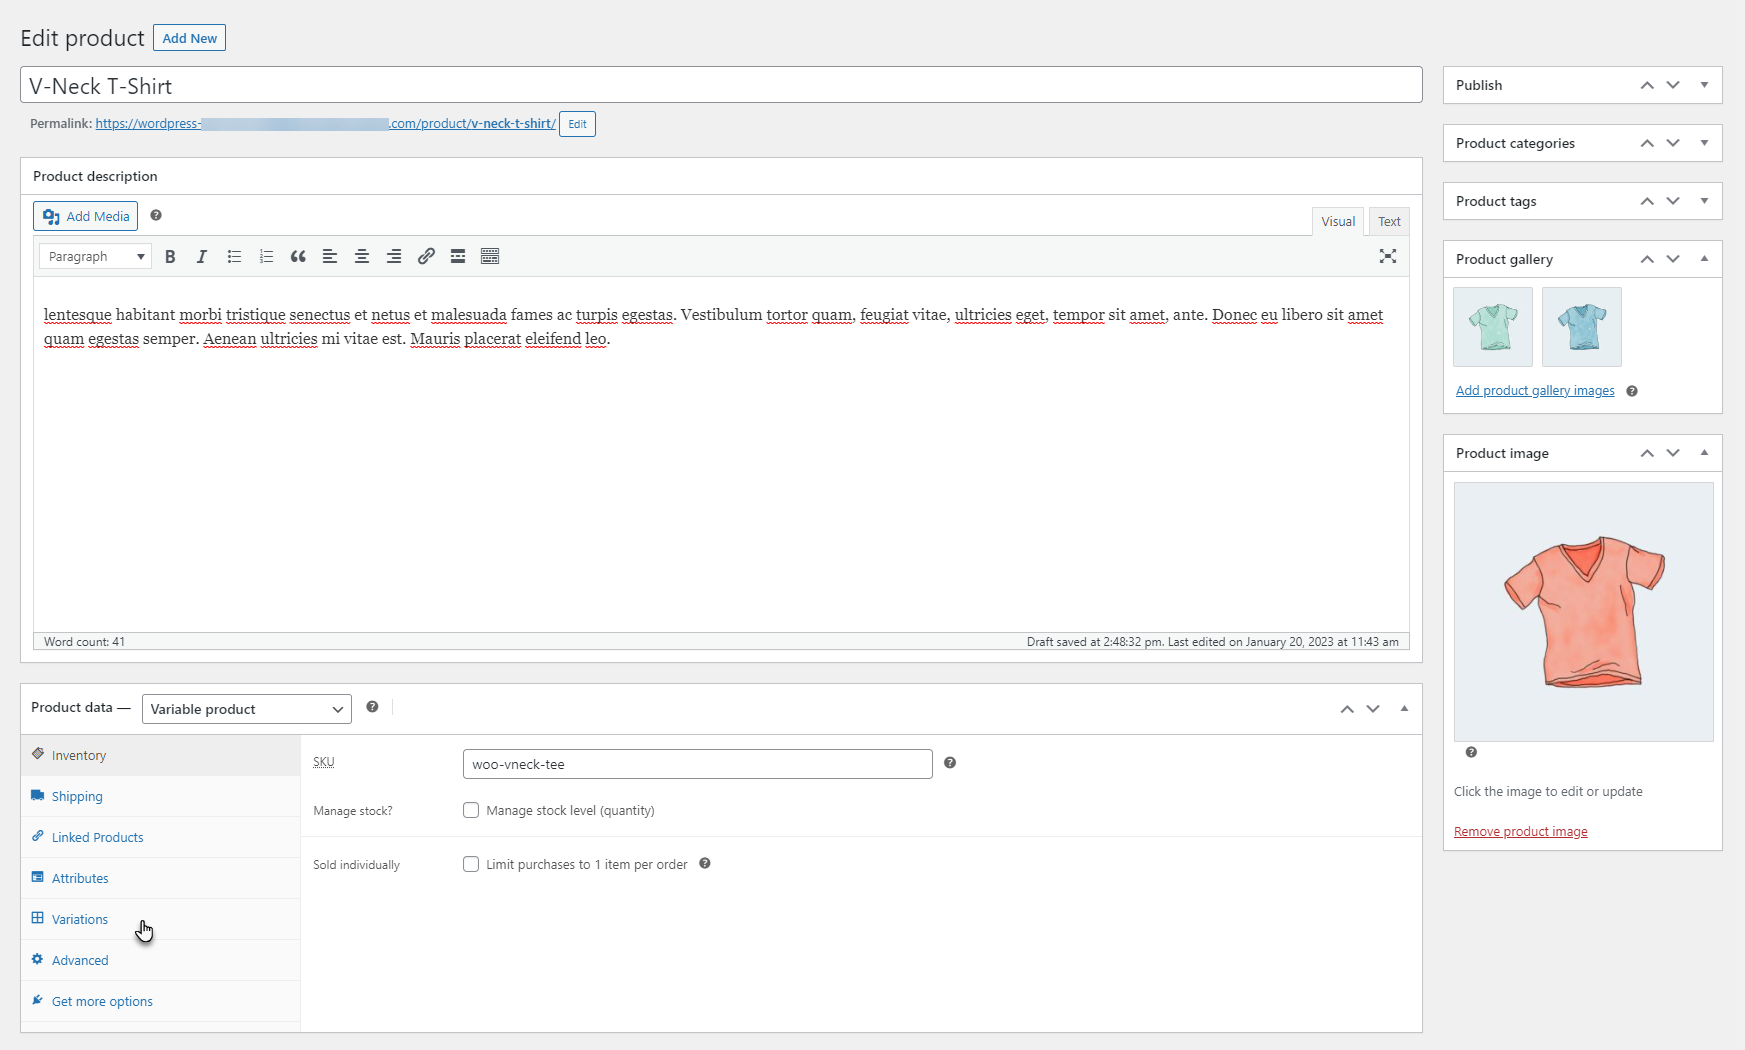
- Click on the Edit button.
- Now you’re on the Edit product page.
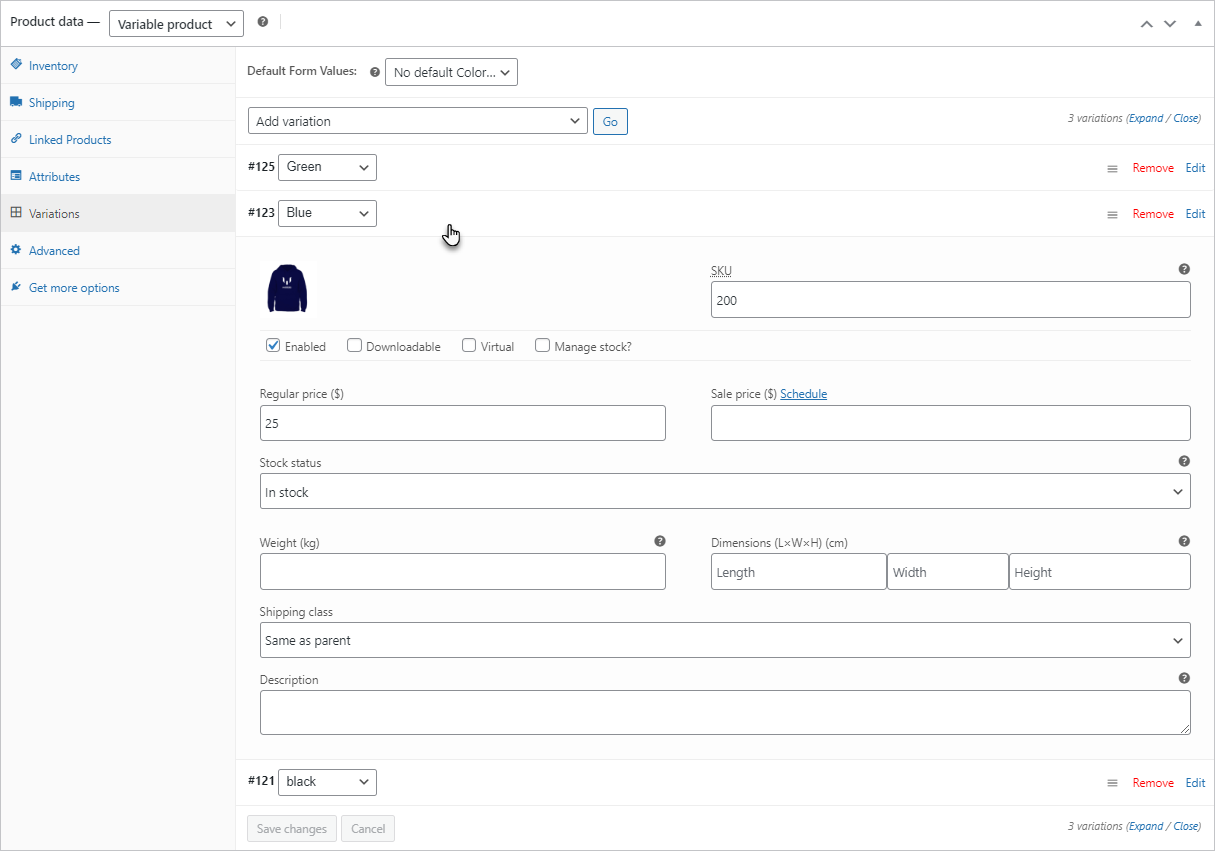
- Go to the Product data section.
- Click on the Variations tab.
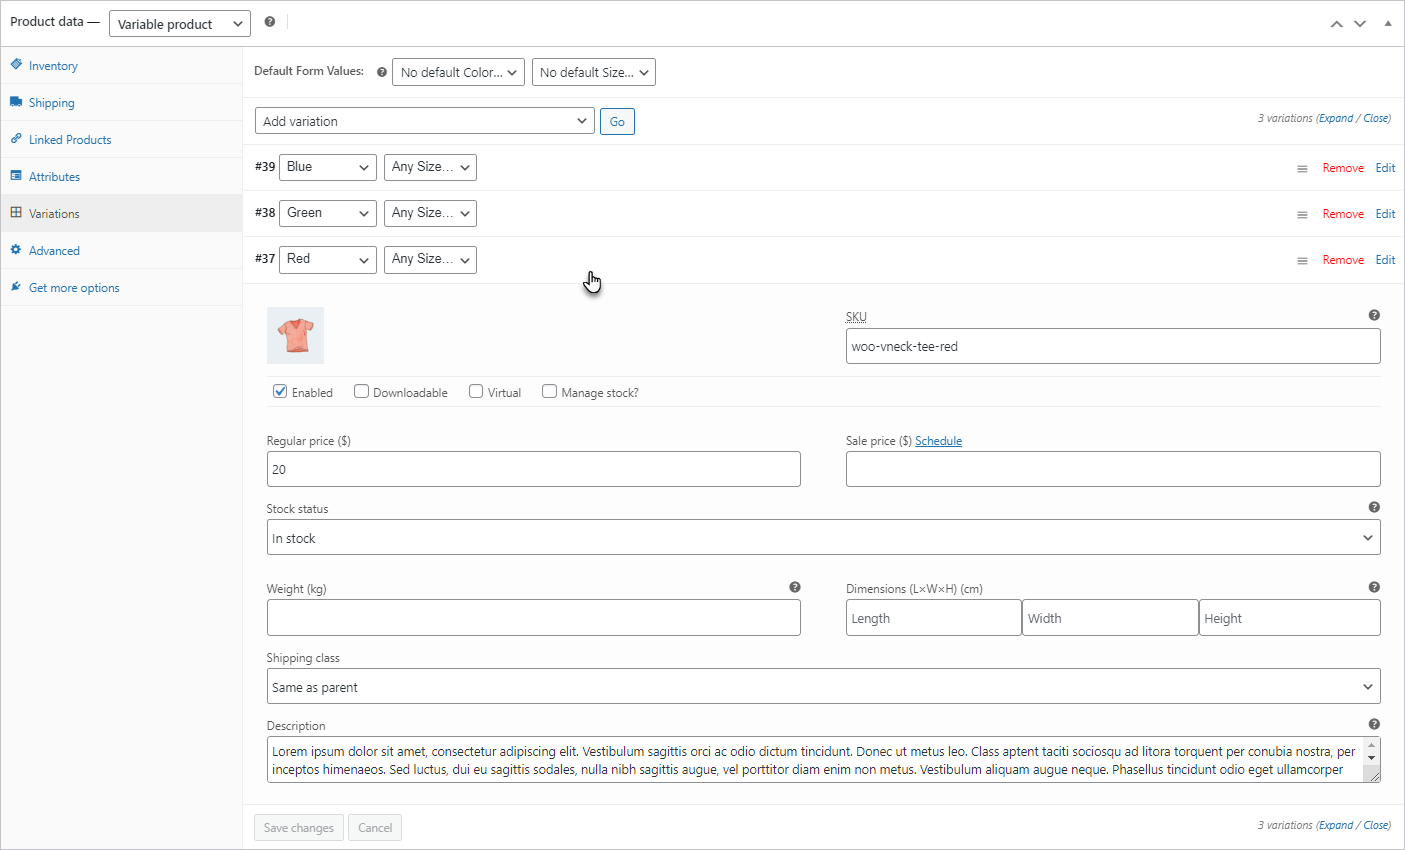
- In the Variations, all the variations are listed.
- We can see that there are three variations(Blue, Green, and Red) available.
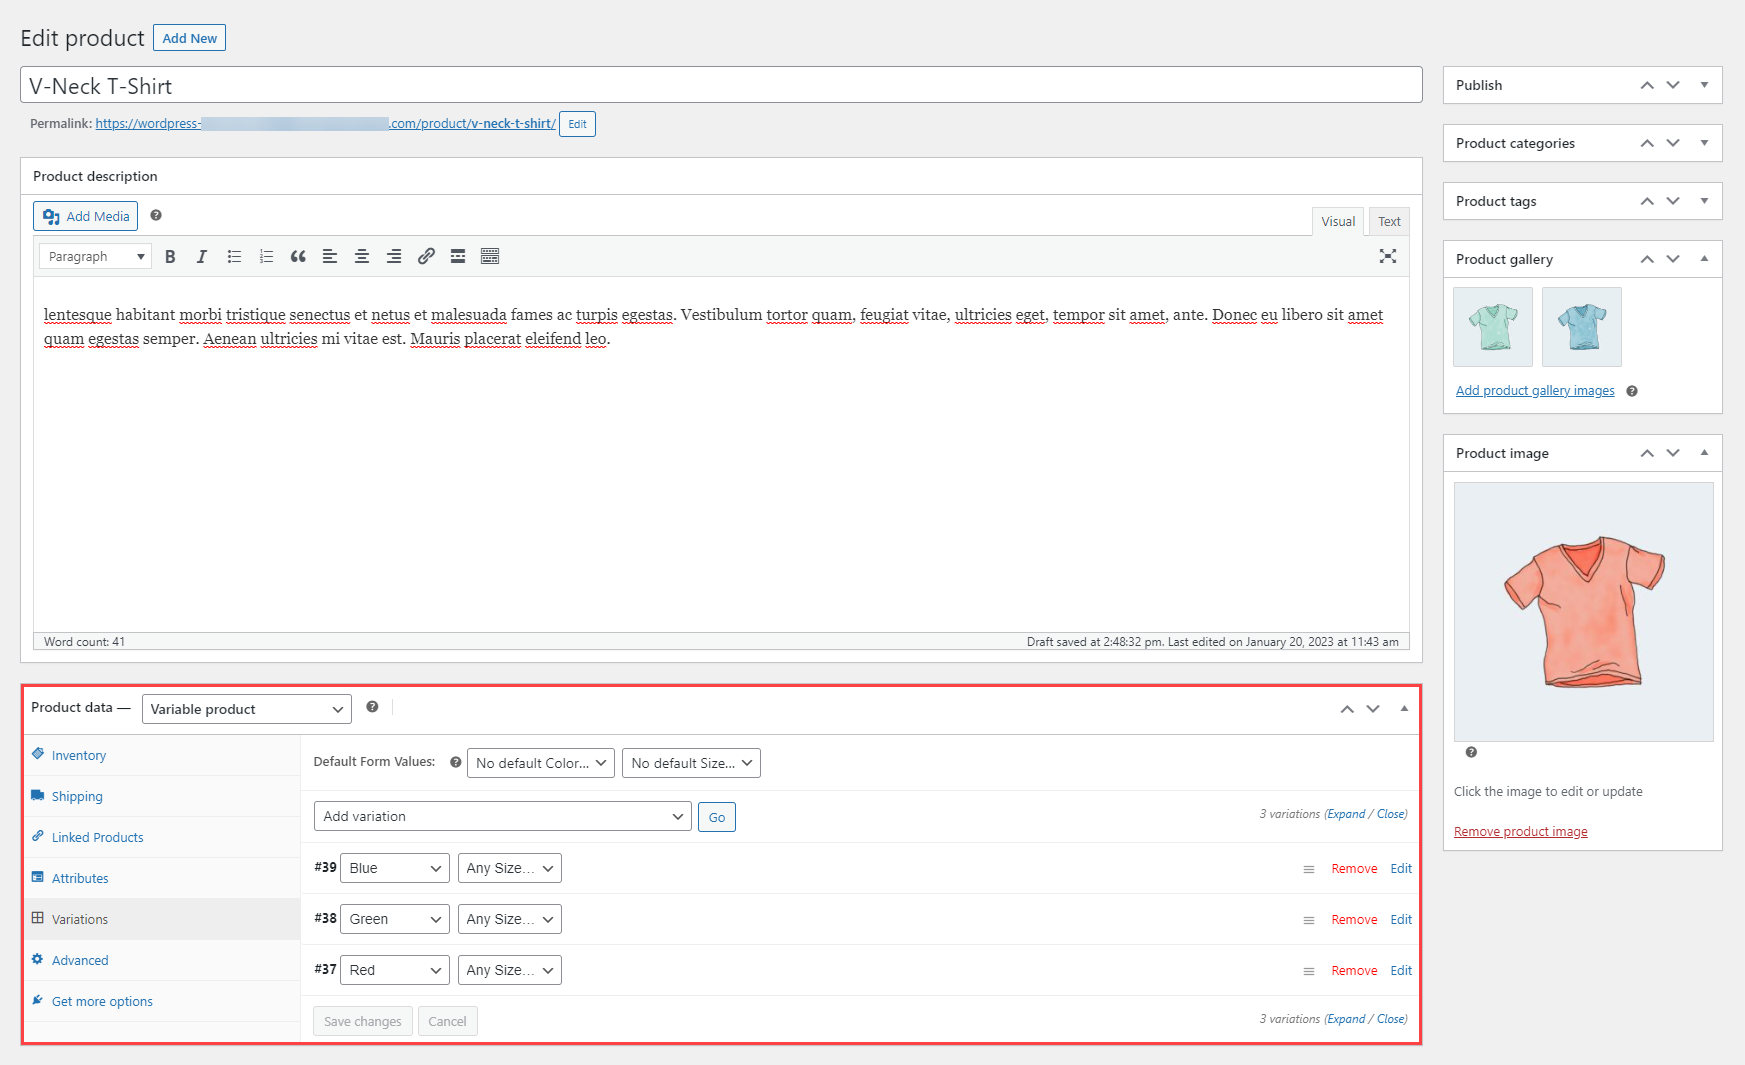
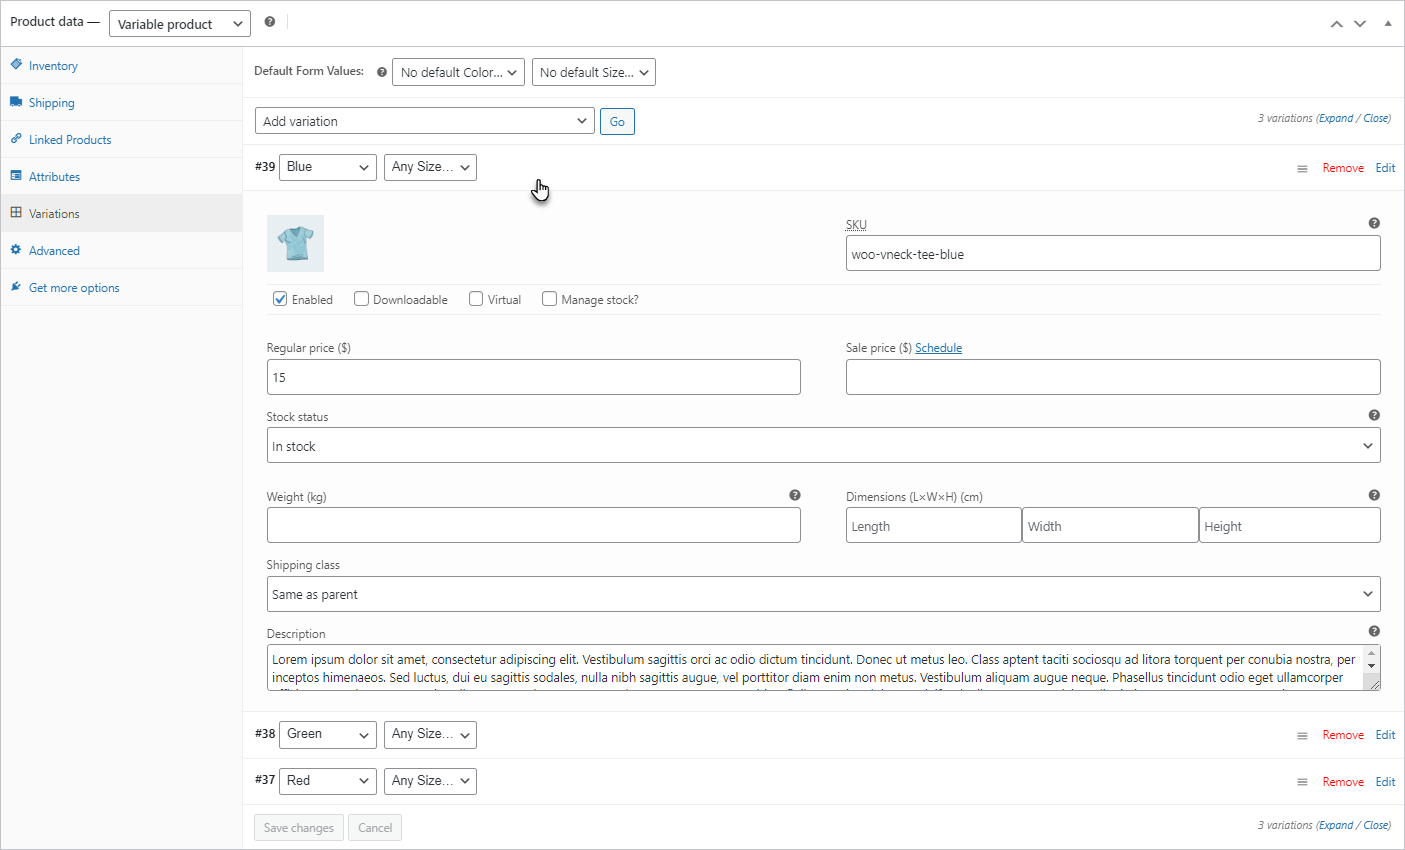
- Click on each variation to view its details.
Blue – Variation
Green – Variation
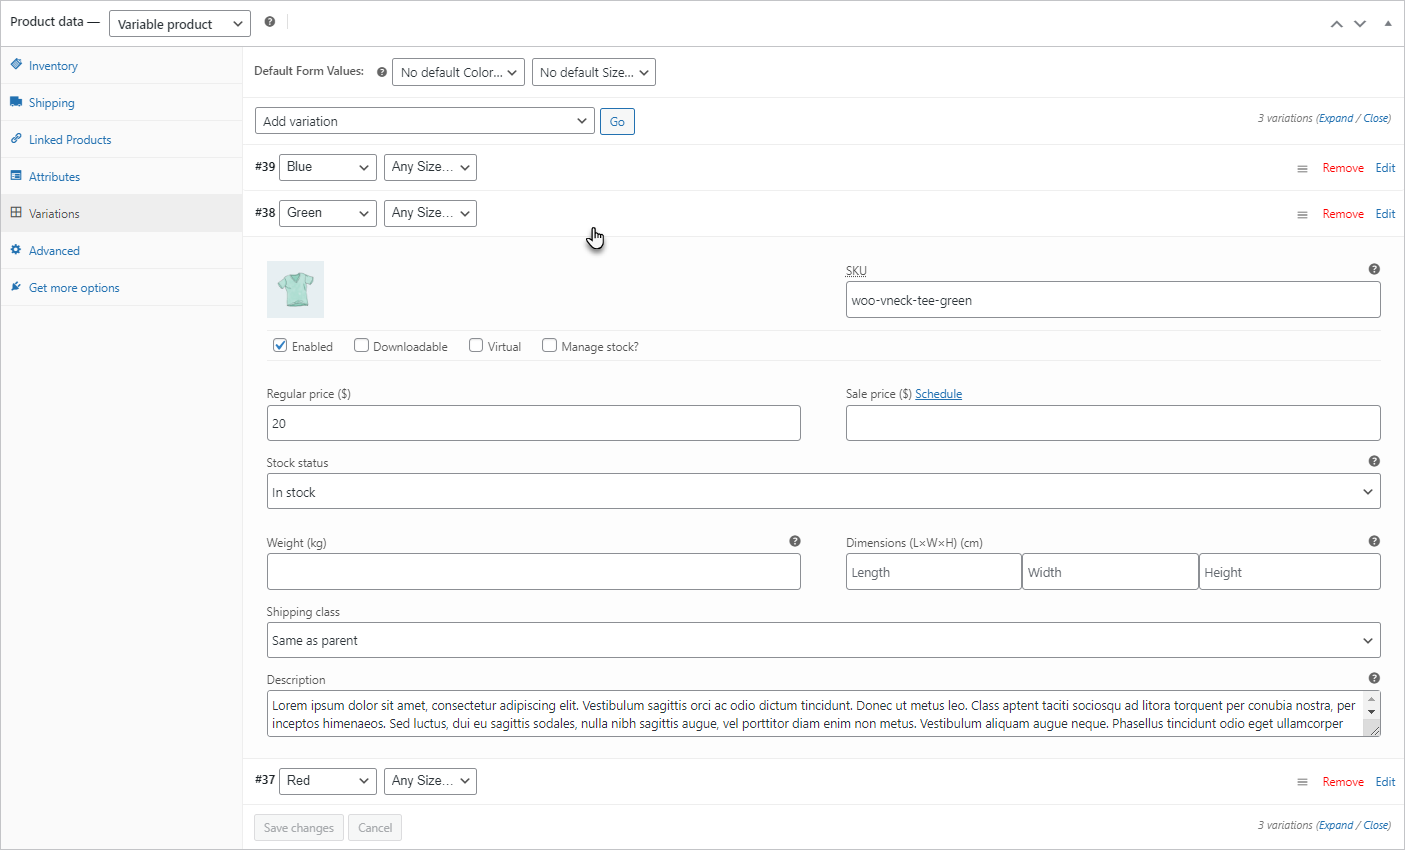
Red – Variation
- Navigate to the WordPress Admin Dashboard → WC Shop Sync → Sync Products.

- Now you’re in the Synchronization of Products Settings tab.
- Make sure that the Enable Stock sync to Woocommerce via webhook? option is checkmarked to the Yes checkbox.
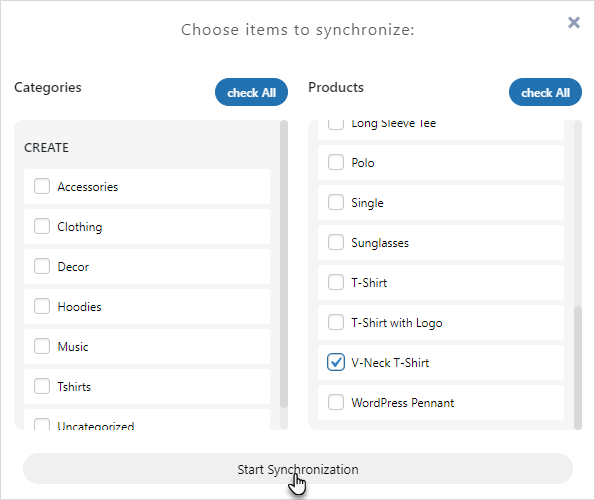
- Click on Synchronize Woo To Square button.

- Select the variable product and click on the Start Synchronization button.
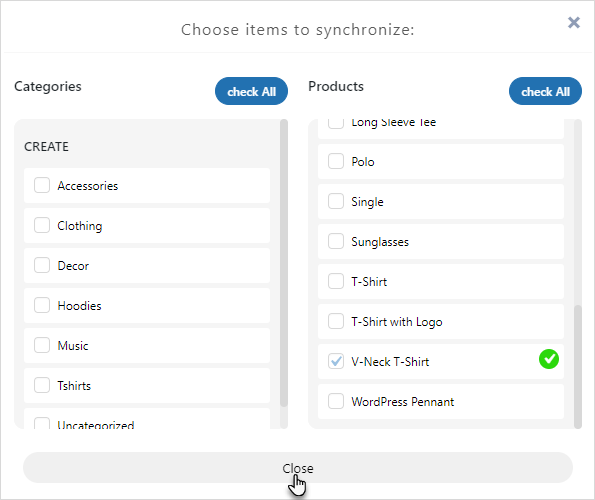
- Once the operation is successfully done, click on the Close button.
- Navigate to the WordPress Admin Dashboard → Settings → Permalinks.
- Now you’re on the Permalink Settings page.

- In the Common Settings section, select the Post Name radio button.
- Click on the Save Changes button.
- Now log in to your Square account.
- Open https://developer.squareup.com/.
- Navigate to Account → Seller Dashboard.

- On the left-hand side, a Quick access dashboard is present.
- Navigate to the Items section.
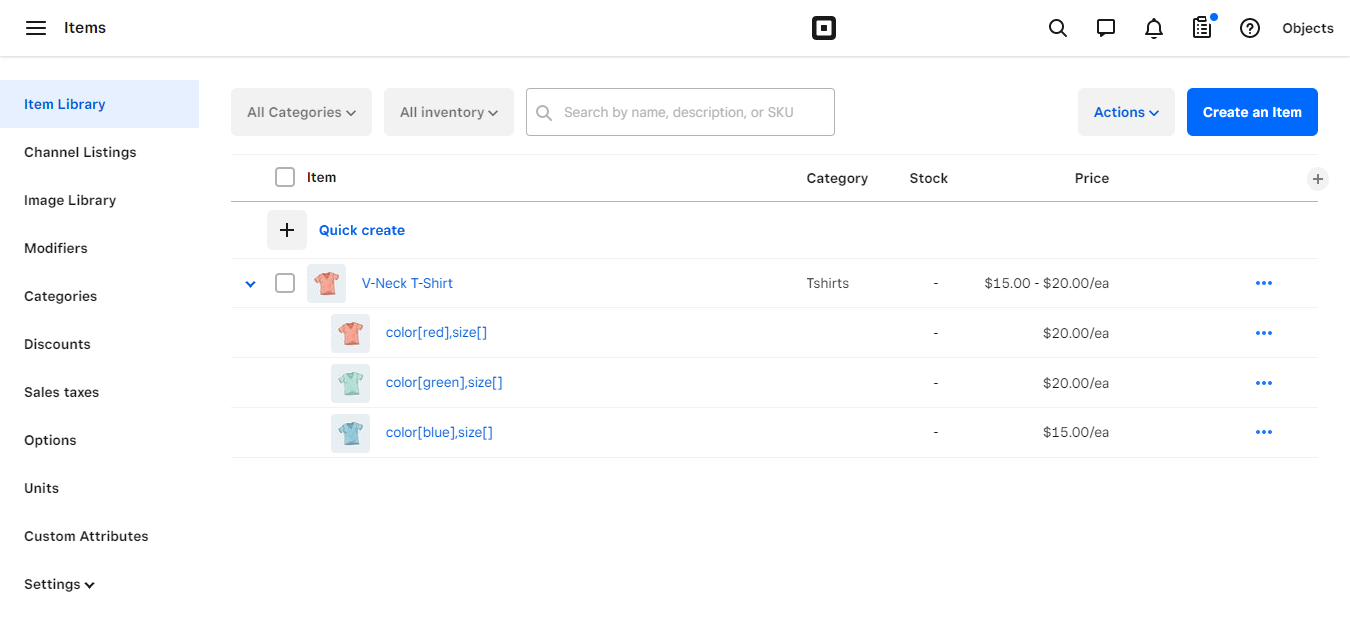
- Now you’re in the Item Library section.
- All the Items will appear in this section with details like Category, Stock, and Price.
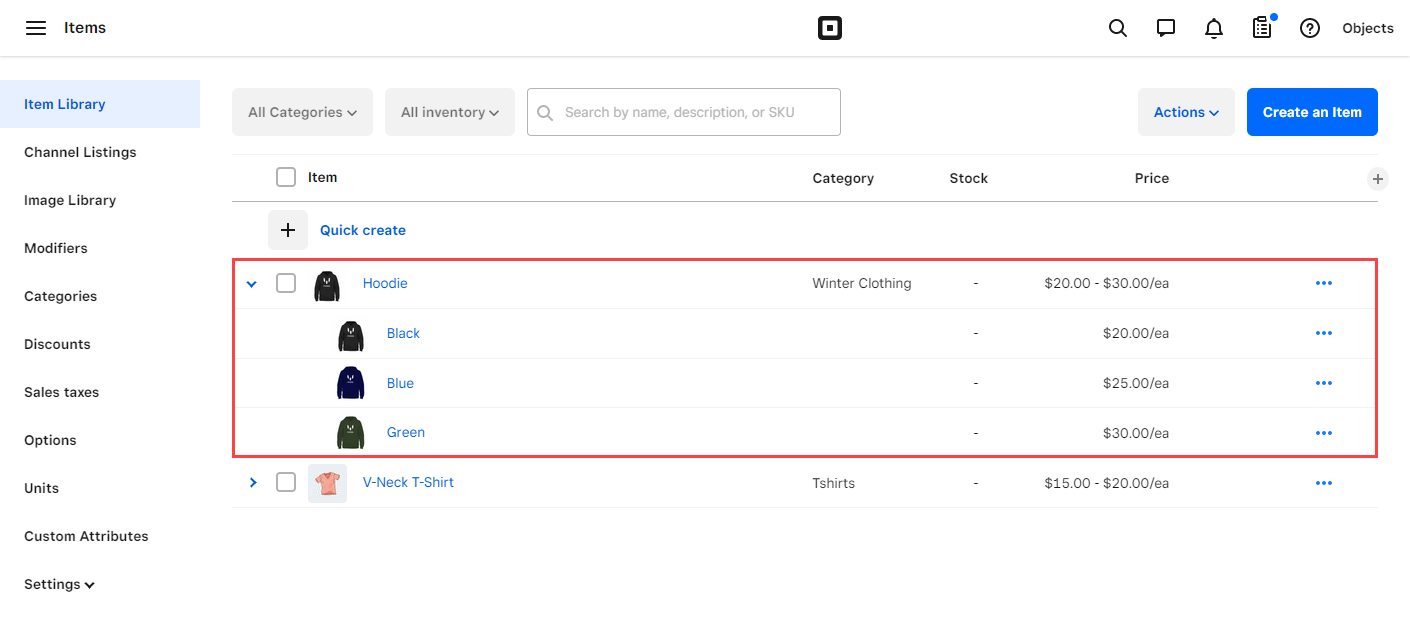
- Click on the side arrow to expand the variable product.

- Once done, all the variables will appear on the product with all the images of each variation and details.
- Click on the variable product to navigate to the Edit Item page.

- Now you’re on the Edit Item page.
- Scroll down and navigate to the Variations section.
- All the product variations are available, and each variation’s images will appear.
- Hence, each product variation’s images are successfully synchronized and visible on the Square platform.
17.2.Synchronize Square To Woo
- Log in to your Square account.
- Open https://developer.squareup.com/.
- Navigate to Account → Seller Dashboard.

- On the left-hand side, a Quick access dashboard is present.
- Navigate to the Items section.

- Now you’re in the Item Library section.
- Click on the Create an Item button.

- Now you’re on the Create an Item page.
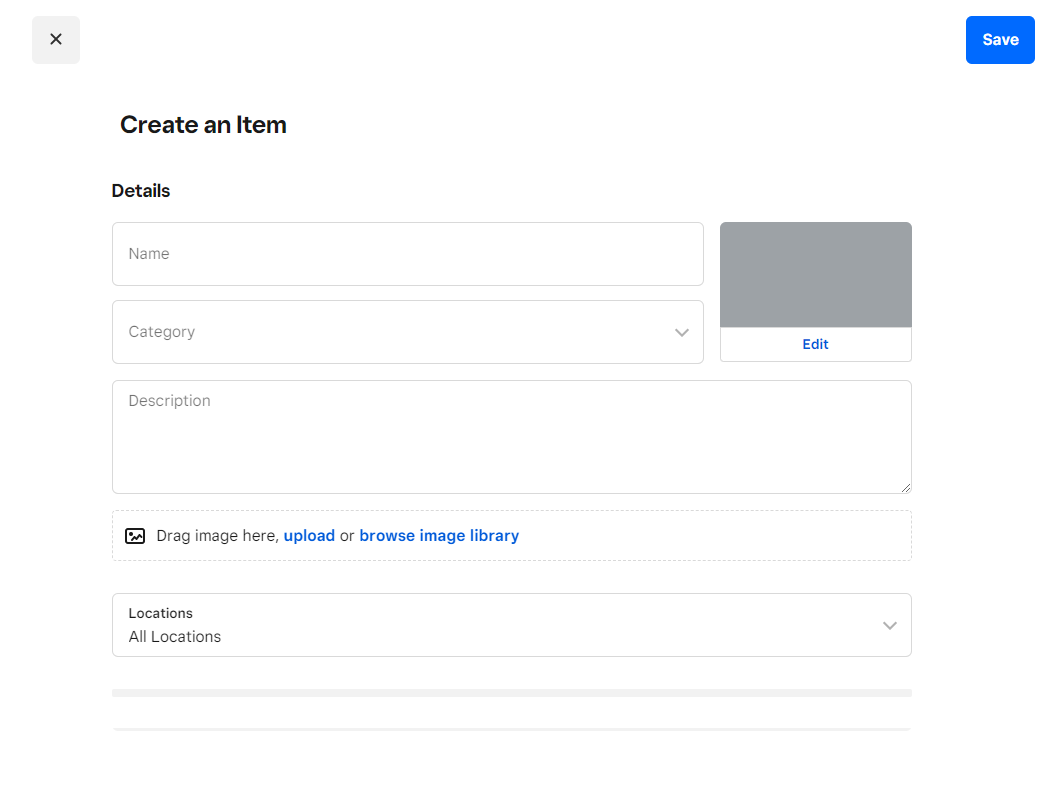
- Fill in all the required details of the product.
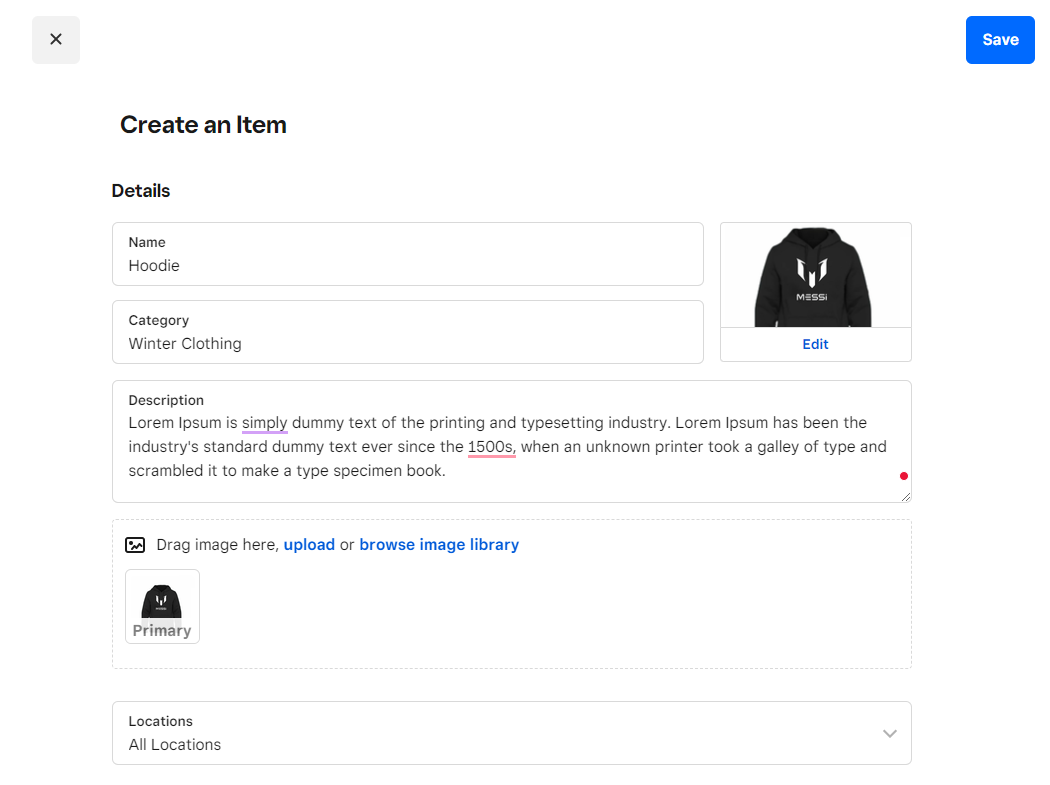
- Scroll down and navigate to the Variations section.
- Click on the Add variation button.
- Create all the variations according to your requirement.
- Once done, click on the Save button.
- The item will appear in the Item Library section with details like Category, Stock, and Price.
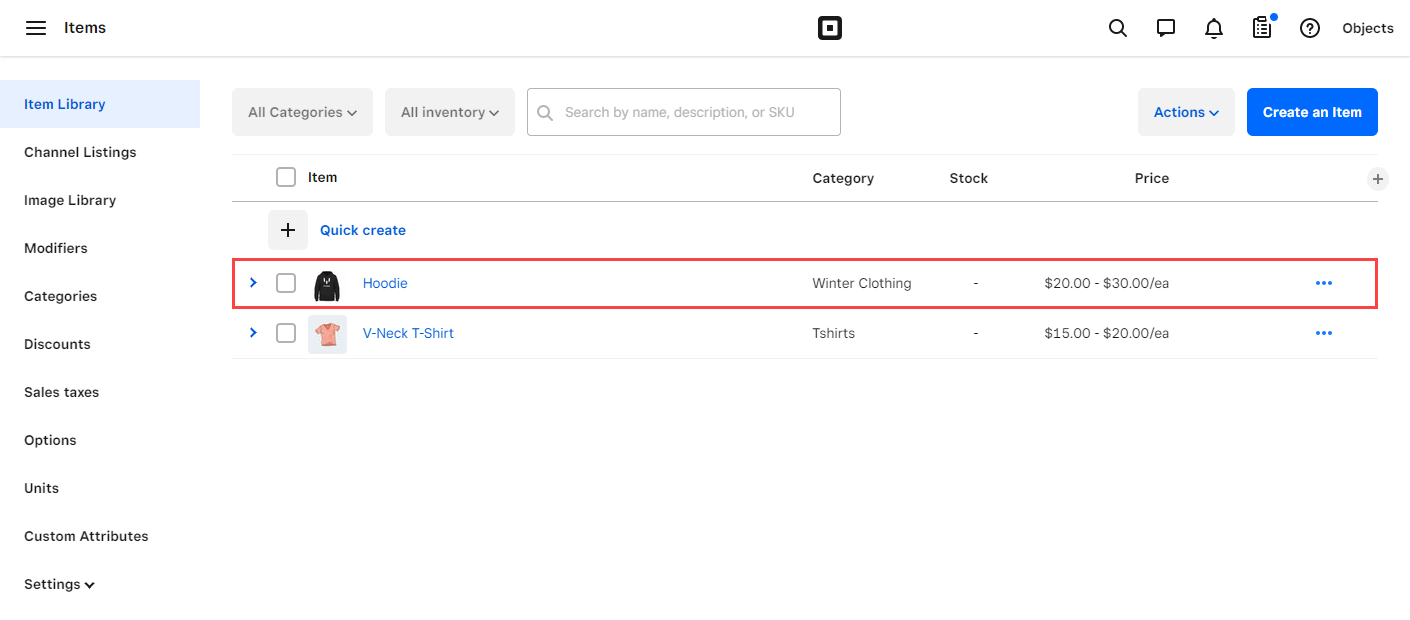
- Click on the side arrow to expand the variable product.

- Once done, all the variables will appear on the product with all the images of each variation and details.
- Navigate to the WordPress Admin Dashboard → WC Shop Sync → Sync Products.
- Now you’re in the Synchronization of Products Settings tab.
- Make sure that the Enable Stock sync to Woocommerce via webhook? option is checkmarked to the Yes checkbox.
- Click on Synchronize Square To Woo button.

- Select the variable product and click on the Start Synchronization button.

- Once the operation is successfully done, click on the Close button.

- Now navigate to the WordPress Admin Dashboard → WC Shop Sync → Sync Products.

- Now you’re on the Products page.
- Now navigate to the variable product synchronized from the Square platform to Woocommerce platform.

- Hover over the variable product to view suboptions.
- Click on the Edit button.

- Now you’re on the Edit product page.
- Go to the Product data section.
- Click on the Variations tab.
- In the Variations, all the variations are listed.
- We can see that there are three variations(Blue, Green, and Red) available.
- Click on each variation to view its details.
Green – Variation
Blue – Variation
Black – Variation

- Hence, each product variation’s images are successfully synchronized and visible on the WooCommerce platform.
18.Refund from Square through Items
Back-End Configuration
NOTE: Make sure to enable the Order Synchronization module.
- Navigate to the WordPress Admin Dashboard → WC Shop Sync → Order Sync.
- Checkmark the Yes checkbox in the Enble Square to WooCommerce Order synchronization option.
- Enter the Application ID, Access Token, and Location ID of your Square Application.
- Copy the link highlighted in the image below. This link will be used in the Notification URL field while creating the Webhook.
- Click on the Save Changes button.
- Once done, a notification will appear at the top of the page “Settings updated successfully!”.
NOTE: In order to use this feature, Stock sync to Woocommerce via webhook? option should be disabled.
- Go to your Square platform.
- Open your Square Application.
- Open https://developer.squareup.com/.
- Click on the Open button on the application.

- Navigate to the Webhooks → Subscriptions on the dashboard.

- Click on the Add subscriptions button.
- Click on the Add subscriptions button.
- Set the name of the Webhook.
- Enter the URL that we copied in the Order Synchronization Settings section.
- Select the API Version.
- Select the inventory.count.updated event in the Events section.
- Click on the Save button.
- Once done, the webhook will be successfully created.
- Click on the webhook to view the details of the webhook.
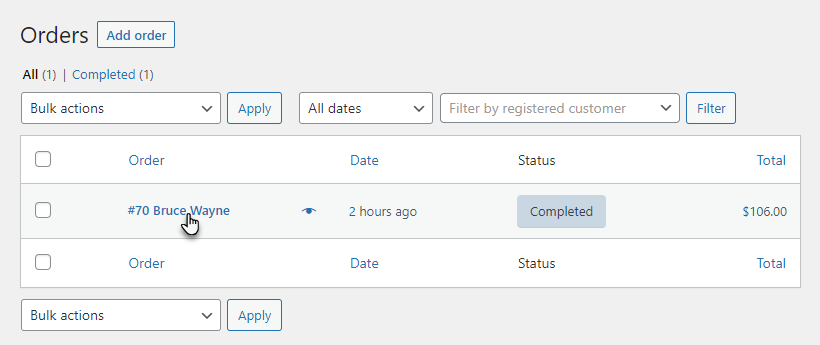
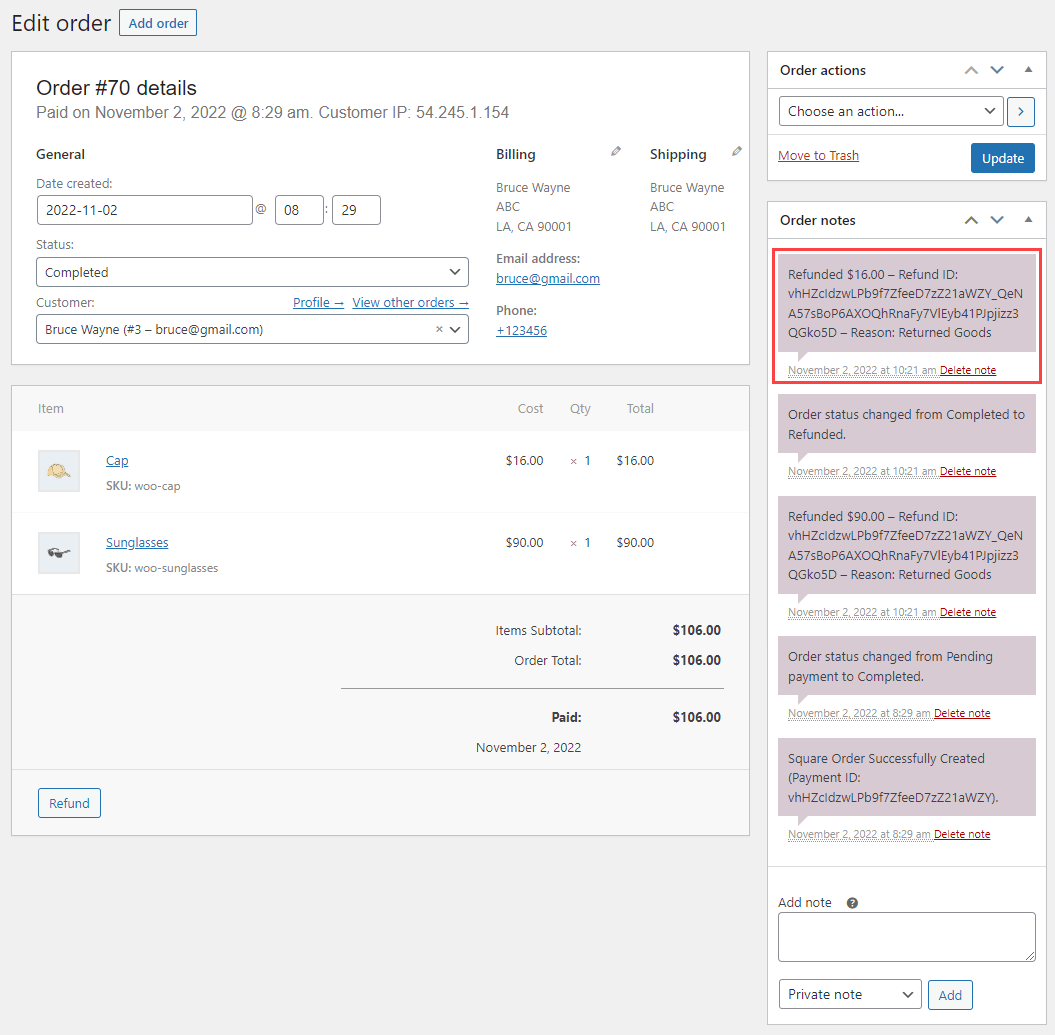
- Navigate to the WordPress Admin Dashboard → WooCommerce → Orders.
- Now you’re on the Orders page.
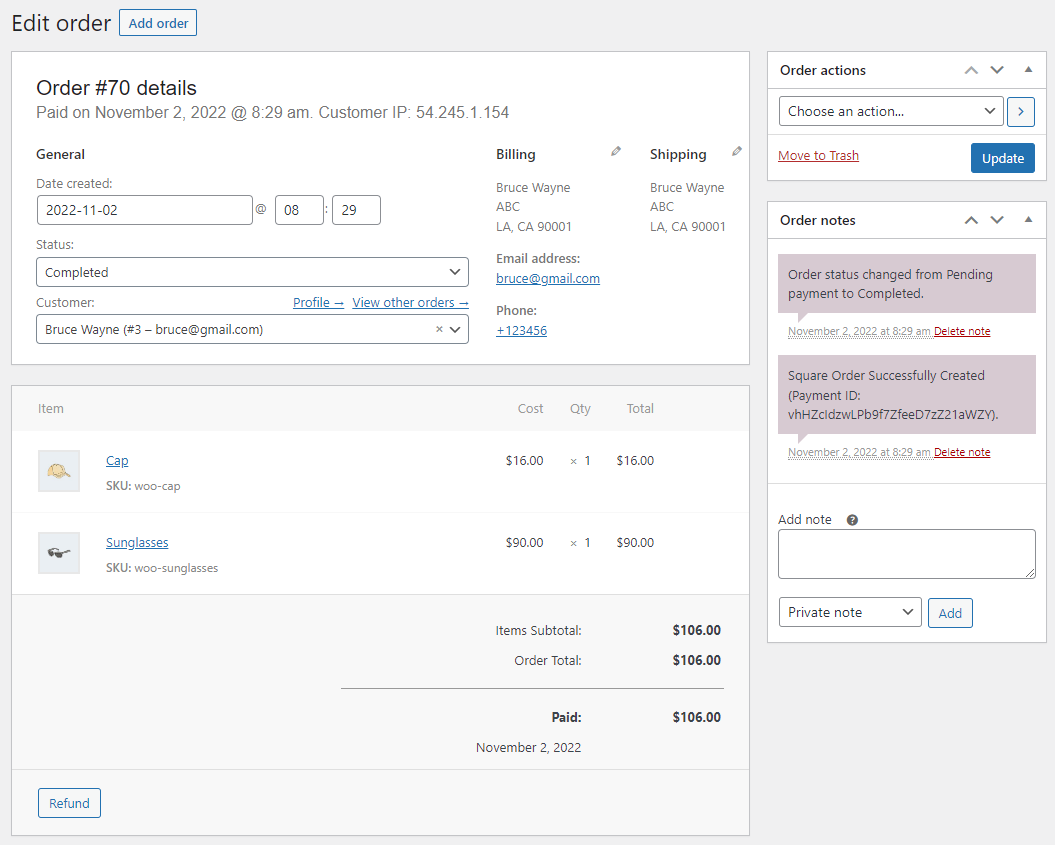
- Click on the order to view details.
- Now you’re on the Edit order page.
- In the Order notes section, all the events will be highlighted regarding the order.
- Go to the Square platform.
- Go to the Transaction tab.
- Click on any transaction.
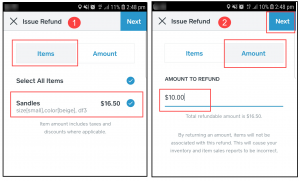
- Click on the Issue refund button.
- Once done, select the Items you want to refund from the order.
- Once done, click on the Next button.
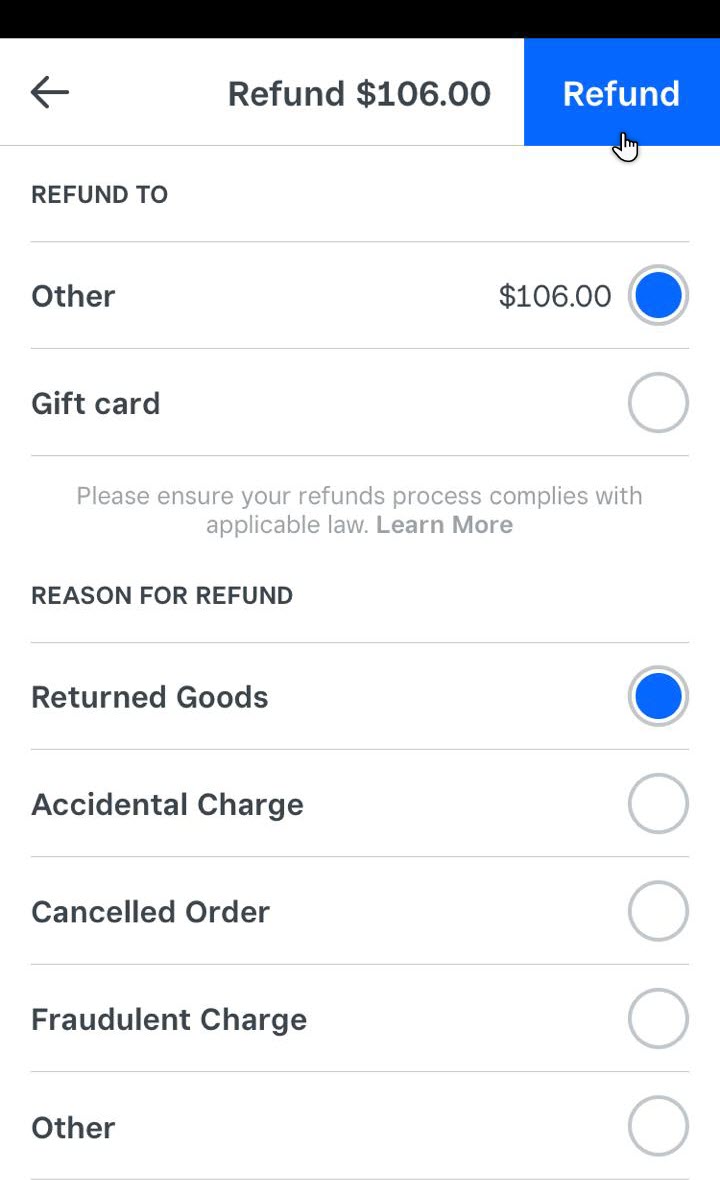
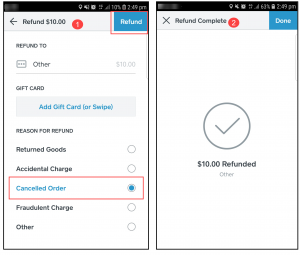
- In the Refund To section, select Other(to refund the amount) or select the Gift Card.
- In the Reason For Refund, select the reason why are you refunding this order.
- Once done, click on the Refund button.
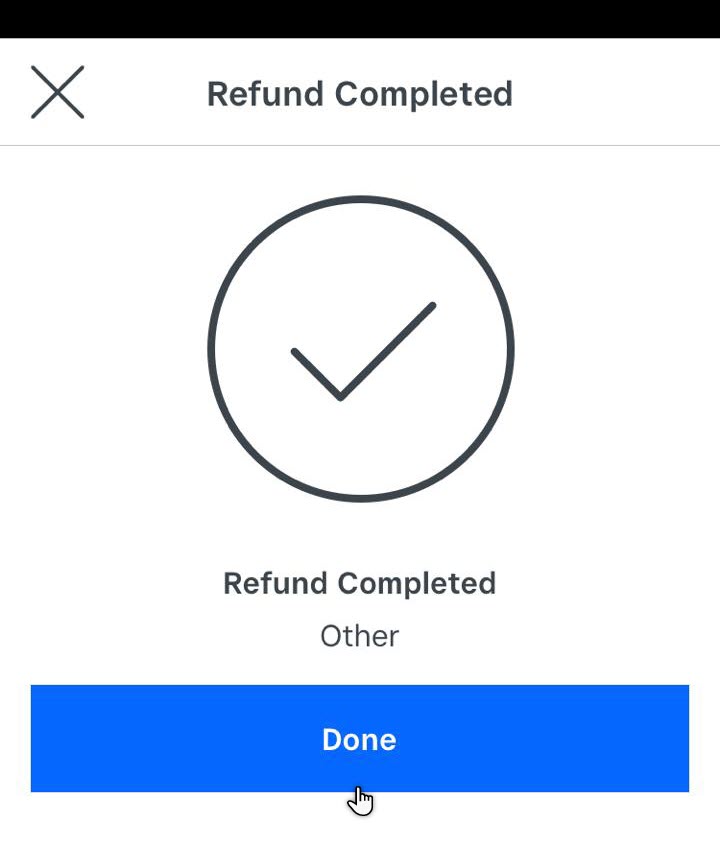
- The Refund is complete.
- Click on the Done button.
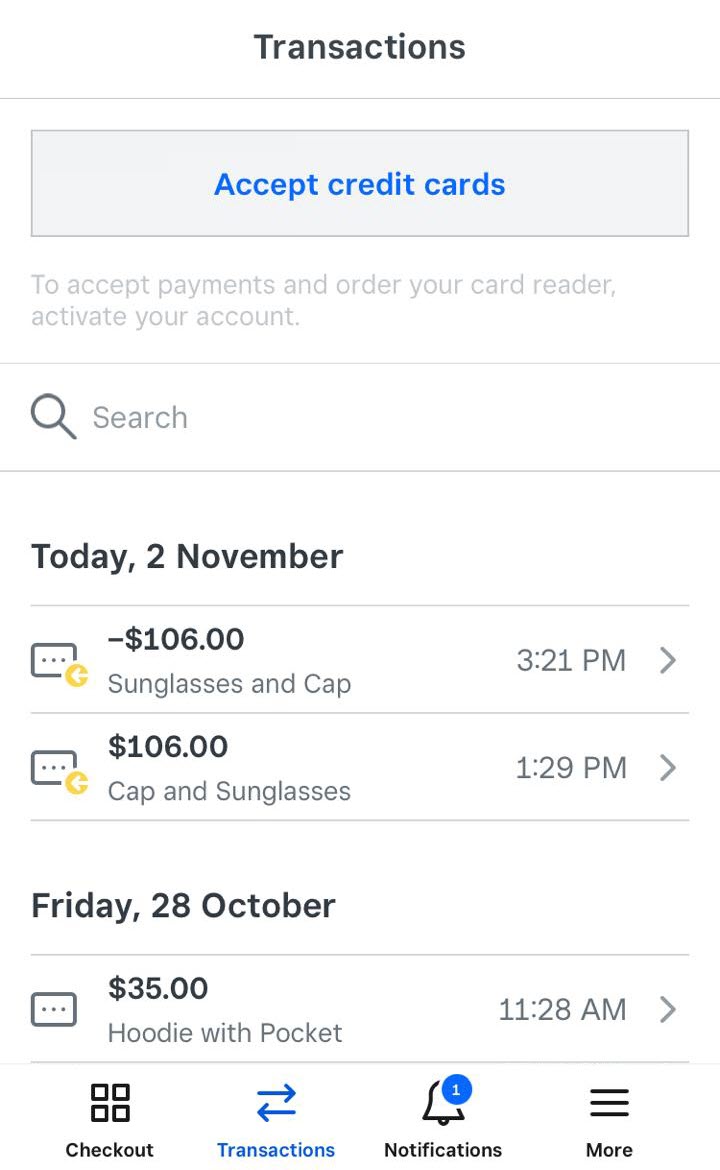
- We can see that specific transaction is no longer mentioned in the Transaction tab.
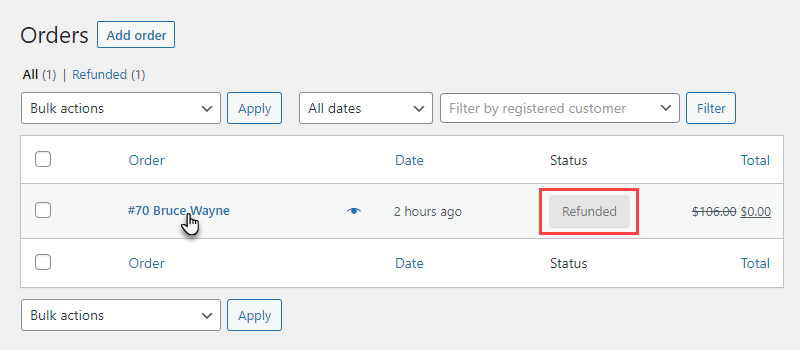
- Navigate to the WordPress Admin Dashboard → WooCommerce → Orders.

- Now you’re on the Orders page.
- We can see the status of the order is changed to Refunded.
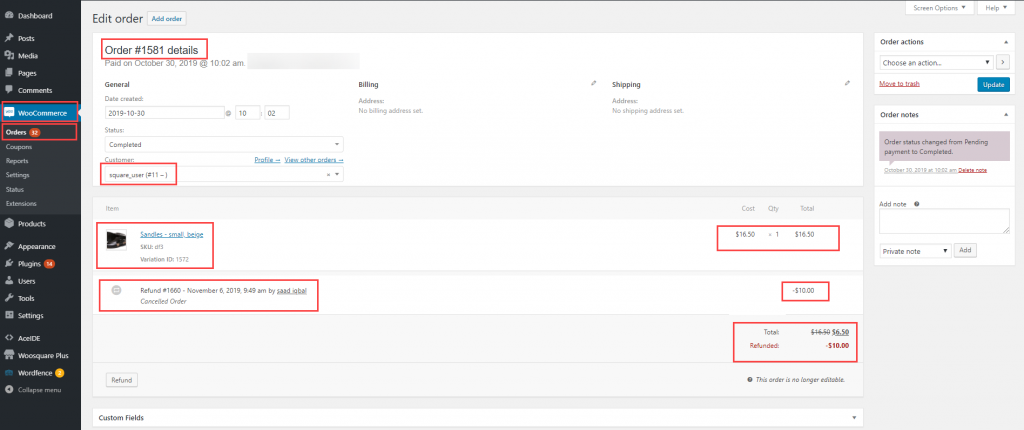
- Click on the order to view details.
- Now you’re on the Edit order page.
- In the Order notes section, we can see that the order is refunded with all the details.
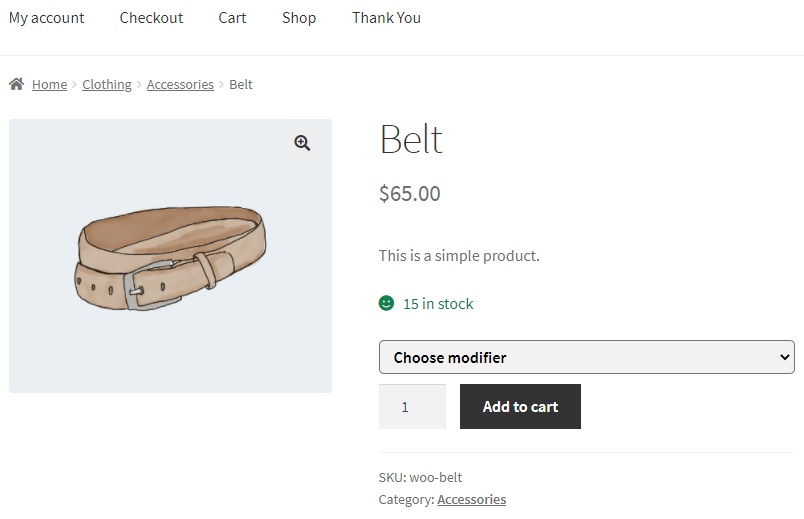
19.SQUARE MODIFIERS
- Square Modifiers are additional options like toppings, add-ons, or special requests. Modifiers that are applied to products will display on your customer’s checkout.
- You can also sync Square modifiers from Woocommerce to Square and vice versa.
- To activate the Square Modifiers, it will have to be enabled from the Plugin module tab.

Create Modifiers
- To create a Square Modifier,
- Go to Admin Dashboard > Products > Woosquare Modifier.
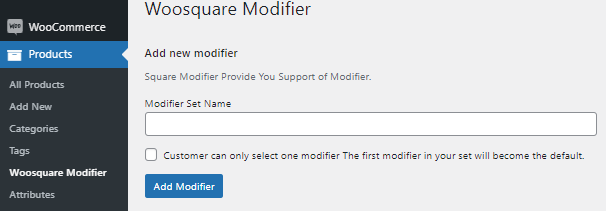
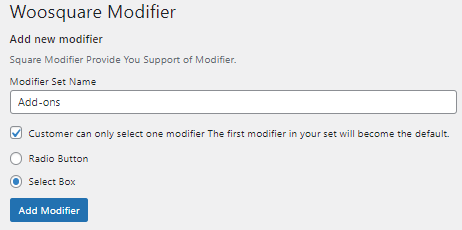
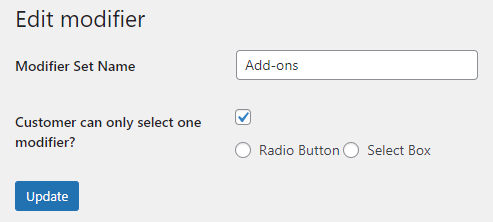
- Enter a Modifier Set Name, for example, Add-ons.
- Click the checkbox if you want your customer to select only one modifier on the front-end, select Radio Button or Select Box.
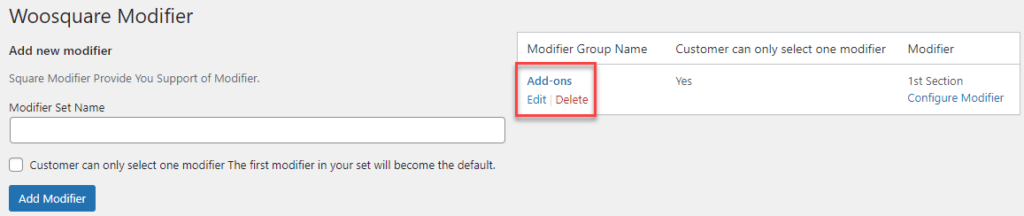
- Once done, click the Add Modifier button.
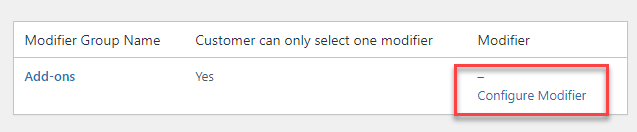
- Now your Modifier is added, which is visible on the right side of the same page.
- Click on Configure Modifier
- Enter the name and price of your Add-ons.
- Once done, click Add new add-ons button.
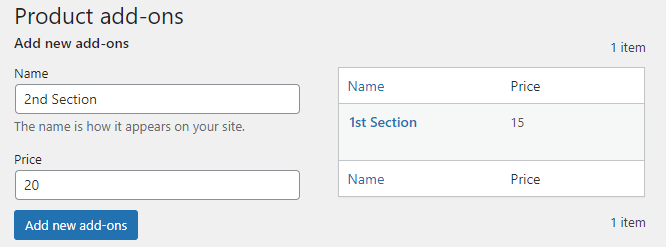
- Click on the Edit option to update your modifier.
- You can also delete your modifier from the Delete button.
- Click on the Update button to save your changes.
- Go to Admin Dashboard > Products.
- Add new or click the button Edit on an existing product.
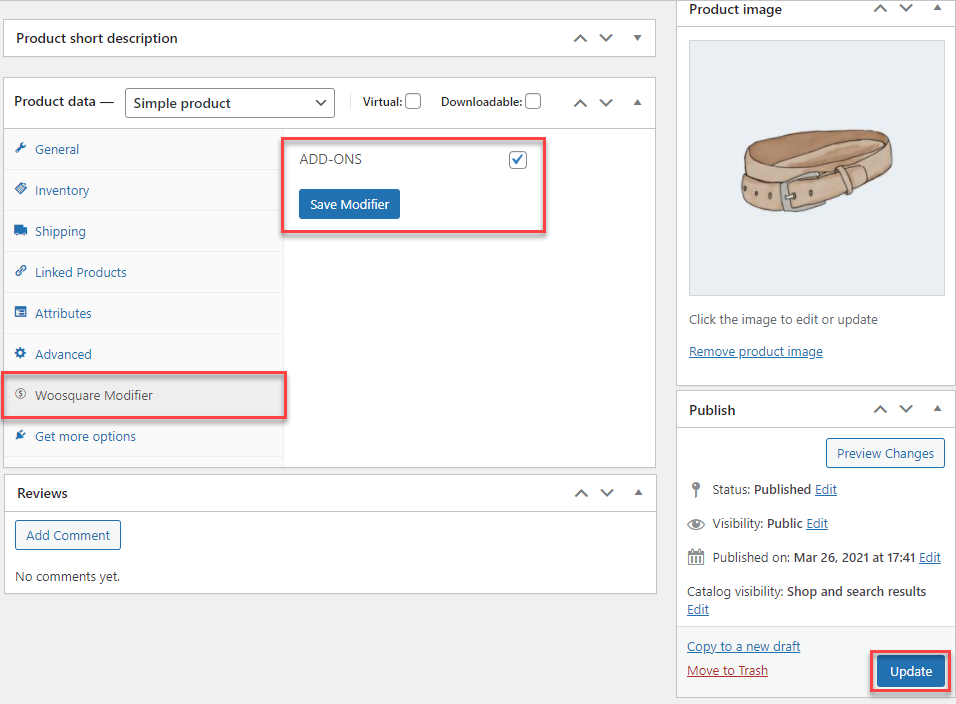
- Once you’re in the Product configuration (Product data), go to the Woosquare Modifier.
- Click the Add-ons checkbox.
- Click the Save Modifier button.
- A notification will appear as a Modifier Successfully Updated.
- Once done, click on the Update button of the product.
Front-End Impact
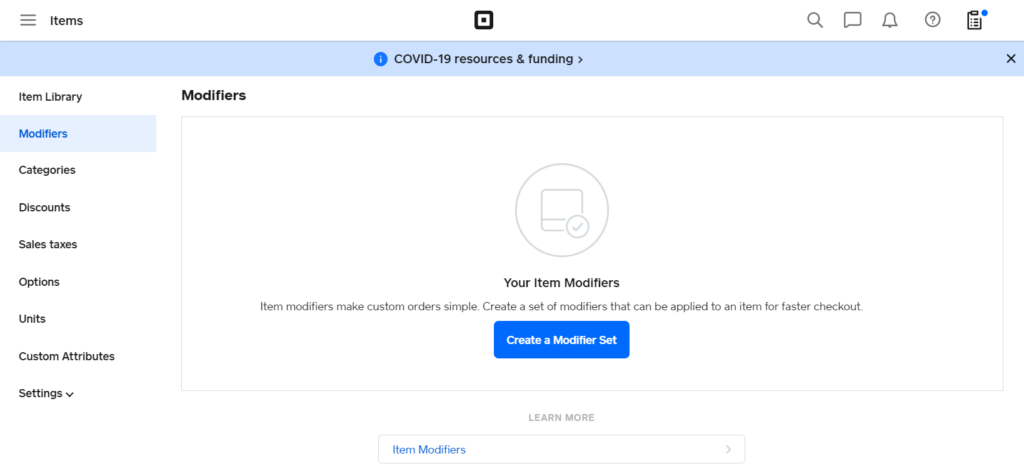
Create Modifiers Sets Square
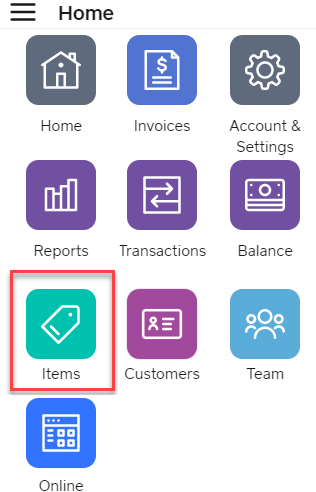
- Go to your Square Dashboard
- Click on the Items.

- Go to Modifiers and click on the Create a Modifier Set button.
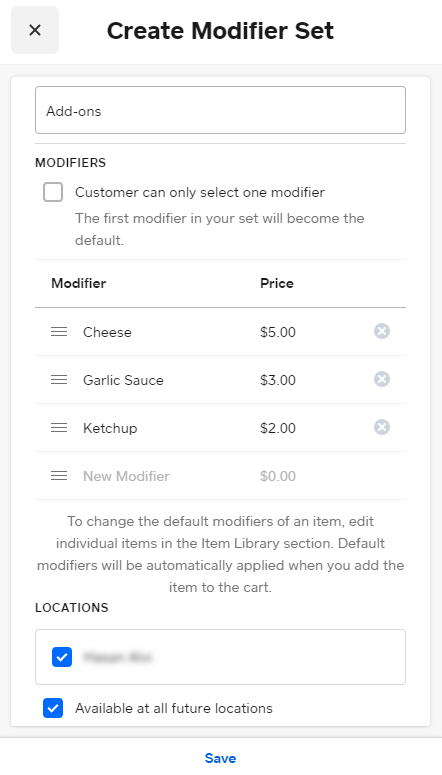
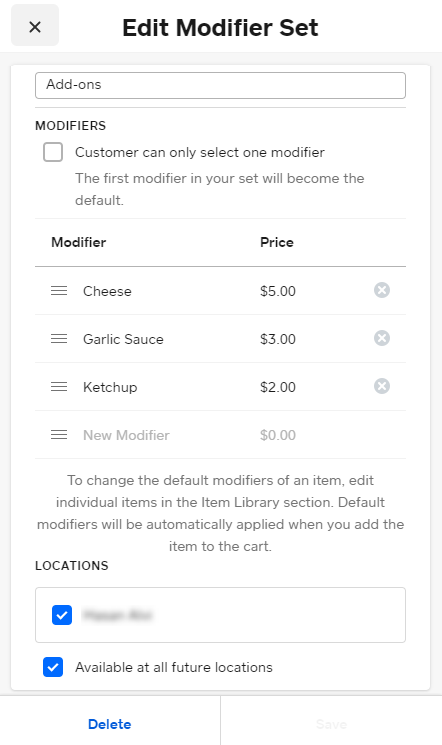
- Enter the name of the Modifier Set and set the price of the enter the Modifier and Price.
- Once done, click on the Save button.
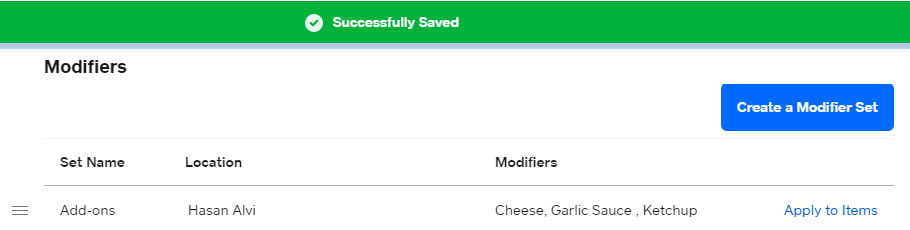
- You’ll get the notification that your Modifiers are successfully added.
Delete Modifiers Set
- Go to your Square Dashboard
- Click on the Items.

- Go to Modifiers and click on any existing Modifiers.
- Once you’re in the Edit Modifier Set section, click on the Delete button.
Rearrange Modifiers
You can customize the order of modifiers and modifier sets from the Square app. Once you’ve customized your modifiers, your settings will sync across all devices.
- Go to your Square Dashboard
- Click on the Items.

- Go to Modifiers and then you’ll be able to view all the existing Modifiers.
- Tap and hold the three horizontal lines next to the modifier or modifier set you’d like to rearrange.

- Drag the modifier or modifier set to its desired place in the list.
Set Modifiers in your Items through Square Account
You can customize the modifiers and modifier sets of the items(Products) from the Square app. Once you’ve customized your modifiers, your settings will sync across all devices.
There are 2 ways to set modifiers to your items,
- Through Modifiers section
-
- Go to your Square Dashboard
- Click on the Items.
- Go to Modifiers and then you’ll be able to view all the existing Modifiers.
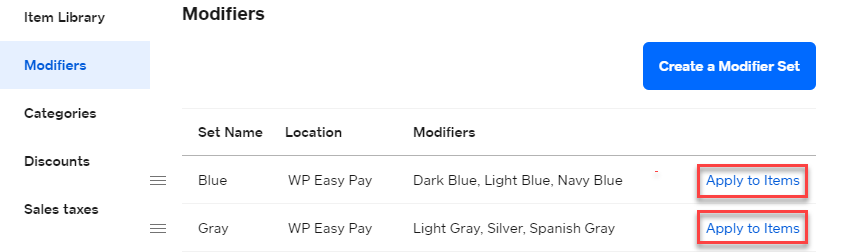
- Click on the Apply to Items button of any specific Modifier you want to apply.
- Once done, a pop-up will appear.
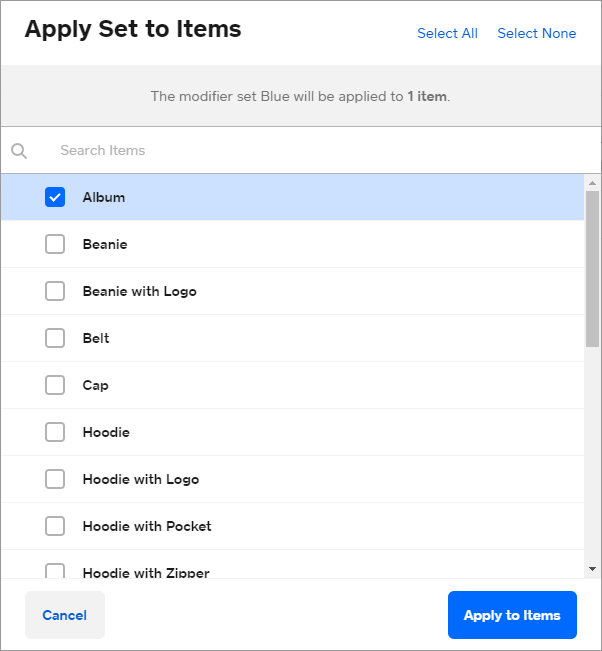
- Select the items in which you want to apply that respective modifier.
- Once done, click on the Apply to Items button.
- Through Item Library section
-
- Go to your Square Dashboard
- Click on the Items.

- Go to the Item Library and then you’ll be able to view all your Items(Products).
- Click on any item, now you’ll enter the edit option of that respective item.
- In the Edit Item section, go to the Modifiers Sets.
- Select the Modifier you want to add in that respective item.
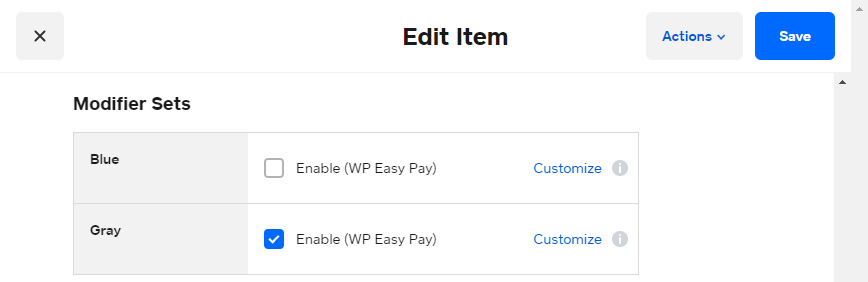
- Click on the Save button to apply your changes and a notification would appear at the top having the label Successfully Saved.
20.ORDER SYNCHRONIZATION
Back-End Configuration
- WooSquare order sync is another module in the plugin that enables us to register order ids from both platforms. Order IDs from the respective platform will be displayed on a single page as the orders are placed, making it easy to track transactions and orders.
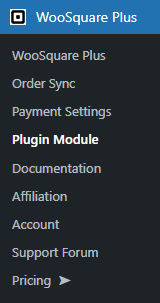
- To enable this module, navigate to Admin Dashboard → WC Shop Sync → Plugin Module.
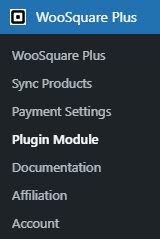
- Enable the Order Synchronization toggle button.
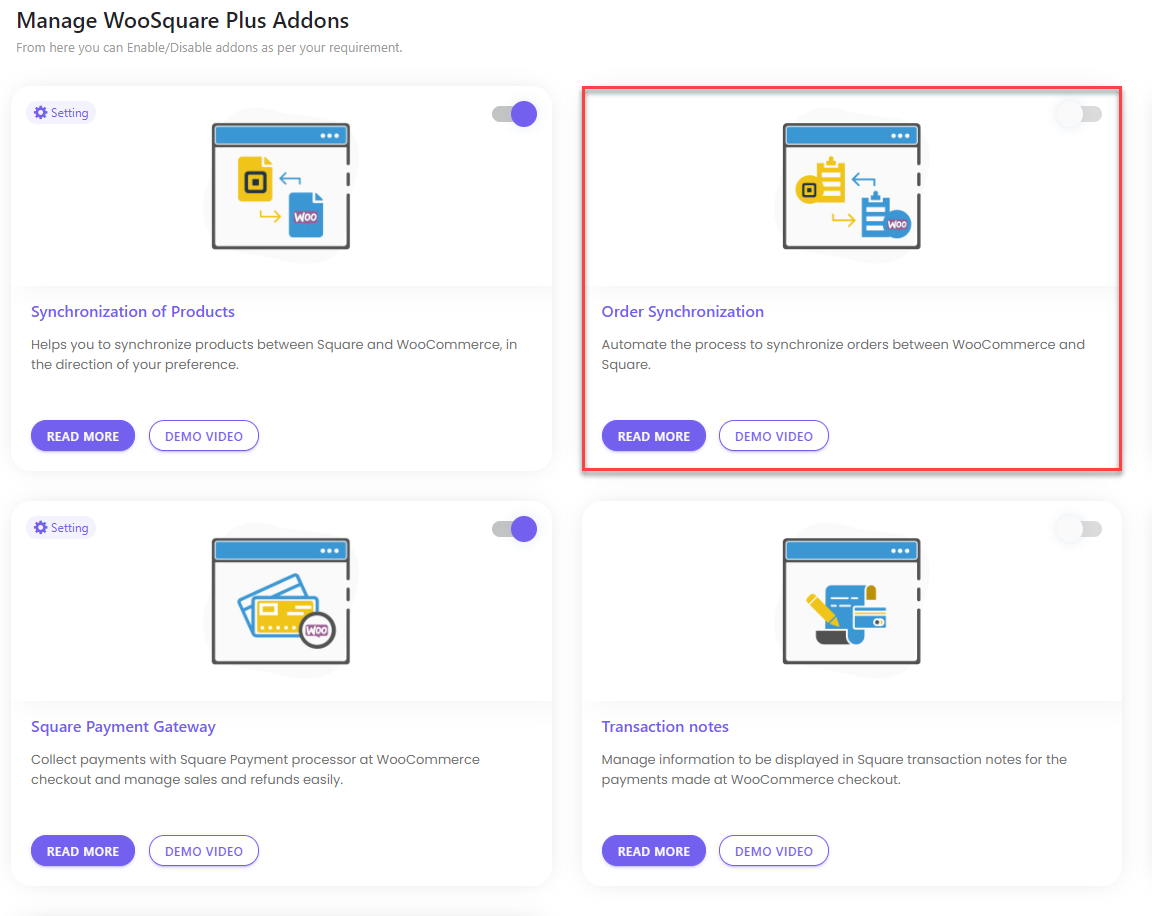
- Once the operation is successful, you’ll receive a notification that Addon Successfully Enabled!.
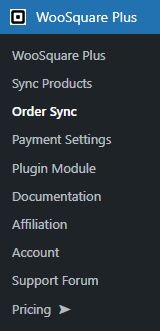
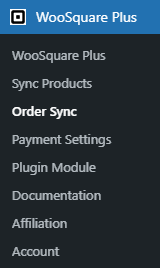
- Once this is enabled, an option titled Order Sync is added in the admin panel of WP.
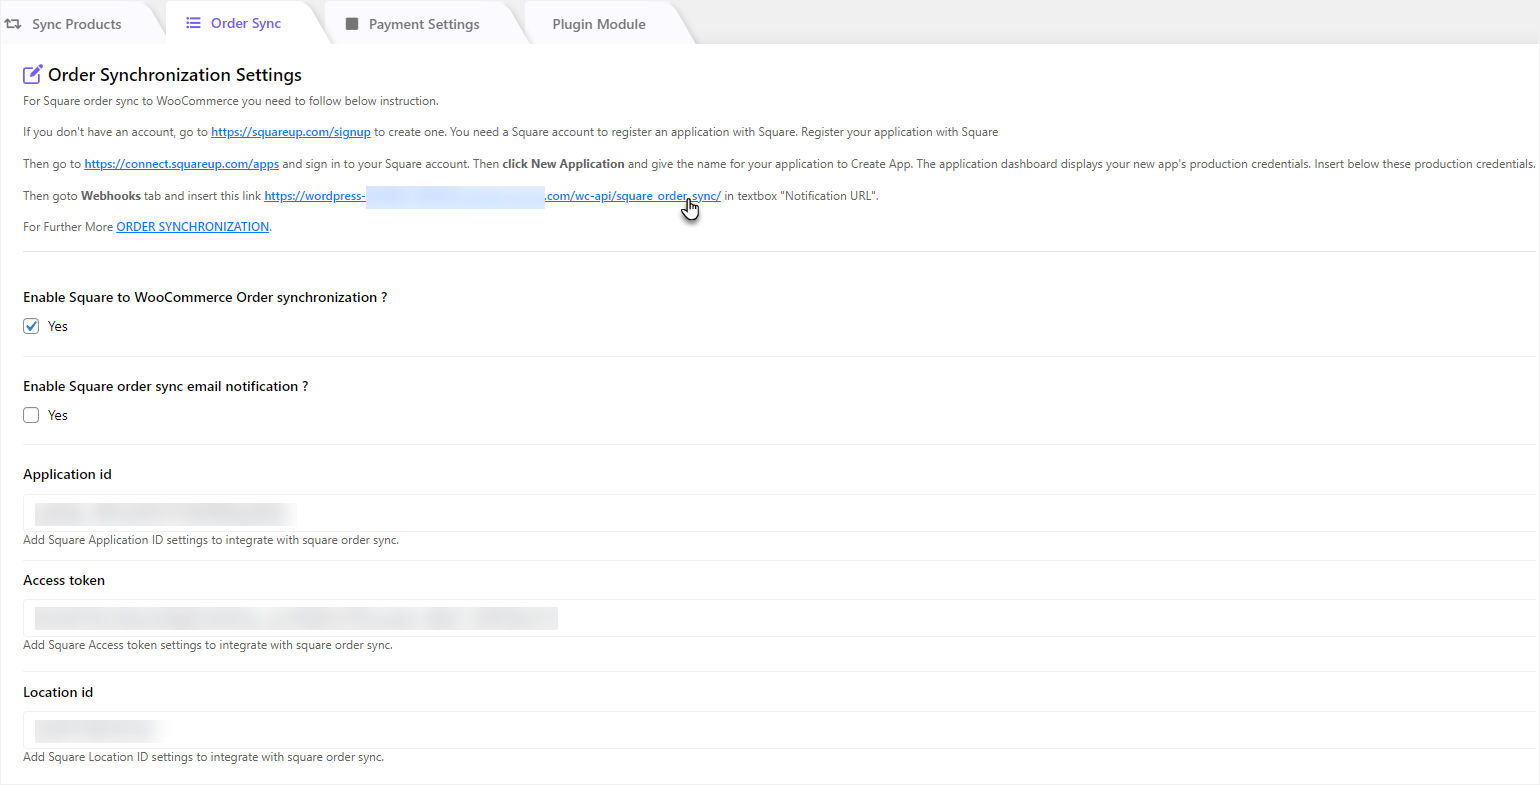
- Go to Admin Dashboard → WC Shop Sync → Order Sync.
- Checkmark the Enable Square to WooCommerce Order synchronization checkbox.
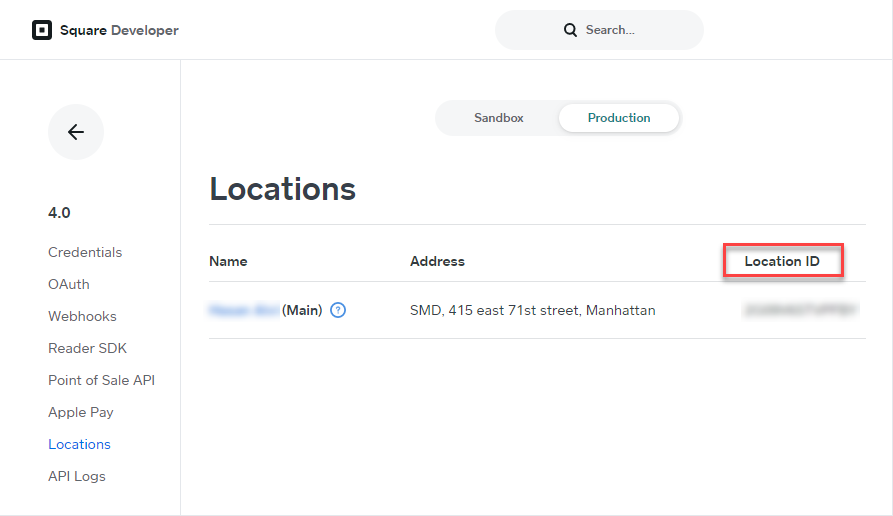
- Enter the Application ID, Access Token, and Location ID of your Square account.
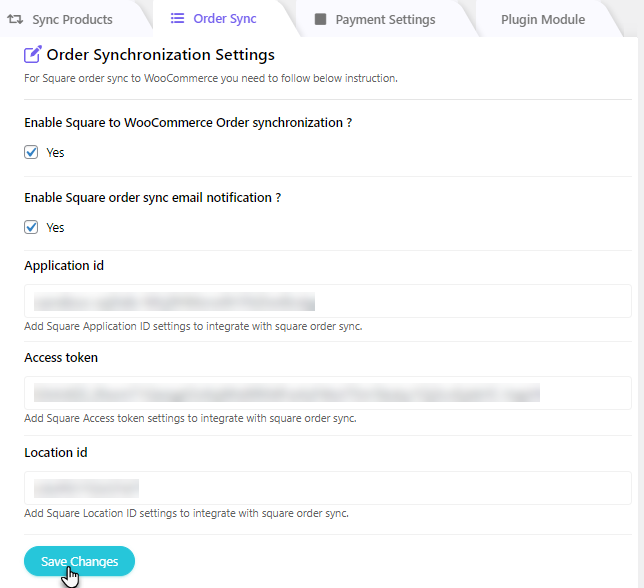
- Click on the Save Changes button.
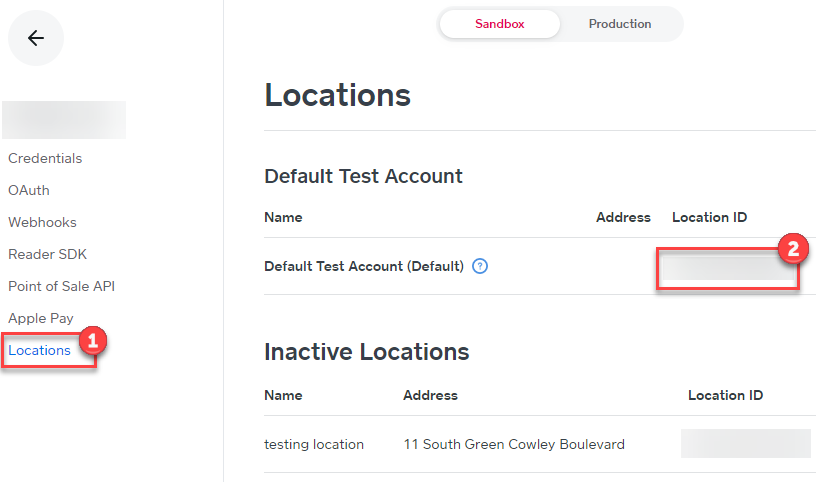
NOTE: Go to the Square account and the Credentials section to retrieve the Application ID and Access Token.
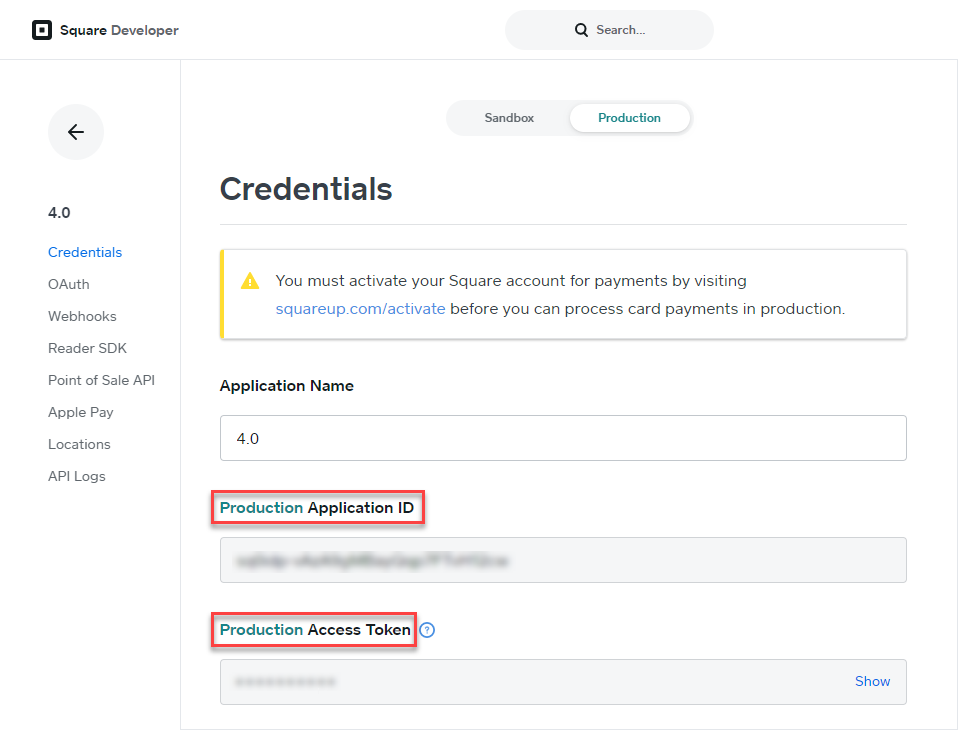
Go to the Location section to retrieve the Location ID.
- Now go to your Square account and navigate to the Webhooks section.
- Select Subscriptions.
- Enable Webhooks.
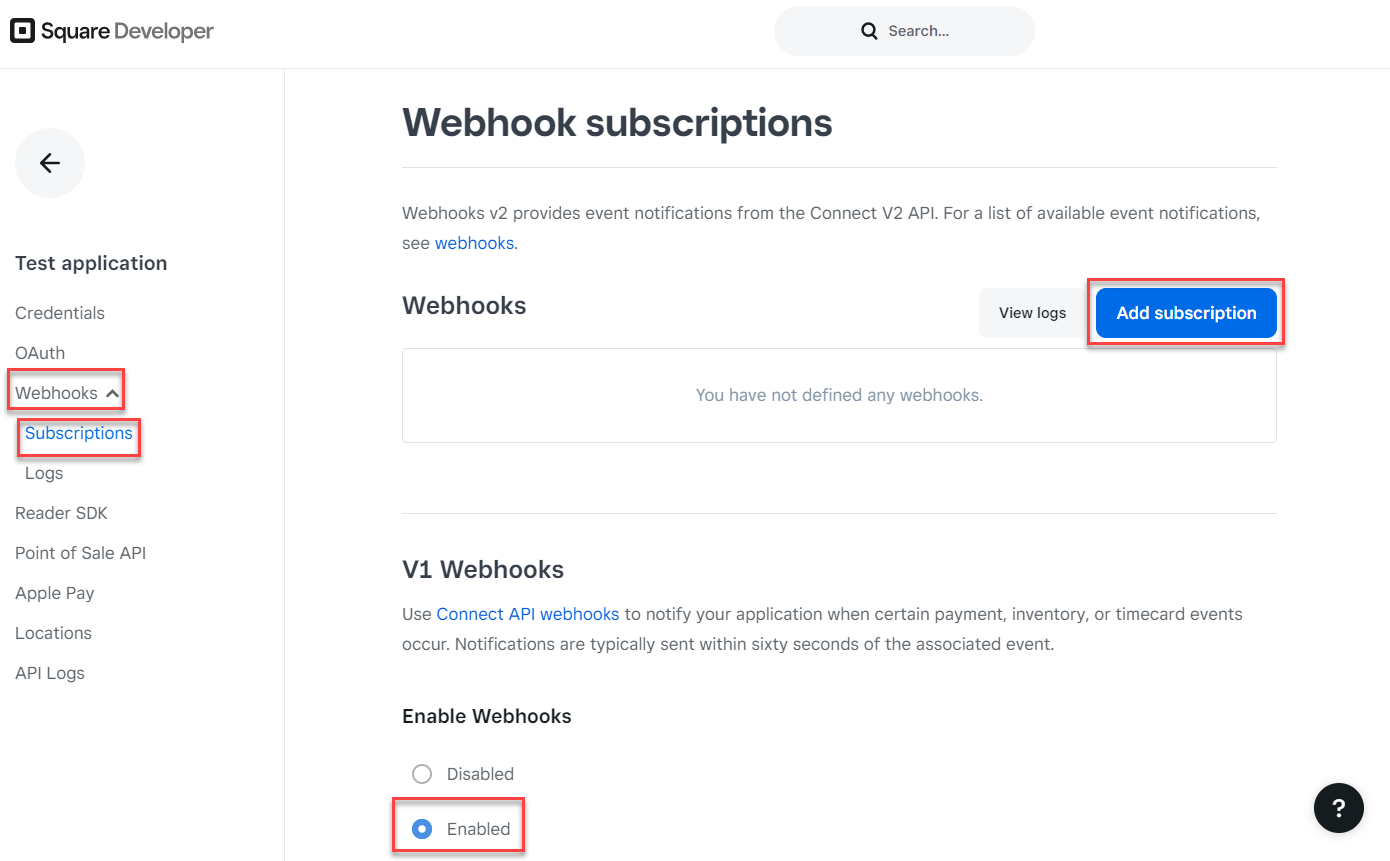
- Click on the Add subscription button.
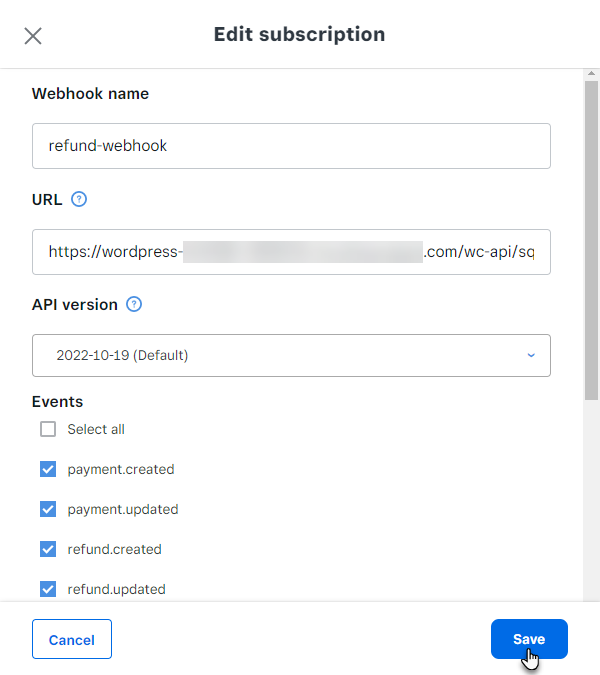
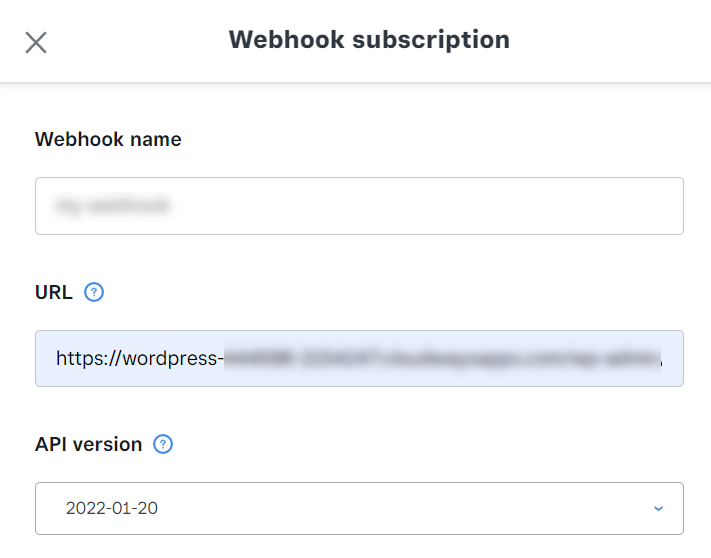
- Enter the Webhook Name.
- Enter the URL link mentioned in the Order Synchronization Settings page in the URL option.

- In the API Version option, select the latest API version from the dropdown menu.
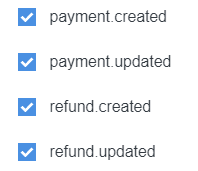
- User after adding the required details, will further select the events from the checkbox as well, user need to select the following checkbox only.
- Once done, click on the Save button.
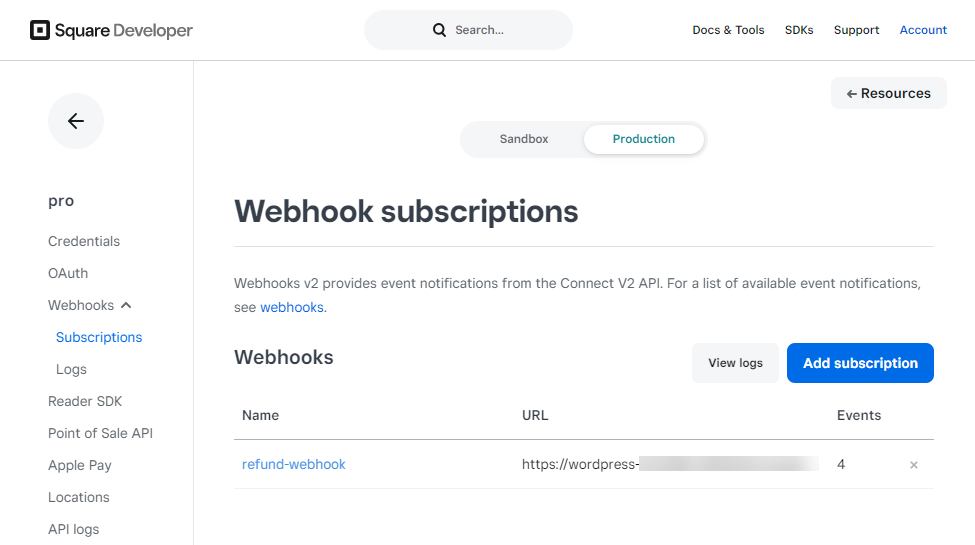
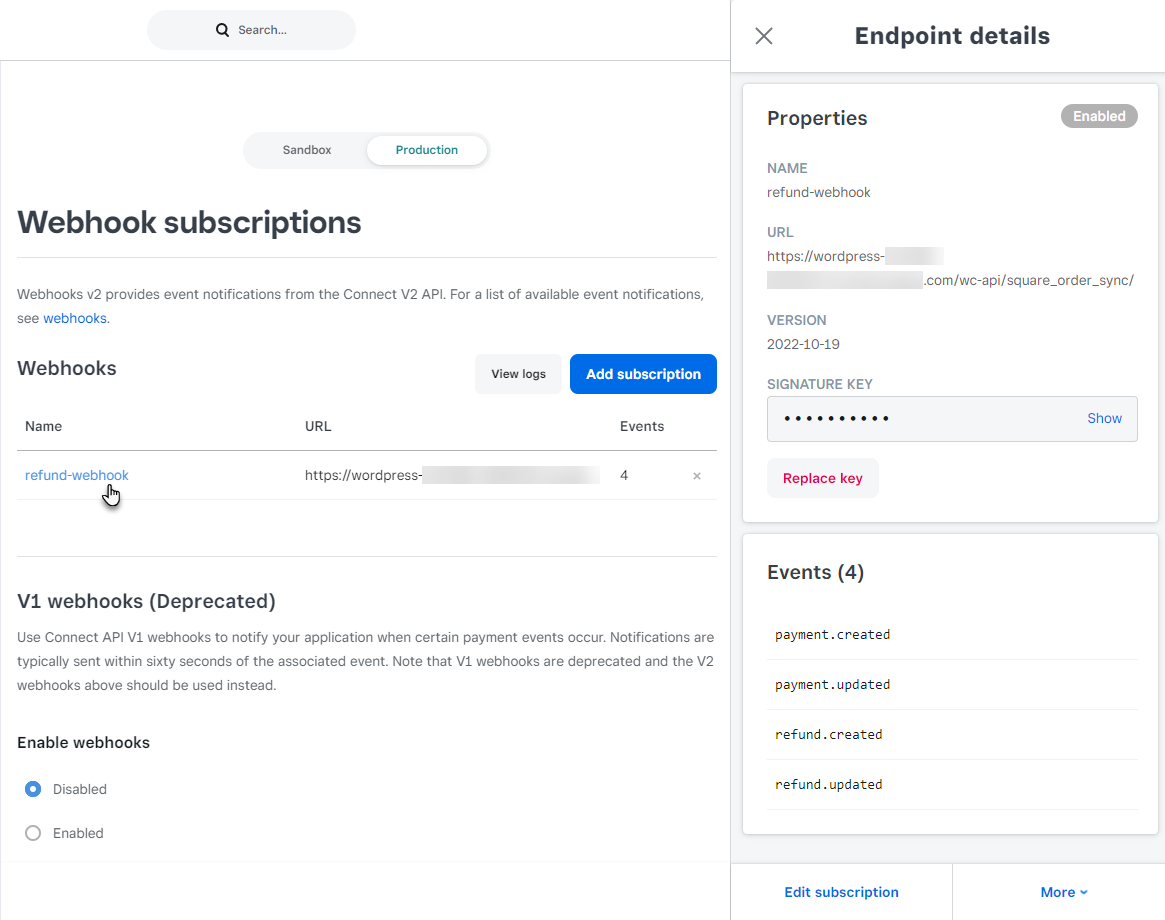
- The Endpoint is created.
- Click on the Endpoint to view its details.
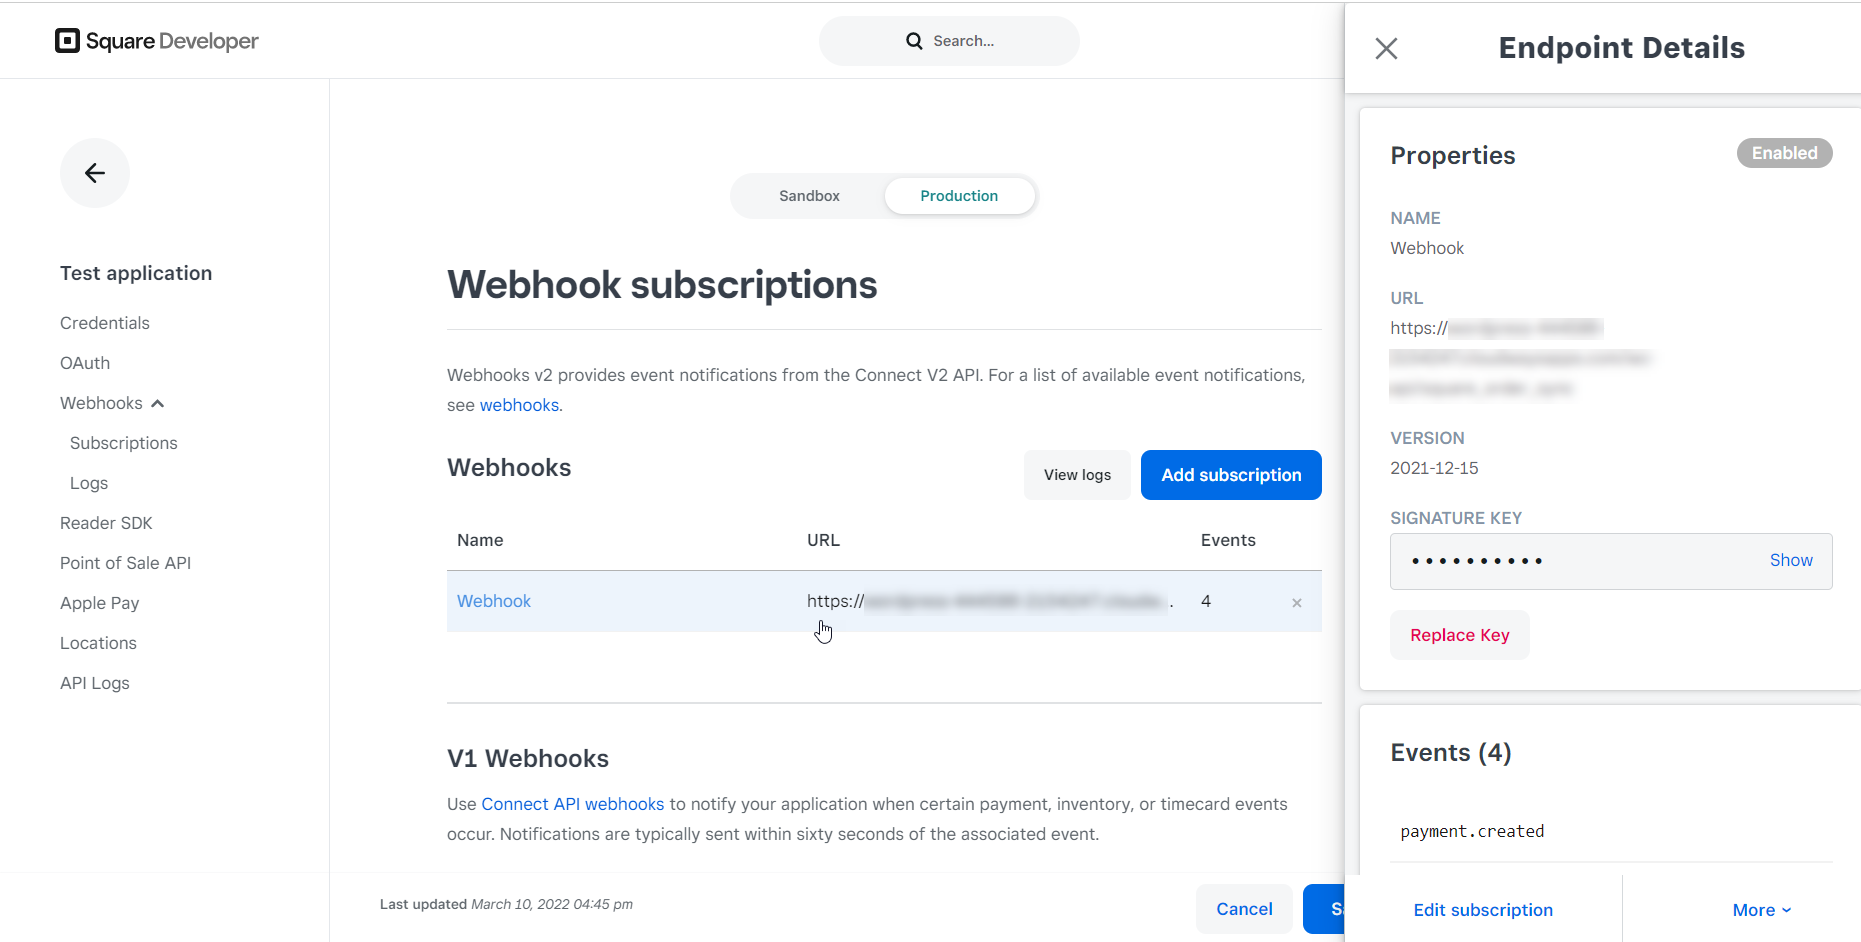
- Click on the More button and click on the Send Test Event button on the Endpoint Details section.

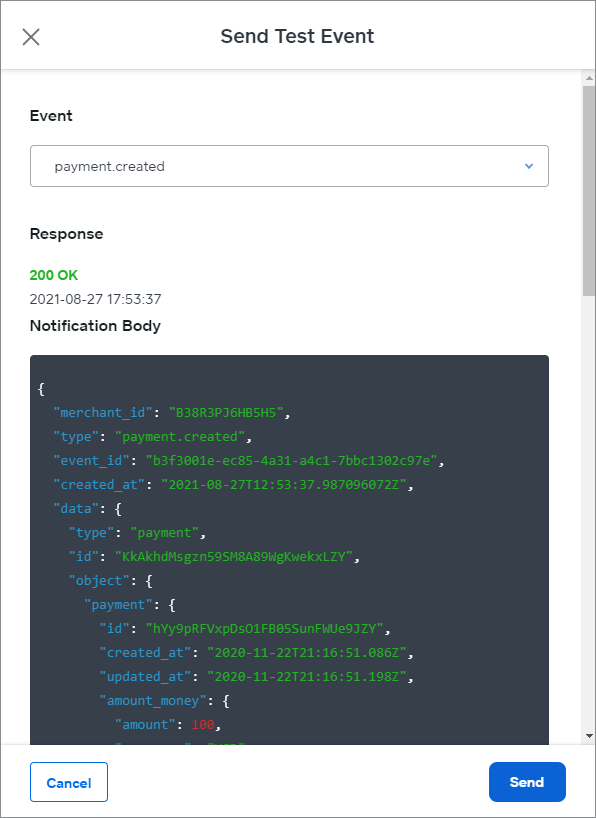
- A popup would appear on the Send Test Event.
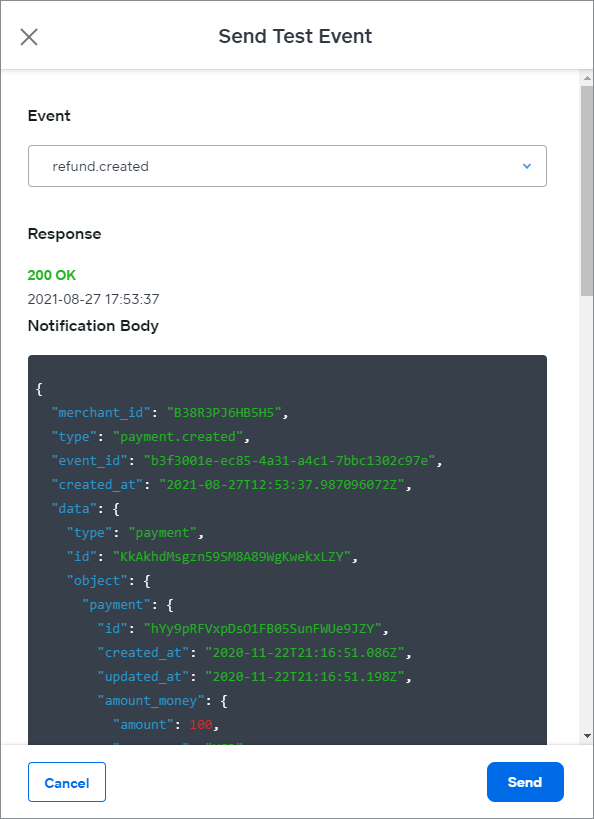
- Select any one event from the dropdown menu.

- Once done, click on the Send button.
- Once Send, the code has to return 200, which means that settings are working correctly from WC Shop Sync to Square. If the 200 code is not returned, then check your settings again and test.
payment.created
payment.updated

refund.created
refund.updated

NOTE: Set your permalink at Post name for better best result regarding Send Test Event.
Go to Admin Dashboard → Settings → Permalinks.
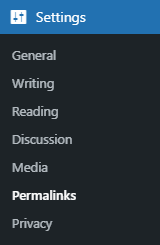
Select the Post name and click on the Save Changes button.
20.1.SYNC SQUARE POS ORDER TO WOOCOMMERCE
- Orders charged through Square Point of Sale app can be synchronized with WooCommerce.
- The orders generated by Square Point of Sale app will be synchronized with all the product details of the product being charged and synced to WooCommerce.
- To make a charge from Square POS.
- Download and open it.
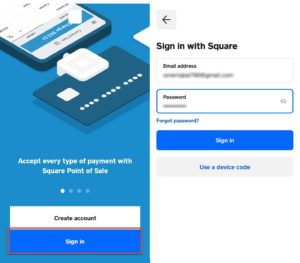
- As the Point Of Sale app is opened it will prompt to Sign In
- Click the sign-in button and provide account credentials on the next screen, click sign-in on the top right corner of the POS.
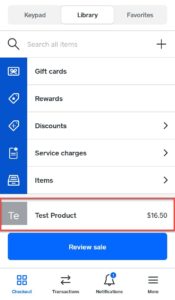
- When the account is logged in, all the items in the Square Item Inventory of the particular account will be displayed through the POS.
- To make a charge tap an item, if the item is a variable product then POS will prompt to choose from Variations.
- Select the variation and click add.
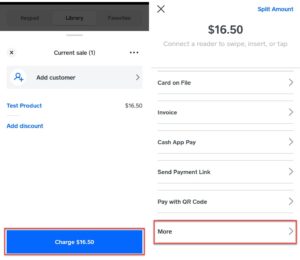
- After clicking the add button, the item will be selected for charge and the amount will be updated on the charge button.
- Click the charge button to create a charge in POS.
- When the charge button is tapped, POS will redirect to the next screen, on the next page, there will be options to tap that option.
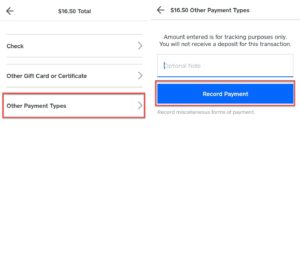
- As more options are clicked it will display the different payment methods, select other payment types.
- POS will redirect to the screen where payment can be recorded through POS.
- To record the charge for the selected item click on Record Payment Button.
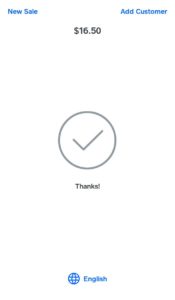
- A charge will be created through POS and a Confirmation page will be displayed.
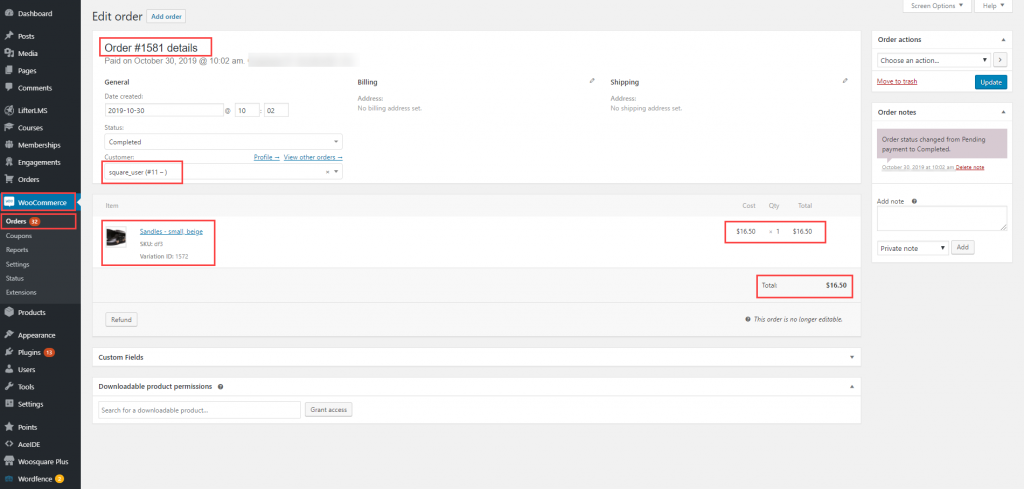
- Order placed through Square POS will sync from Square to WooCommerce and display in the orders tab.
20.2.REFUND FROM SQUARE POS
- A refund can be given through Square POS on any order created through the POS.
- Any refund given on Square POS will reflect in the WooCommerce order tab for the particular synced Square Item.
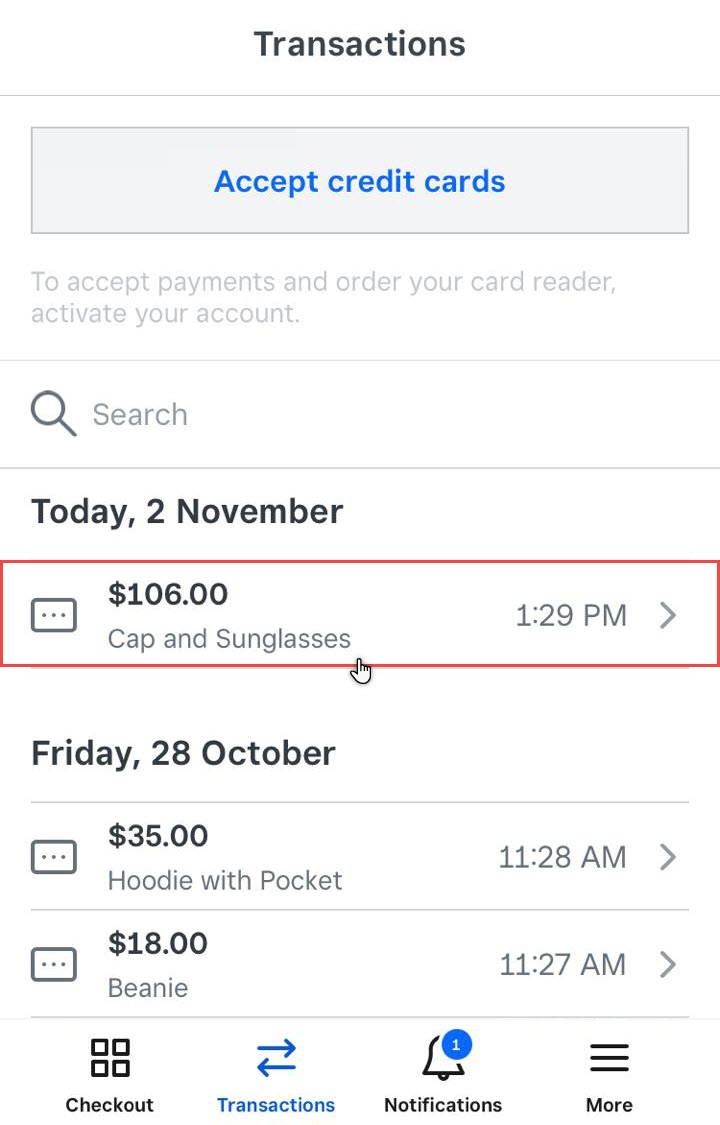
- Log in to Square POS through Square Account and issue a refund.
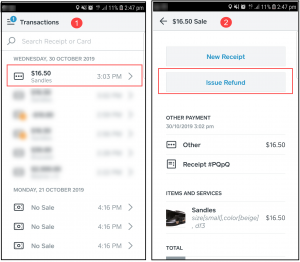
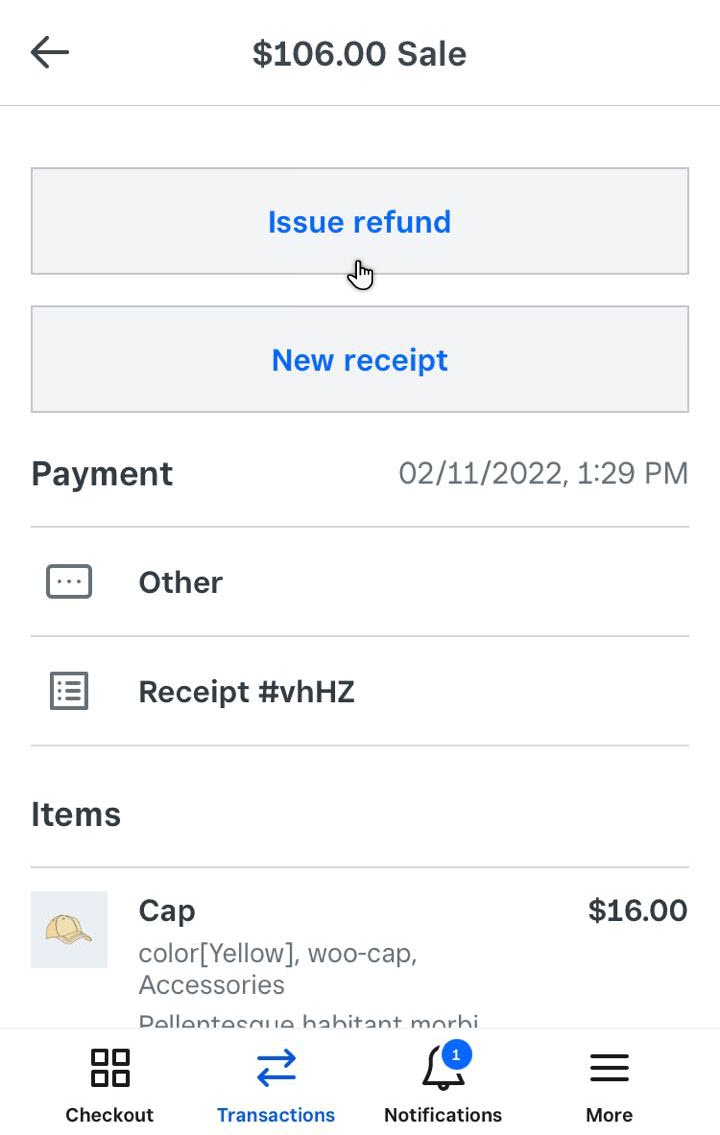
- Open Transactions and click on that transaction you want to refund.
- When the transaction information screen opens tap the issue refund button.
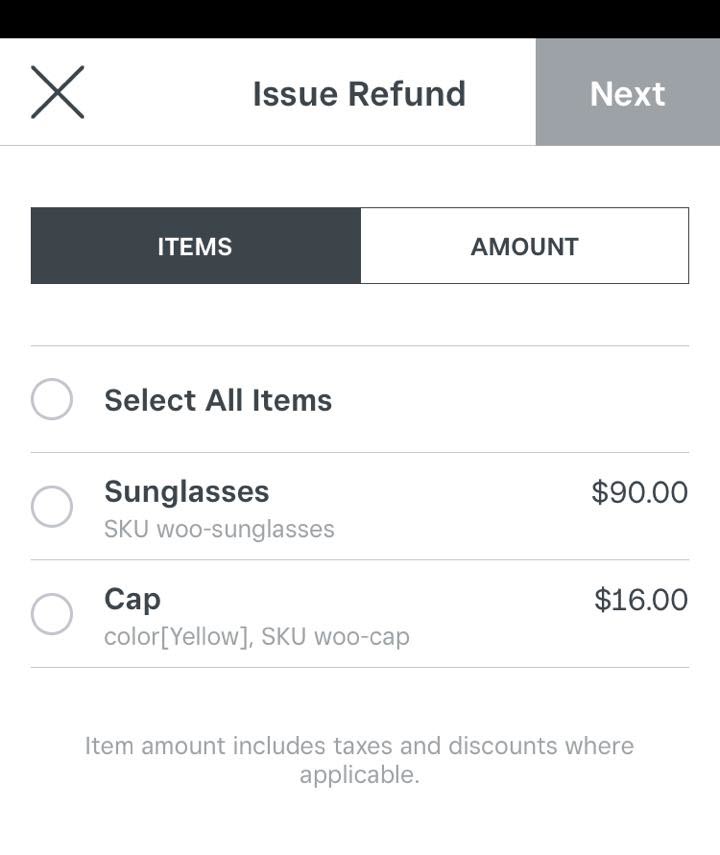
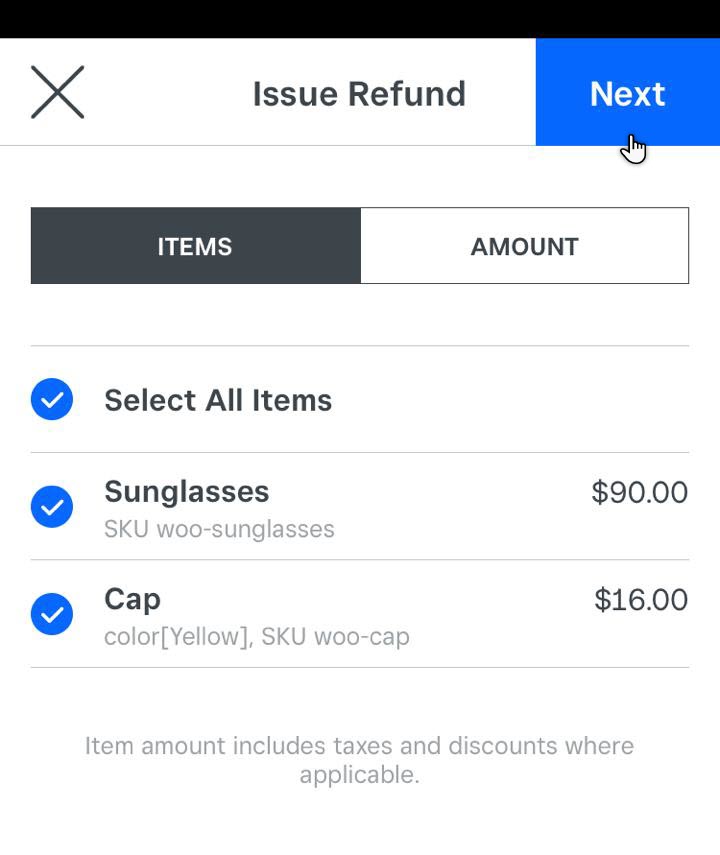
- Select the item from the items tab and define the amount to be refunded from the amount tab and tap next.
- On the next page, a reason for the refund has to be selected. After selecting a reason click on the refund button.
- A confirmation screen will display for refund displaying the amount that is to be refunded.
- As the POS has processed the refund it will be synced in real-time with WooCommerce and the refund will be displayed for the particular order in WooCommerce.
20.3.SYNC WOOCOMMERCE ORDER TO SQUARE TRANSACTION
- Enable sandbox to place test transactions.

- Click enable sandbox checkbox to set up a sandbox, fields for Sandbox application id, Sandbox access token, and Sandbox location id will appear.
- Sandbox Application Id, Sandbox Access Token, and Sandbox Location id can be retrieved from the Square account.
- Copy these credentials from the Square account and paste in the fields in the Payment settings tab and click save changes.
- Sandbox Application ID and Sandbox Access Token can be retrieved from here on the Square Account. (Note: Create a Square application if you don’t have one: https://developer.squareup.com/apps)
- Square Application must be set to Sandbox Settings mode.
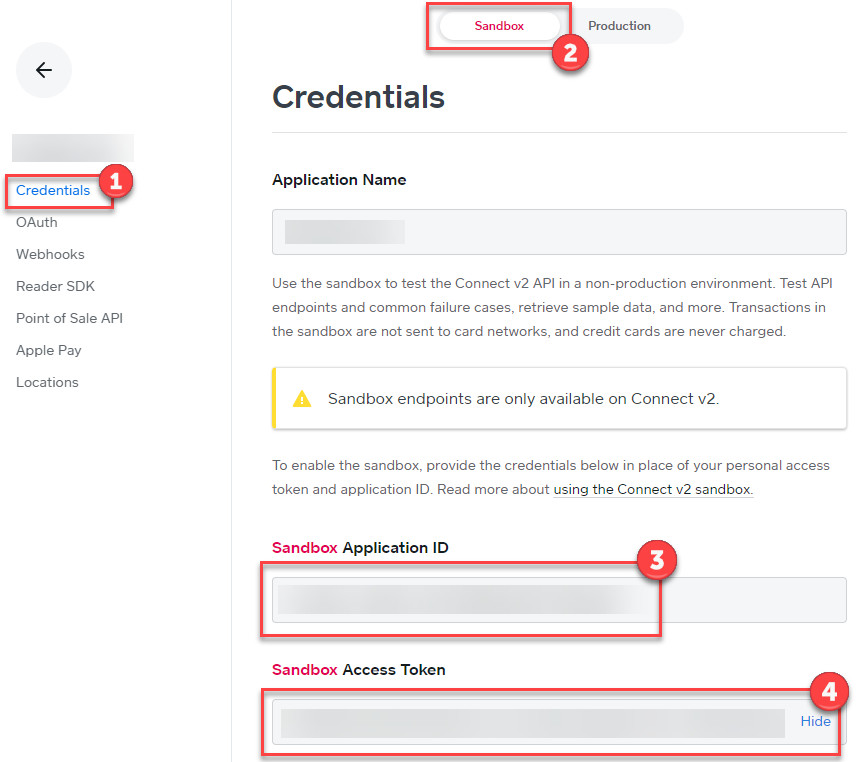
- Location ID can be retrieved from here on the Square Account.
- Place an order on your WooCommerce site.
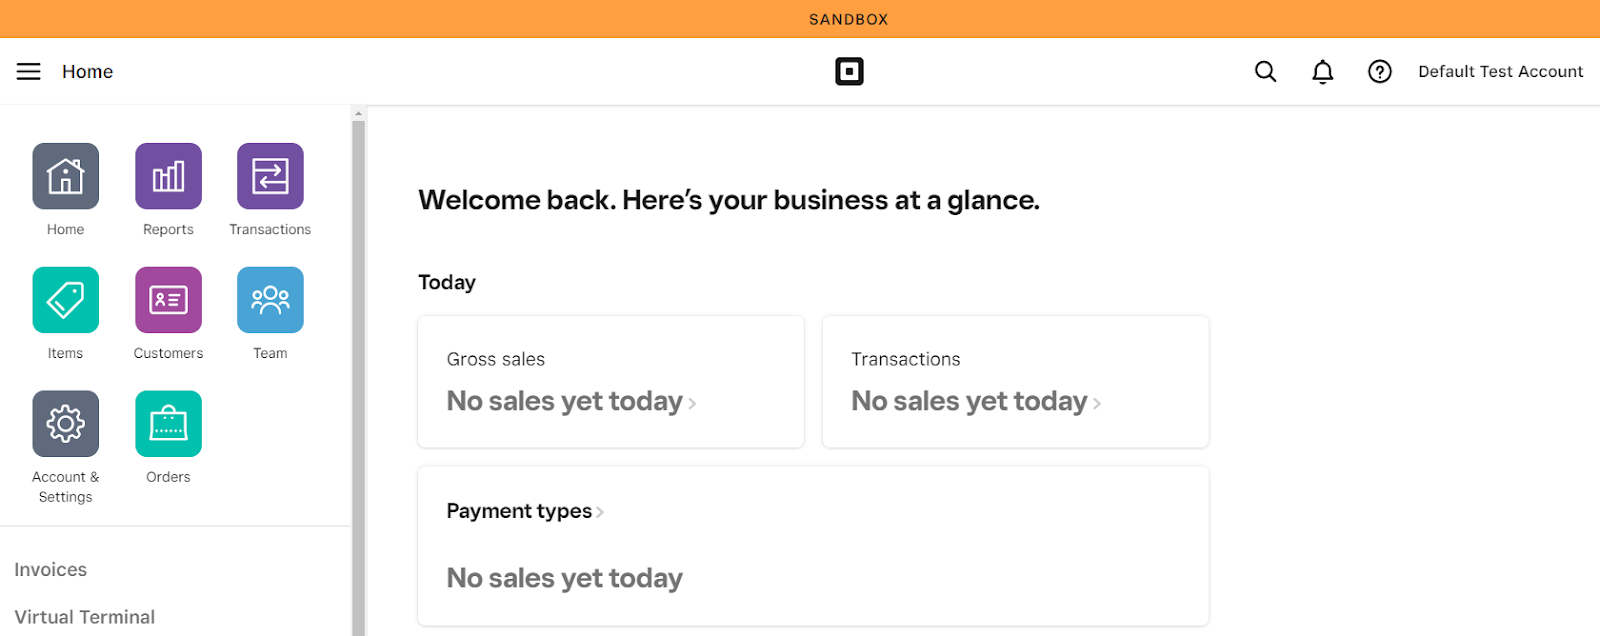
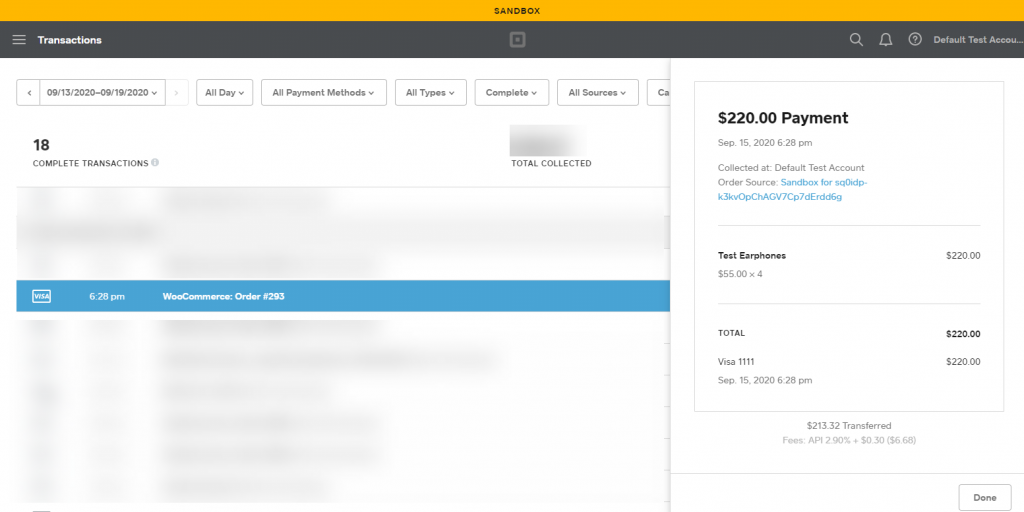
- Open your Square Default Test Account.
- Go to Transactions.
- Synced orders will be displayed.
21.TRANSACTION NOTES
- Through the Transaction notes module, set a template for transaction notes to be sent on every transaction.
- This module has to be enabled from the plugin module as it is enabled, a tab for transaction notes will be activated.
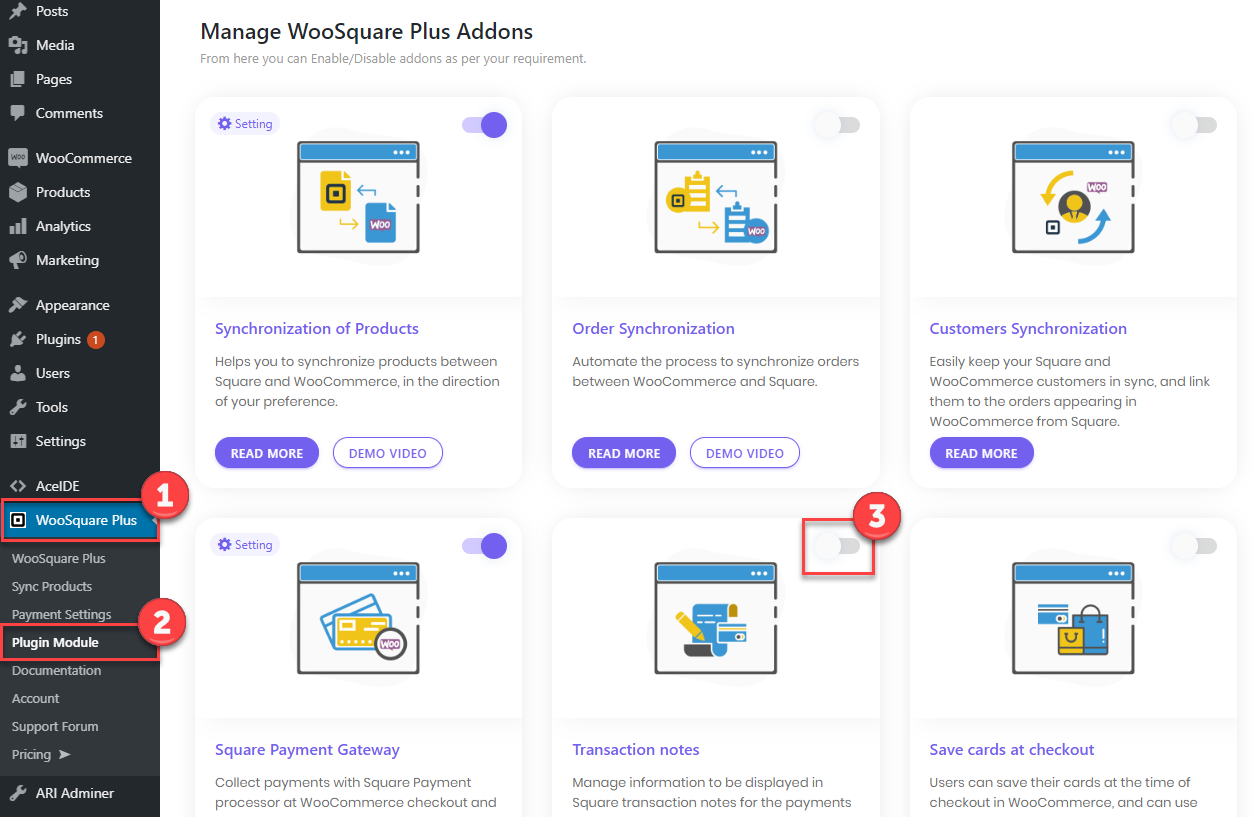
- To activate the module, go to the WC Shop Sync tab.
- Navigate to the plugin module tab.
- Enable the Transaction notes module.
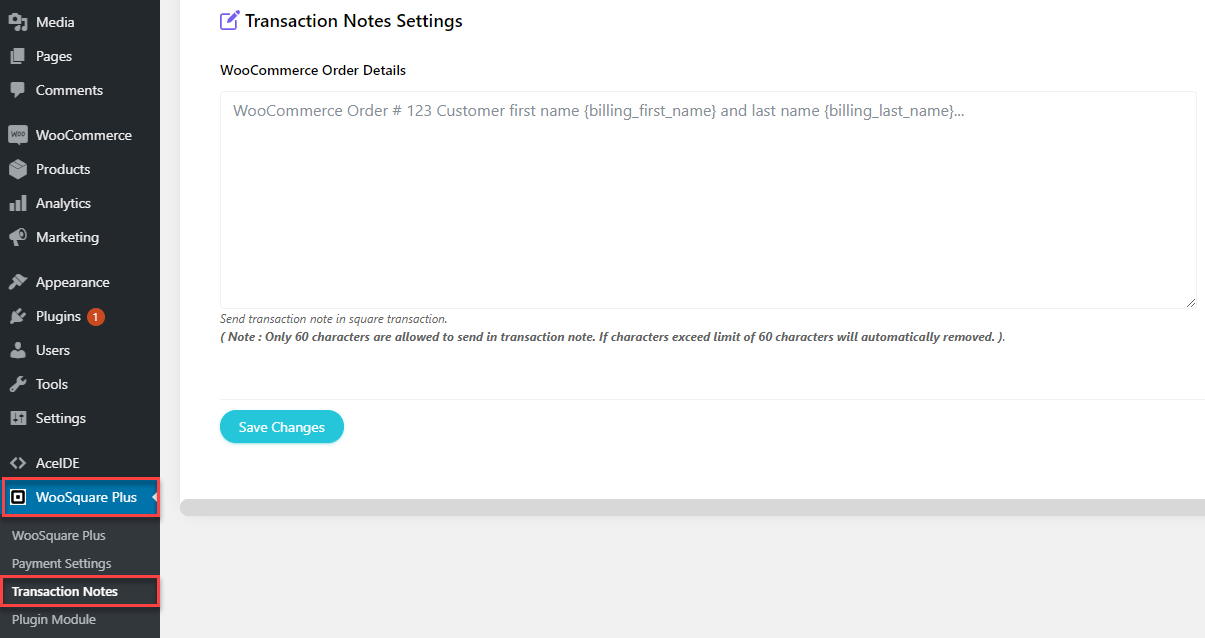
- The template can be designed to have multiple tags like {order_id} tag which will fetch order id of the order placed or {billing_first_name} tag which will fetch the first name of the customer who is placing the order and send it in the transaction note. Tags given below in the module tab can be used.
- Click Save changes to save the transaction note.
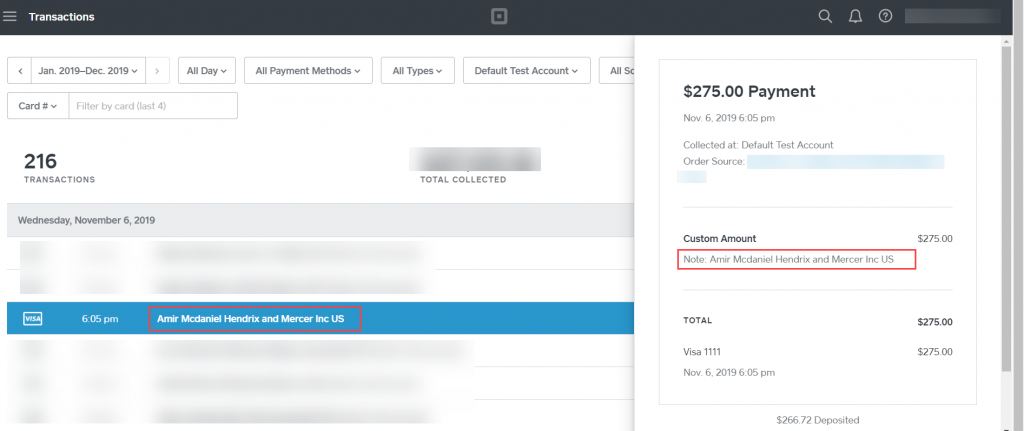
- As a transaction is completed through WooCommerce checkout and hits the Square account the transaction note for the respective transaction can be seen in the transaction receipt.
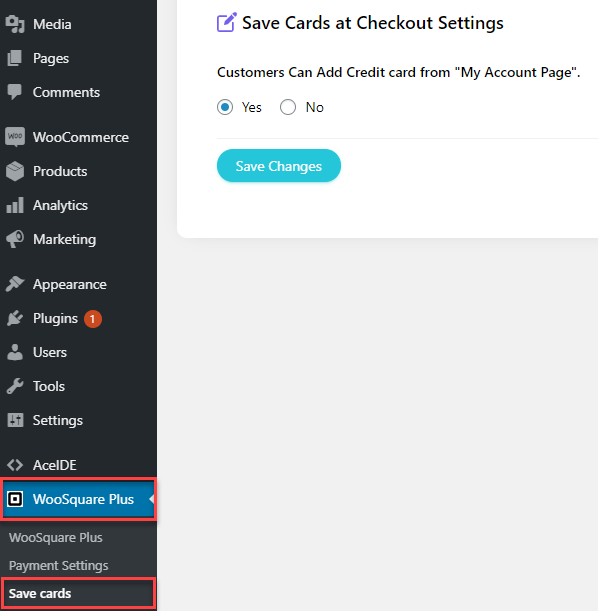
22.SAVE CARDS AT CHECKOUT
- Enabling this module will allow the card to be saved on WooCommerce checkout and can also be synchronized from My account page of the user.
- To display the settings of the module, it will have to be enabled from the plugin module tab, save cards tab will be activated as this module is enabled.
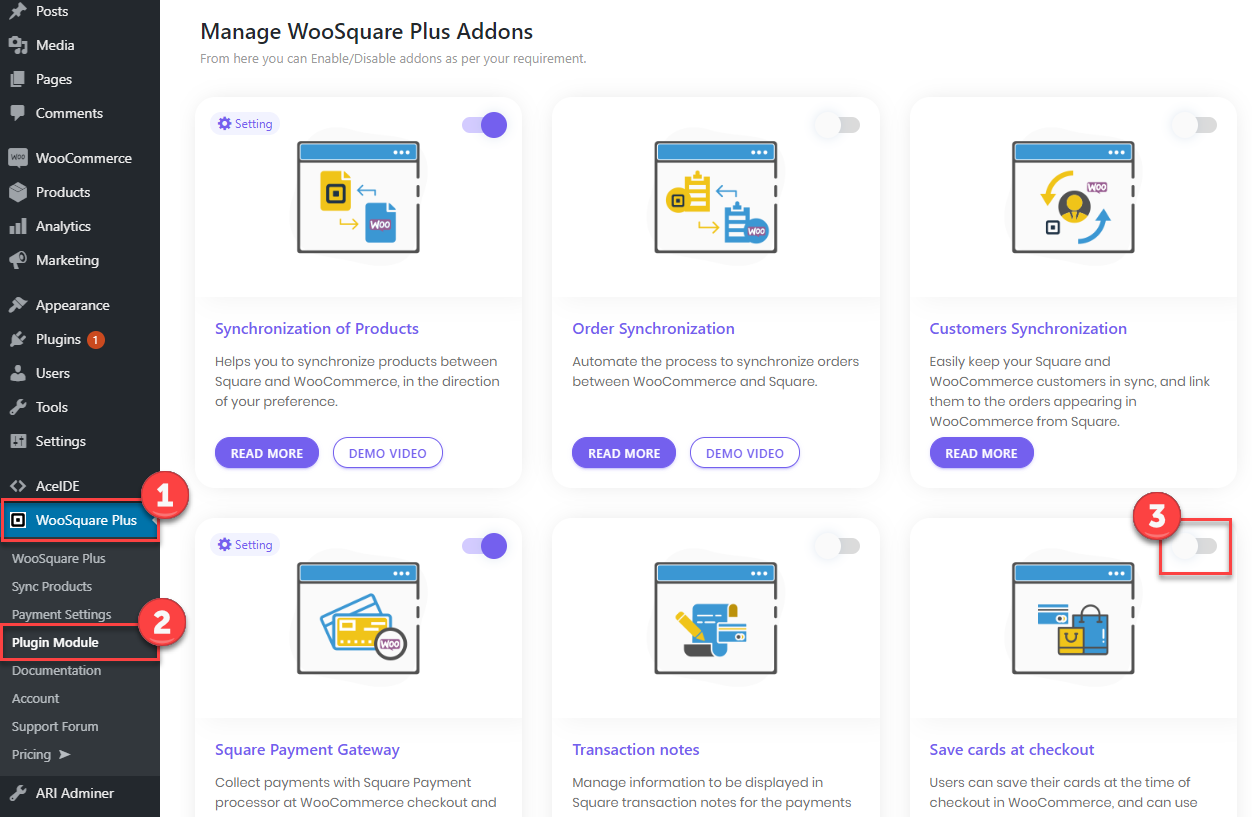
- To activate the module, go to the WC Shop Sync tab.
- Navigate to the plugin module tab.
- Enable the Transaction notes module.
- When the module is activated, then there will be a new tab available in the dashboard side menu, Customer Sync tab.
- Select Yes and click Save changes, if you want customers to add credit cards on My Account page.
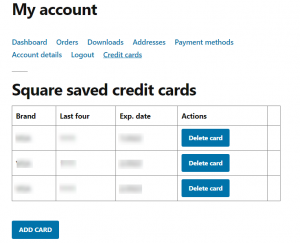
- The credit cards page will be displayed on My Account page, where users can add his/her credit cards.
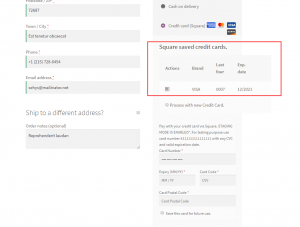
- On the checkout page, Different cards saved in the user My account will be displayed to choose from.
- Users can directly choose anyone of his/her credit cards through which he/she wants to pay.
23.CUSTOMER SYNCHRONISATION
- Enabling this module will allow customer synchronization.
- To display the settings of the module it will have to be enabled from the plugin module tab.
- WooCommerce/Square Customer tab will be activated as this module is enabled.
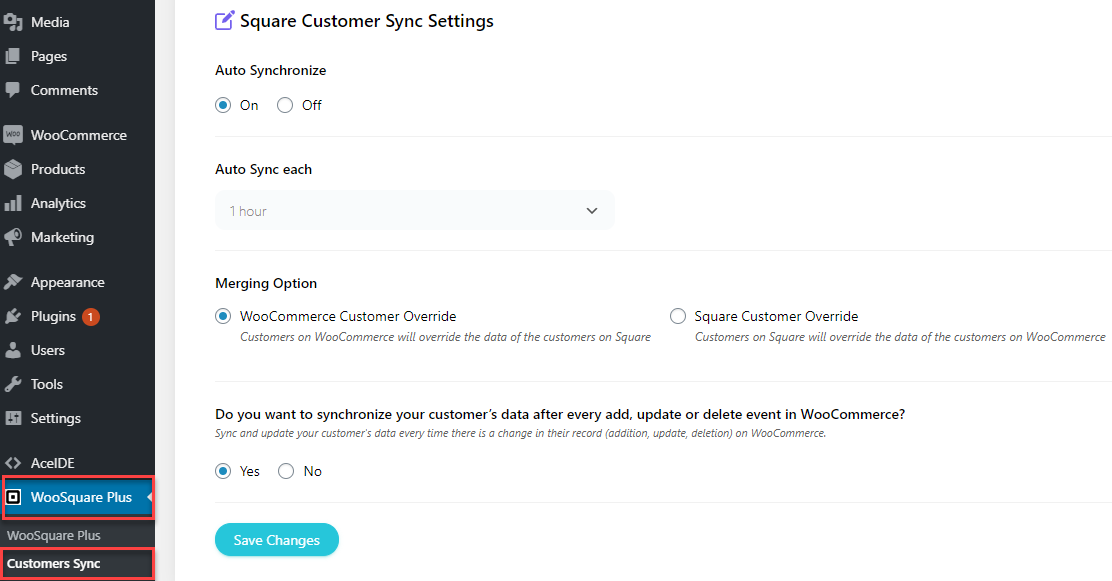
- To automatically synchronize the customer between both platforms set this option to on, the plugin will auto synchronize customers.
- As this setting is set to on, another setting will be enabled for auto-sync time, the customer can be auto-synced after 1 hour, 12 hours, and 24 hours.
- The time selected for the auto-sync, the plugin will auto-synchronize the customer according to the set time interval.

- This setting enables the override/sync customer between WooCommerce and Square.
- There are two options to choose from: WooCommerce customer Override Square customer and Square customer Override WooCommerce customer, the plugin will synchronize data according to the option selected. This setting works with auto-sync functionality.

- The plugin will edit, update, and delete the synchronized customer if this option is selected.
- Editing, updating, and deleting can be done both ways, from Square to WooCommerce and from WooCommerce to Square.
- If the sync is selected from Square to WooCommerce, then any customer being edited, updated in Square will be reflected in WooCommerce and the same goes for WooCommerce to Square.
- Remember to click save changes.

24.CARTFLOWS FOR WC Shop Sync
- WC Shop Sync also provides integration with Cartflows.
- CartFlows plugin makes a flow of steps that a user goes through your website.
- Cartflows Links:
- Available Cartflows step types to choose from:
- Landing Page Step
- Checkout Step
- Upsell Step
- Downsell Step
- Thank You Step
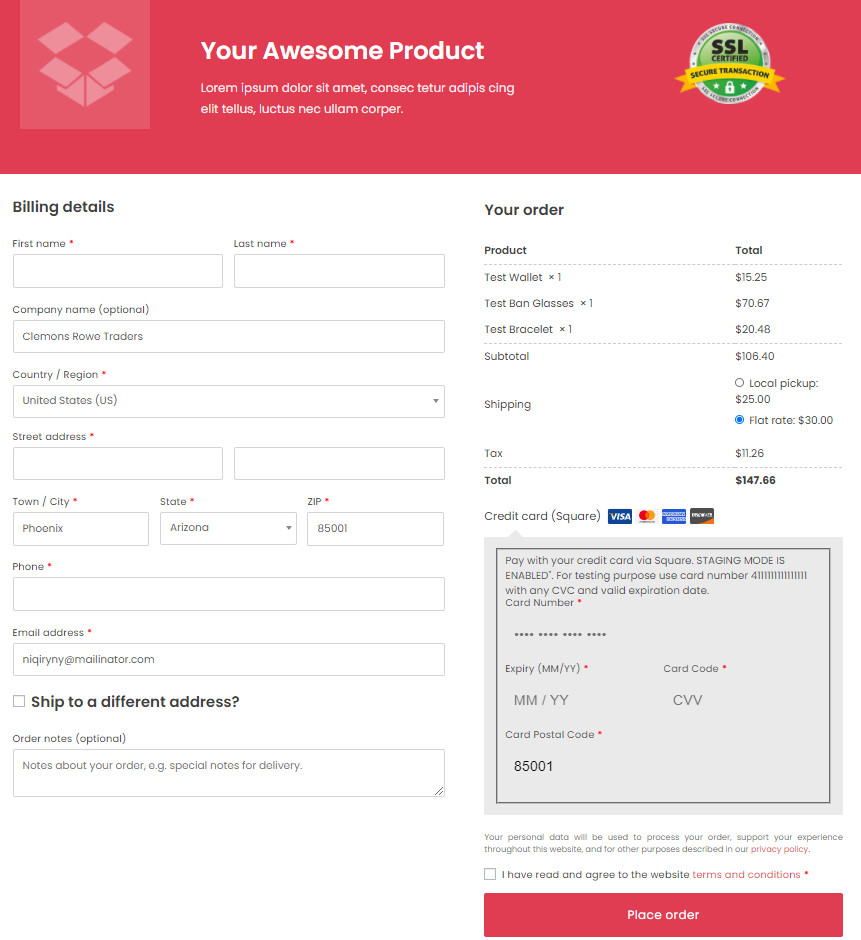
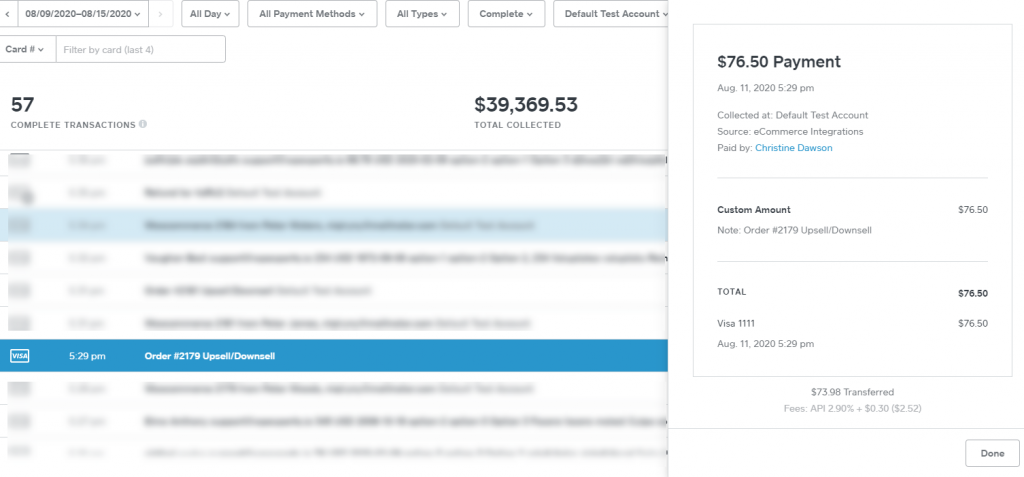
- A Cartflow Checkout.
- An Upsell Popup.

- A Downsell Popup.

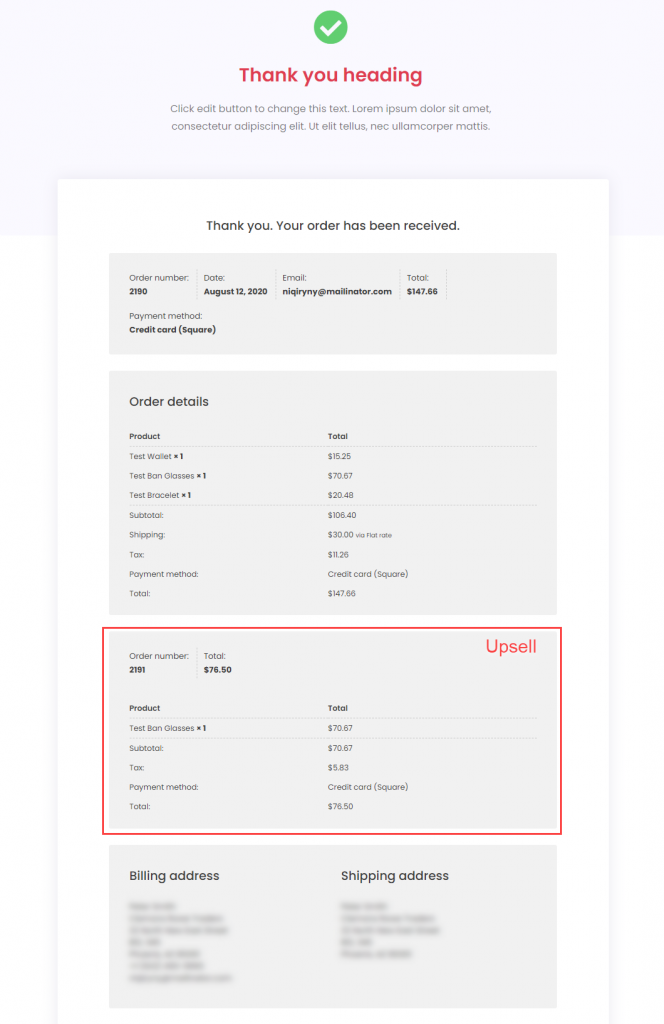
- A Completed Order through Cartflow checkout with an upsell order.
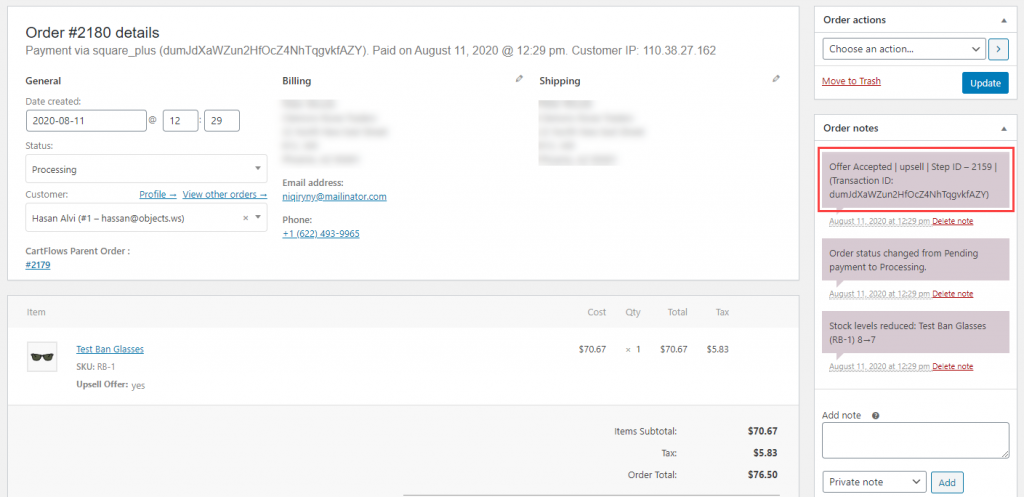
- A Cartflow Upsell order in Woocommerce orders.
- Order in Square.
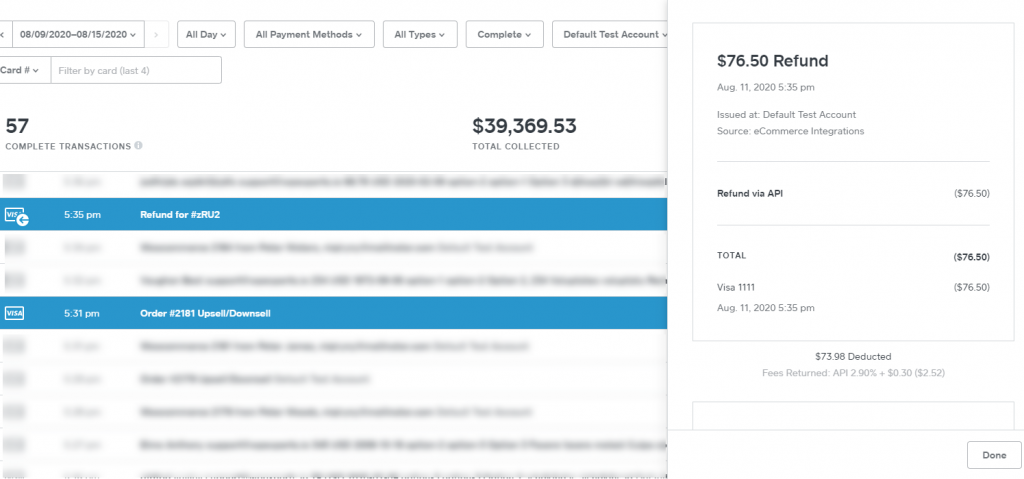
- Upsell/Downsell Refund in Square
25.WOOCOMMERCE PRE-ORDERS FOR WC Shop Sync
- WC Shop Sync also provides integration with Woocommerce Pre-Orders.
- WooCommerce Pre-Orders link:
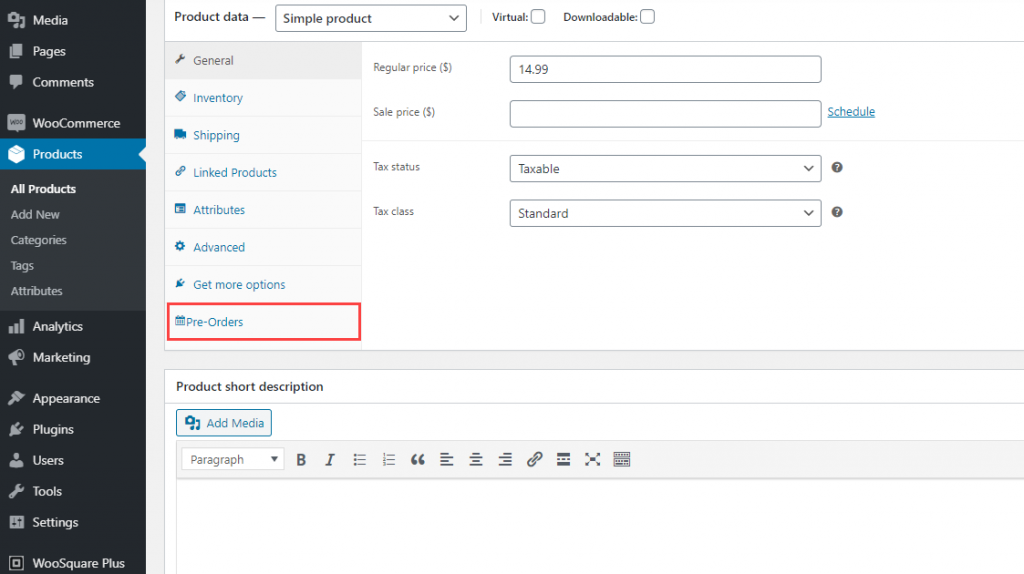
- After you have activated the Woocommerce Pre-Orders plugin, click the WooCommerce Product tab and navigate to Add new option and click it.
- A new page will open where a new product can be created in WooCommerce.
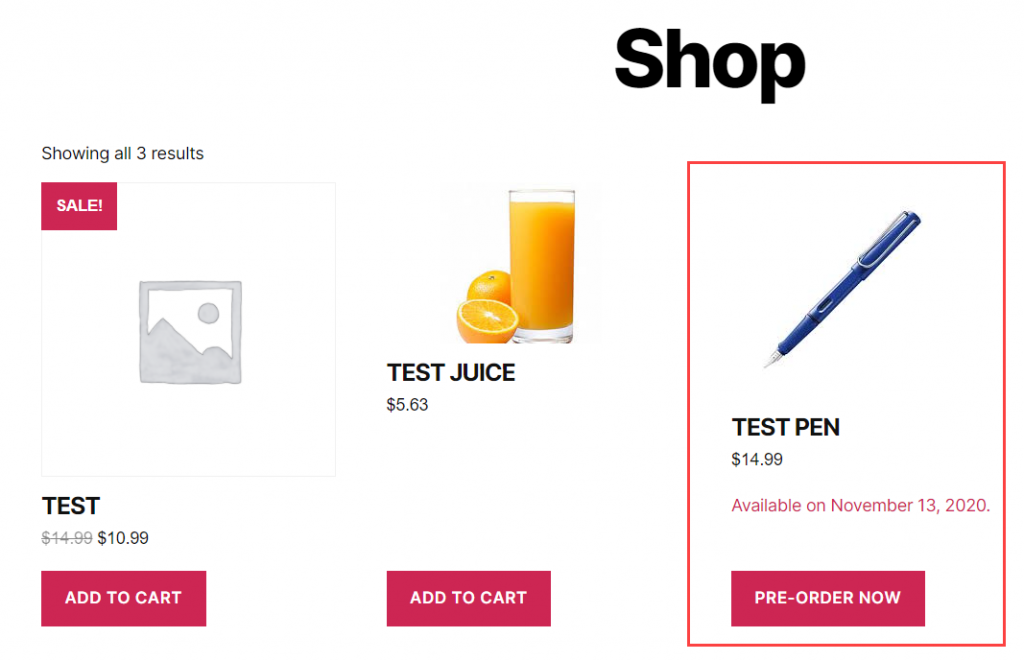
- Provide all the product details then Pre-Orders tab in the Product data.
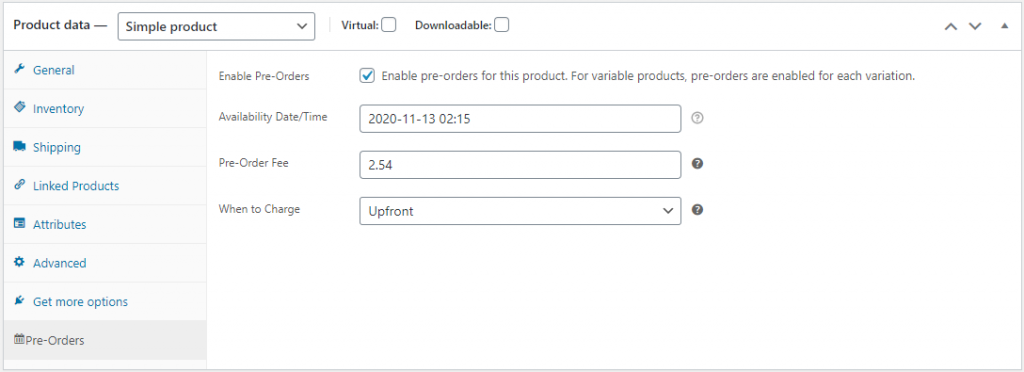
- Click Enable Pre-Orders checkbox.
- Enter Availability Date and Time.
- Enter Pre-Order fee if you want to.
- Select When to Charge for product: Upfront or Upon Release.
- Update the Product.
- Product on Shop page.
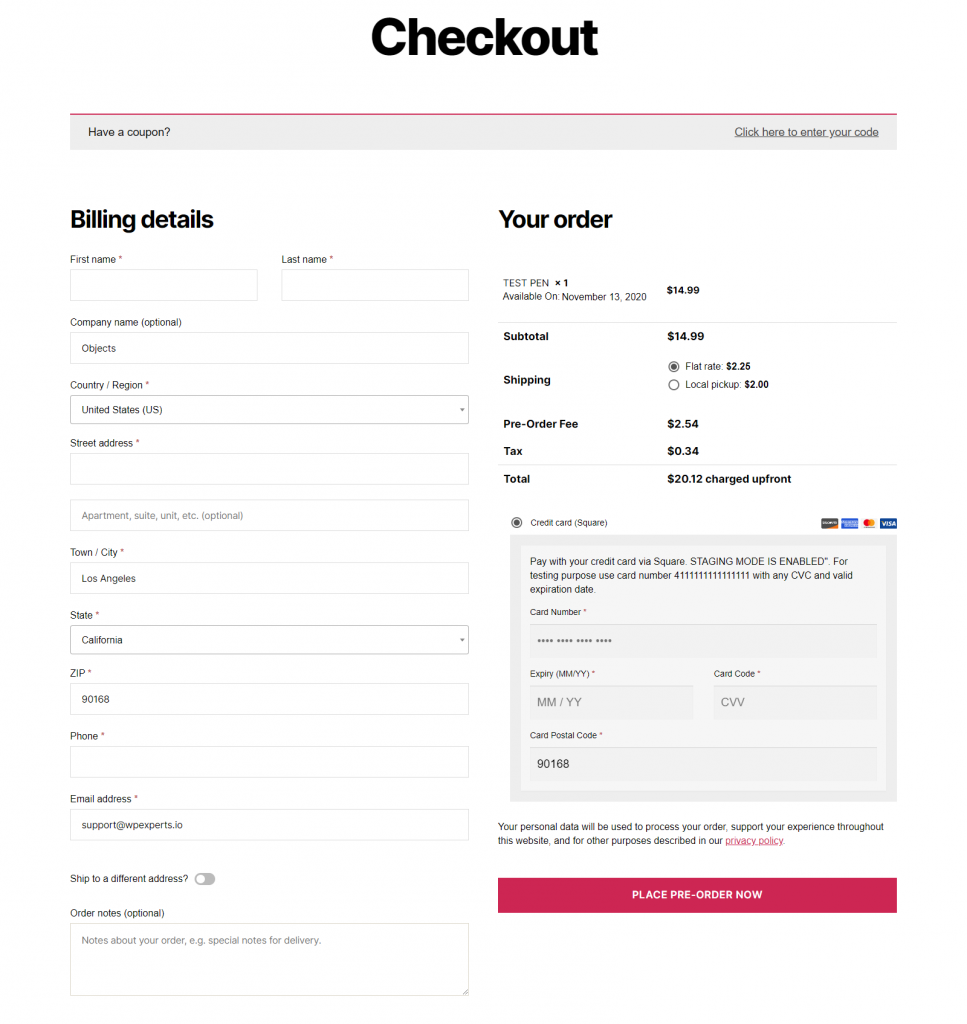
- Product on Checkout page.
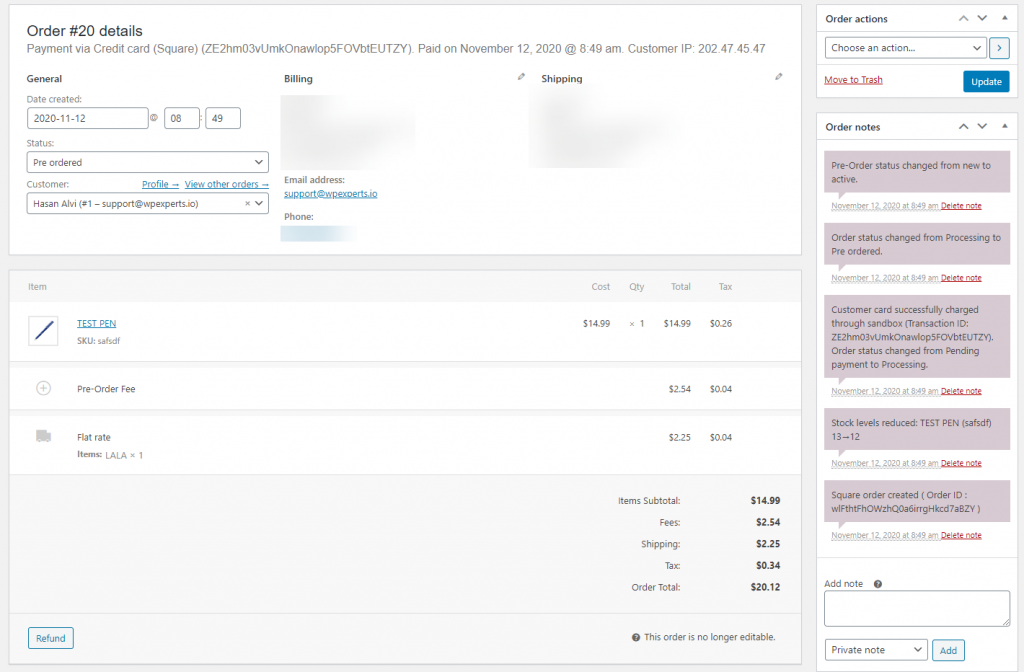
- A Completed Woocommerce Pre-Order on checkout through WC Shop Sync.
![]()
- Pre-Order in Woocommerce orders.
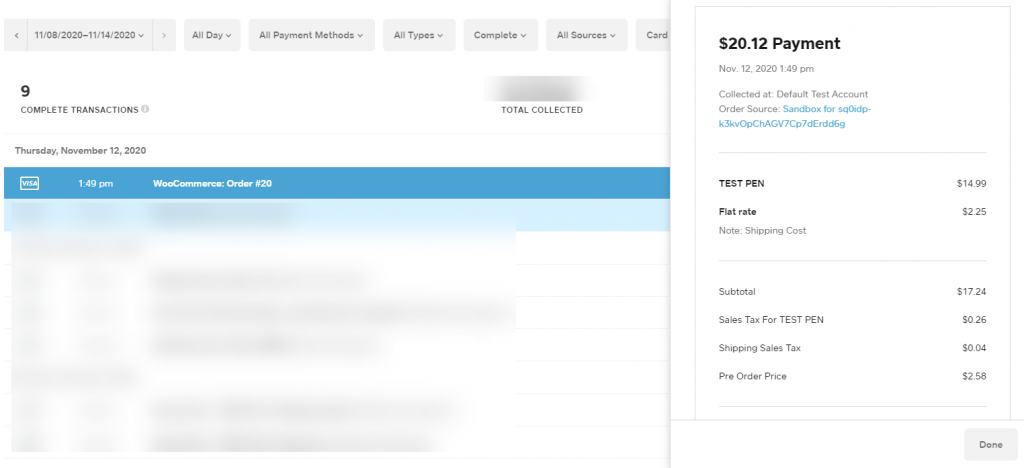
- Pre-Order transaction in Square.
26.WOOSQUARE WITH FUNNELKIT FUNNEL BUILDER
Install FunnelKit Plugin
- Go to the FunnelKit.
- Get the Funnel Kit Funnel Builder plugin.
- Install the Funnel Builder Plugin.

- Navigate to WordPress Admin Dashboard → FunnelKit → Funnels.
- Add a new Funnel.
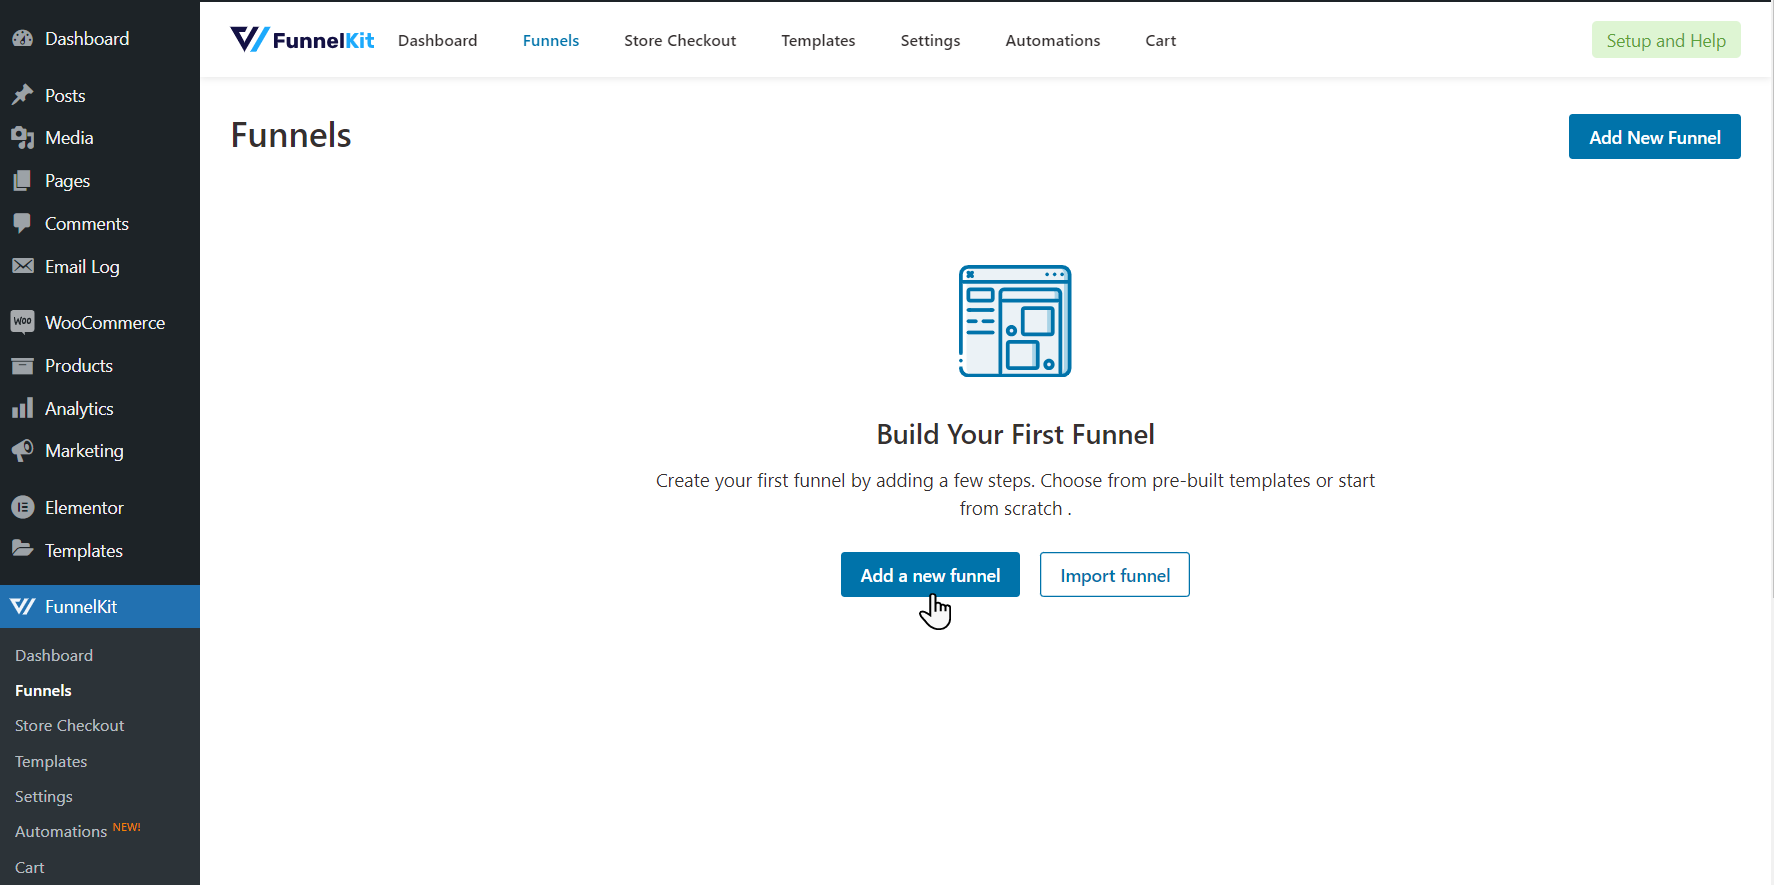
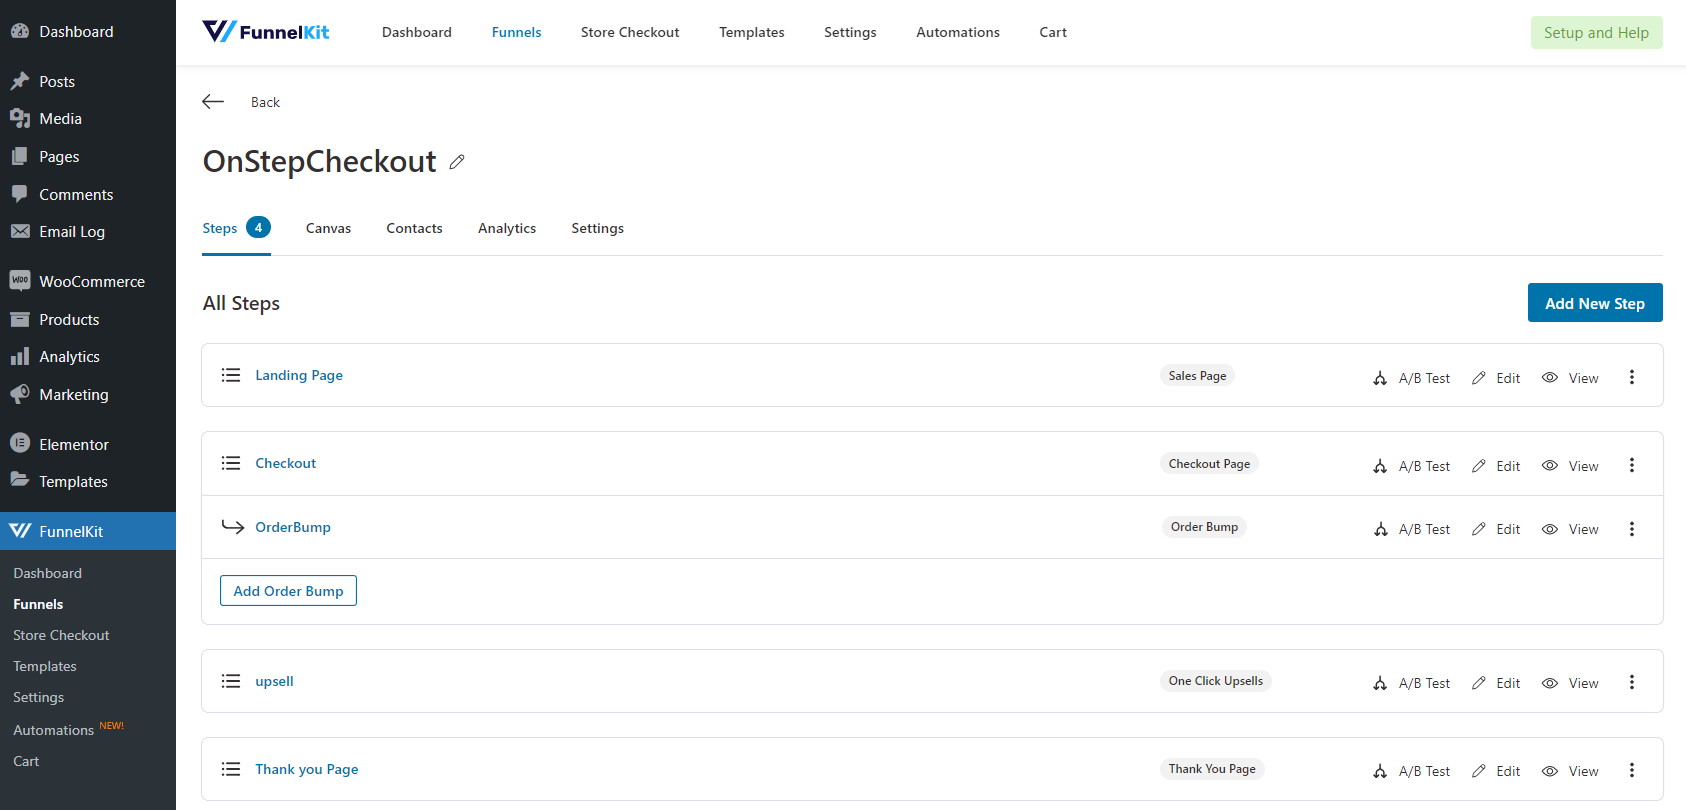
- After adding a funnel, add steps in the funnel.
- Add the Checkout step.
- Add the product in the Checkout step.
- You can also add an Upsell step.
- For more details on how to add steps, setup a funnel, and design the template, go to the FunnelKit Documentation page.
WooSquare Payment Gateway Settings
- Navigate to the Woo-Square Plus → Payment Settings.
- Click on Enable Square.
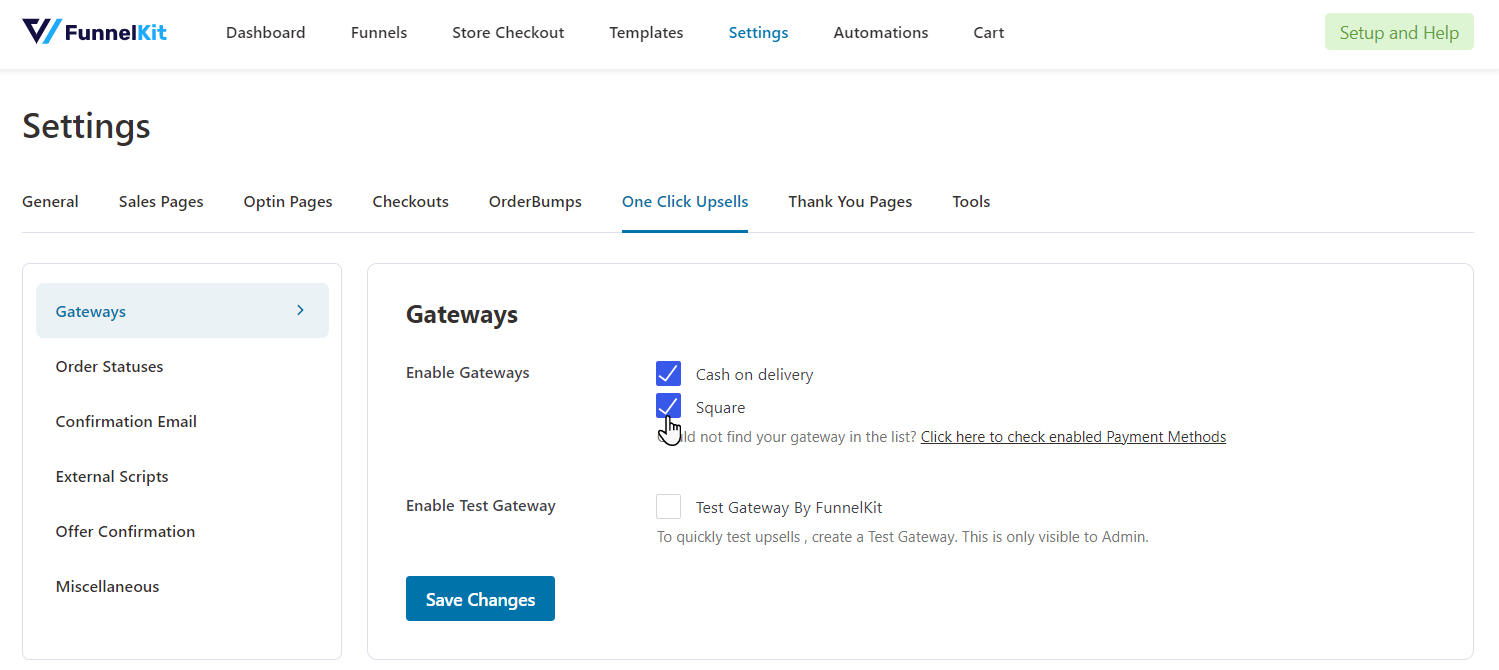
- After enabling Square Credit Card, navigate to the FunnelKit → Settings.
- In the FunnelKit Settings, go to the One Click Upsells section.
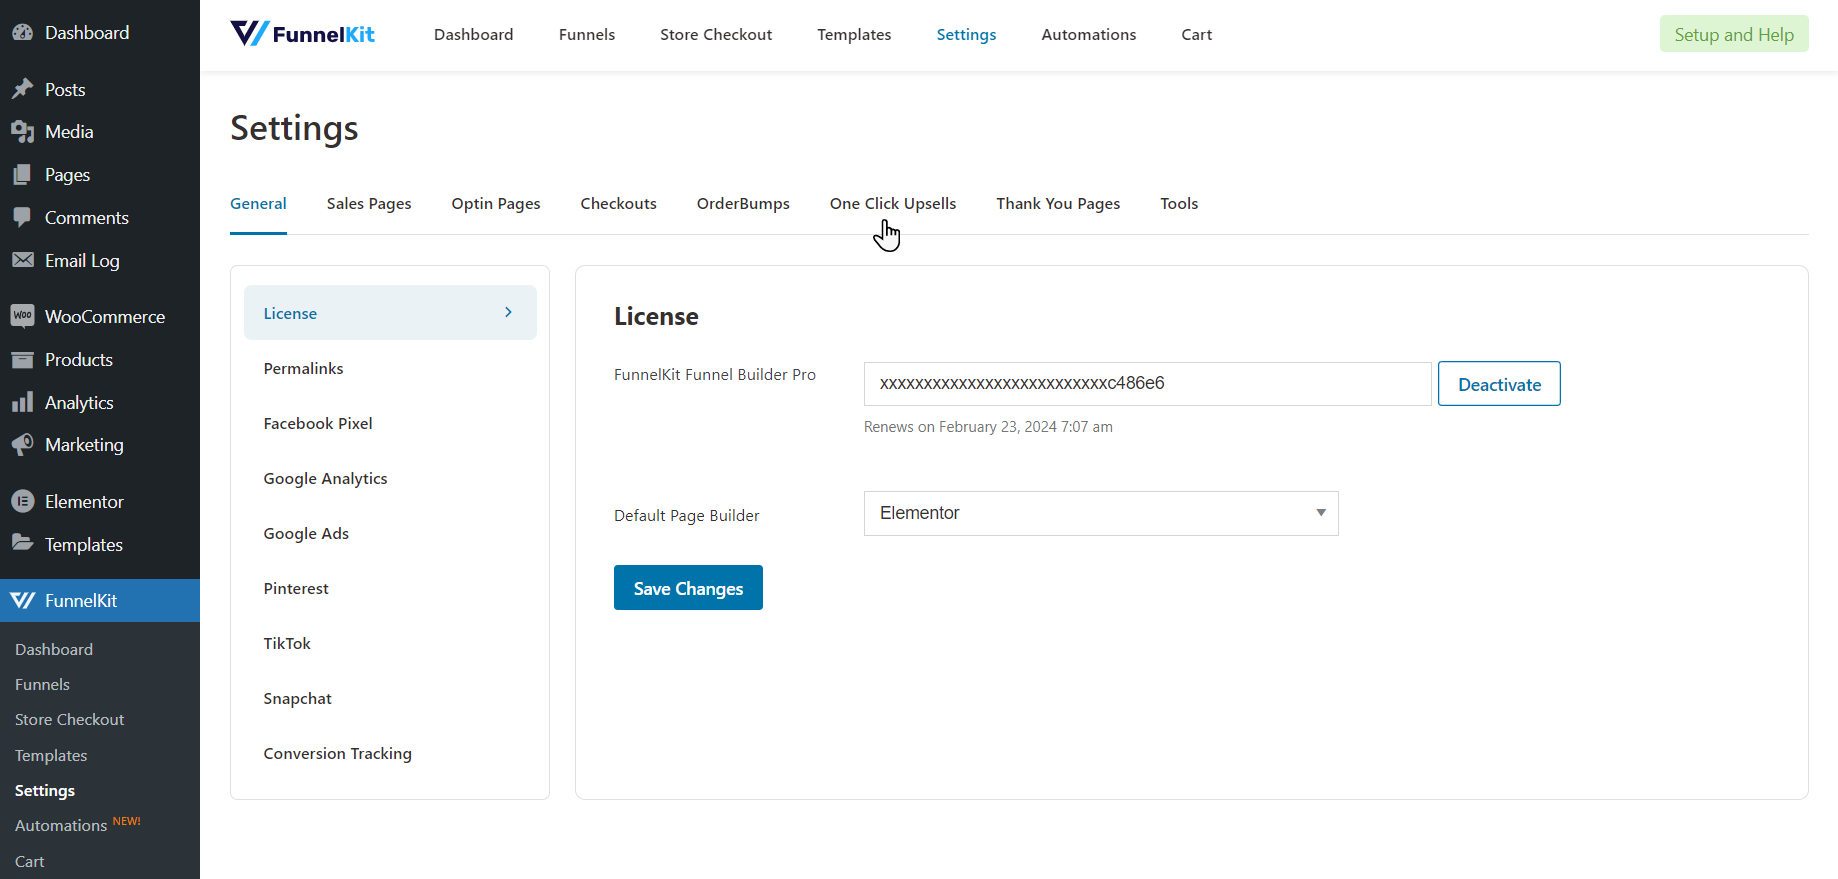
- In the One Click Upsells, navigate to the Gateways section.
- In the Gateways, click on the Square checkbox to enable the Square payment gateway in the funnel checkout and upsell step.
Front-End Impact
- Go to your Website.
- Click on Buy Now on the landing page.

On the Checkout Page, select Square Credit Card as payment method.
- Enter card details.

- Place Your Order.
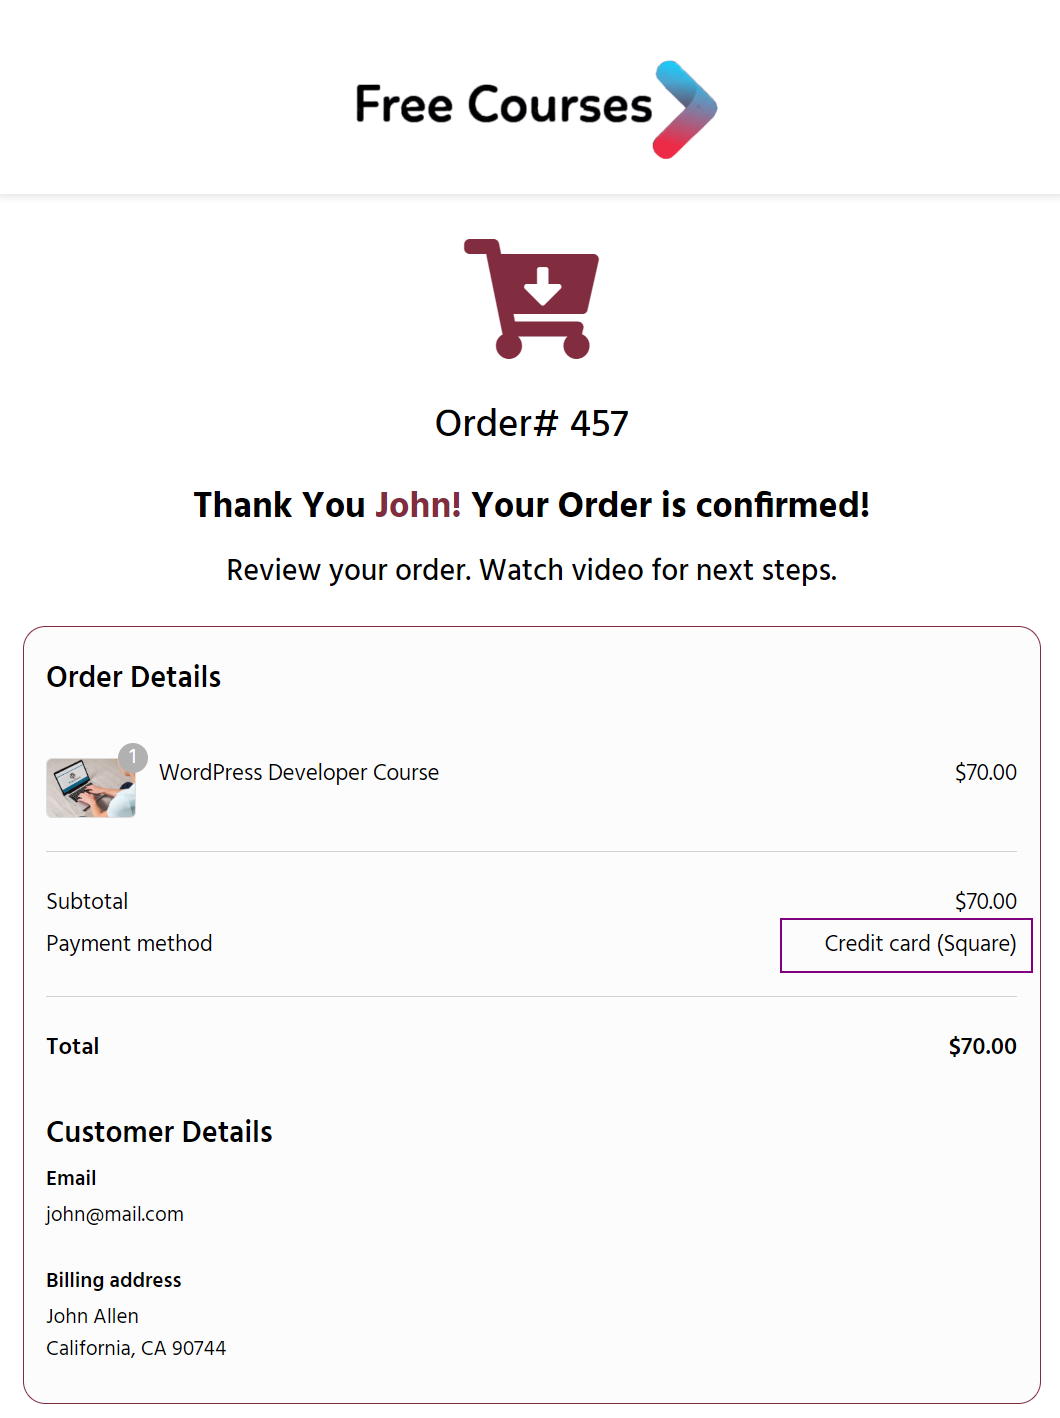
- Users will be redirected to the Upsell page if you have added this step.

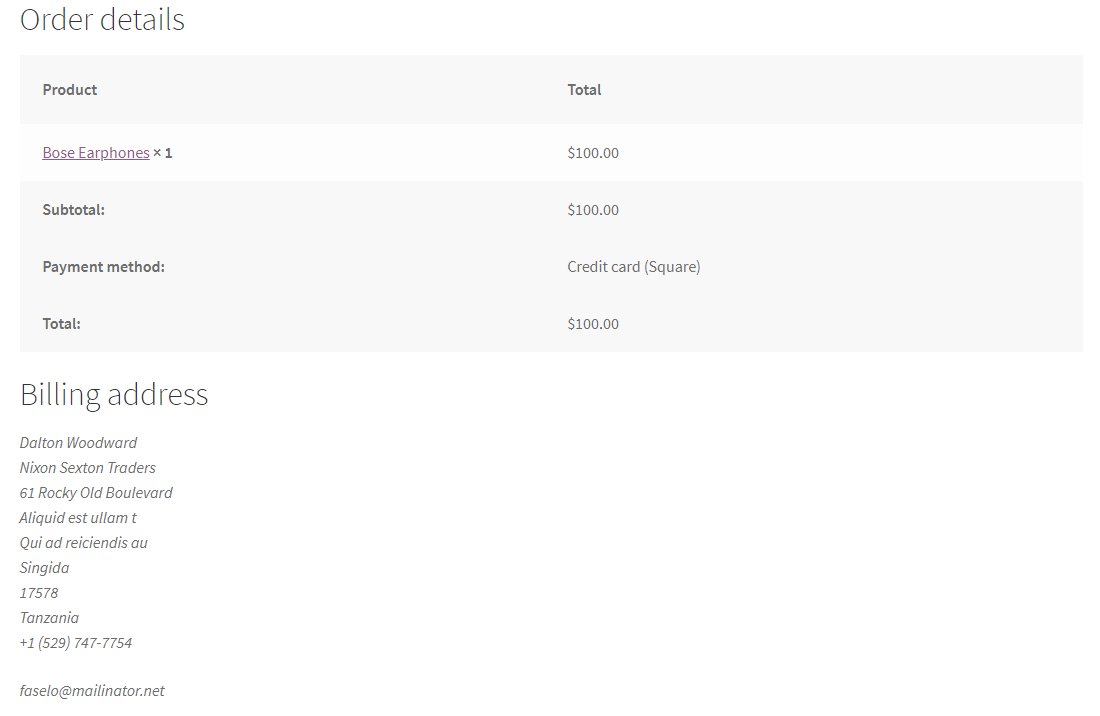
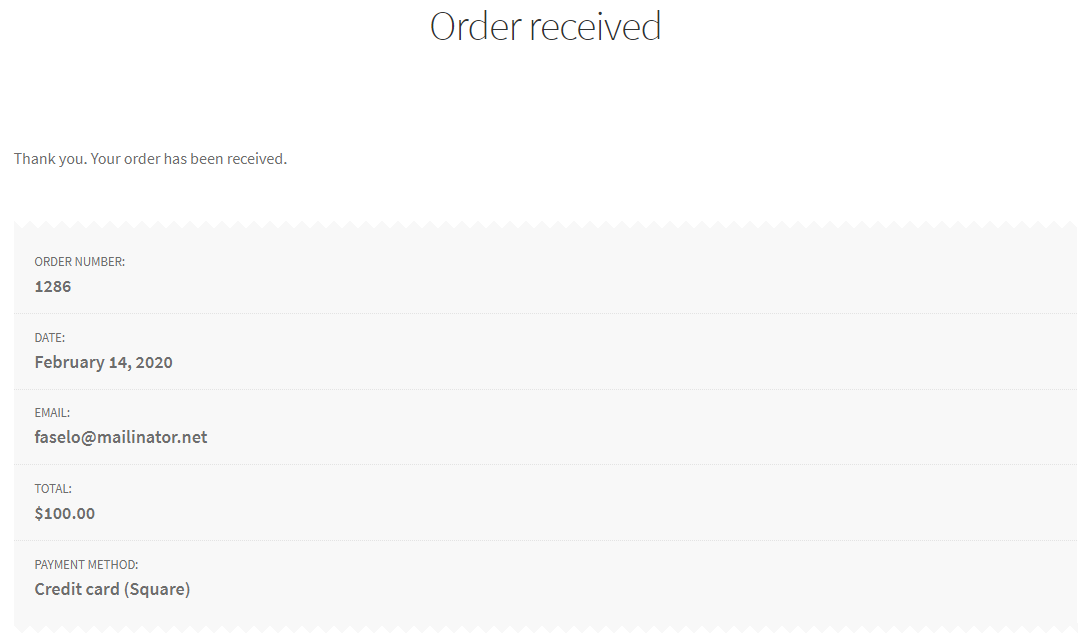
- The user will be redirected to the Thank You page, where the user can review the order.
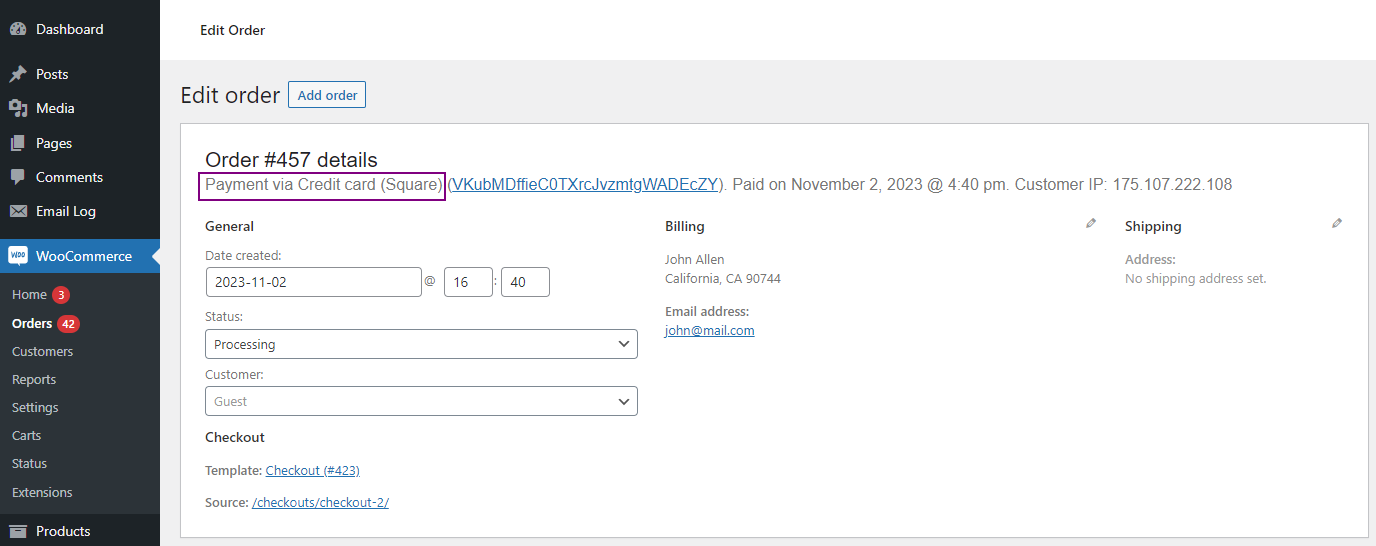
WooCommerce Orders
- Navigate to the WordPress Admin Dashboard → WooCommerce → Orders.
- Click on the order to view the order details.

Square Sandbox Transaction
- Login to your Sandbox account.
- Go to the Squareup Sandbox dashboard.
- Navigate to the Transactions section.
- All the transactions will be displayed here.
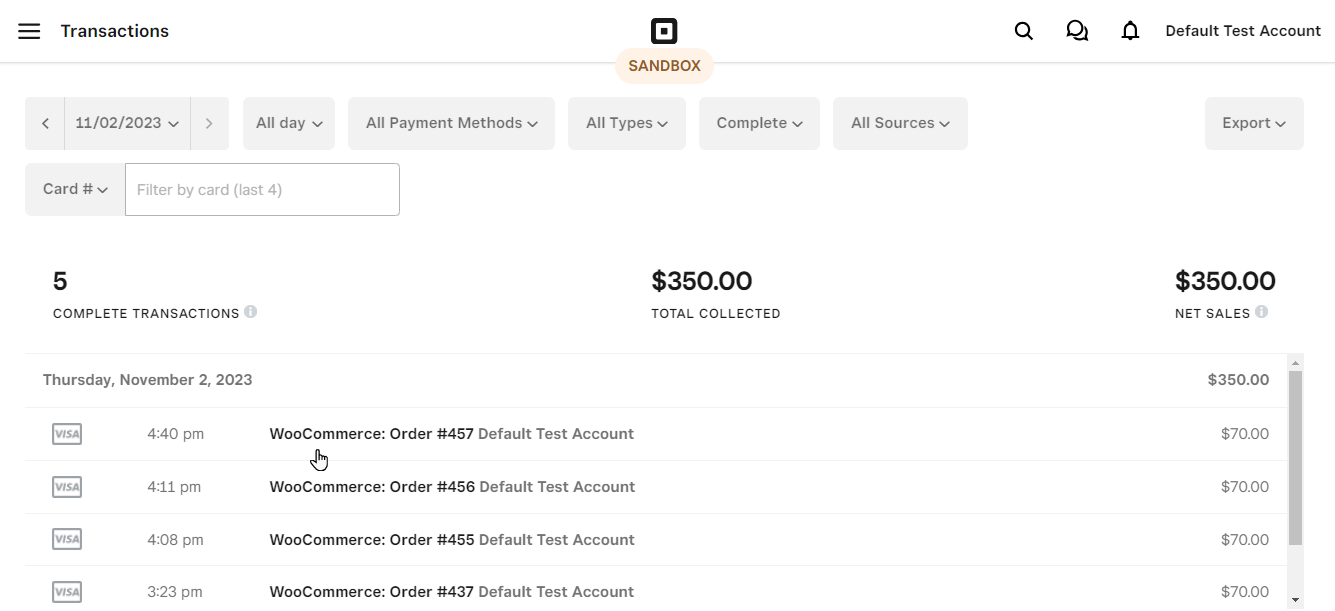
- Click on the transaction to view more details.
27.UPGRADE TO WC Shop Sync
- If you want the upgraded WC Shop Sync plugin.
- You will need to download and then install it.
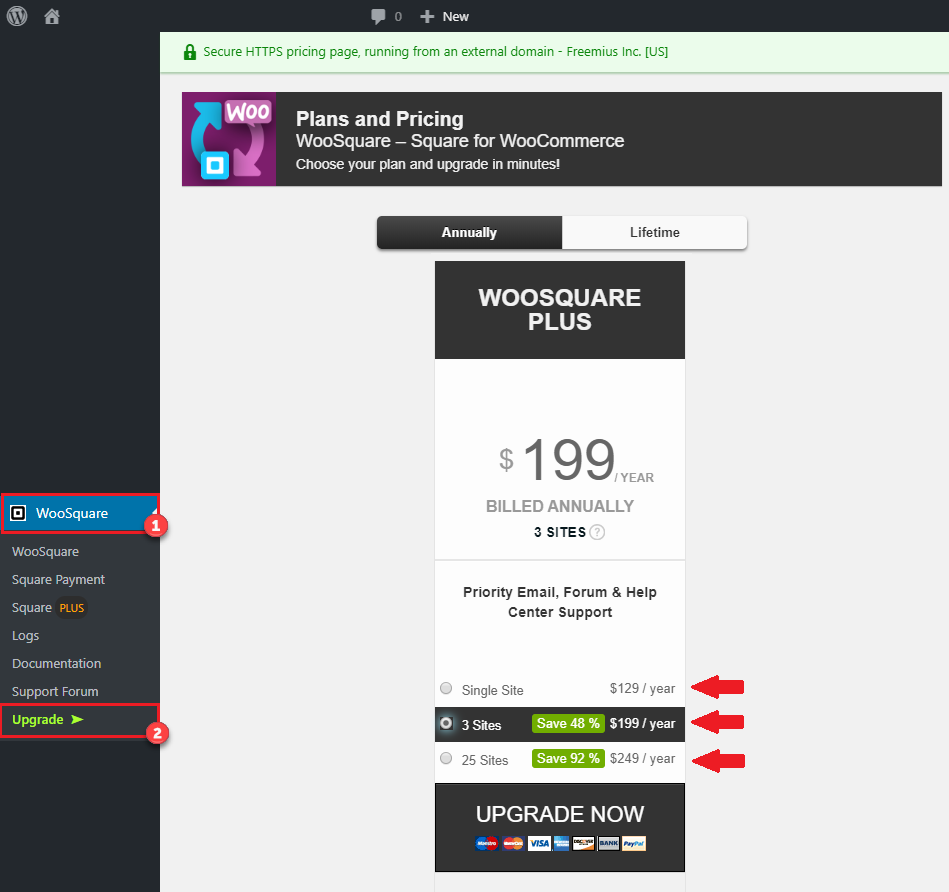
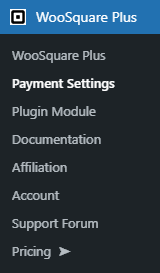
- Click on the WooSquare tab on the left side menu.
- Click Upgrade.
- Select any one of the options from Single Site, 3 Sites or 25 Sites.
- And click Upgrade Now.
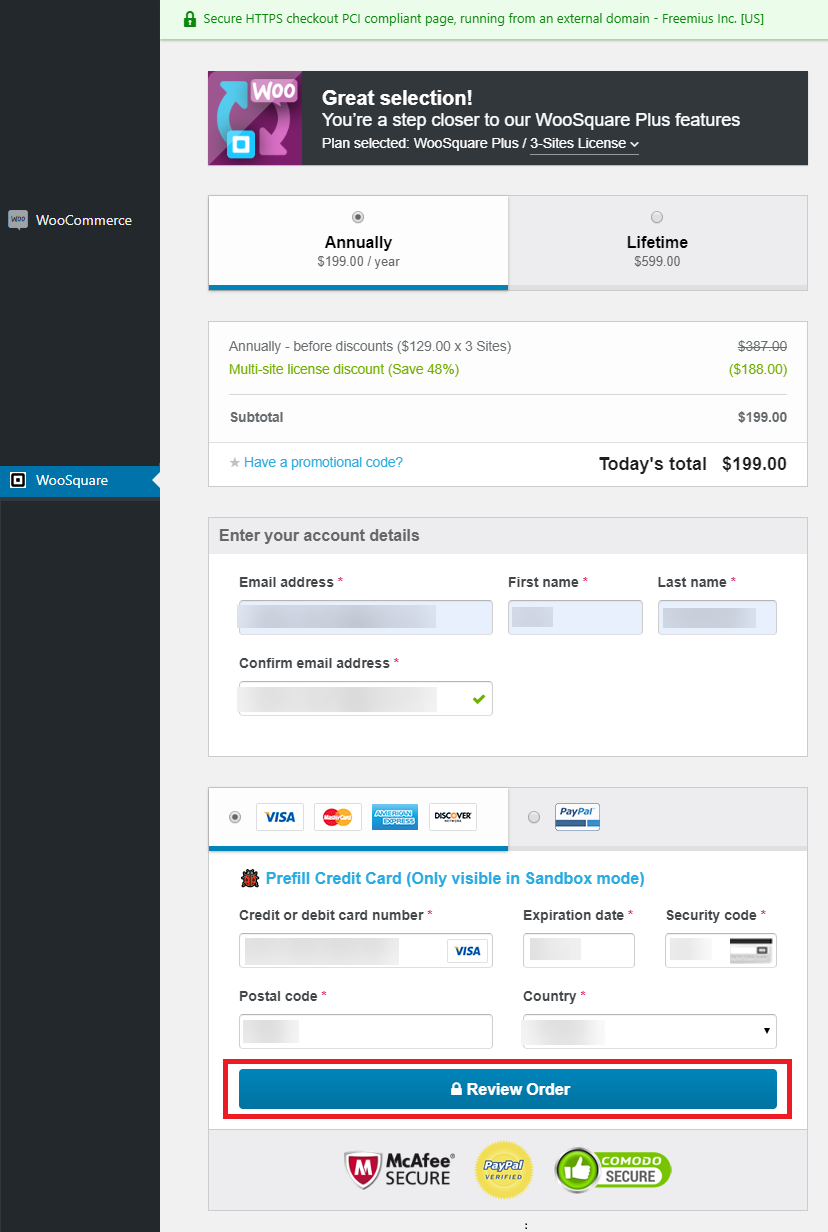
- Now enter your account details. Example: email, name etc.
- Select a payment method and enter details. Example: card number, security code etc.
- And click Review Order.
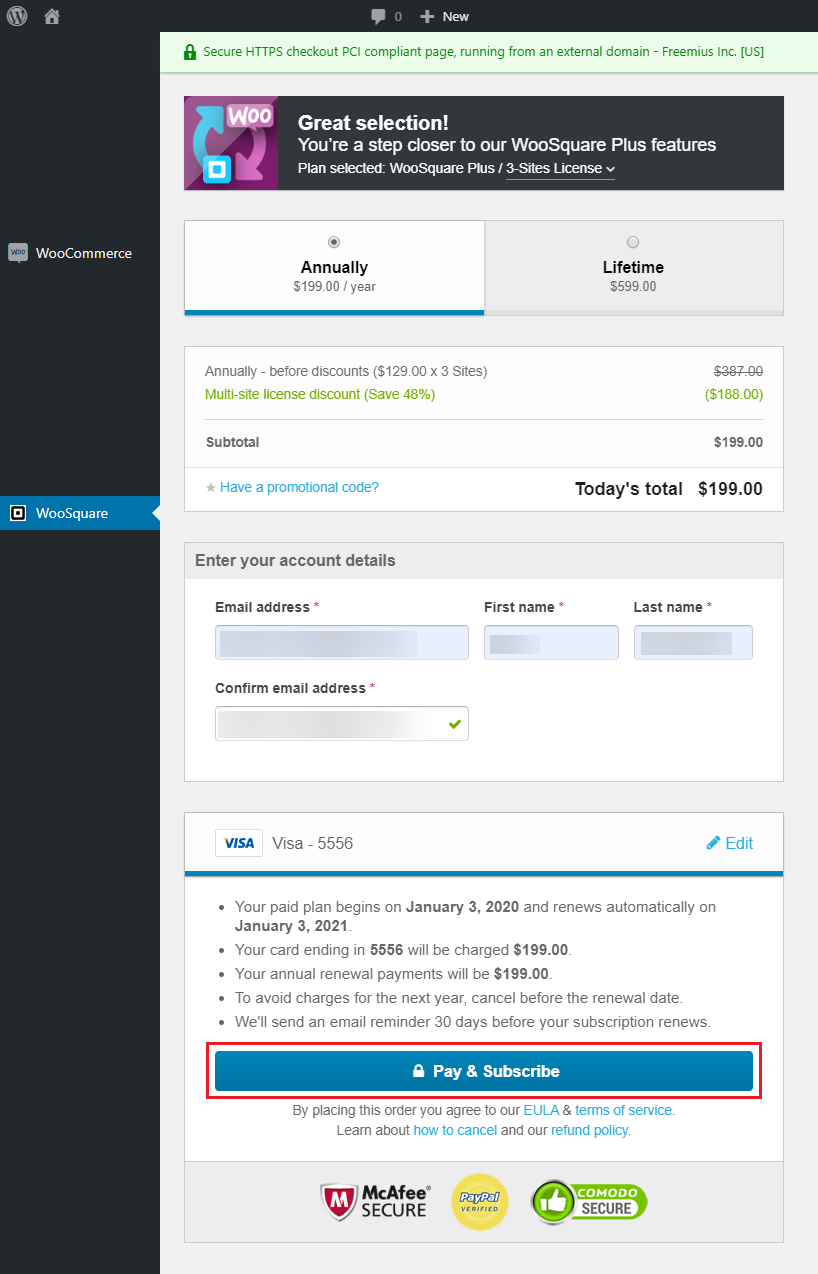
- Now select one option between Annually or Lifetime.
- Enter your account details again. Example: email, name etc.
- And click Pay and Subscribe.
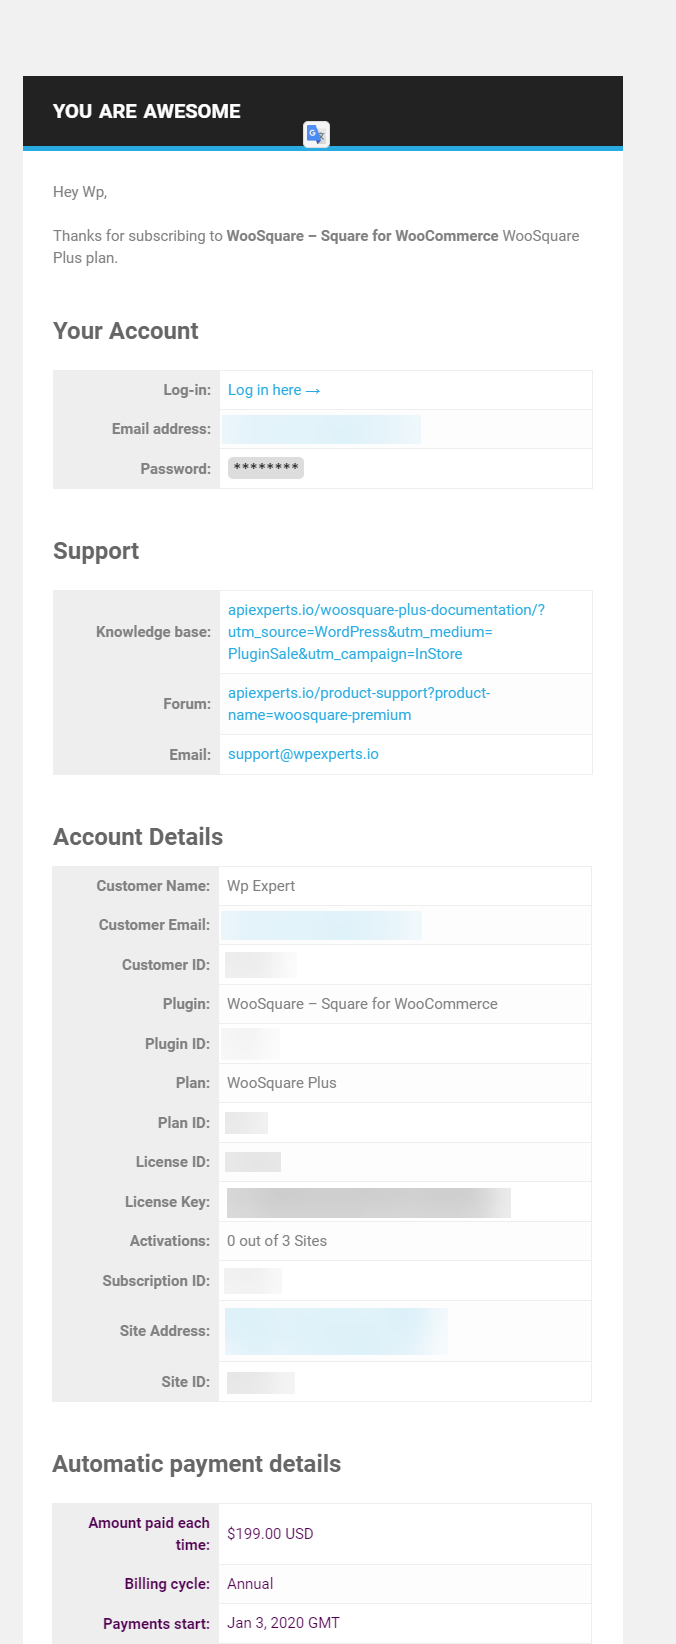
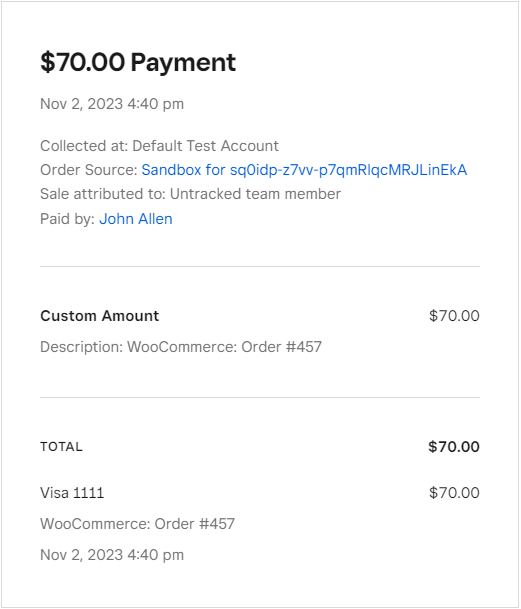
- When you see the above page, that contains all your essential details, your payment and subscription are successful.
- Now login into your Freemius Account.
- Enter Email and Password.
- And click Sign in.
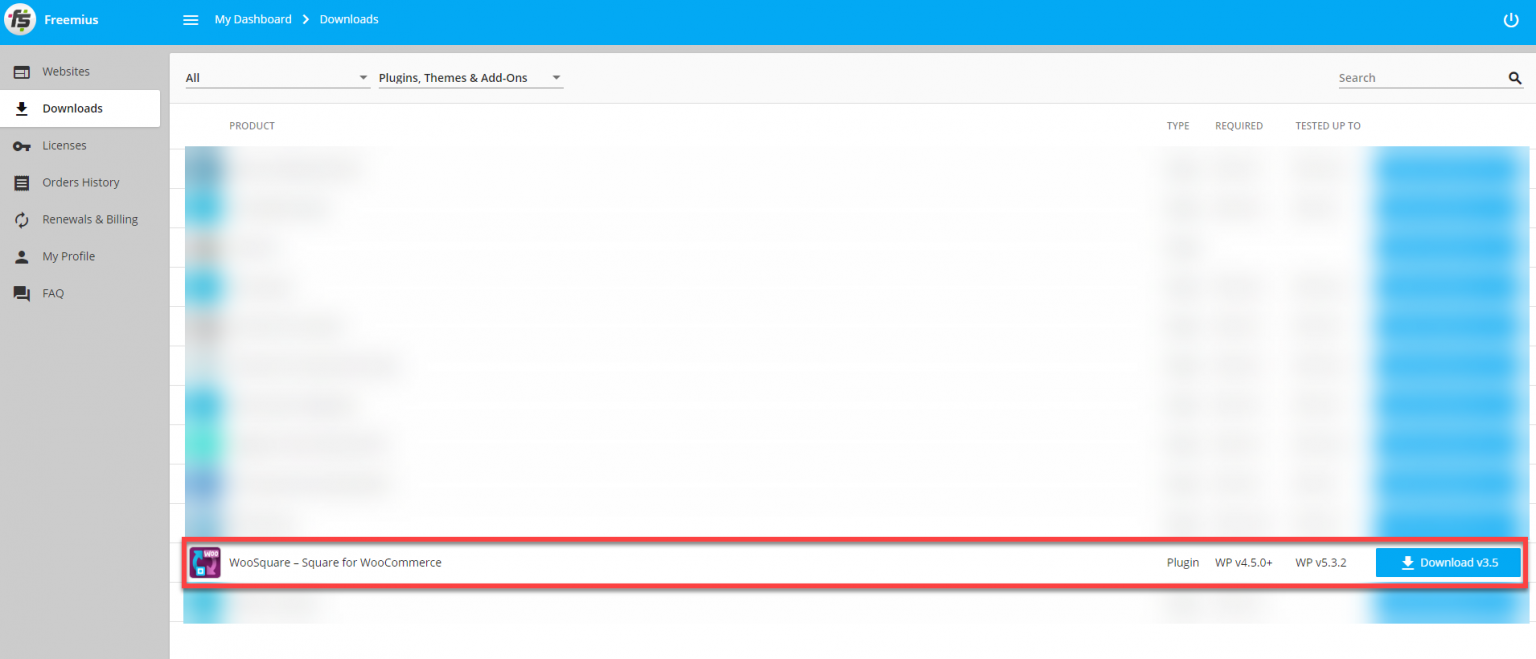
- Now go to the Downloads tab on your Freemius Dashboard.
- In the Downloads tab, your bought WC Shop Sync plugin will be displayed.
- You can download it from your Downloads tab.
28.FREQUENTLY ASKED QUESTIONS
Q: Why aren’t products syncing from Woo to Square or vice versa?
A: Make sure you have entered the product SKUs.
Q: Why aren’t orders syncing?
A: For orders to sync, credentials must be copied from the square developer dashboard to WC Shop Sync, when Square Application is set to Production Settings mode only.
Q: Why isn’t the Webhook event test working?
A: Webhook link copied from WC Shop Sync to Square Application is not correct or duplicated.
Q: Why aren’t Woocommerce orders appearing in Square?
A: Test orders only appear in Sandbox Test Accounts, use the pre-made Default Test Account in the Square Developer Dashboard for this process.
Q: Why do I get an error, when I create a credit card?
A: Error appears if incorrect or new Postal/Zip code is entered, enter the Postal/Zip code that you provided on your WC Shop Sync Account.
Q: Why isn’t SKU appearing for a variable product synchronization in WC Shop Sync?
A: SKU only appears on the main products page for a simple product, for a variable product SKU(s) appears inside the product’s variations settings.
Q: Does order sync from Woo to Square support shipping?
A: Yes, order sync from Woo to Square supports shipping.
Q: What are the abbreviations?
A: SKU > Stock Keeping Unit: a distinct type of item for sales, such as a product or service, and all attributes associated with the item type that distinguish it from other item types.
POS > Point of Sale: the time and place where a retail transaction is completed.
AVS > Address Verification System: a verification system used to verify the address of a person.
OAuth > Open-standard Authorization: an open standard for access delegation, commonly used as a way for Internet users to grant websites or applications access to their information on other websites but without giving them the passwords.
Q: Is there a setup fee?
A: No, there are no setup fees on any of our plans.
Q: Can I cancel my account at any time?
A: Yes, if you ever decide that WooSquare – Square for WooCommerce isn’t the best plugin for your business, simply cancel your account from your Account panel.
Q: What is the time span for your contracts?
A: All plans are year-to-year unless you purchase a lifetime plan.
Q: What payment methods are accepted?
A: We accept all major credit cards including VISA, MASTERCARD, AMERICAN EXPRESS, as well as PAYPAL payments.
Q: Do you offer refunds?
A: We don’t offer refunds, but we do offer a free version of the plugin (the one you are using right now).
Q: Do I get updates for the premium plugin?
A: Yes, Automatic updates to our premium plugin are available free of charge as long as you stay as a paying customer.
Q: Do you offer support if I need help?
A: Yes, Top-notch customer support is key for a quality product, so we’ll do our very best to resolve any issues you encounter via our support page.
Q: I have other pre-sale questions, can you help?
A: Yes, you can ask us any questions through our support page.
Q: What are the recommended adjustments to the PHP settings for optimal performance?
A: To enhance performance, it’s advised to increase the memory_limit to 2048M and set max_execution_time to 0. Additionally, ensuring a fast server response is crucial to avoid connection timeouts and request timeouts.
Q: How can I address payment failures or errors that occur during the checkout process?
A: A solution is to re-authenticate by disconnecting Square and then reconnecting it. This action can help resolve the issues related to payment failures or errors at checkout.
Q: What steps should I take if the stock is not updating correctly in WooCommerce?
A: Ensuring the stock history is kept up-to-date within the year in Square is vital. This practice contributes to accurate stock updates in WooCommerce.
Q: What formatting guidelines should I follow when syncing variations from Square to WooCommerce?
A: When syncing variations, adhere to the following guidelines:
- Utilize lowercase letters for attributes and variations.
- Avoid special characters in titles, attributes, descriptions, and variations.
- If adding variations in Square, use a format like attribute[value], for instance, color[red], size[small].
Q: How does the product synchronization work with your plugin?
A: The plugin supports two-way product synchronization and functions seamlessly in this mode, ensuring efficient product data management. The stock will be synced through webhook in real time.
Q: What measures can be taken to prevent the duplication of products within Square?
A: Maintaining consistent SKUs for each product is crucial to avoid creating duplicates in Square.
Q: How can I enable SSL checkout in WooCommerce?
A: To enable SSL checkout, navigate to https://yourwebsite.com/wp-admin/options.php and locate the woocommerce_force_ssl_checkout option. Set this option to “Yes” to ensure secure checkout transactions on your website.
Notes:
- If product variations are not given properly, the synchronization process might not work.
- Order synchronization does not work with Square Modifiers.
- Order synchronization might take some time to work.
- Order can be charged through Square POS app only.
- Cash on delivery in the Square POS app will not sync orders.
- A maximum of 60 characters is allowed in a transaction note.
29.DEVELOPMENT CHANGE-LOG
== Changelog ==
=4.5=
* Added – Support for PHP version 8.0
* Added – Variation image for variable products.
* Fixed – Order create feature.
* Fixed – Support bugs fixes.
=4.3=
*Added – Support for AfterPay Payments support.
*Added – Support for Cashapp Payments support.
*Added – Webhook for inventory update instantly.
*Added – refund by line items from square to woocommerce.
*Fixed – initializeApplePay.
*Added – Modifier sorting.
=4.2=
* Added – Support for ACH Payments
* Added – Payment Reporting Option
* Added – Sales Statistics
* Added – Global Sandbox support.
=4.0=
* Added – Apple Pay Support
* Added – Square Support Gift Card Pay For WooCommerce coupon discount.
* Added – Connect V2 webhook for square pos to woocommerce order sync.
* Added – Ireland support for Square.
* Fix – Square Modifier issues.
* Fix – Some square support fixes.
= 3.9 =
* Added – Square Support Google Pay for WooCommerce.
* Added – Square Support Gift Card Pay for WooCommerce.
* Added – Sync Support for Square Modifier.
* Added – Sync Modifier Support Square into WooCommerce / WooCommerce into Square.
= 3.7.6 =
* Added – Square Support for WooCommerce Pre Orders.
* Fixed – JS error and conflict resolve.
= 3.7.1 =
* Added – Buycred For Square compatibility.
* Added – Compatibility with WordPress 5.5
* Fixed – Support bugs fixes.
= 3.7 =
* Added – Cartflow Compatibility with Upsell/DownSell.
= 3.6.7 =
* Fixed – Payment process conflicts.
= 3.6.6 =
* Added – New beautify User interface revamp.
* Added – admin can select Title / Description / Price / Stock / Category / Product Image sync.
* Added – Disable Auto Delete on admin control.
* Added – OrderSync module removed glitches with coupons , shippings and taxes.
* Added – OrderSync bypass order if square order amount not match.
* Fixed – delay capture support..
= 3.6.4 =
* Fixed – order sync with payment endpoints glitches with coupon and shipping.
* Fixed – Auth obj array conversion.
* Fixed – Square SDK Updated customer sync.
= 3.6.2 =
* Fixed – stock for simple product.
* Fixed – auto sync settings.
* Fixed – data-debug-mode.php added.
= 3.6 =
* Added – Sign-up fee or Free trial support for order sync module for recurring-payment
* Fixed – order refund through square.
* Fixed – variation displaying transient removed.
* Fixed – sandbox credentials sanitize fields.
* Fixed – payment enabled checks.
* Fixed – card not found through woocommerce customer id.
= 3.5.1 =
Added – free api.
Fixed – Some error fixed.
Fixed – file missing issues.
= 3.5 =
Added – code quality.
Enhancement – Added compatibility for WordPress 5.3.2
Enhancement – Added compatibility for WooCommerce 3.8.1
= 3.2.2 =
Update – SDk updated version 2.3.1
= 3.2.1 =
Fix – Selected payment location.
= 3.2 =
Added – SCA Integration.
Added – replace depreciated with new one api endpoints.
Added – Square Sandbox dashboard integration with v2 api.
Added – Create payment V2 API.
Added – Get payment V2 API.
Added – Cancel payment V2 API.
Added – Refund payment V2 API.
= 3.1.8 =
Added – WooSquare Official documentation link added.
Added – Refund support for reason optional.
Fixed- Some error fixed.
= 3.1.4 =
Added – Square Payment Gateways Support.
Added – Refund support.
Update- SSL notice code update.
= 3.1.2 =
Improvement – Square connect authorization.
= 3.1.1 =
Update – SDk updated.
= 3.1 =
Improvement – Square connect authorization.
Added – Square connect revoke.
= 3.0 =
Added – Square connect authorization.
= 2.8 =
Enhancement – CURL code to HTTP API request.
= 2.6 =
Enhancement – Added compatibility for WordPress 5.0.1
Enhancement – Added compatibility for WooCommerce 3.5.2
Enhancement – Manage Stock management conditions.
= 2.4 =
Added – Html escape check.
Remove – Conflicts with square multi location.
Remove – font size bold conflicts.
Added – Support for wc_update_product_stock.
Manage – Stock management according to square rule RECEIVE_STOCK,SALE.
= 2.2 =
Added – Synchronization Compatibility Multiple attribute with multiples variations WooCommerce to Square.
Added – Synchronization Compatibility Multiple attribute with multiples variations Square to WooCommerce.
= 2.0 =
Added – Compatibility single attribute with multiples variations.
Added – Sync to square on Added,edit,update or delete event.
Update – WooCommerce to Square variations uppercase lowercase compatibility.
Update – Square to WooCommerce variations sync space trims.
Update – Improvement in product synchronization.
Update – Terminate or delay when other synchronization with.
= 1.5.5 =
Optimization – Added compatibility for the latest version of woocommerce.
= 1.5.1 =
Optimization – Optimization of code with free and paid conflicts.
= 1.5 =
Added – filtration validation with global and custom attributes.
Optimization – Organized the code.
= 1.4 =
Added – PHP version compatibility checked.
= 1.3 =
Added – Compatibility with woocommerce 3.0x .
Added – sync multiples variations with starting 2 attributes variable product in free completed in pro version.
Update – Add Woosquare Double attributes with variable product with variations.
= 1.2 =
Commit to clean and update code upto standards
= 1.1 =
Fixed Conflict with Pro version
Tested upto WooCommerce 3.0
Tested for WordPress 4.7.3 Compatibility
= 1.0.3 =
Small update in backend
= 1.0.1 =
Added some backend features
= 1.0 =
Initial release[/vc_column_text][/vc_column][/vc_row]

