
1.Introduction
Ninja Forms Square plugin is a WordPress plugin that allows customers to pay for their form using Square payment Gateway.
This extension will help you to create your form and add your Square payment settings so users will be able to pay via Square, so any product purchased through ninja form will have an option for users to pay via credit card data and this payment will integrate with Square transactions.
2.Plugin Description
- This plugin will provide you an option to add Square payment settings and specify price per each ninja form.
- Add Square Credit Card pricing field per selected form.
Required Plugins
- Ninja Form Plugin.
- Page which will contains form must be https:// .
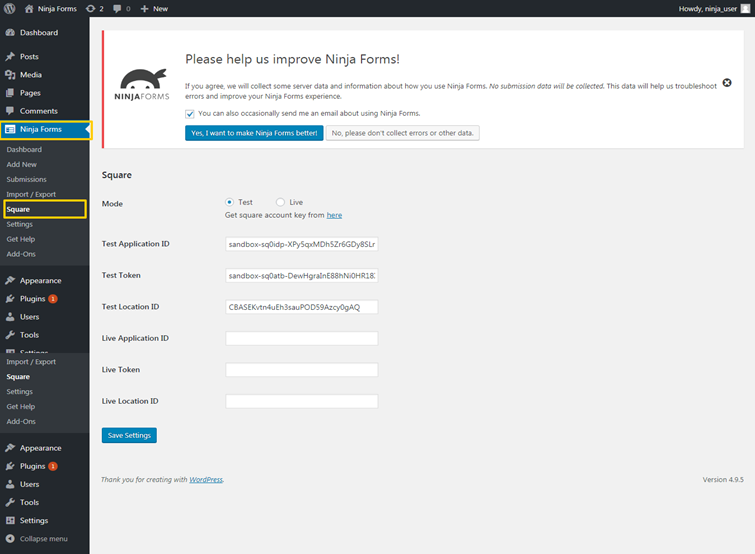
3.Connect Ninja Forms With Square
Announcement: In Version 1.0.7 we have improved Sandbox support with the latest version of SQUARE V2 API in order to see test transactions in Square Dashboard.
TEST MODE PROCESS
Once you got access in Square then go to https://connect.squareup.com/apps and follow these steps for Sandbox API:
Square Dashboard -> Apps -> My App -> Go to Developer Portal -> Click on New Application
Now enter a name for your application and Create App. The application dashboard displays your new app’s credentials. One of these credentials is the personal access token. This token gives your application full access to your own Square account.
Copy These credentials from Square Dashboard As Shown in Screenshot below -> Access token -> Application id -> Location ID
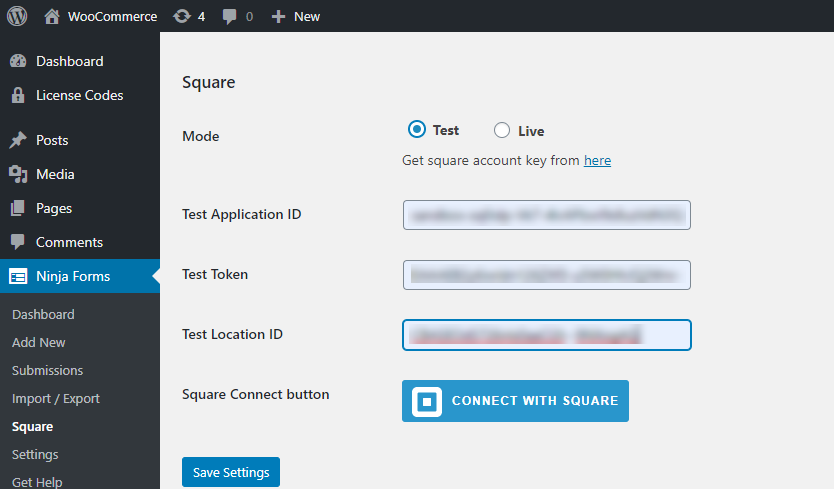
Once you Enable test mode then place above sandbox credentials in Plugin Setting Page and Click on save changes button.
LIVE MODE PROCESS
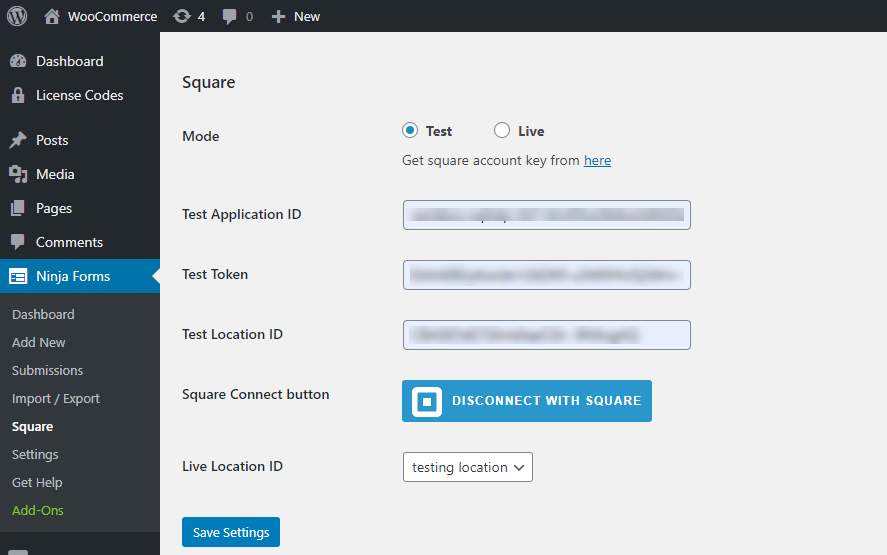
Go to the Admin panel settings and Click on Connect with Square button

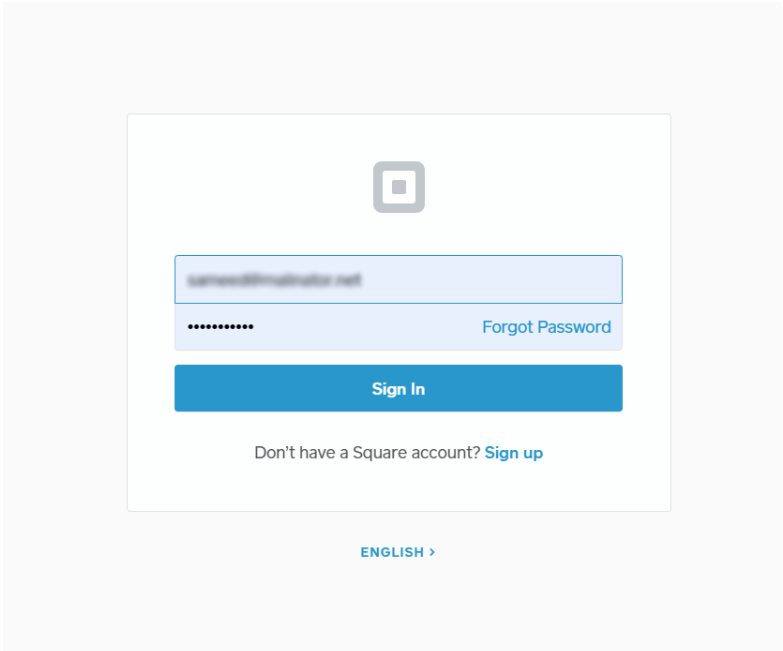
Insert your Square Account credentials to logins.
Once your login permission page will appear. Kindly click on the “Allow” button to proceed further.
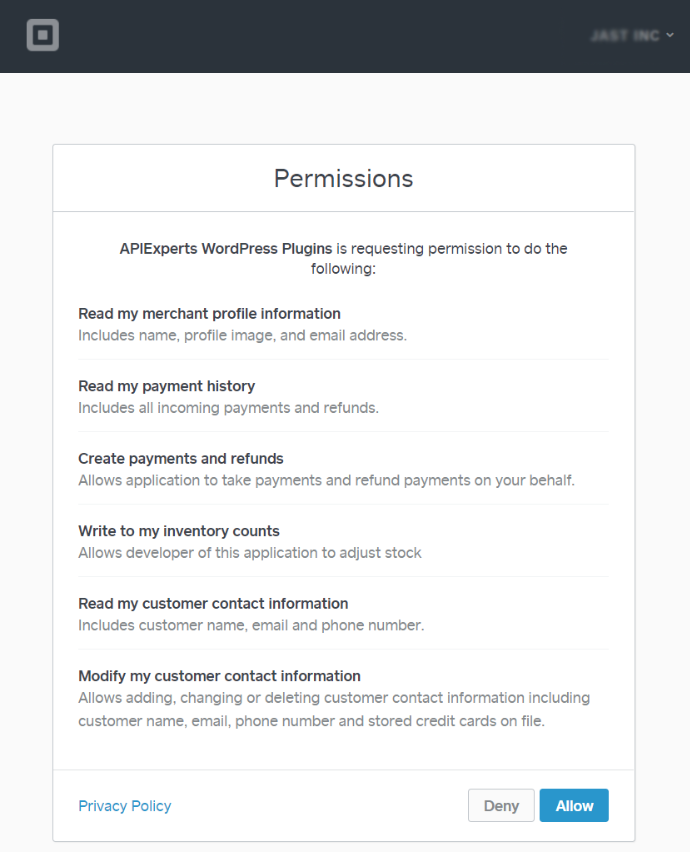
You have an authenticated Square account and will land on API Experts page, here you have the option to get a redirect yourself back to the website.

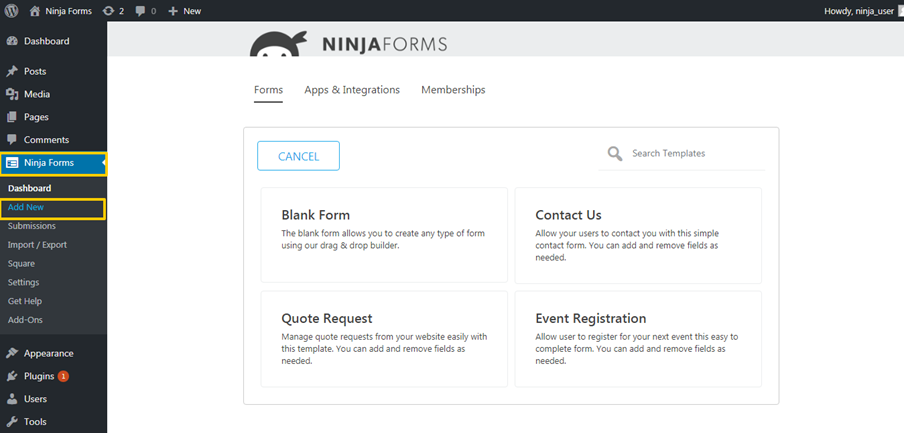
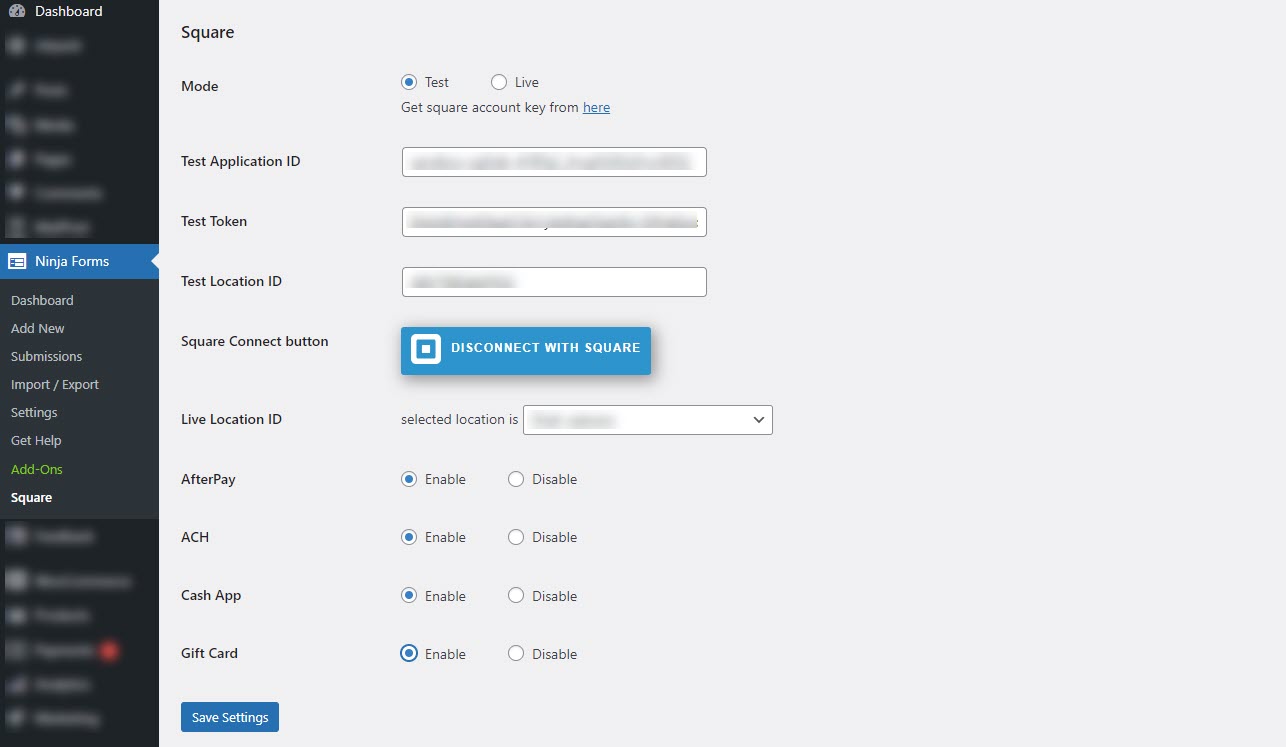
4.Ninja Forms Settings with Square
Add Square payment settings
-
- Select the Square payment settings will be added from (Ninja forms→ Square).
-
- Add Square Payment settings. (Add testing and live payment settings for Square payment account)
- Add Square application settings to integrate with ninja form (Token – Application ID – Location ID)
- Add square application test mode settings. Testing credit card must be processed using the following data.
Test Card:
Card Number: 4532 7597 3454 5858
Card CVV: 111
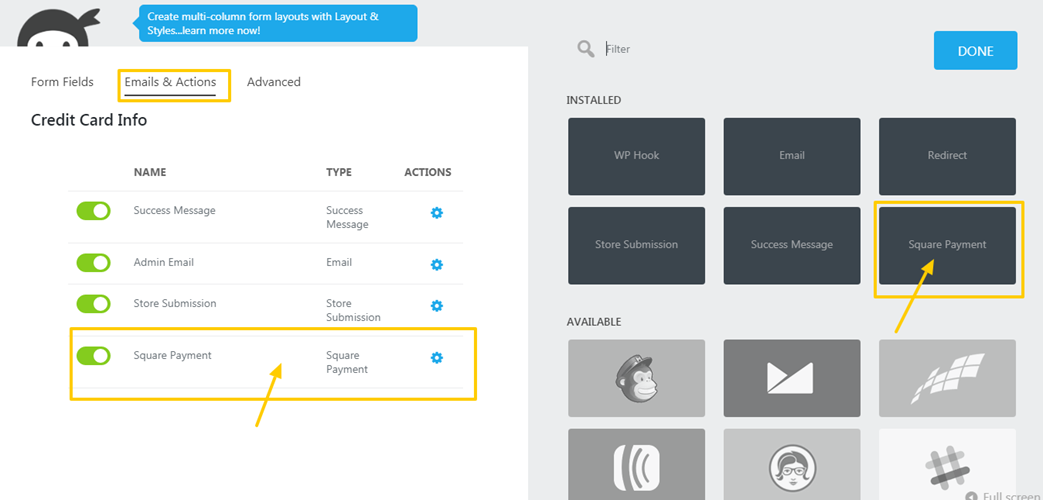
Add Ninja Form Square payment option.
-
- Add Ninja form Square Payment option.

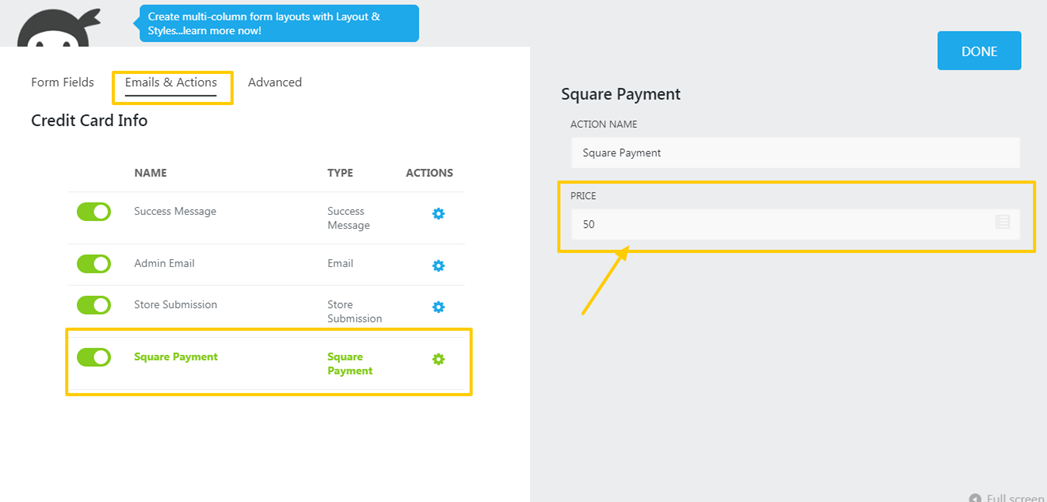
Add Ninja Form Square pricing field
-
- Add Ninja form Square Payment pricing field (Select Square payment→ Add price)
Note: Must fill Price in backend to accept Payment.

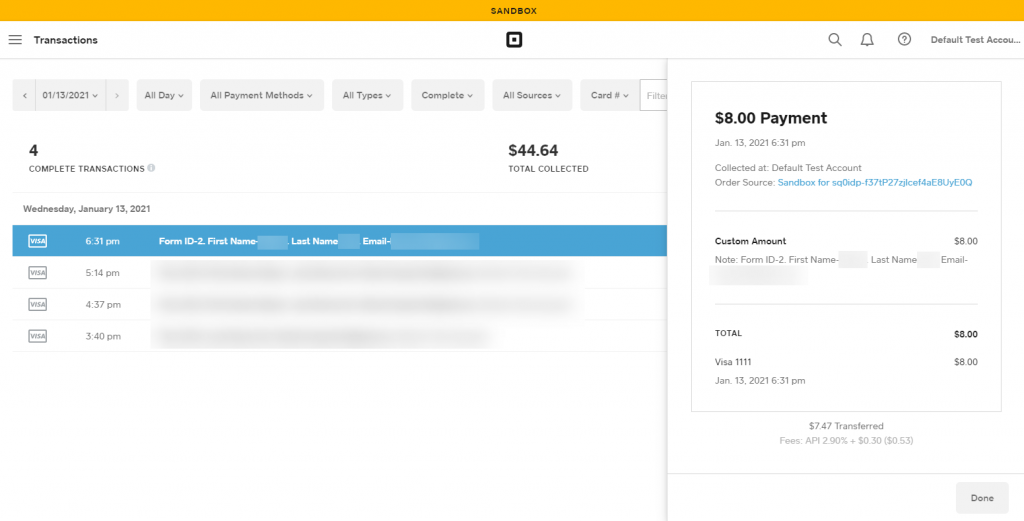
View Ninja Form paid transaction via Square.
-
- View paid Square transaction ID tracking number same number in Square.
![]()

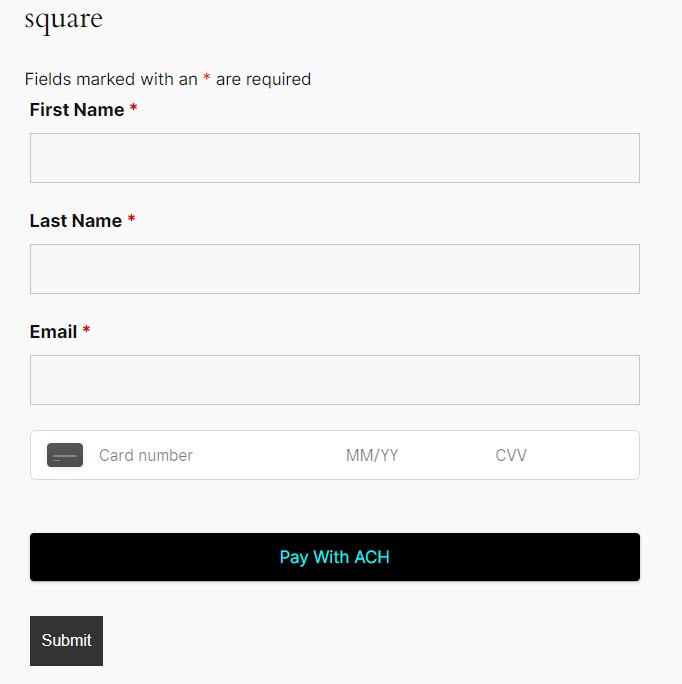
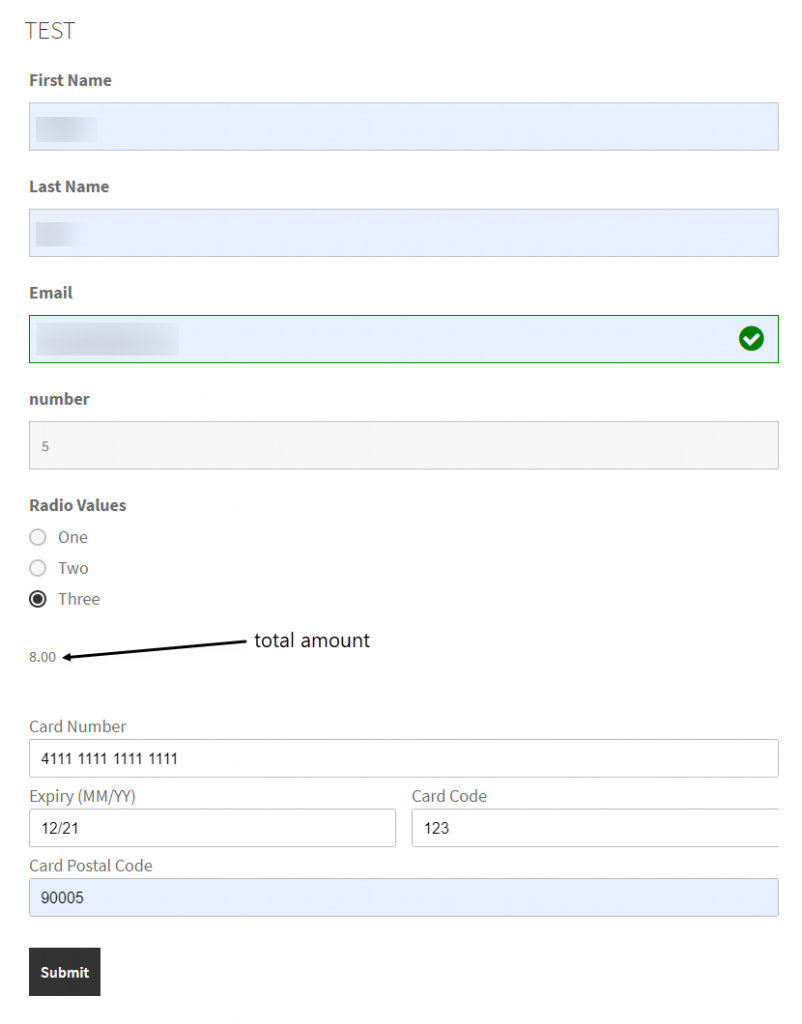
Form preview in front end

Ninja Forms Payment Integration
With the addition of payment integrations of After Pay, Cash App, ACH & Gift Card, users can now seamlessly collect payments through their forms.
Enabling Payment Options:
- locate the radio button associated with each payment option.
- Click on the radio button to enable the desired payment method. This will allow users to select their preferred payment option on the front end of the form.
Front-End Impact:
ACH Payment
- Click the ACH pay (Pay with Bank Account) option.
- The user needs to click on it.
Step 1:
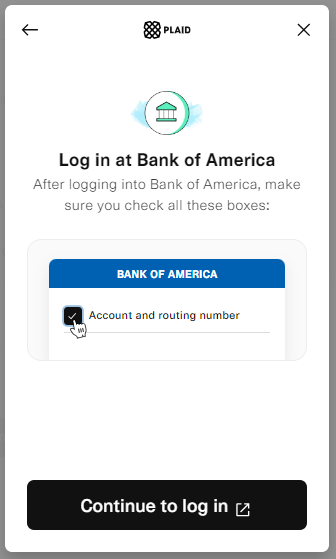
- Click the Pay with Bank Account button On the Ninja Form square page, click on the Pay with Bank Account button to start the ACH transaction process.
- Select Your Bank: A list of available banks will be displayed. Choose your bank from the provided options.
- Login to Your Bank Account: You will be redirected to the login page of your bank’s online portal.

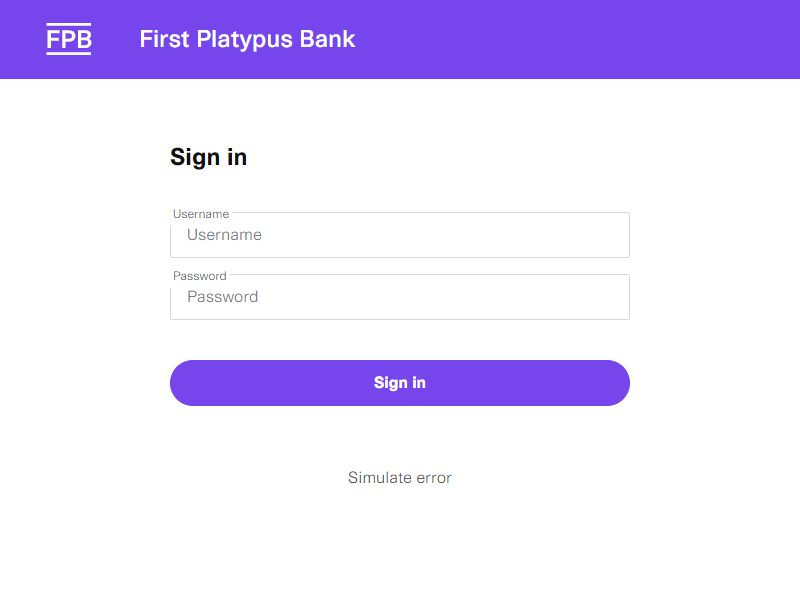
Step 2: Signing into FPB Portal
- FPB Sign-in: Upon successful login to your bank account, you’ll be prompted to continue the transaction.
- FPB Portal Login: You will be directed to sign in to the FPB portal. Enter your FPB portal username and password as required.

Select Your Account: Once signed in, choose the bank account linked to the transaction.

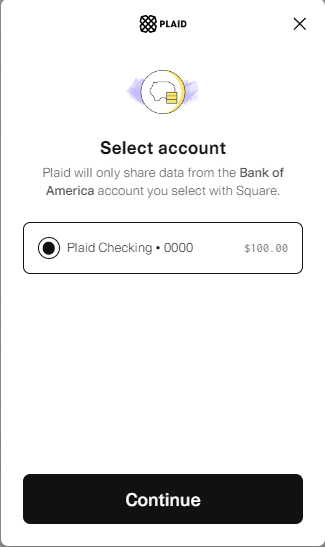
Step 3: Linking Your Account and Completing Transaction
-
- Link Your Account: After selecting your account, follow the prompts to link it to the transaction. This might involve confirming details or authorizing access.

- Link Your Account: After selecting your account, follow the prompts to link it to the transaction. This might involve confirming details or authorizing access.
- Continue with Transaction: Once your account is successfully linked, click on the Continue button to proceed with the transaction.
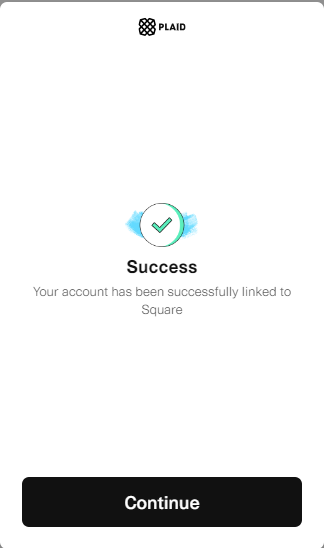
- Transaction Confirmation: The system will process the transaction, and upon completion, a message confirming the successful transaction will appear on the screen.
After Pay:
- An option for payment After Pay (Buy now with After Pay) will appear.
- The user needs to click on it.
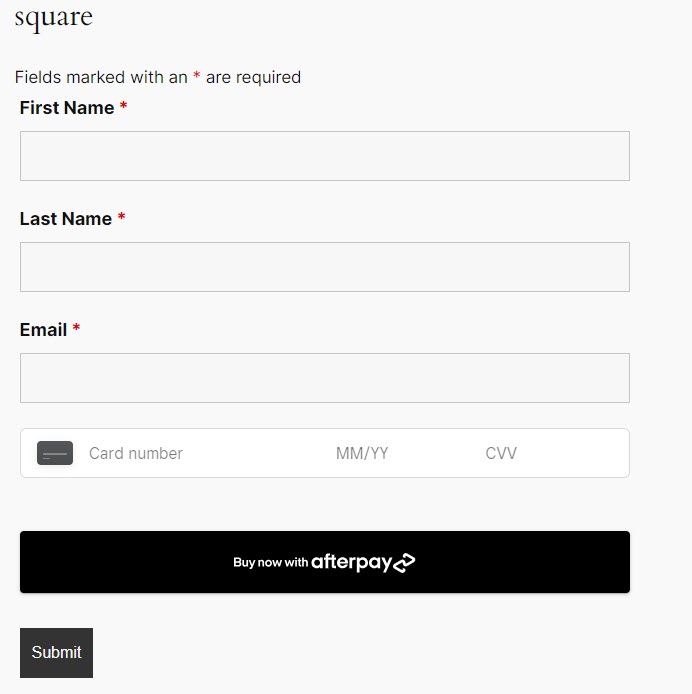
- Click the Buy Now with Afterpay button A popup window will appear, prompting you to enter your Afterpay credentials. Input your Afterpay username and password in the provided fields.

- After entering your credentials, click the “Continue” button to proceed with the payment process.
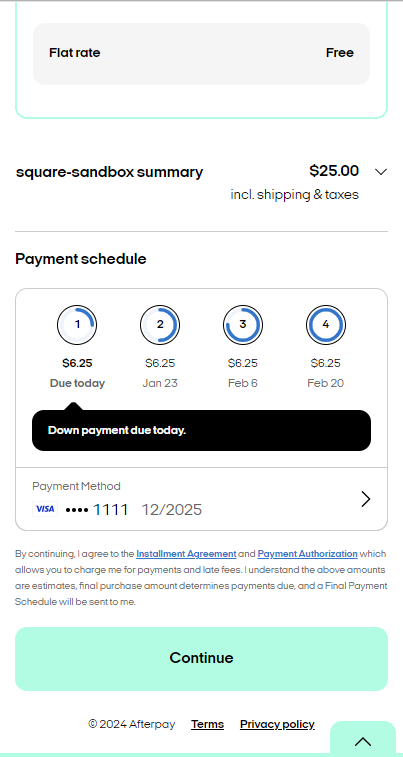
- Once you’ve successfully logged in, you’ll be presented with split payment options. These options typically involve dividing the total purchase amount into installments.
- After choosing your preferred payment option, click on the “Continue” button to proceed with the transaction.
- Upon successful processing, a message or notification confirming the successful payment will be displayed on the screen.
Cash App:
-
- An option for payment Cash App (Cash App Pay) will appear.
- The user needs to click on it.


- After selecting Cash App as your payment method, a popup window will appear displaying a QR code. This QR code contains payment information for your transaction.
- Open Cash App: Take your mobile phone and open the Cash App application.
- Scan to Pay: Within the Cash App, locate and tap the “Scan” or “Scan QR Code” option. This usually appears as an icon or within the payment section.
- Scan the QR Code: Use your phone’s camera to scan the QR code displayed on your computer or the payment screen. Align the QR code within the camera frame until it’s recognized.
- Transaction Details: Upon scanning the QR code, the Cash App will display transaction details on your phone screen, such as the recipient and payment amount.
- Confirm Payment: Verify the transaction details shown on your Cash App and then confirm the payment by tapping the appropriate option.
- Transaction Completion: After confirming the payment, Cash App will process the transaction, and you will receive a confirmation notification on your phone indicating that the payment has been completed.
Square Gift Card:
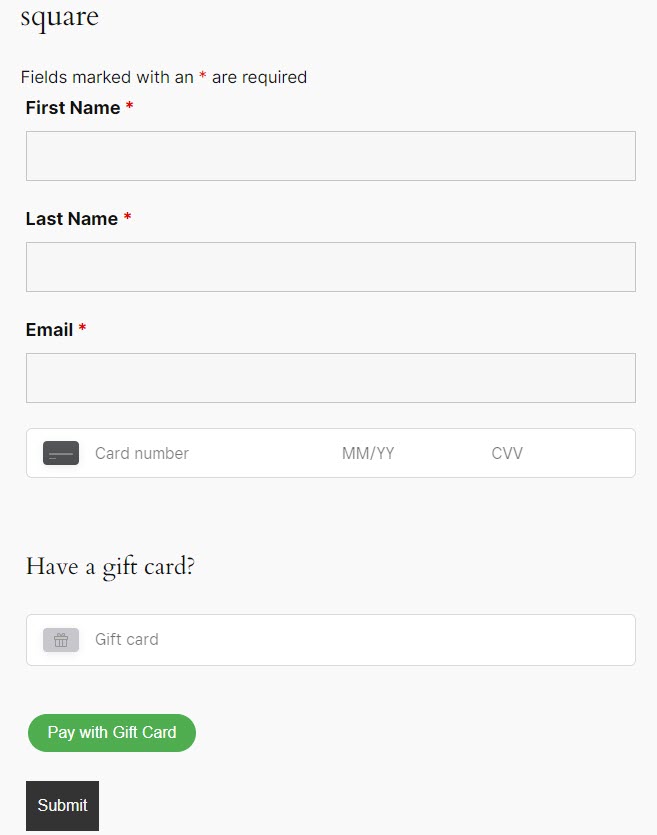
- Enter Gift Card Code: Carefully input the gift card code into the designated field. Ensure accuracy to avoid any errors in code entry.
- Apply Gift Card: After entering the gift card code, click the “Apply Gift Card” button to proceed.
- Then click on the checkbox, and the system processes the gift card code, it will validate the code and apply the associated discount to your total payment.
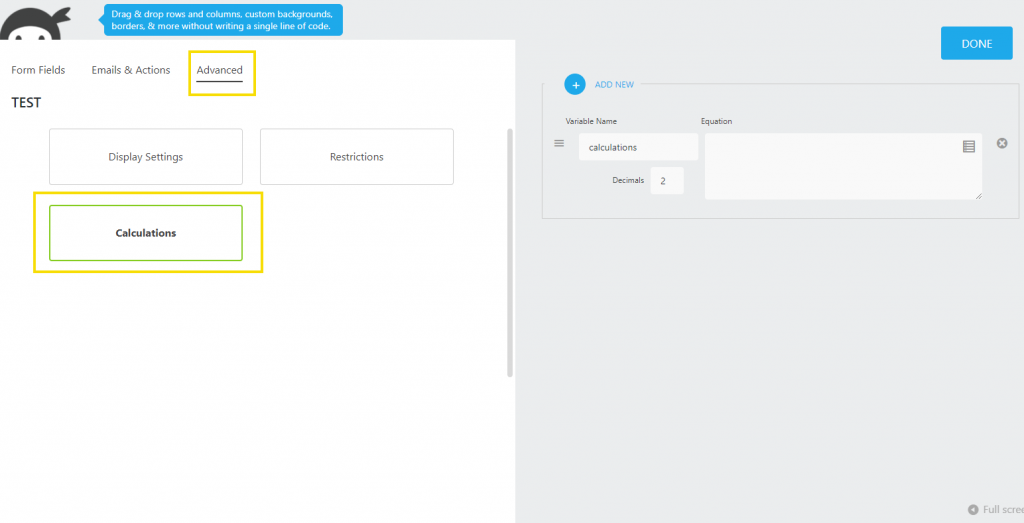
5.Conditional Payments
- You can also make conditional payments.
- Below is an example of the addition of a number and radio fields, you also add number fields only.
- Add a number field and radio list field in your form.
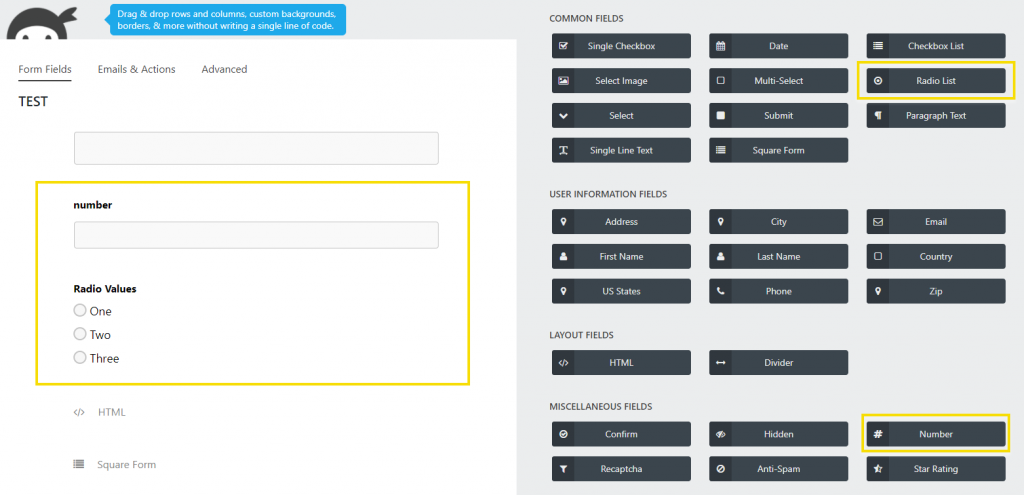
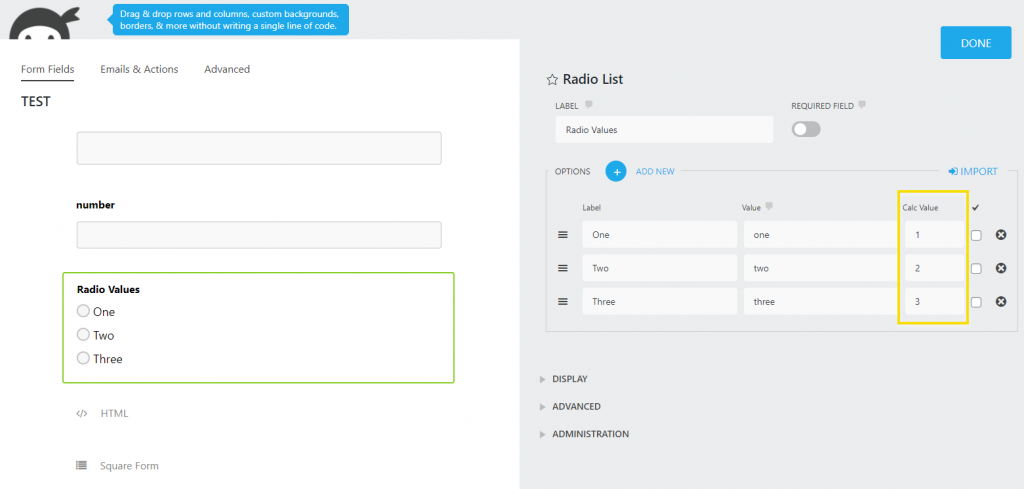
- Enter values for the radio list.
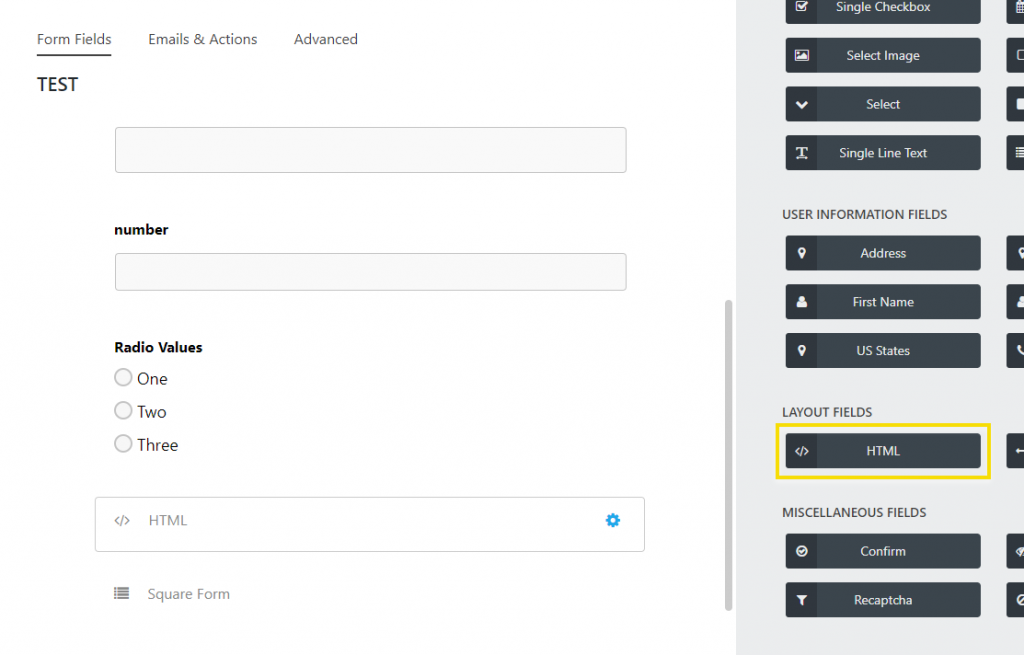
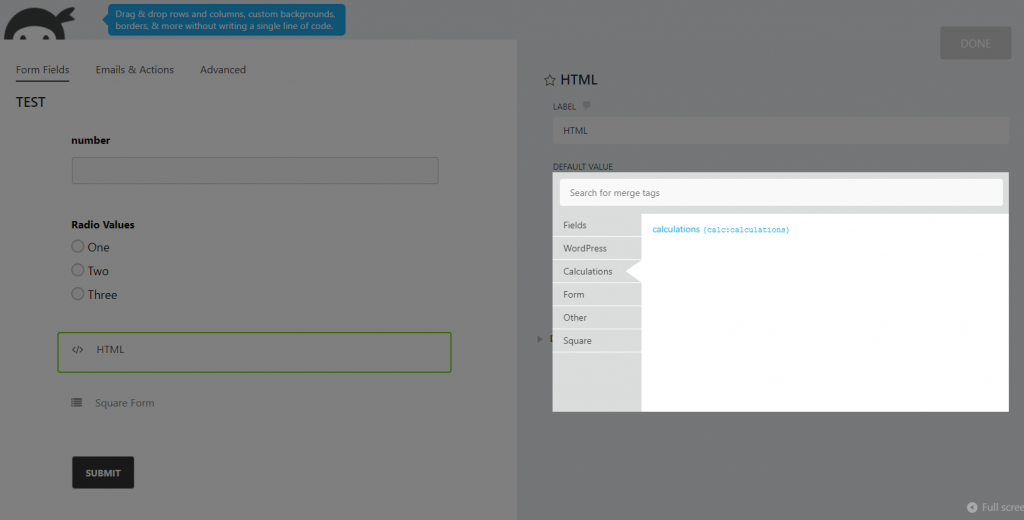
- Also, add an HTML field.
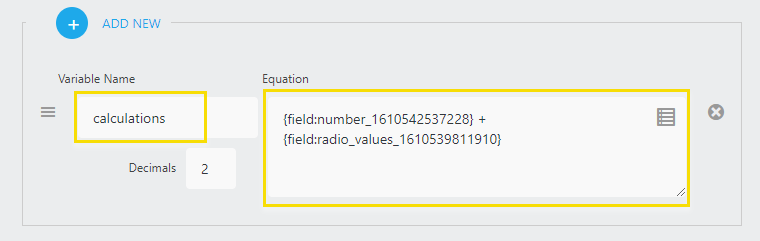
- Now go to the Advanced tab, then Calculations.
- Here you need to add number and radio field tags for addition.
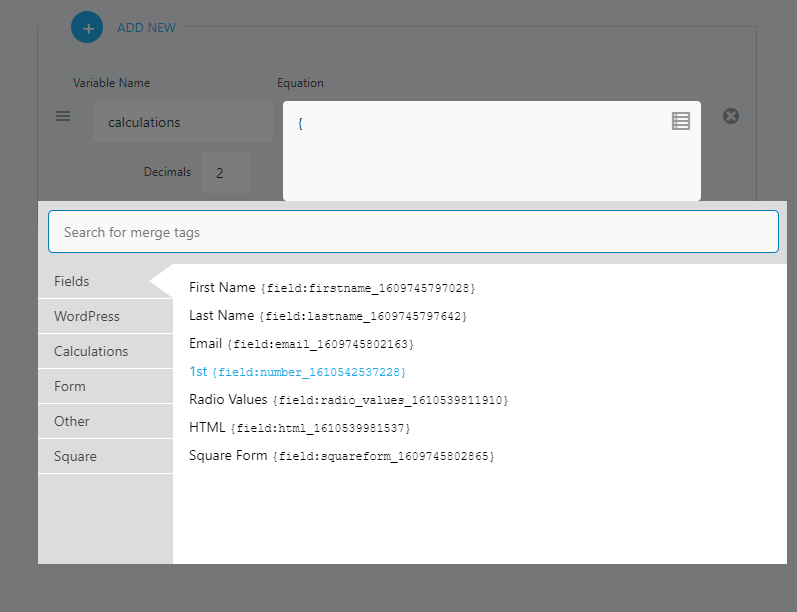
- After adding the tags add a + for addition, between the field tags as shown below.
- Also, enter the variable name.
- Click Done.
- Now go to HTML field settings and add the calculations tag.
- Publish the form.
Frontend Form
- Enter the credentials
- Make a payment.
- Square transaction

