
1.PURPOSE
Gravity Forms Square lets users to pay from their gravity form using Secured Square payment gateway. Instantly, add Square payment option into your form created through Gravity Form plugin. Whether it is a one-time simple payment or automatic recurring payment users will be able to pay via Credit Card which will process through your Square account. Also, you can view your transaction in your Square dashboard along with the Form ID sent through transaction notes.
2.FEATURES
- Square Simple Payment.
- Square Recurring Payment.
- Google Pay.
- Apple Pay.
- Gift Card.
- Email Notification.
- Send Transaction Notes.
- Card Authorization.
- Card On File.
- Create Multiple Forms with Multiple Square accounts.
- Sandbox supported for a test run.
- View Transactions in Square.
- Order Synchronisation.
- Payment Refund.
- Item Sales Reporting in Square.
- Secure Payment Transactions.
- Forced SCA Testing.
- Improved UI.
- Conditional Logic.
3.REQUIREMENTS
- Gravity Forms.
- Square Account.
4.INSTALLATION
- Download the Square for Gravity Forms plugin zip file.
- Go to Plugins ? Add New ? Upload Plugin.
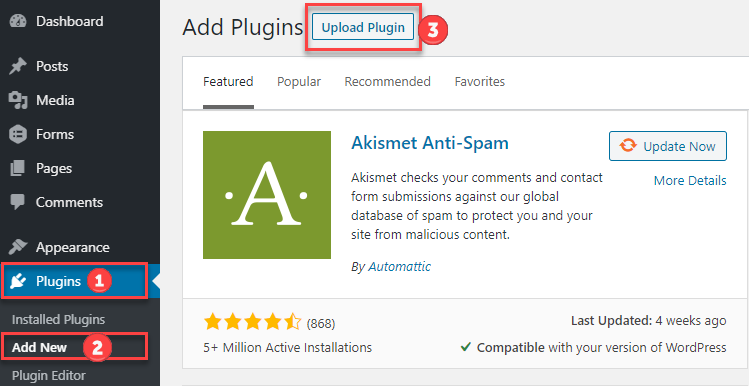
- Click Choose File ? Select Square for Gravity Forms zip file ? Upload.
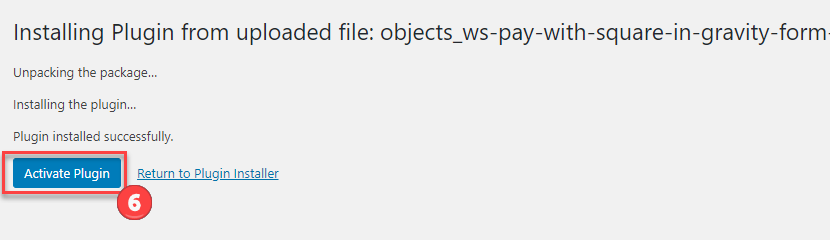
- Click Install Now.

- Click Activate Plugin.
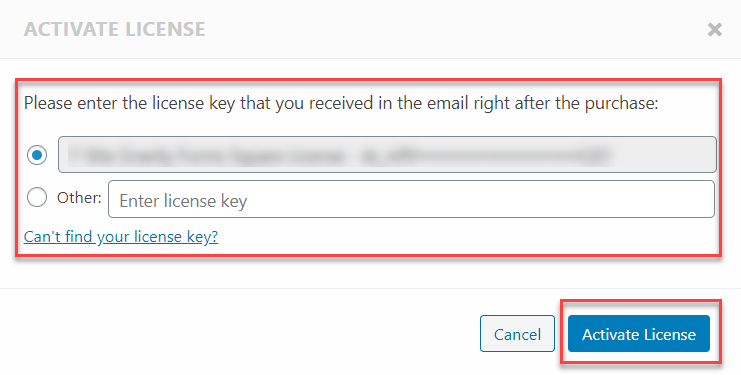
- Go to Installed Plugins ? Activate License.
- You’ll find your License key from your Freemius account.

- Enter Your License Key.
- Click Agree & Activate License.
5.UPGRADE TO VERSION 2.4 OR ABOVE
It is to inform you that recurring addon is now being merged with Square for Gravity Form Simple Payment in Version 2.4 or above. After updating to Version 2.4 or above your recurring addon will be deactivated automatically. Their existing recurring payments will remain the same and automatic payment works as per previous settings.
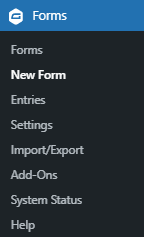
6.SQUARE SETTINGS
- Go Admin Dashboard → Forms → New Forms
- Enter the Title and Description of your form.
- Click on the Create Form button.
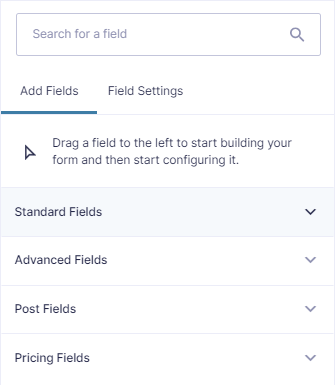
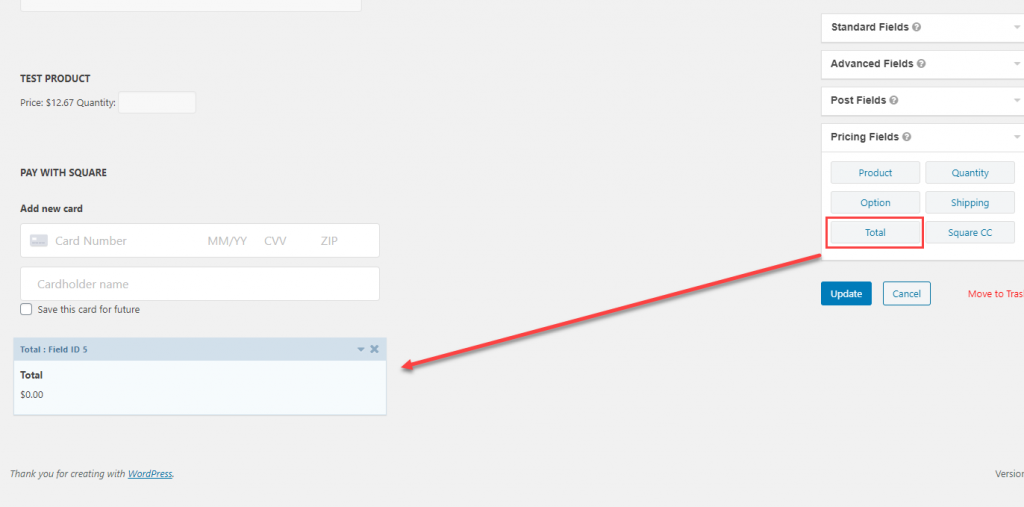
- In the Pricing Field section, click or drag and drop the Product and Square CC fields/elements on the form.
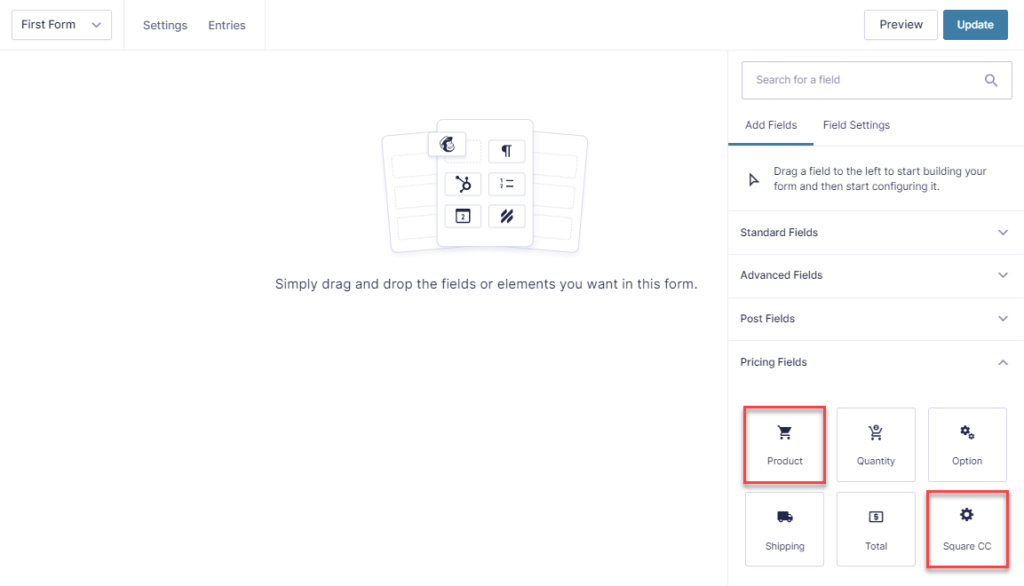
- You can also search the fields in the Search Box present on the form page.
- Click on the Publish button to save your form.
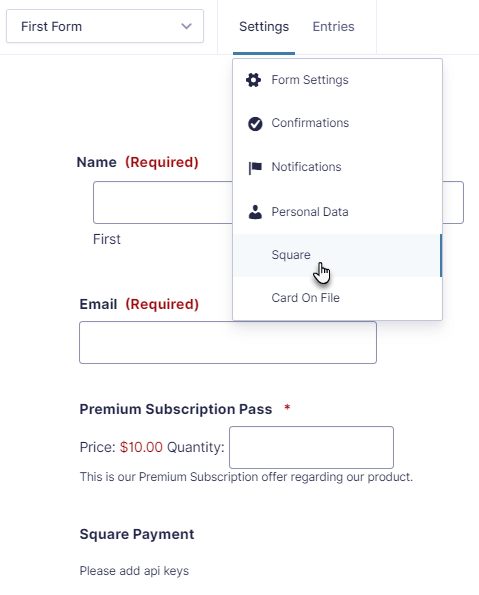
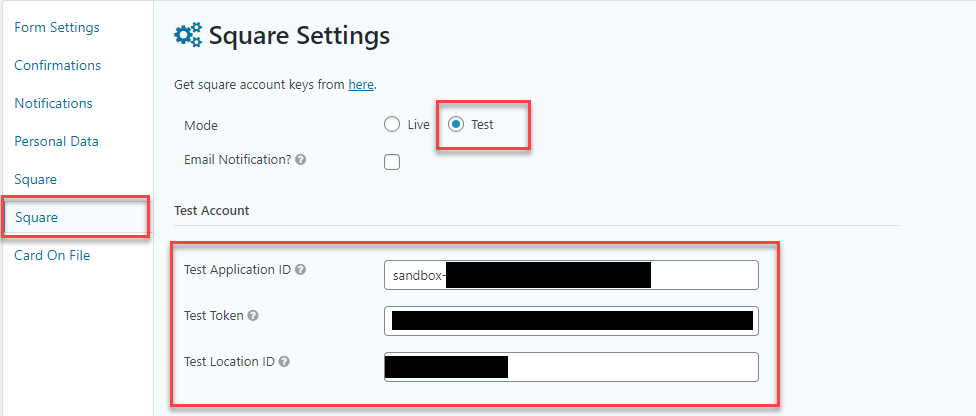
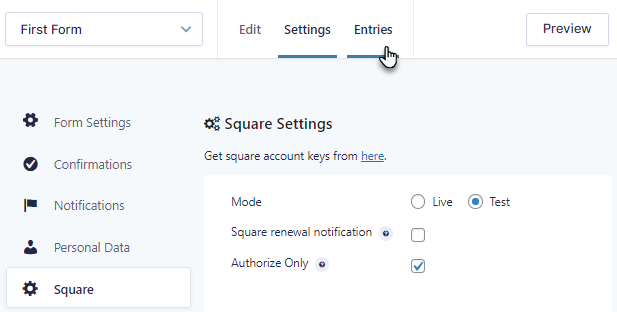
- Once the fields are added, go to the Settings tab and click on the Square option.
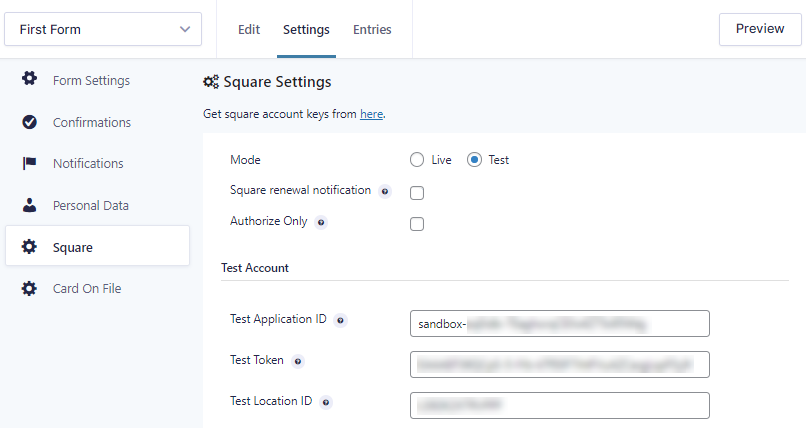
- Select either Live mode or Test mode.
- By enabling Square Renewal notification admin will receive notification emails for further events for example Square Payment, Access Token.
- By enabling Authorize Only, you will be able to complete the payment by clicking the complete button from the entry details page.
- When selecting Test mode, enter the Test Application ID, Test Token, and Test Location ID which are on your Square account.
Test Mode
- To get started Square account is required.
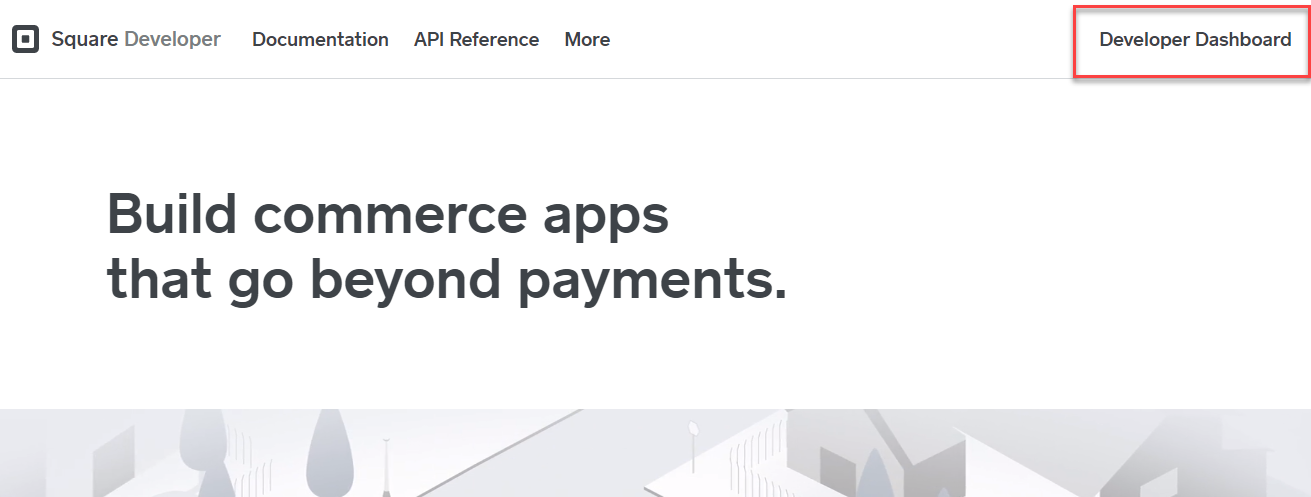
- Go to Square Developer: https://squareup.com/signup?v=developers.
- Create an Account.
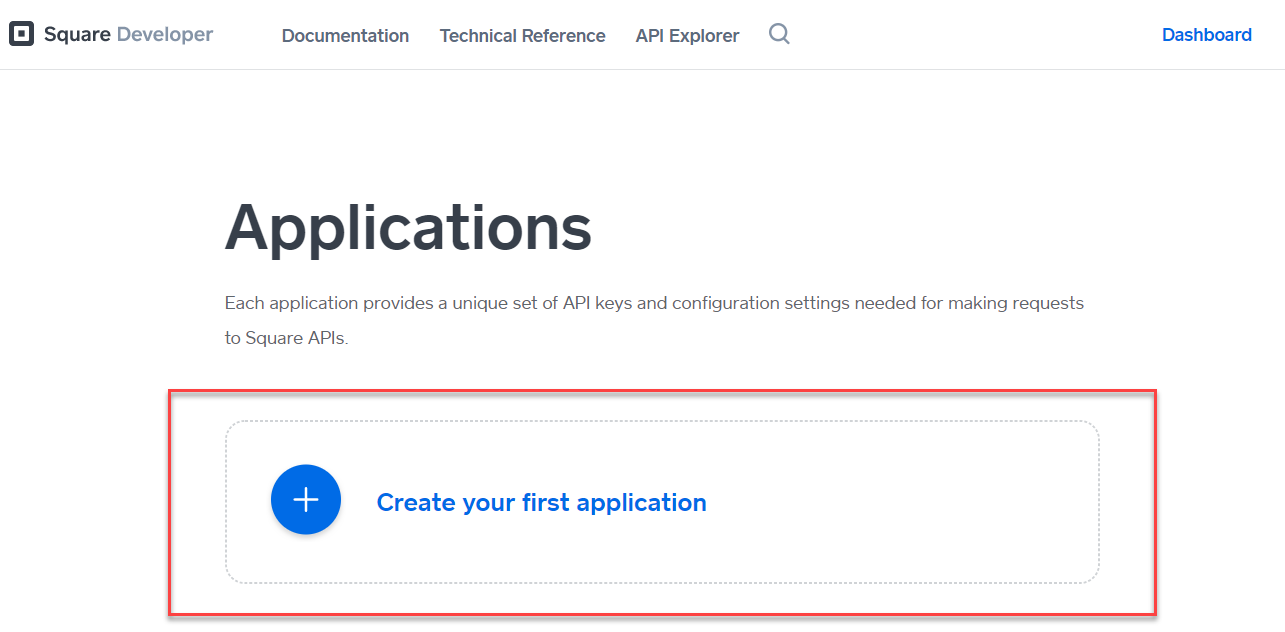
- Go to Apps.
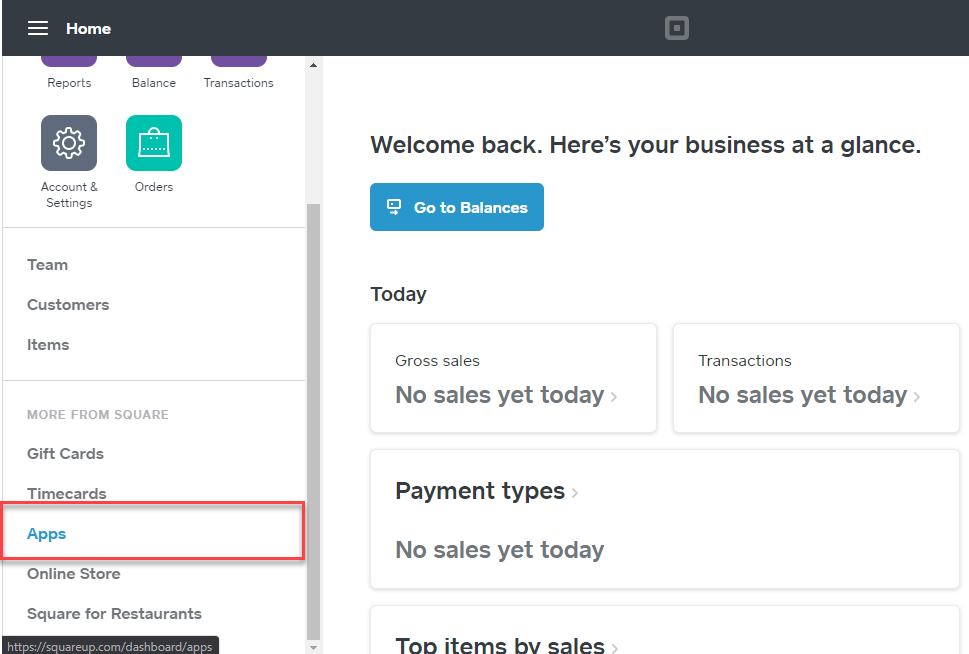
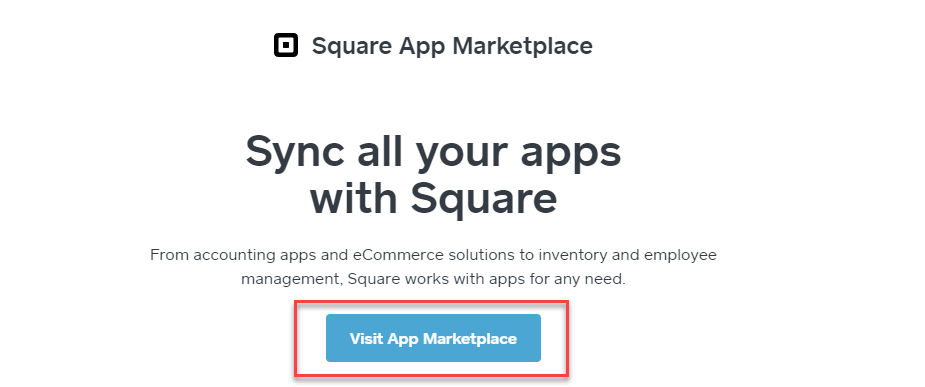
- Click Visit App Marketplace.
- Click More ? Developer Platform.
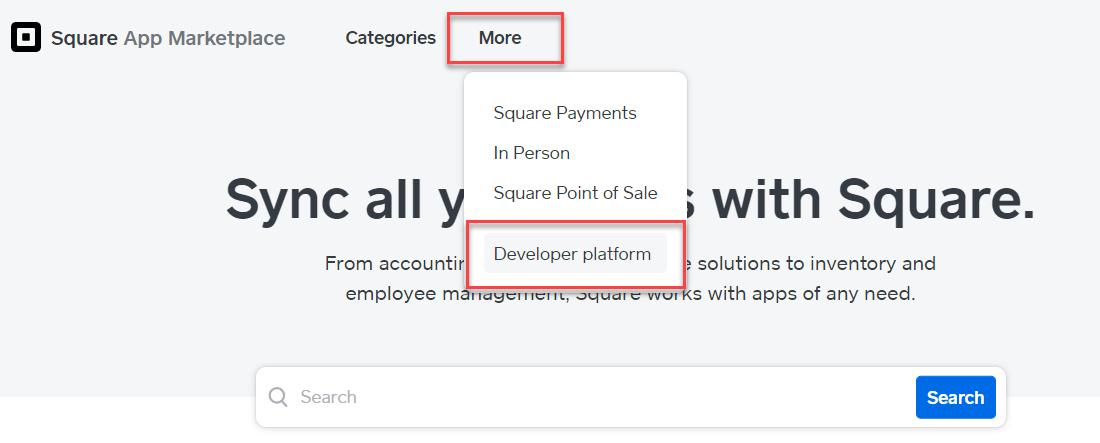
- Go to Developer Dashboard
- Create New Application.
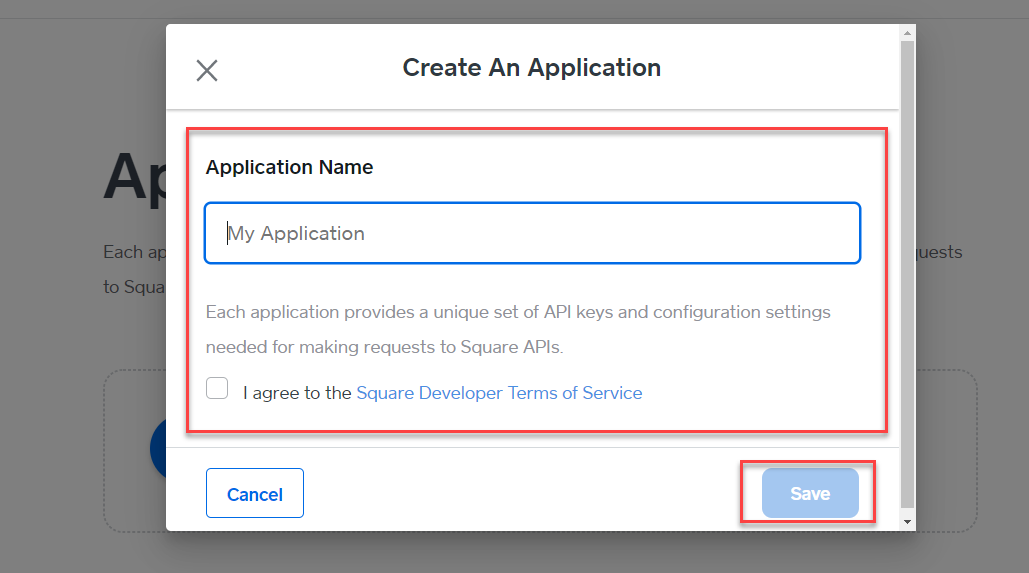
- Enter Application Name
- Click Save.
- Open Application.
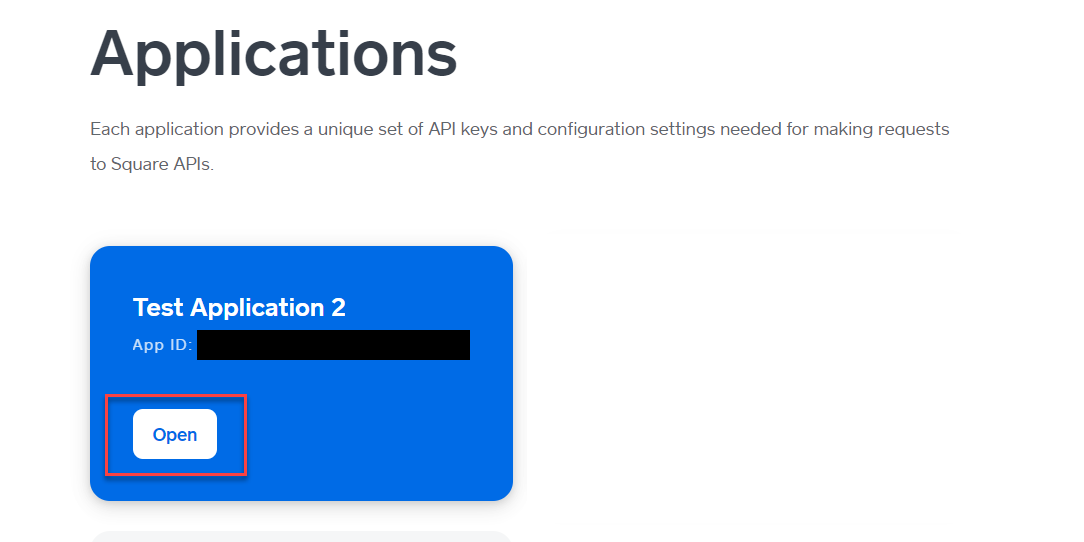
- You’ll find your Application ID & Access Token. Along with the Location ID. Make sure Sandbox mode is enabled.
- Get your Application ID and Access Token.
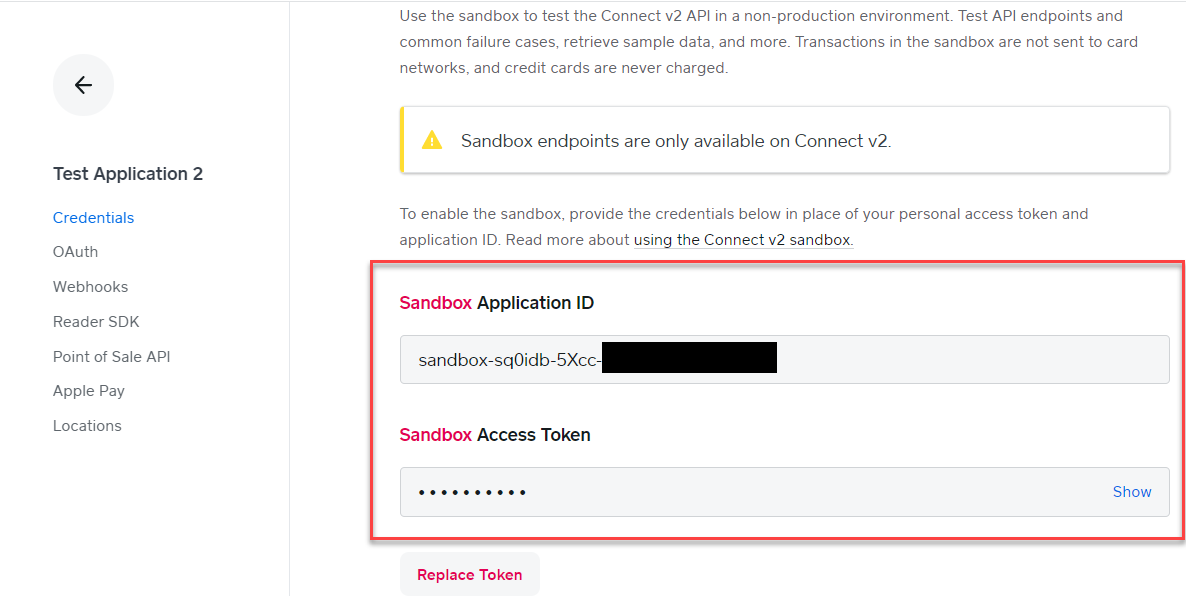
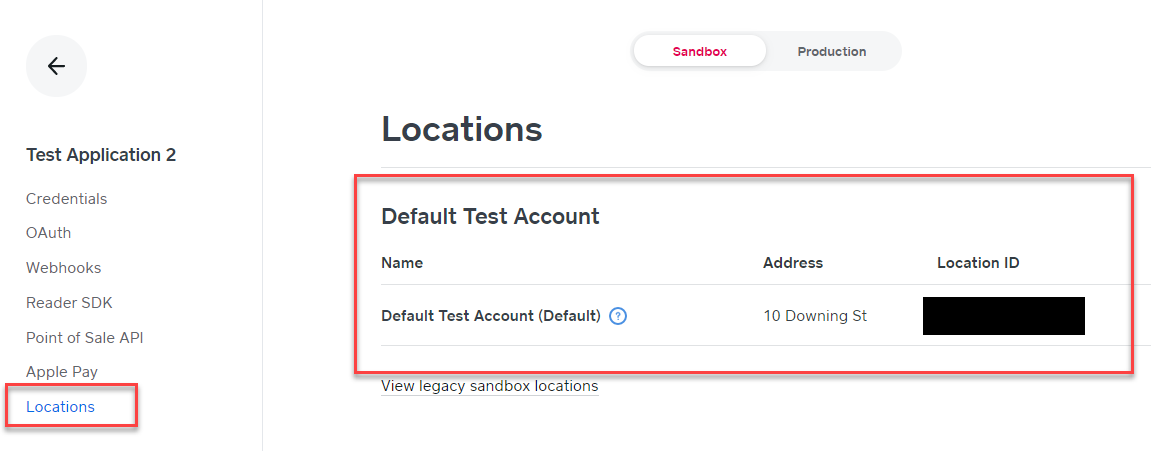
- Go to Locations to get Location ID.
- Now get back to your WordPress setup and Go to Square settings.
- Enable Test Mode.
- Enter Application ID and Access Token.
- Enter Location ID.
- Update Square Settings.
Live Mode
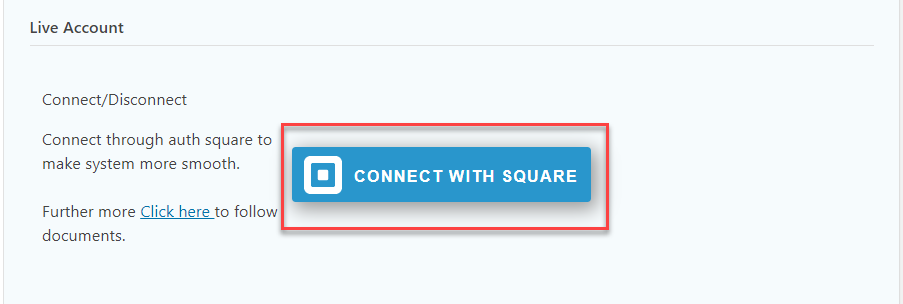
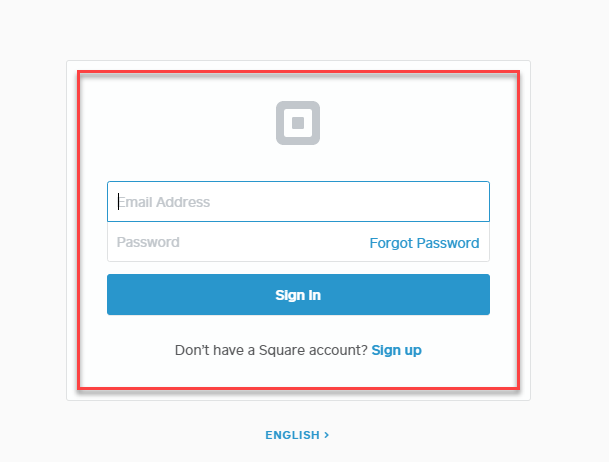
- Go to Forms Settings ? Square.
- Click CONNECT WITH SQUARE.
- You’ll be redirected to Square Website
- Login with your Square account.
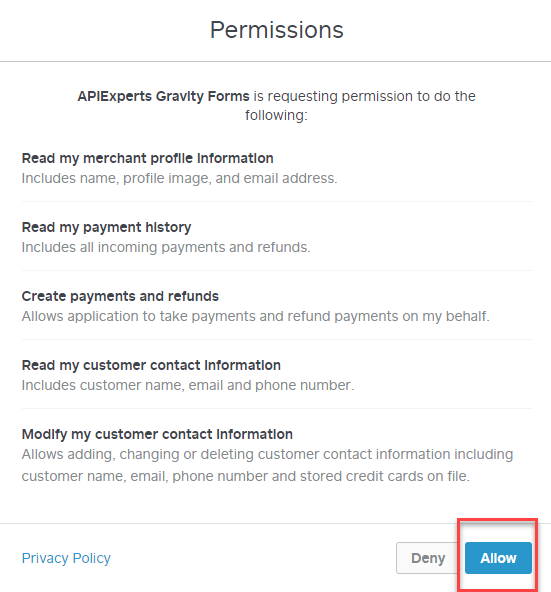
- Allow access to requested Permissions.
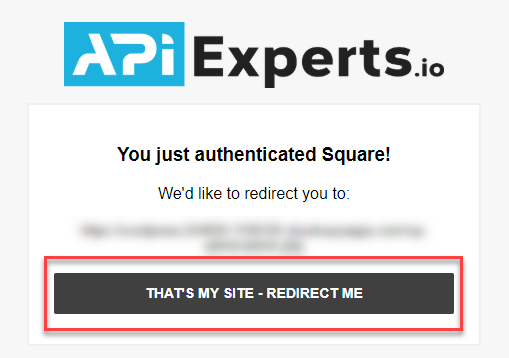
Authentication Message will appear.
- Click Redirect Me.
- Select Location

- Update Square Settings.
Card Authorization
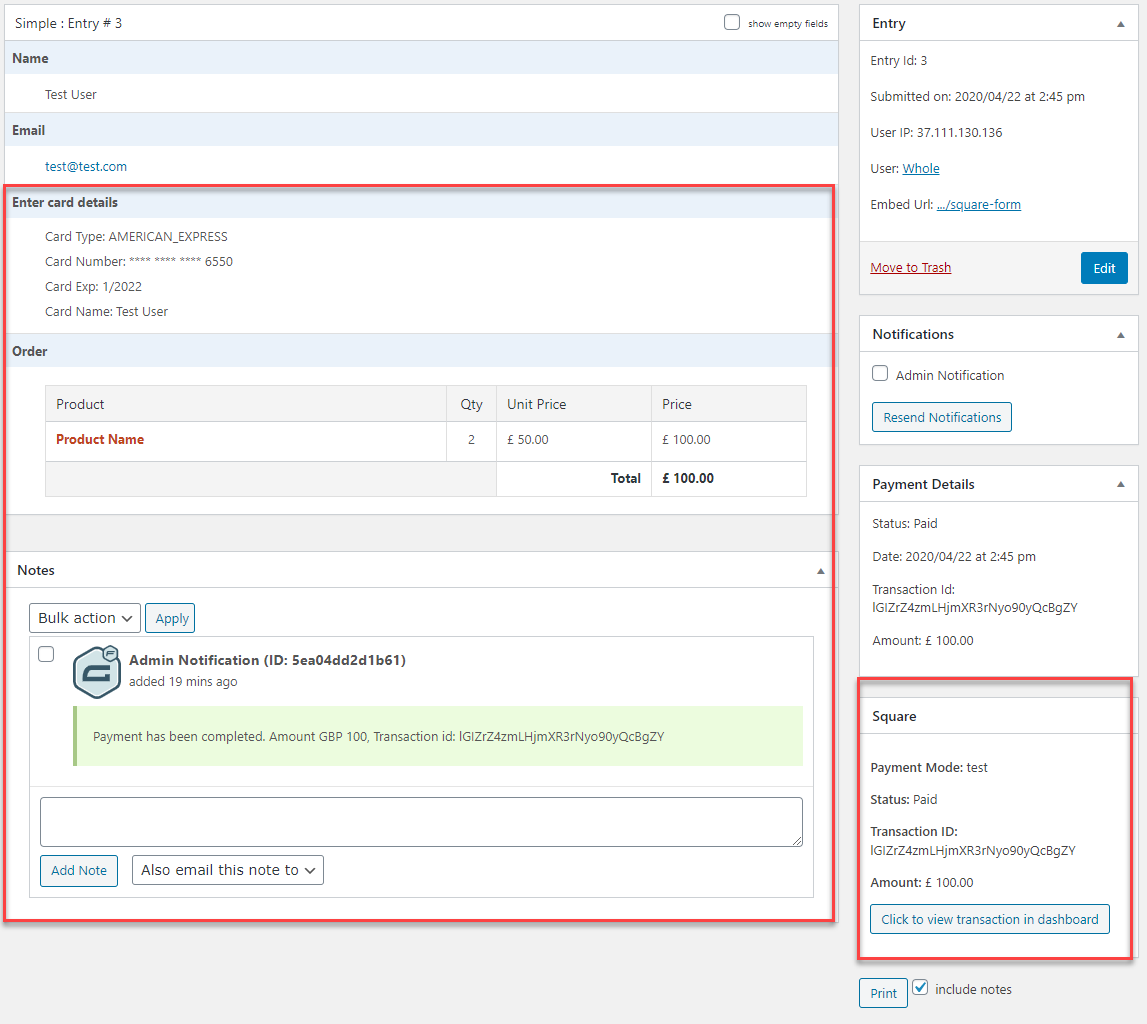
- When the User will complete the transaction from the form, the request would be moved to the Entries section.
- Click on the Entries to view all the requests.
- Hover over the respective entry to view the further options, click on the View option.
- All the new details would appear on your screen related to the transaction.
- At the bottom of the page, there is a Square section,
- The Admin can click on the Complete button to make the transaction successful or click the Cancel button to decline it.
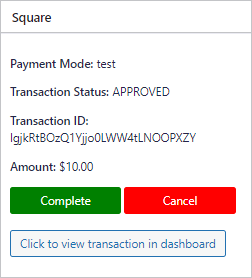
- When you’ll click on the Complete button, a popup will appear.
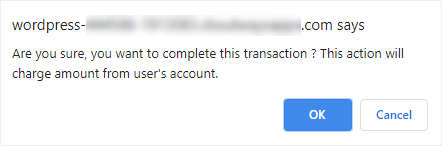
- Click on the OK button to complete the transaction process.
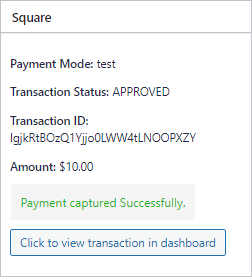
- Once the payment is done, the admin will be notified in the Square box with the label Payment captured Successfully.
Payment Refund
- The Admin can also Refund the transaction once its status is Completed.
- Go to the bottom of the page in the Square section.
- Click on the Make Refund button.
- You can also enter the reason for the refund. However, it is optional.
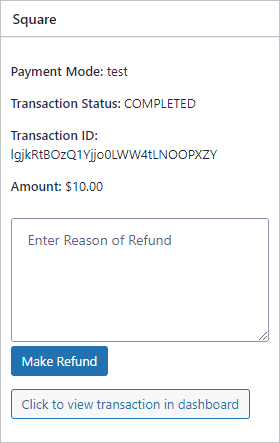
- When you’ll click on the Make Refund button, a popup will appear.
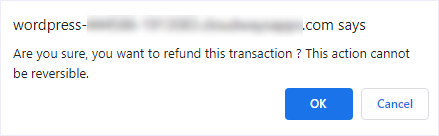
- Click on the OK button to complete the refund process.
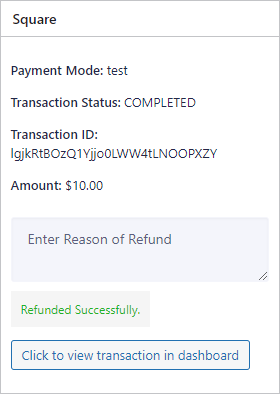
- Once the refund is done, the admin will be notified in the Square box with the label Refunded Successfully.
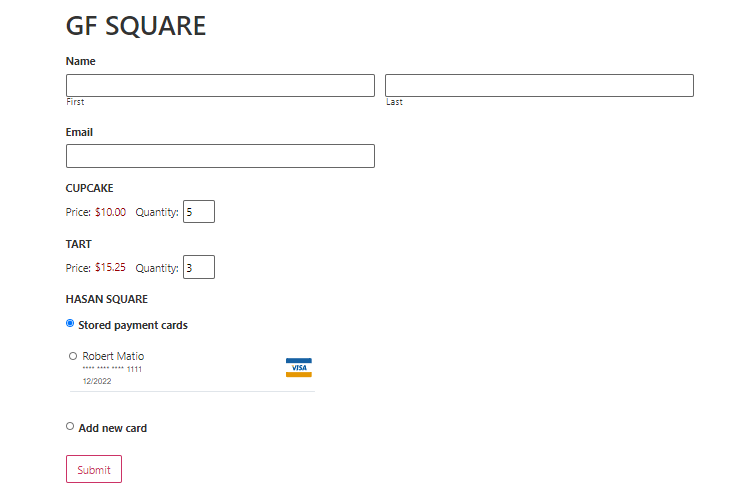
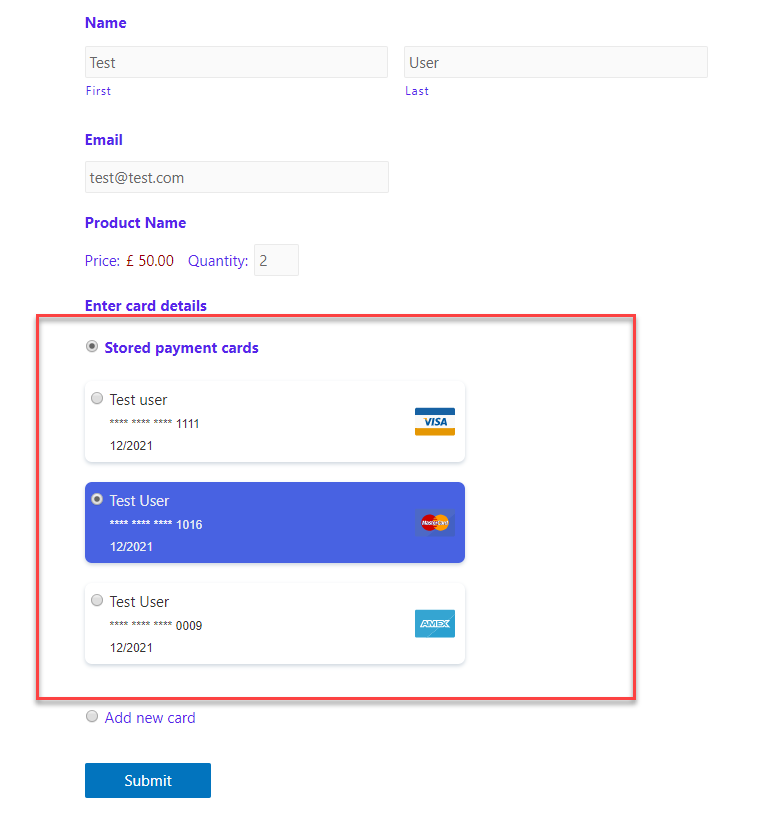
Card on File
- Go to Forms settings ? Card on File.
- Click Enable to save card.
- Enter a message for non-logged-in users.
- Enter Card save text.
- Save settings.
- To view saved cards user must be logged in.

- Make sure Card on File is enable when using Square Recurring payment option. If Card on File is disable it will show an error to the User on Front-end.
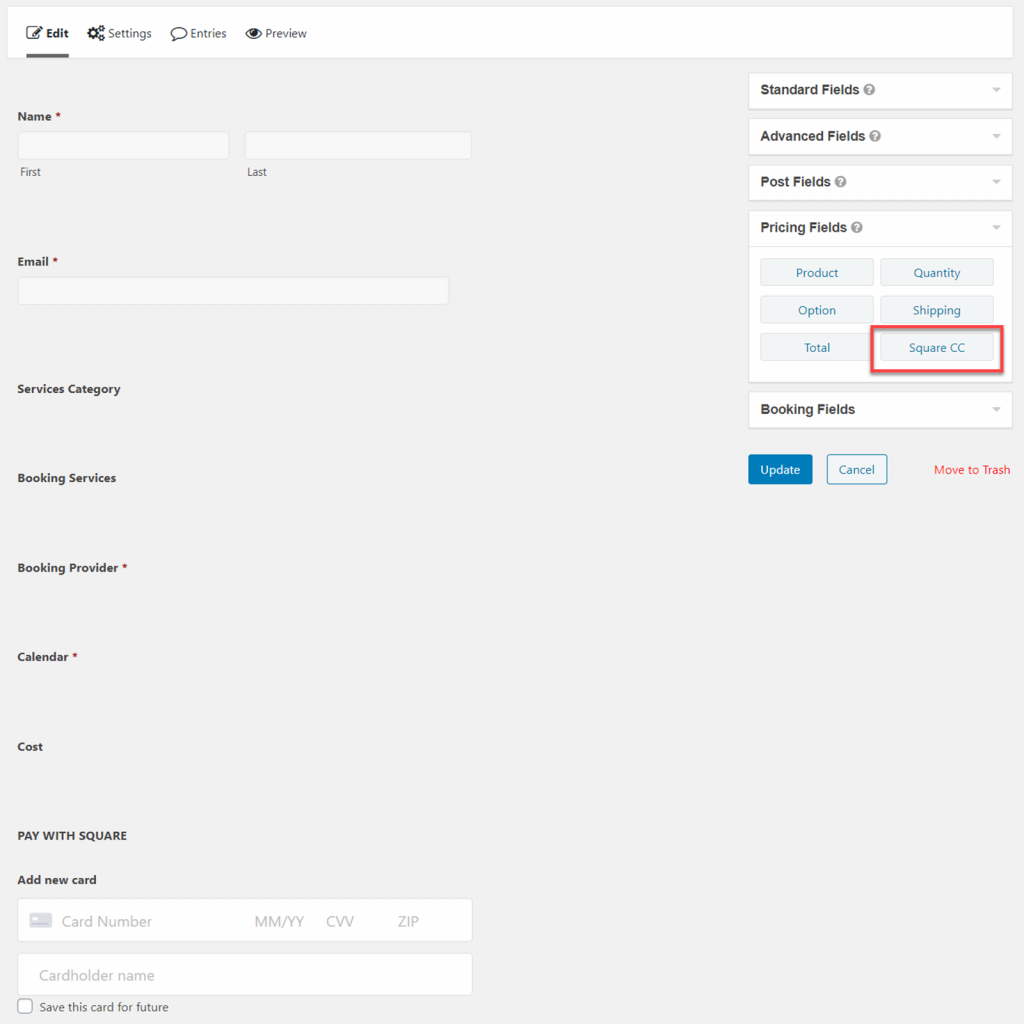
7.SQUARE CC FIELD
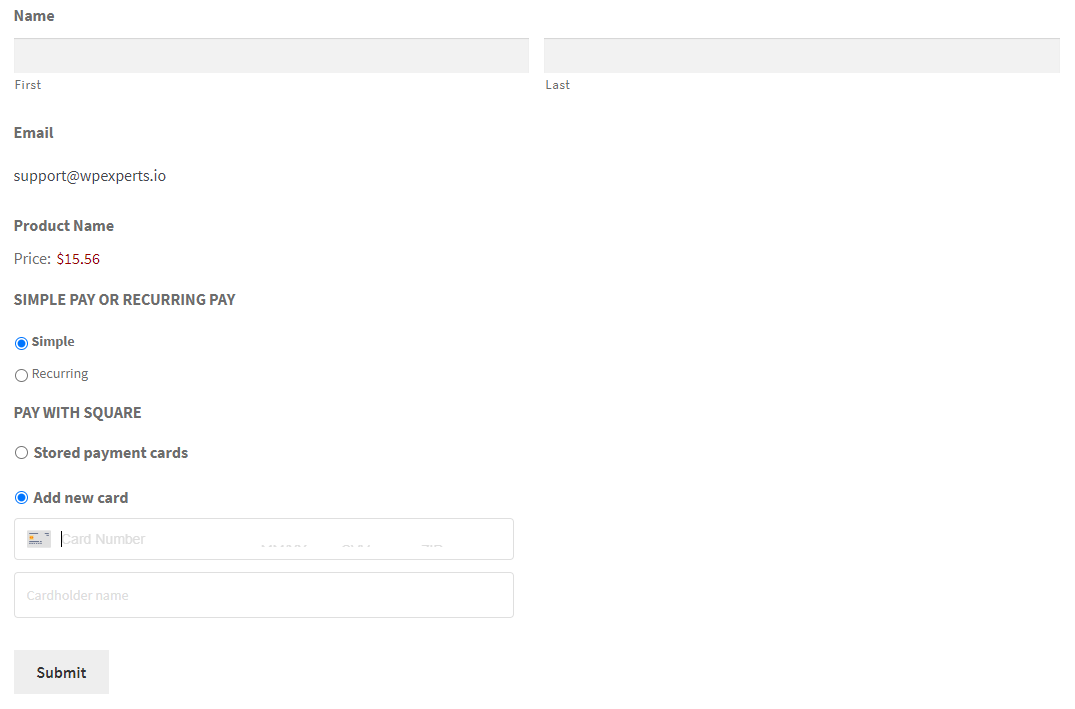
Simple Payment
- Go to edit form.
- Click to Add Product Field & Square CC from Pricing Fields Box.
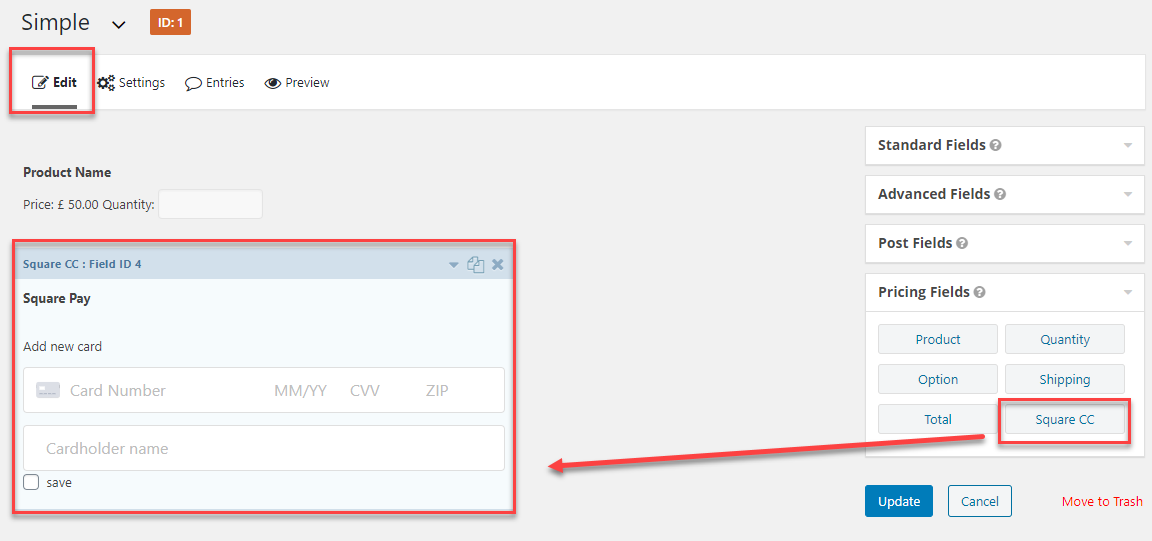
- Enter Field Label and Description.
- Enter Card Labels.
- Google Pay payment option can also be enabled. (Note: Google Pay only works with simple payment).
- Update Form.

- Also for Google Pay the Total field should be added.
Recurring Payment
- Please enable card on file option for Recurring Payments.

- Square Recurring option is available in the Square CC field.
- For Recurring Payments, enable the Recurring Payment option.
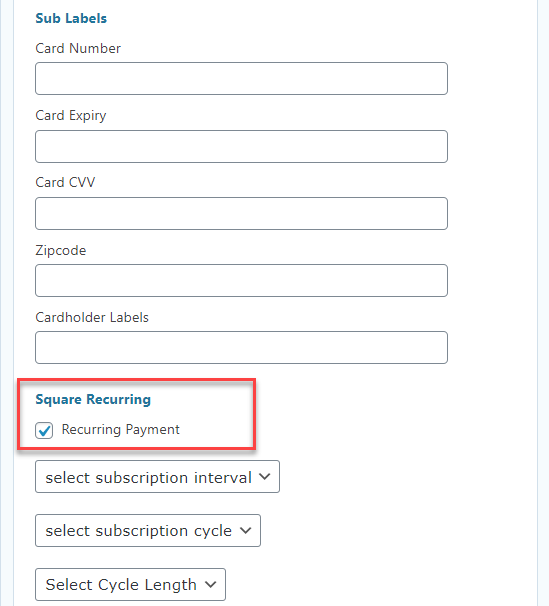
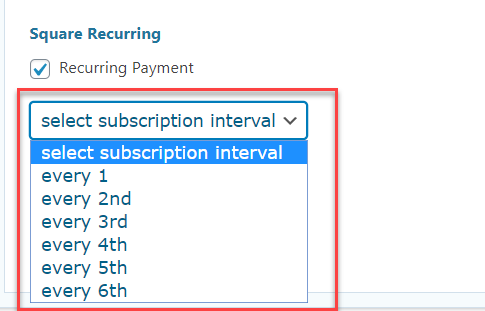
- Select Subscription Interval from Every 1st to 6th.
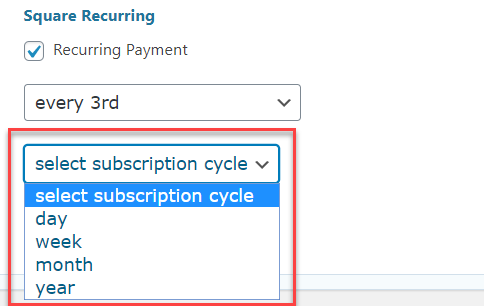
- Select Subscription Cycle it can be daily, weekly, monthly or yearly.
- Select Cycle Length from 1st to 24th or set it to Never Expire.
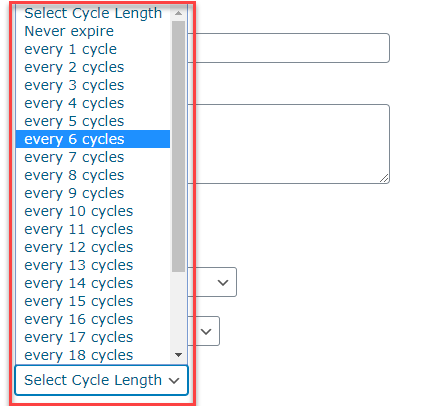
- Subscription Interval and Subscription Cycle shows how the subscription would be charged for example Every 1st month that means every month.
- Subscription Cycle shows how long the subscription will run for example 6 times/cycles that means for 6 months.
- So according to the use case above a subscription would be charged every month for 6 months.
Transaction Notes
You have to add form fields to appear in transaction notes settings.
- Go to Form Settings ? Square.
- Enable Form ID to send Form ID in transaction note.
- Select fields to send in Square transaction note.
- Update Square Settings.
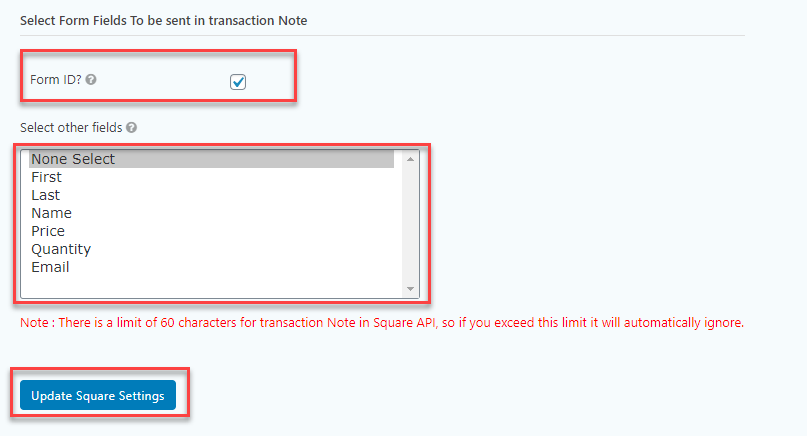
- Only those fields will appear in the transaction box which have been added in the form. If no field is added select field box will be empty.
Note: – All Test transactions will be displayed in Square Sandbox Account.
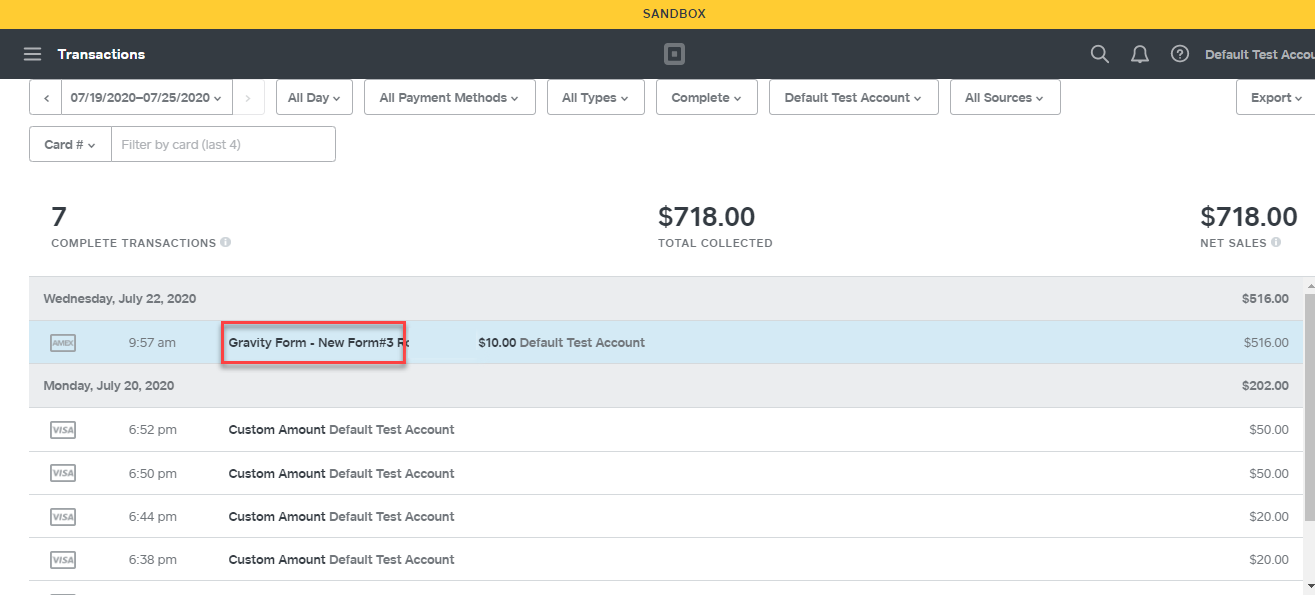
View Transaction Notes in Square Dashboard (Test Mode)
- Go to squareup.com ? Login.
- Go to Apps ? Click to open Application ? View in Developer Dashboard.
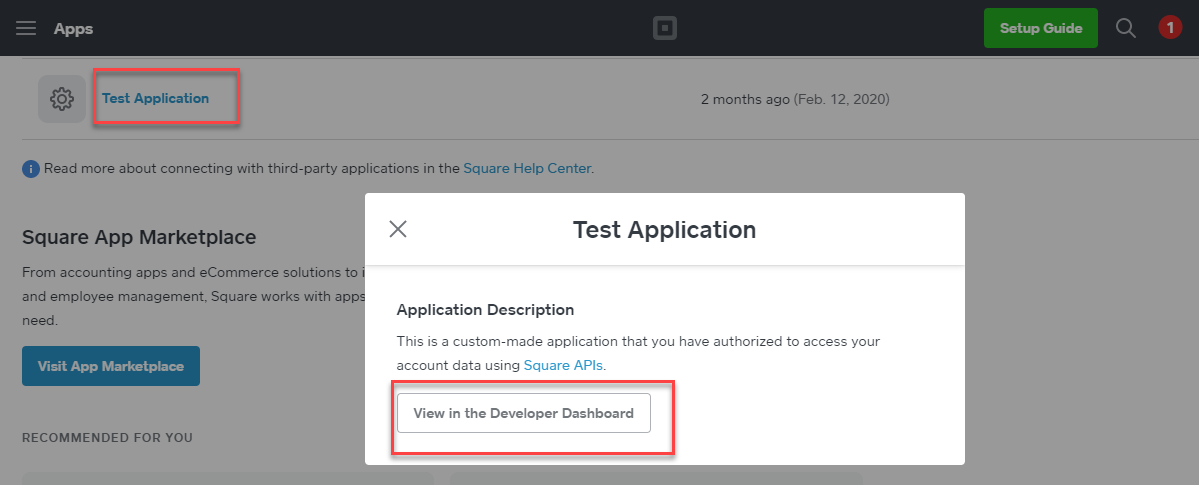
- Go to Developer Dashboard.
- Open the Sandbox Test Account.
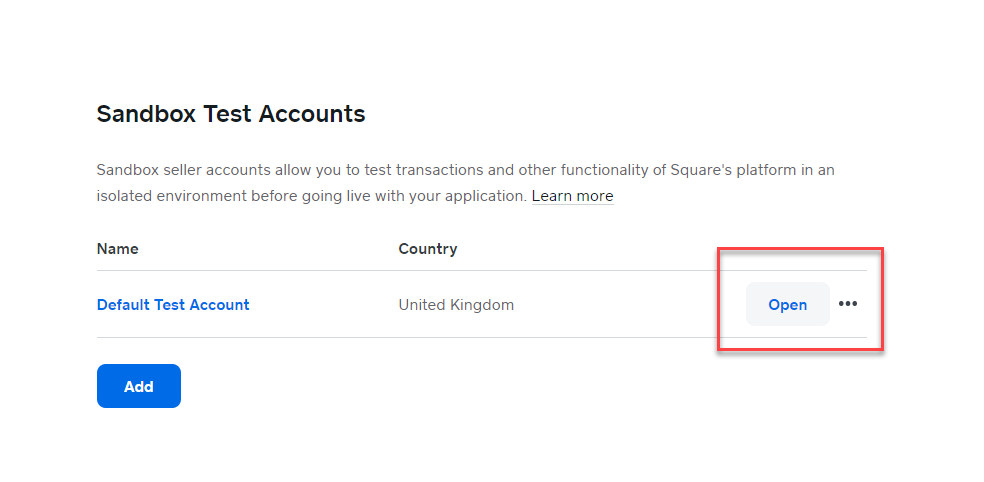
- Go to Transactions.
- View recorded transactions along with transaction notes.
View Transaction Notes in Square Dashboard (Live Mode)
- Go to squareup.com ? Login.
- Go to Dashboard ? Transactions.
- View recorded transactions along with transaction notes.
8.GOOGLE PAY
BACKEND CONFIGURATION
To Enable Google Pay Option, following configuration is required:
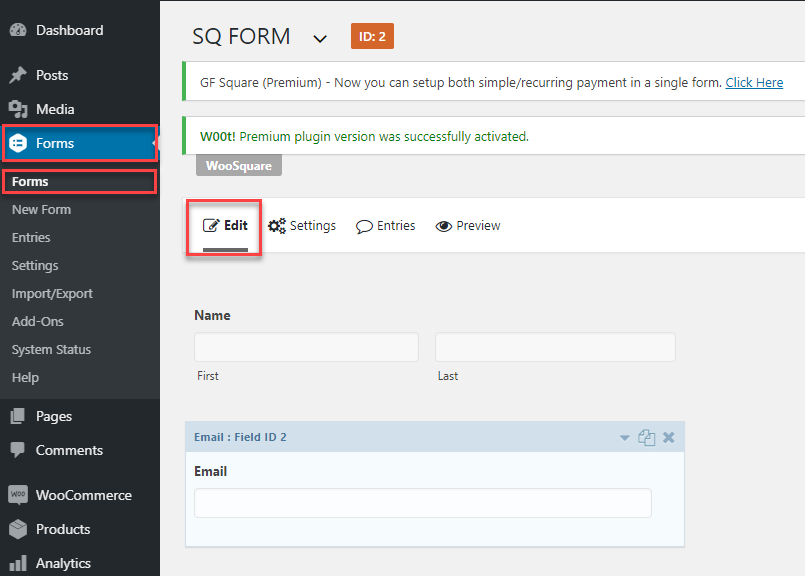
- Go to ‘Forms’ Tab then ‘Forms’
- Click on edit as shown in below image.
- Go in ‘Pricing Field Tab’ and then In ‘Square CC’ Tab
- A new screen will appear in ‘General Tab’ where you need to put ‘Field Label’
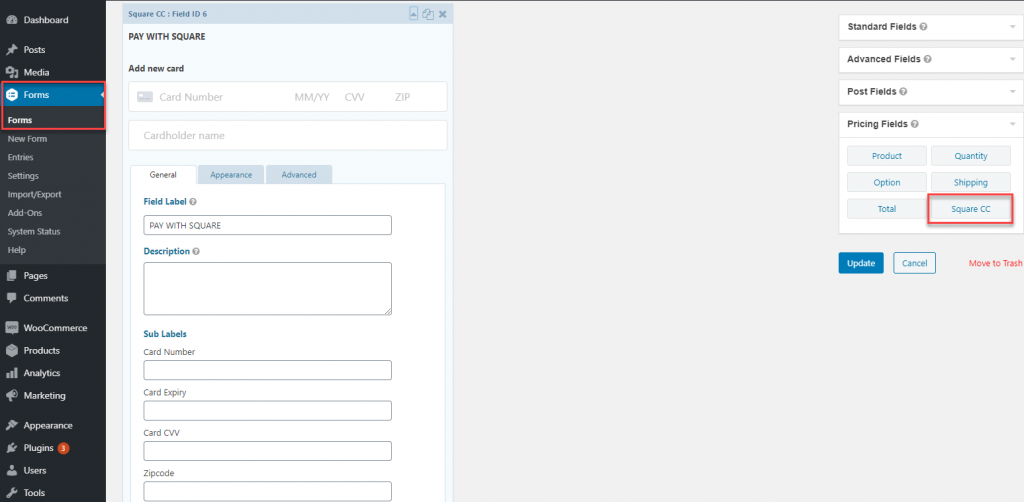
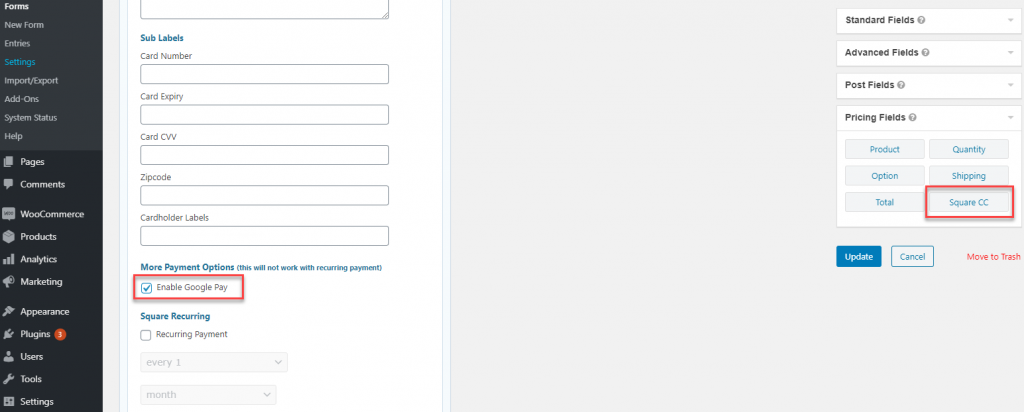
- In same form you need to scroll down and then you will find a checkbox named ‘Enable Google Pay’. Mark it as checked and Update it.
GOOGLE PAY FRONTEND FUCNTIONALITY
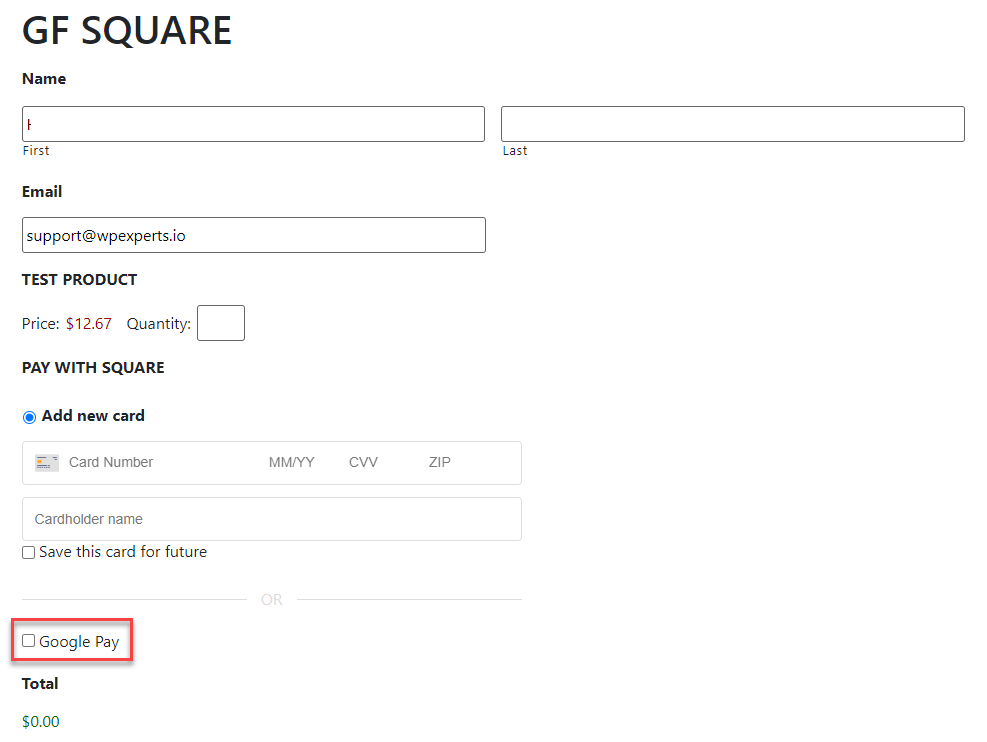
- Option for marking google pay will appear.
- User need to mark it as checked.
- Following option will appear on marking checkbox.
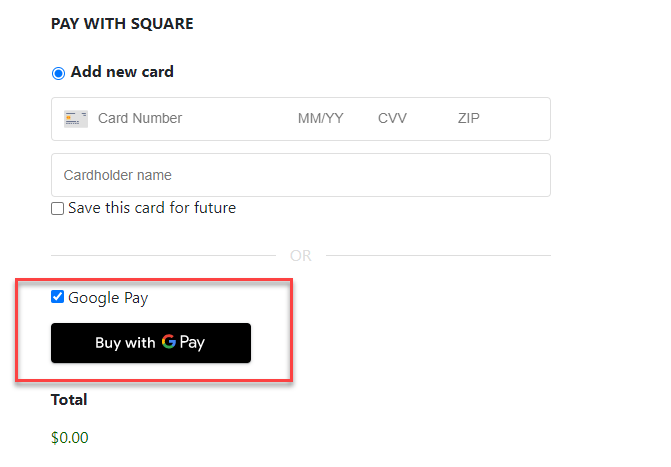
- User need to click on above highlighted button.
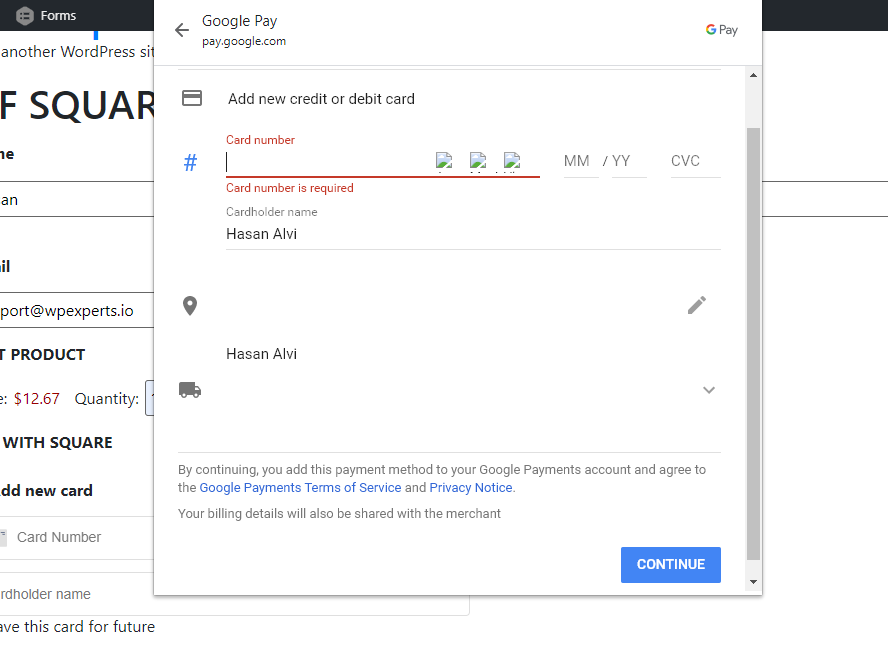
- Following option will appear to proceed for the payment via Goolge Pay.
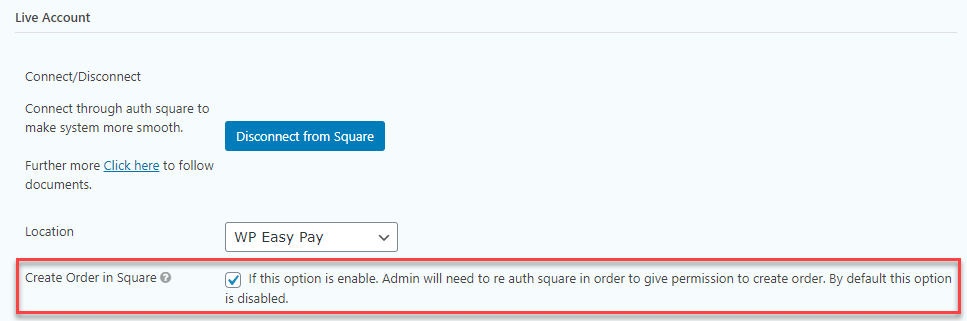
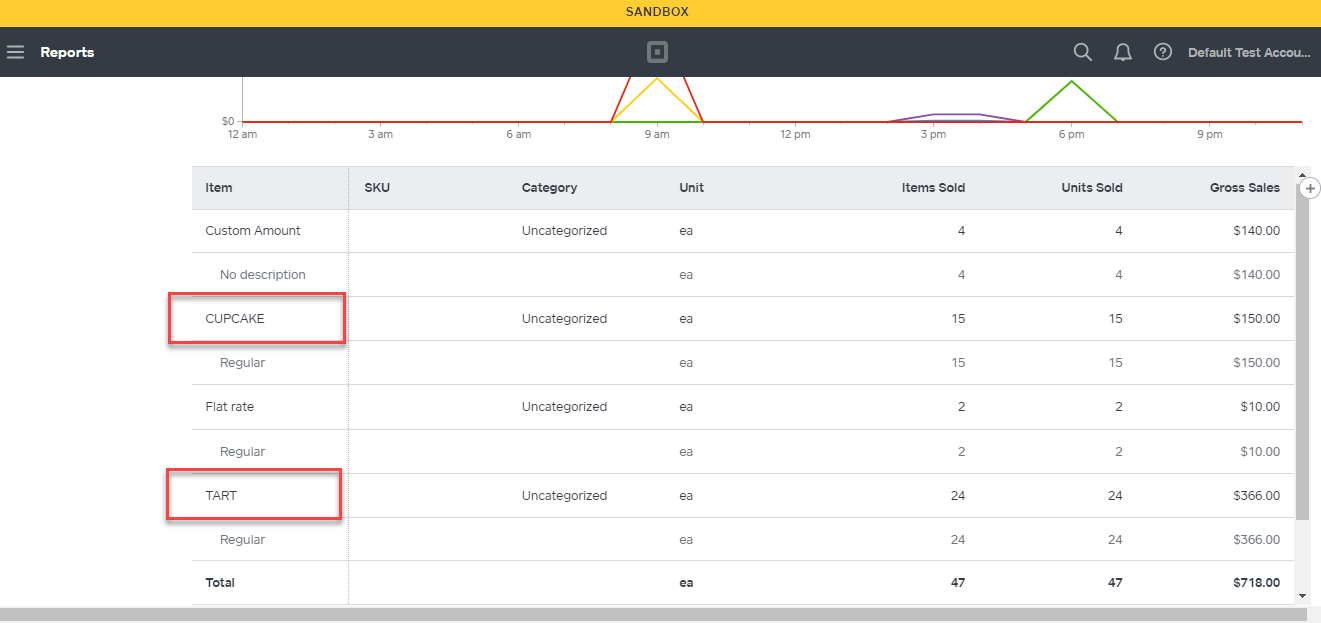
9.ORDER SYNCHRONISATION
You have to enable Create Order in Square for orders and reports to appear in Square
- Go to Form Settings ? Square.
- Enable Create Order in Square.
- Update Square Settings.
- Example form.
- Order Receipt in Square.
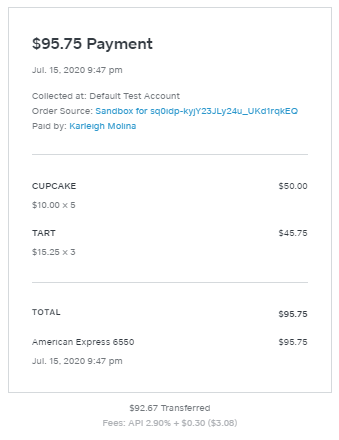
- Reports Item Sales
10.GRAVITY FORMS SQUARE WITH GRAVITY BOOKING
Gravity Forms Square also works with Gravity Forms Booking making it easy for you to book payments through Square.
Gravity Forms Booking features include:
- Customize Your Booking Form
- Display Service Category
- Multiple Payment Methods
- Book Appointments and View in Calendar or List View
- Multi-Step Forms
Settings
- Simply go to your Booking Form Settings ? Square.
- Enable Square.
- Add Square CC field.
- Click Update.
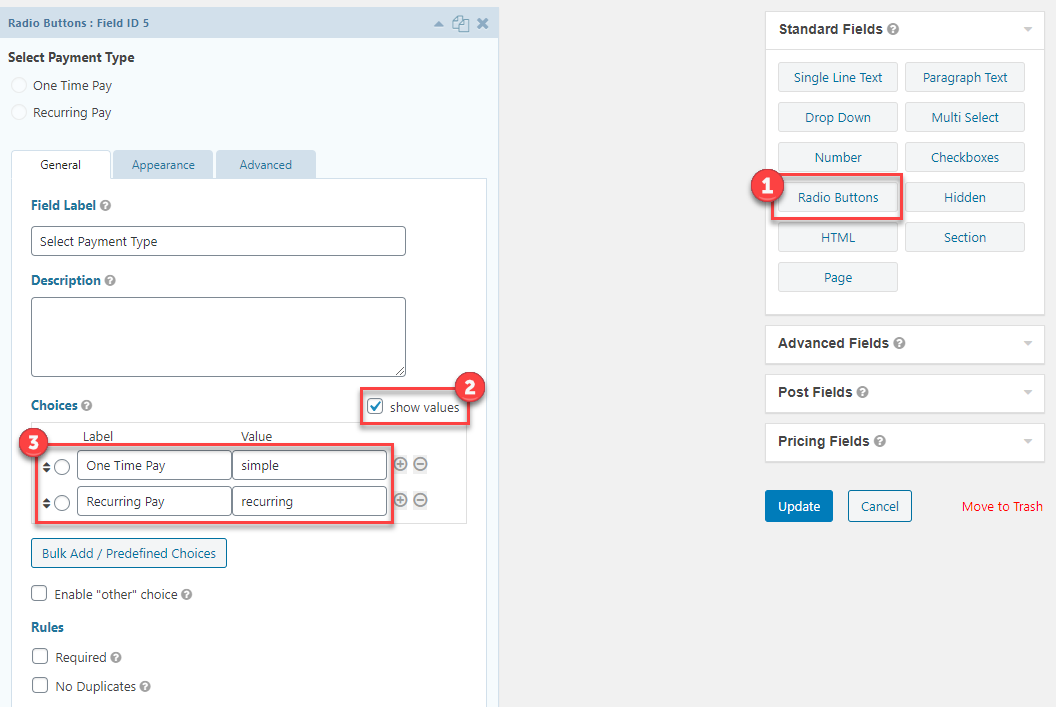
11.CONDITIONAL LOGIC
- If you want both Simple Payment and Recurring Payment options in a single form, you need to create a conditional logic.
- For that add a Radio Buttons field and go to its General settings.
- Click on show values, then enter simple for simple payment and recurring for recurring payment in the value fields as given below. You can enter any labels as you like. (Note: both simple and recurring values are case sensitive).
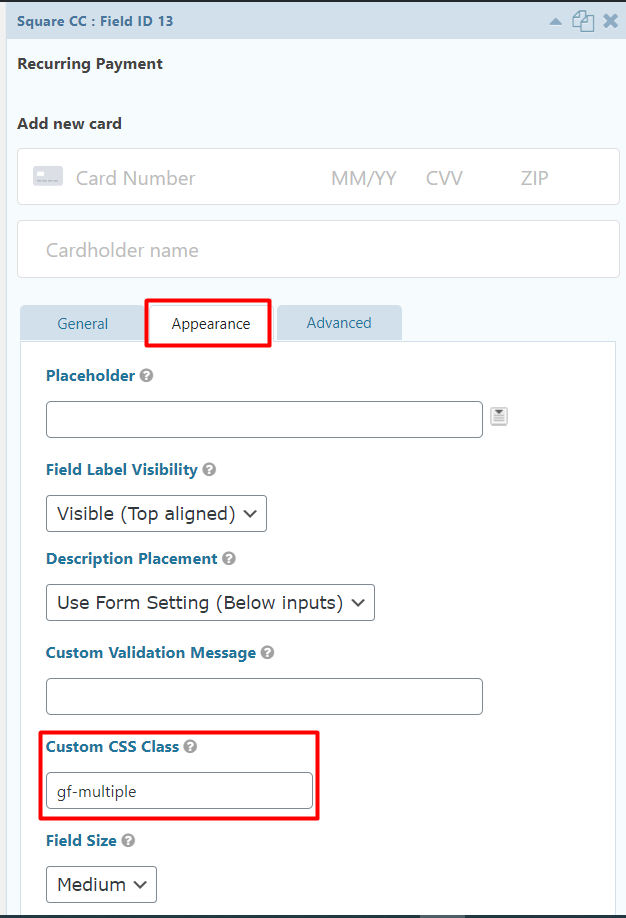
- Now go to the Square CC field Appearance settings tab
- In Custom CSS Class field add class gf-multiple (Note: classname gf-multiple is case sensitive)
- Then go to the Advanced settings tab and enable Conditional Logic and set logics as follow:
-
- Show this field if Any of the following match:
- Set two conditions as given below: one for simple and the other for recurring. {radio buttons field label} is {field label}.
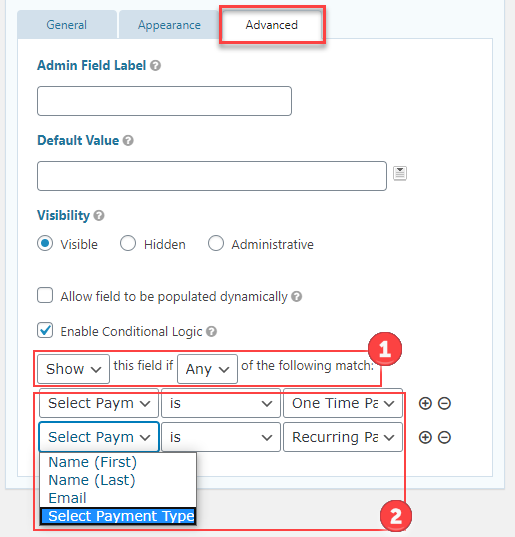
- Now click Update to update the form.
Notes for Conditional Logic:
- Card on File should be enabled.
- Credit cards are saved after a recurring payment.
- Card Save checkbox and its text is not displayed.
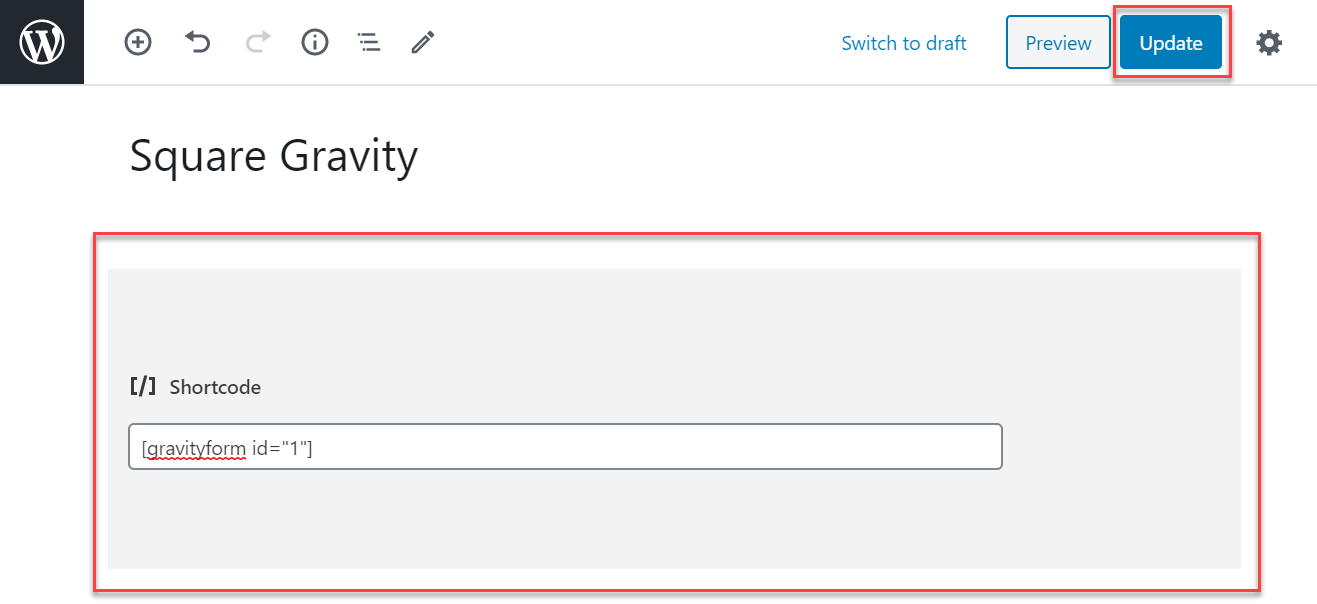
12.GRAVITY FORM SHORTCODE
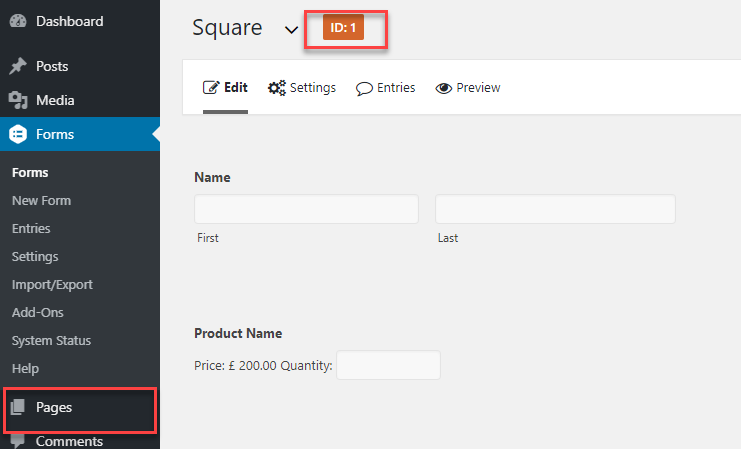
- Copy Form ID.
- Go to Page/Post ? Add New.
- Enter Shortcode: gravityform id=”idnumber” using square brackets like given below
- Publish/Update.
13.FRONT END – View
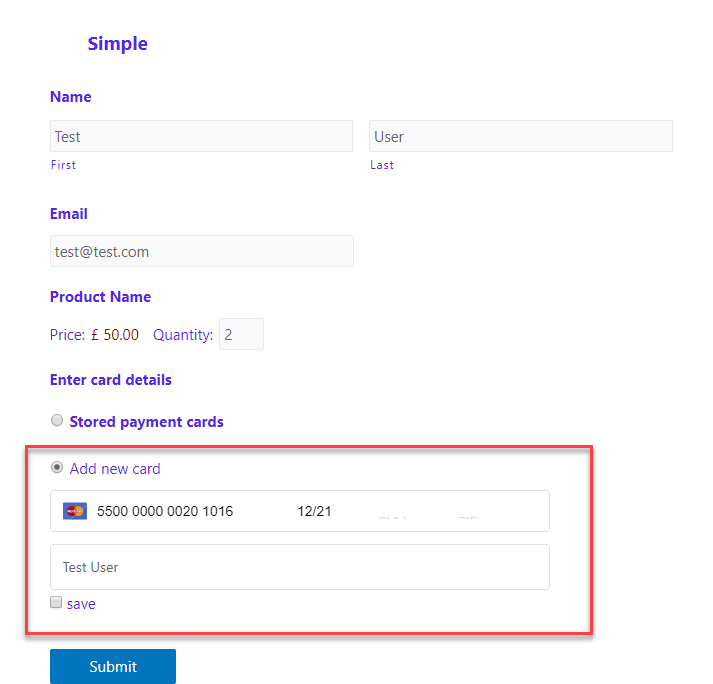
Simple
Recurring
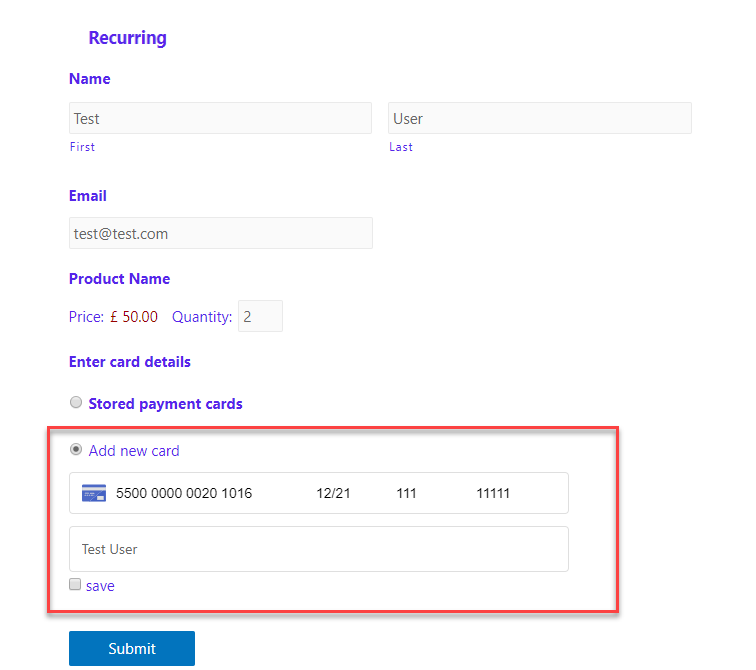
13.1.FRONT END – View (Card On File)
13.2.FRONT END – View (Google Pay)
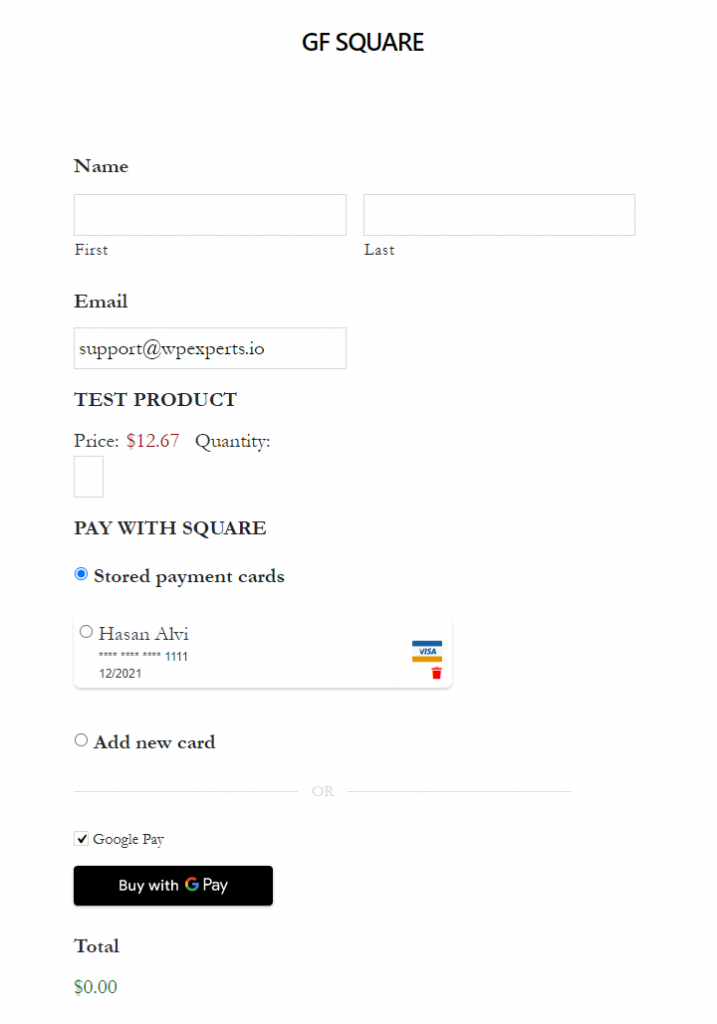
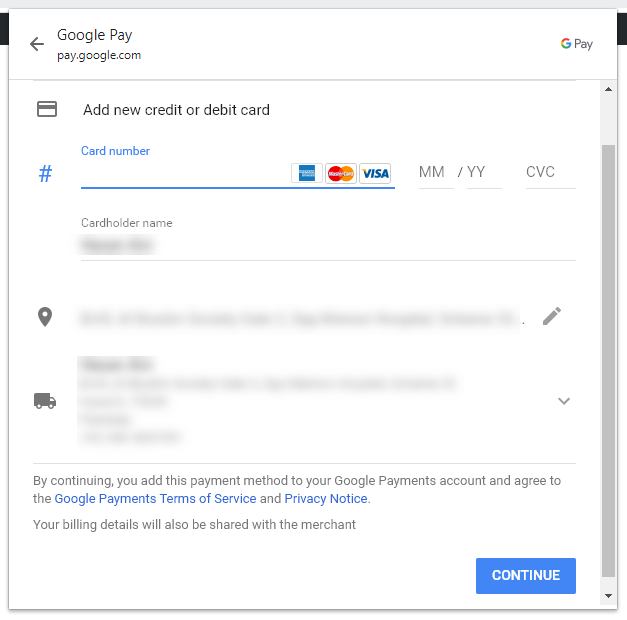
- Google Pay popup.
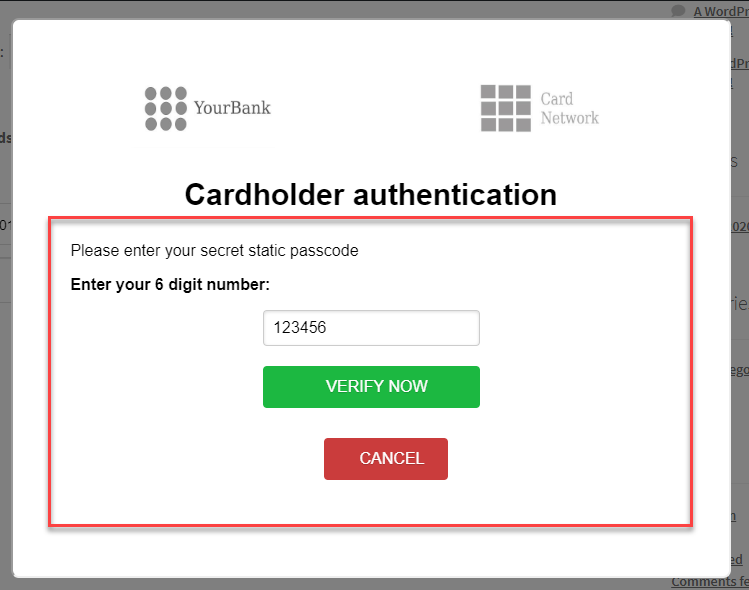
13.3.FRONT END – View (SCA Testing)
13.4.FRONT END – View (Conditional Logic)
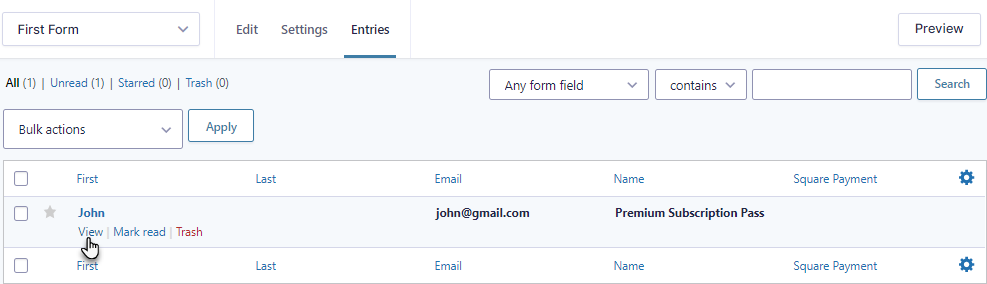
14.GRAVITY FORM ENTRIES
- Go to forms ? edit form.
- Click on Entries.
- View Entry.
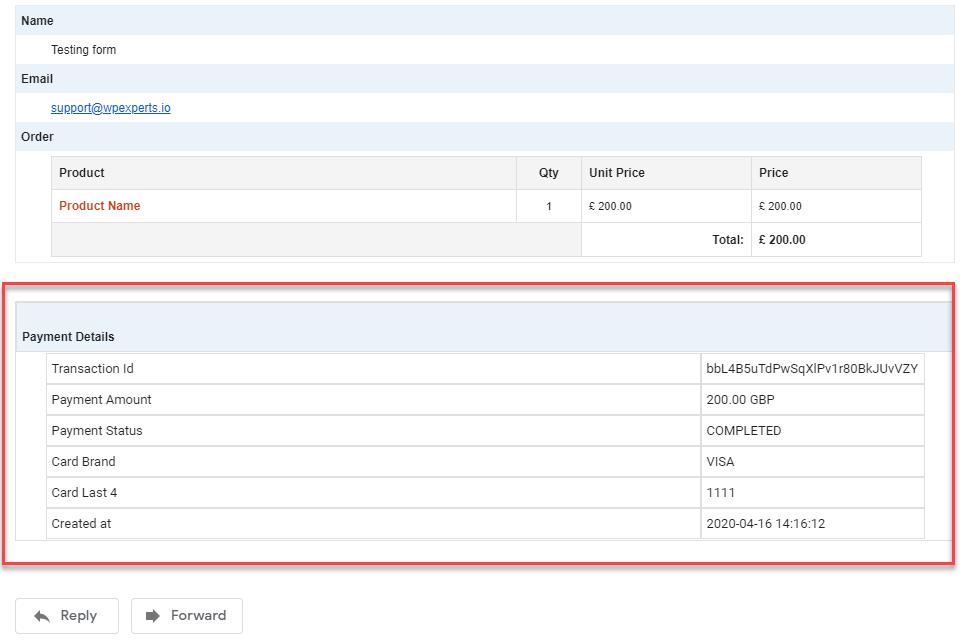
You’ll find the transaction entry details along with the Square Transaction ID and Payment Status.
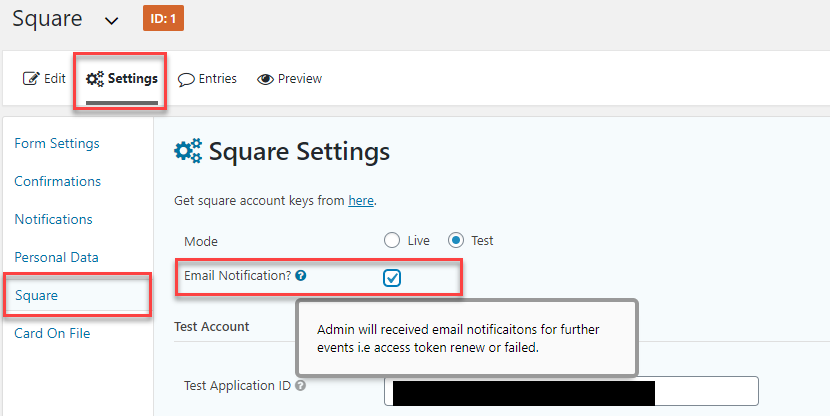
Email Notifications (Admin)
- Go to Forms ? Settings ? Square.
- Enable Email Notification.
Note: An email notification is sent to the admin whenever the OAuth expires, fails, or renewed. Admin will receive an email when the Square application disconnects from the plugin.
Email Transaction Details
- Go to Notifications ? Edit.
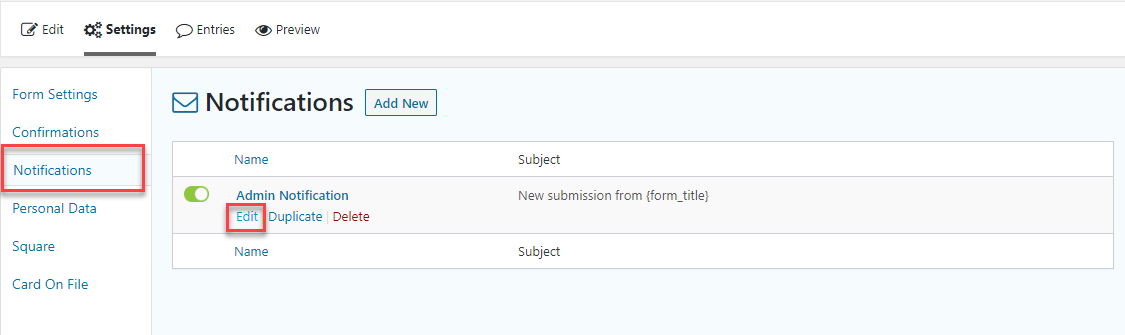
- Select Enter Email Option.
- Add your Email address.
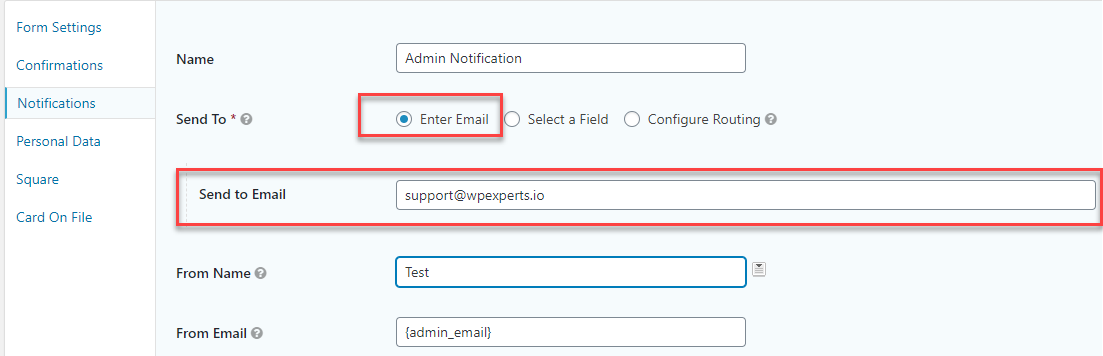
- Scroll down.
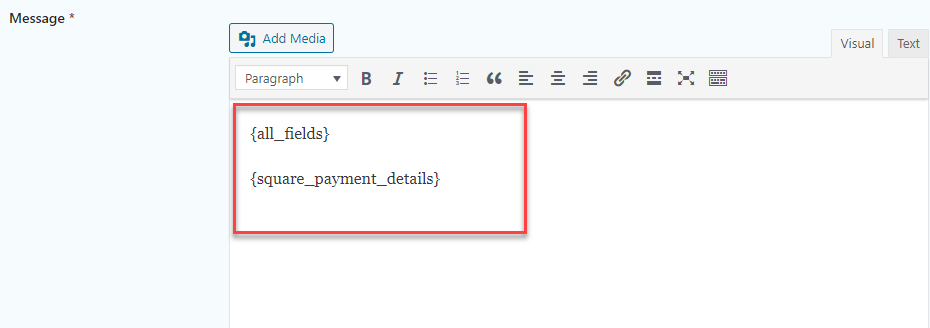
- Add Transaction details into message body.
- Update notification.
Transaction details: {square_payment_details}
Email View
Email Notifications (User)
- Go to Notifications ? Add New.
- Enter Name.
- Select “Select a Field” option.
- Select Email from send to field dropdown.
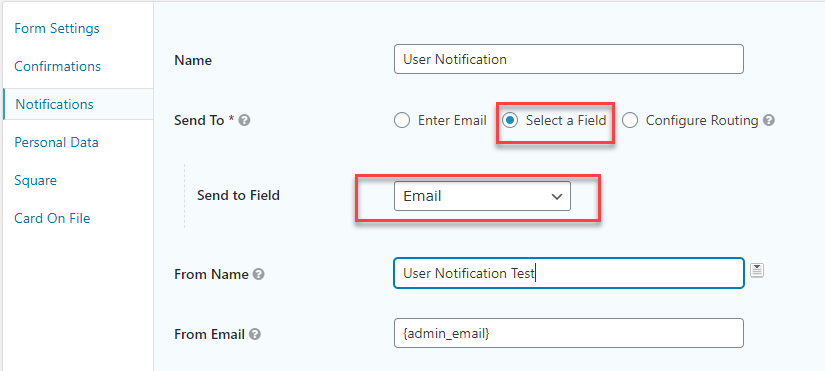
- Enter Transaction details into message body.
- Update notification.
Transaction details: {square_payment_details}
Email View

