

Cash App is a widely used peer-to-peer money transfer service that lets you send and receive money instantly using your smartphone. But if you’re wondering, how do I accept cash app payments on a WordPress or WooCommerce website? Then you have come to the place!
This article will show you how to integrate Cash App with WordPress and WooCommerce using plugins like WP EasyPay and WooSquare Plus. These plugins will enable you to integrate the Cash App payment option on your website, which offers low fees, fast transactions, security, and convenience.
Before we dive into the integration process, let’s understand what exactly the Cash App is and why you should use it for your business.
What is Cash App, and How Does it Work?
Cash App, developed by Block Inc., the same company that owns Square—a popular card processing service for small businesses. With Cash App, you can send and receive money instantly from anyone with a Cash App account.
You can also use Cash App to buy and sell stocks or bitcoin, get exclusive discounts with Cash App Pay and Cash Card, and access banking services such as direct deposit, ATM withdrawals, and cash deposits.
To use Cash App, you need to download the app on your iOS or Android device and sign up with your email or phone number. You will also need to create a unique username called a $Cashtag, which you can use to send or request money from anyone.
To send money, you just need to enter the amount and the recipient’s $Cashtag, email, or phone number. Conversely, to receive money, you simply share your $Cashtag with the sender or scan their QR code.
Why Should You Use Cash App for Business?
As the popularity of Cash App continues to soar, it presents a compelling opportunity for businesses to enhance their payment options and cater to a large user base.
According to Block Inc, Cash App’s monthly active users increased by 17% during the first quarter of 2023, reaching 53 million in March.
Given its significant growth, incorporating Cash App as a payment method on your website provides access to a broad customer base prepared to make purchases via this trusted platform.
Here are some of the benefits you can get using Cash App for your business:
- Expand Your User Base: Offering Cash App as a payment mode instantly connects you to a vast pool of potential customers. As Cash App’s user base expands, you can easily leverage this network and attract new buyers who prefer Cash App payments.
- Swift Transactions: Cash App facilitates seamless and instant transactions, eliminating the traditional payment methods that often entail delays or extra charges. You can also transfer money from your Cash App balance to your bank account within 1-3 business days using the standard deposit option or within minutes using the instant deposit option with a fee of 0.50% – 1.75% of the transaction amount or a minimum of $0.25.
- Versatility and Additional Services: Other than peer-to-peer payments, Cash App also offers additional services. With features like stock trading, Bitcoin buying and selling, exclusive discounts, and banking services, It provides more than just simple transactions, which means customers can enjoy additional value and access to various financial services.
- Security and privacy: Cash App uses encryption and fraud detection technologies to ensure your financial information’s safety. To secure your account, you can enable security features such as PIN code, Touch ID, Face ID, or two-factor authentication, which reduces the likelihood of fraudulent transactions.
- Convenience for Mobile Shoppers: In an increasingly mobile-driven world where customers love to buy things quickly and easily, offering Cash Ap payments on your website aligns your business with evolving consumer preferences and captures the attention of tech-savvy customers who value convenience.
Incorporating the Cash App as a payment option on your website expands your customer reach and enhances your users’ payment experience. With its growing user base and numerous benefits, Cash App presents a compelling choice for businesses seeking to elevate their payment solutions.
How to Integrate Cash App with WordPress and WooCommerce
Before you begin the Cash App integration with WordPress or WooCommerce, you need to set up a Cash App Business Account that will allow you to accept payments via Cash App. You can also switch your personal Cash App account to a business account.
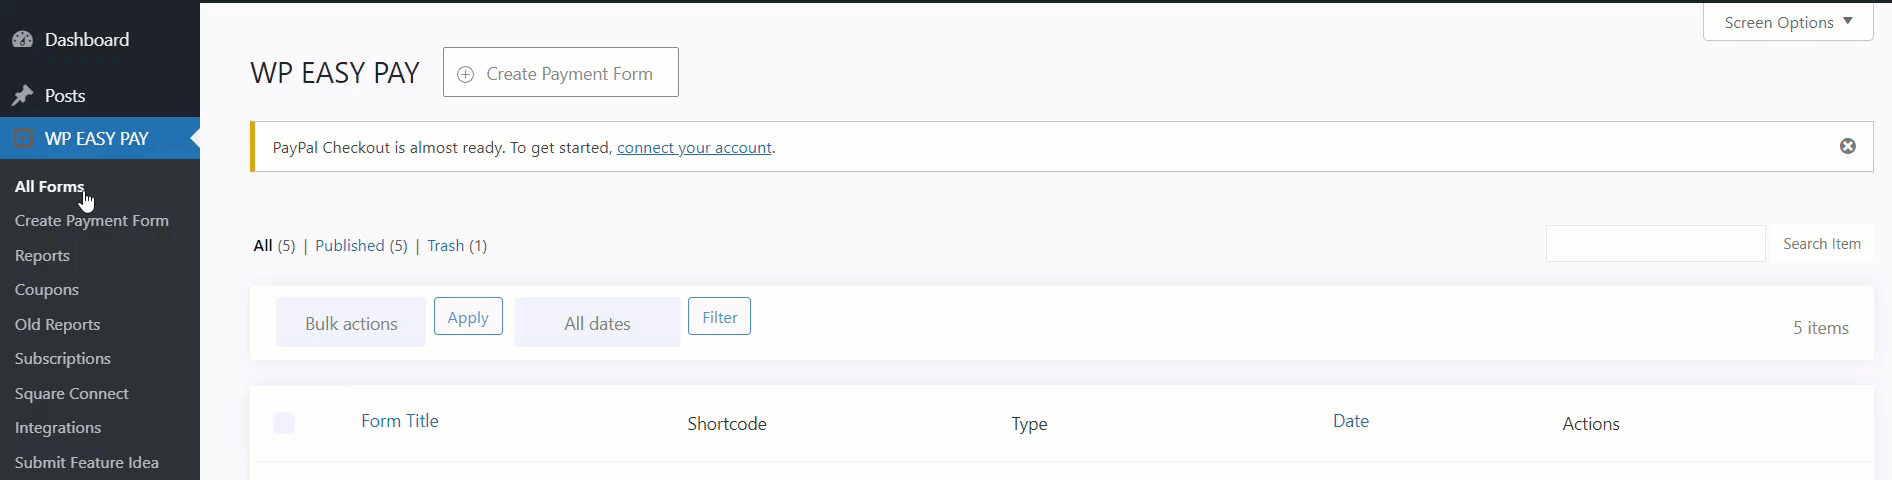
After setting up a Cash App Business Account, you can integrate it with your WordPress or WooCommerce website using plugins such as WP EasyPay and WooSquare Plus.
Here:
- WP EasyPay allows you the Cash App integration with WordPress
- WooSquare Plus provides Cash App integration with WooCommerce
With these plugins, you can create forms or products that let your customers pay with their Cash App balance or any other payment option supported by Square.
For WP EasyPay, simply follow our step-by-step installation guide by clicking here. Likewise, if you’re using WooCommerce, refer to our WooSquare Plus installation guide here.
These guides will walk you through the step-by-step instructions for downloading, installing, and activating WP EasyPay and WooSquare Plus on your website.
Cash App Configurations for WordPress
Once you have installed and activated WP EasyPay on your WordPress website, follow the steps below to enable Cash App payments on your WordPress website.
Step #1: Connect Your Square (Sandbox) Account
To begin, you need to establish a connection between your Square Sandbox account and your WordPress website. The Sandbox environment allows you to test your setup before going live, ensuring everything works correctly and securely.
The following instructions will guide you through linking your Square account:
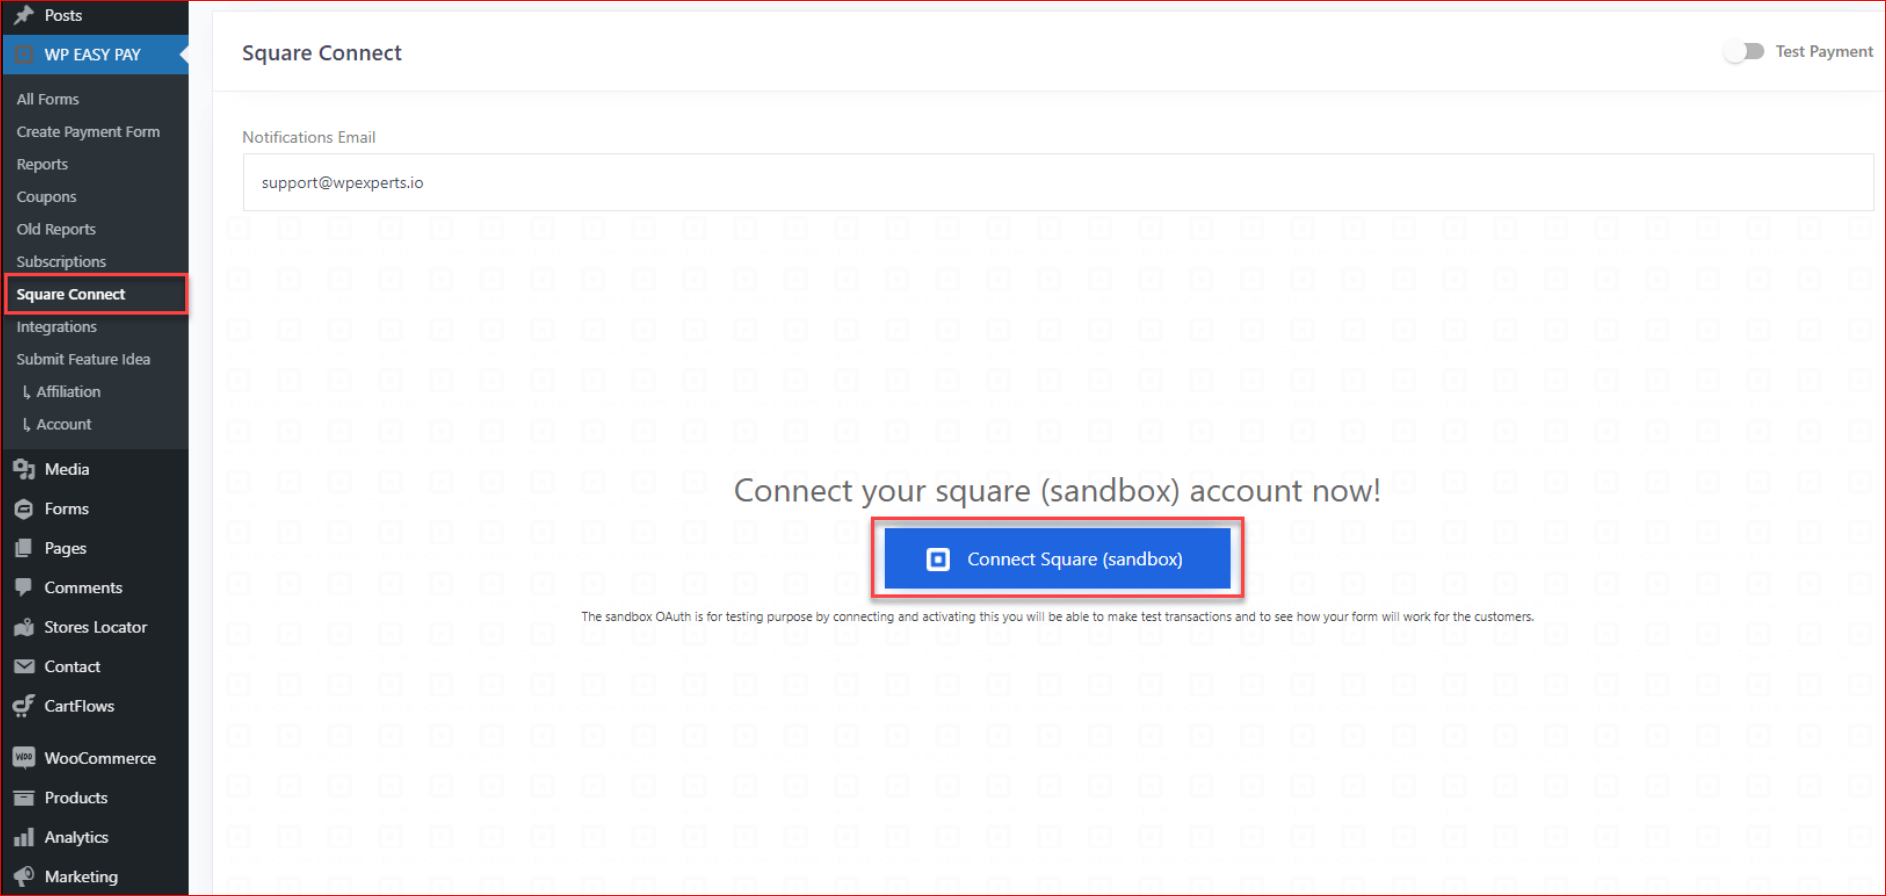
1- Navigate to Square Connect from your WordPress dashboard.
2- Input your Notification Email.
3- Choose your desired Test Payment Type.
4- In a new tab, open your Square Sandbox Dashboard.
5- Click the ‘Connect Square (sandbox)’ button.
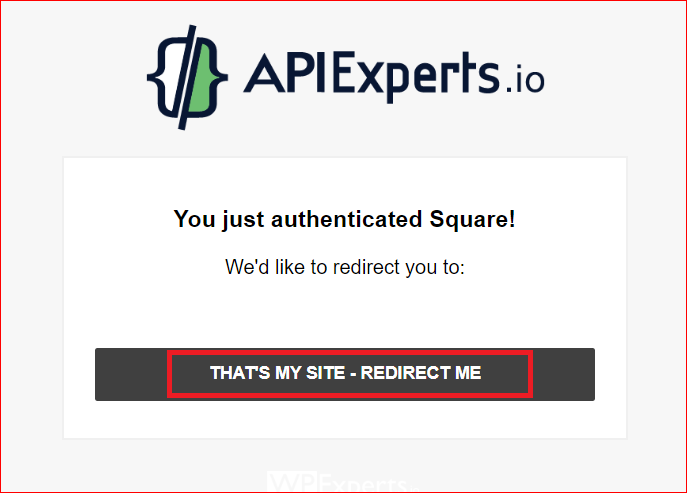
6- Follow the redirection to the subsequent page, and click on ‘Redirect Me’.
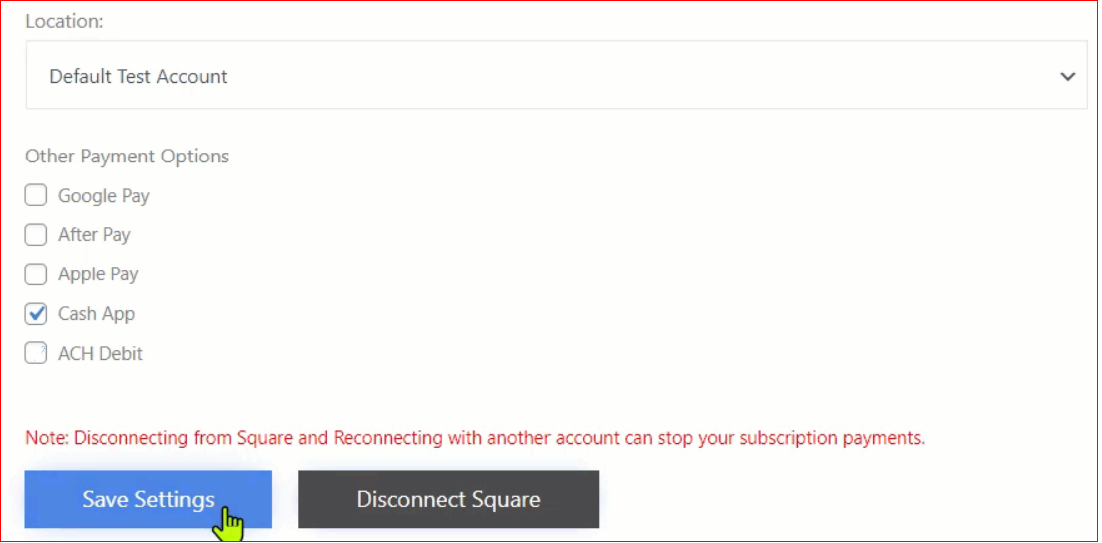
7- Choose “Default Test Account” as the location.
8- You can also enable Google Pay and Apple Pay.
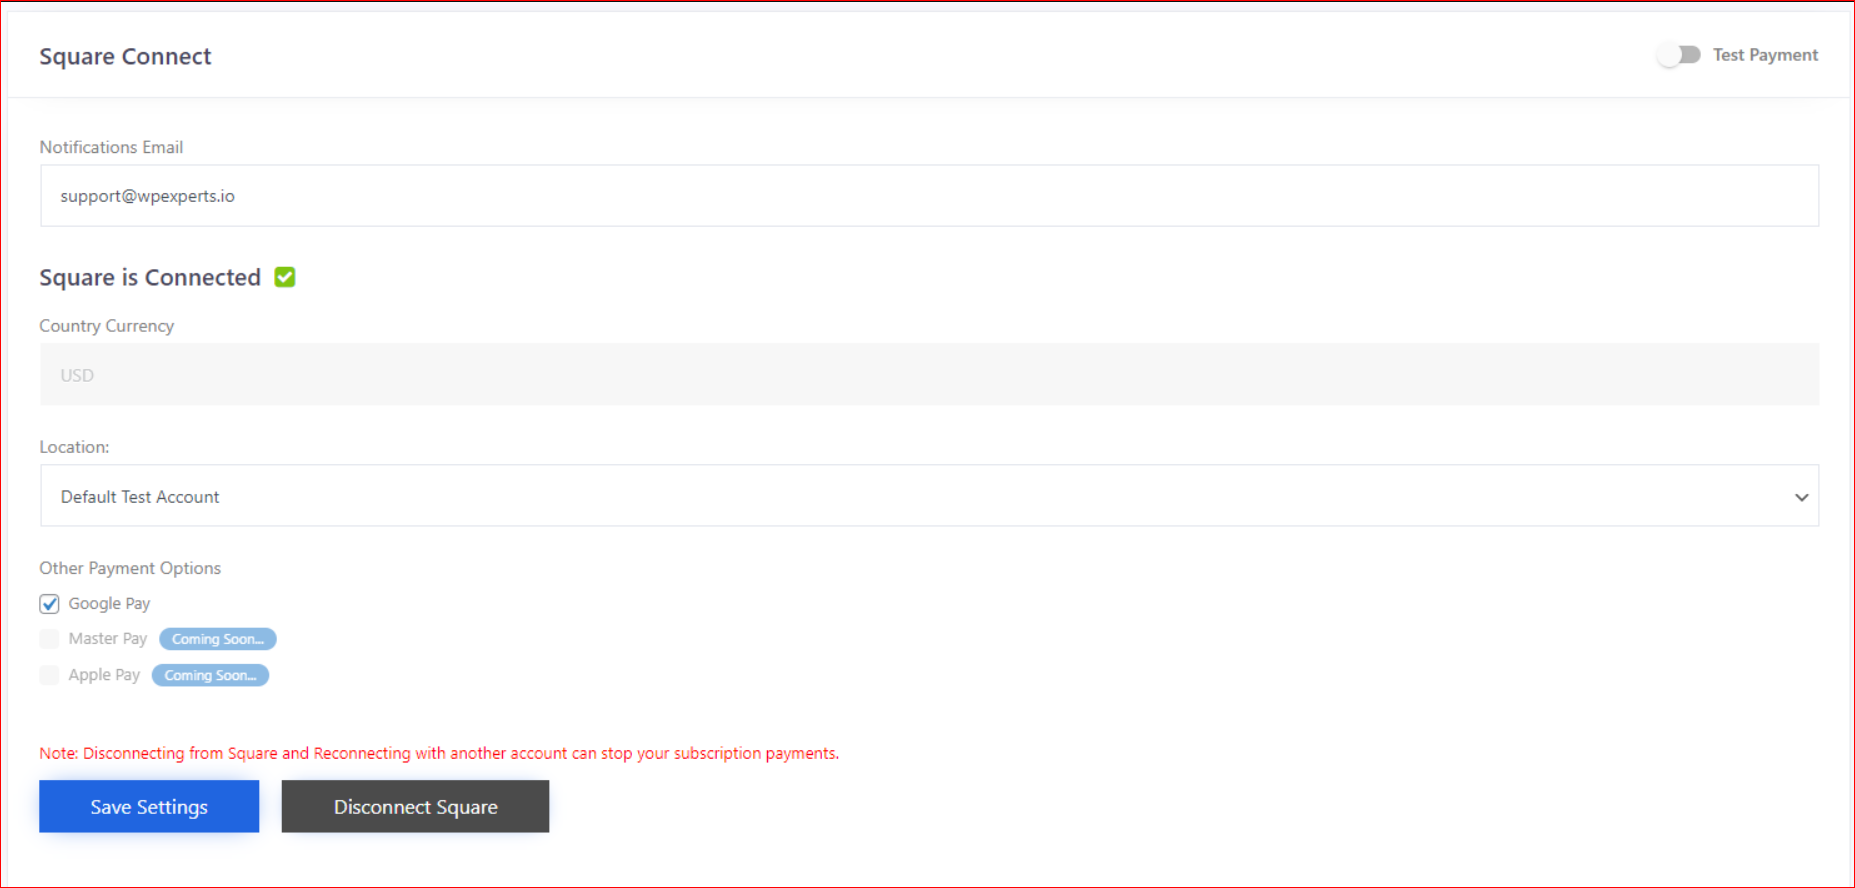
9- Finally, save your settings by clicking ‘Save Settings.’
You’ve now successfully connected the Square account. Let’s move on to the next step.
Step #2: Add Cash App Payment Option
This step involves adding Cash App as a payment option on your website, allowing customers to choose Cash App as their preferred payment method during checkout. Please note that Cash App payments are only available to customers based in the US and UK.
1- Go to the Other Payment Options section and select Cash App.
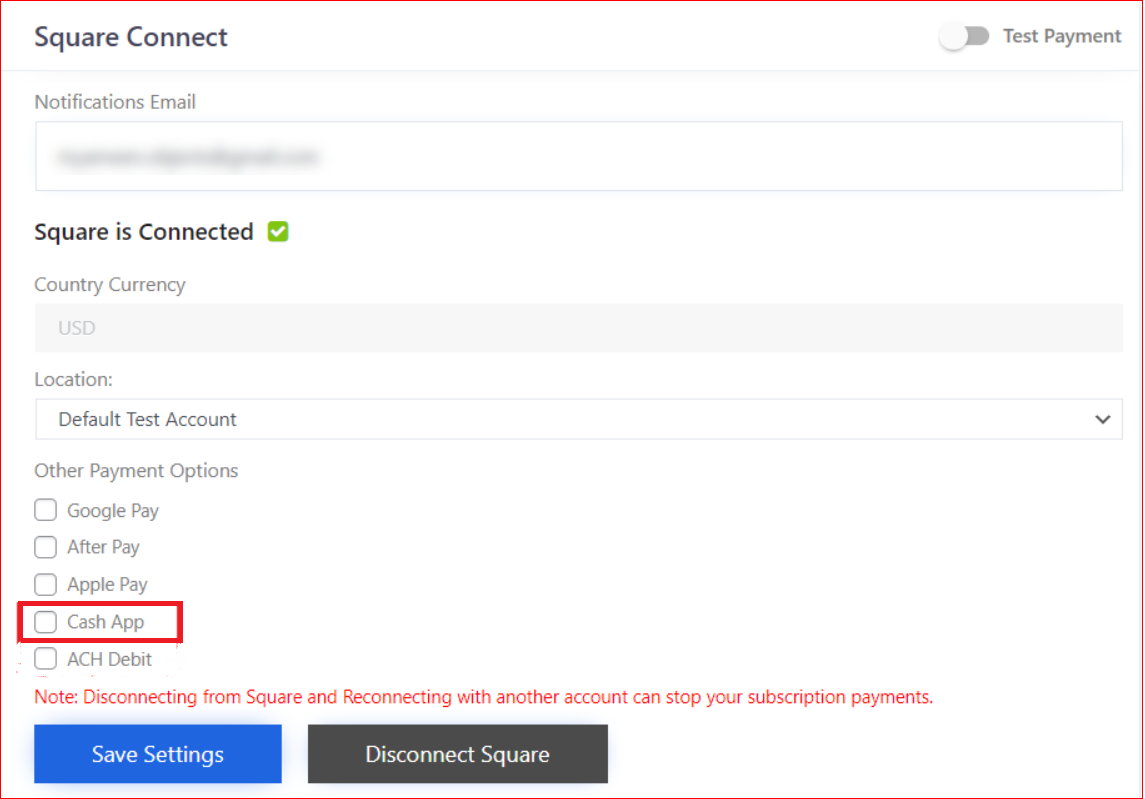
2- Choose your location from the Location Drop-Down menu.
3- Save these settings by clicking the ‘Save Settings’ button.
Step #3: Test Cash App Payments for WordPress
Before going live, it’s crucial to test the functionality of your Cash App payments. By doing this, you can ensure that the checkout process is seamless for your customers and that payments are being correctly processed and recorded.
1- Visit your website and navigate to the WP EasyPay Form page.
2- Fill out the Form Information and choose the payment amount.
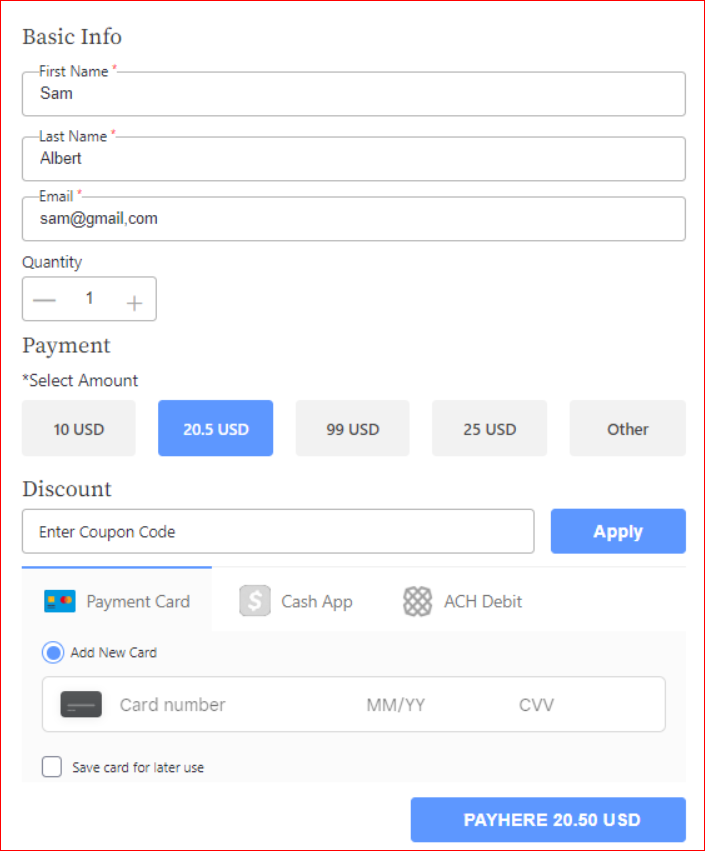
3- Select the Cash App as your payment method.
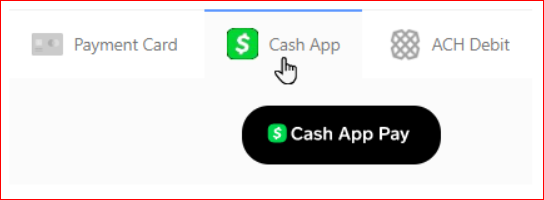
4- Click the ‘Cash App Pay Button,’ this will reveal a QR Code.
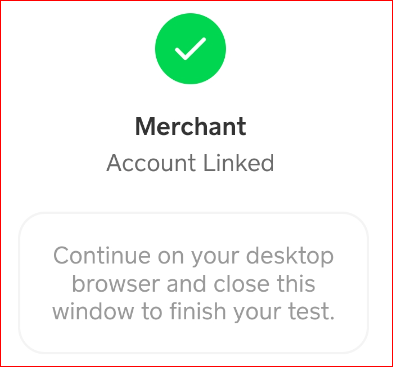
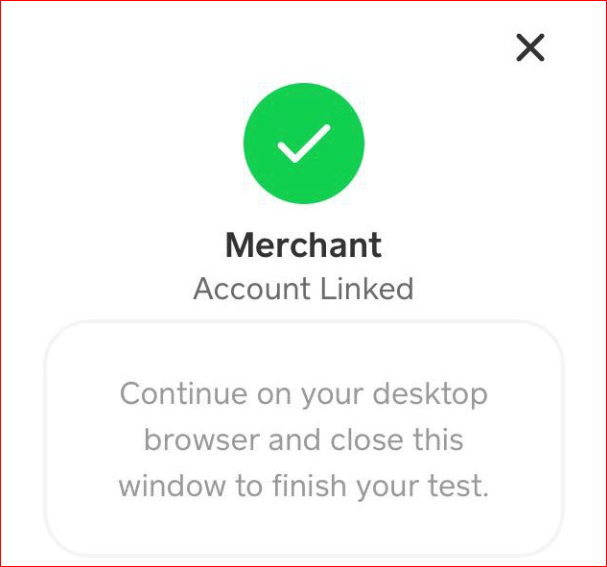
5- Scan the QR Code with your phone and follow the appearing link.
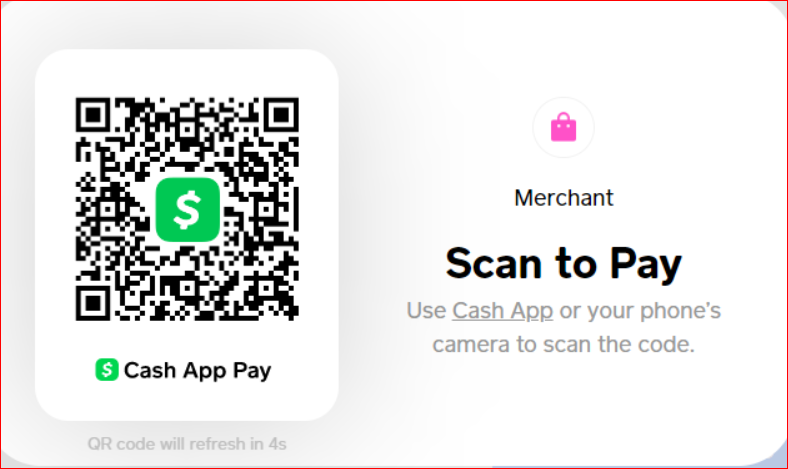
6- It will ask for approval if you are in test mode.
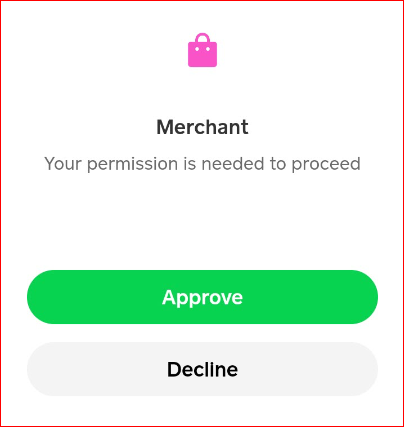
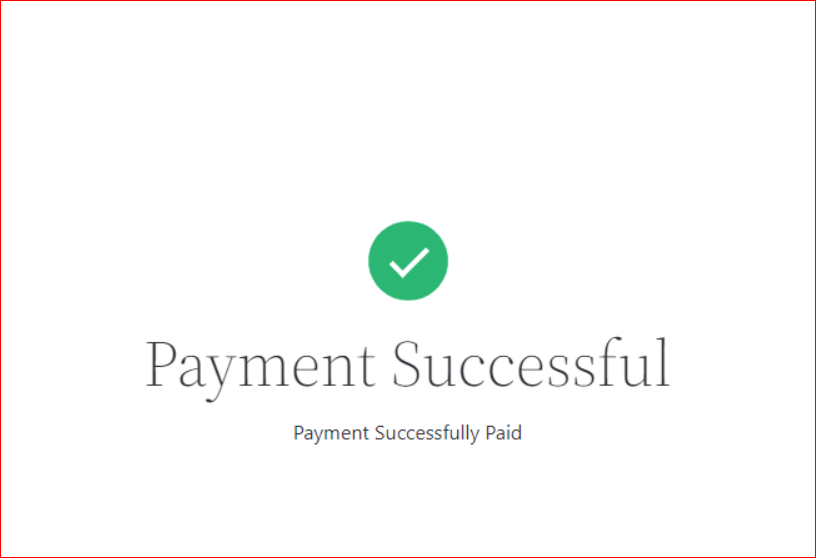
7-Once you approve it, the transaction will proceed to the sandbox for processing.
8- Users will see the status of their payments as follows:
Note: For live transactions, you will be redirected to the mobile app to complete the transaction.
Step #4: Cash App Payment Management (Reports and Refund Option)
The final step involves managing your Cash App payments. This involves managing your subscriptions, monitoring your Cash App transactions, and handling any necessary refunds.
1- Go to WP Easy Pay → Subscriptions to access subscription reports. Here, you can view all subscriptions, access detailed information, and even pause subscriptions if necessary.
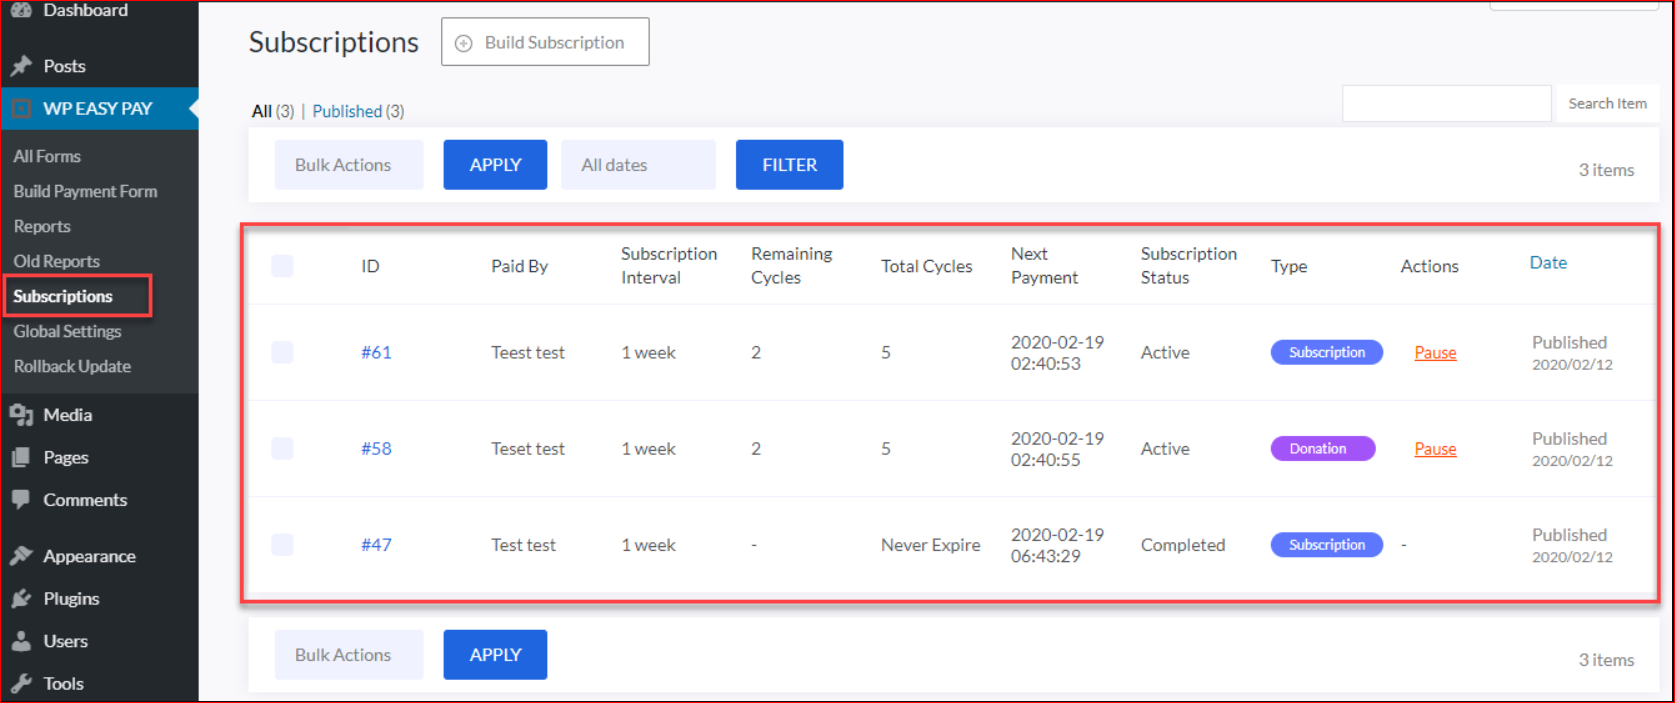
2- To view Cash App transactions in WordPress, navigate to WP Easy Pay → Reports. Here, you can access detailed transaction information. You can also download it as a CSV file.
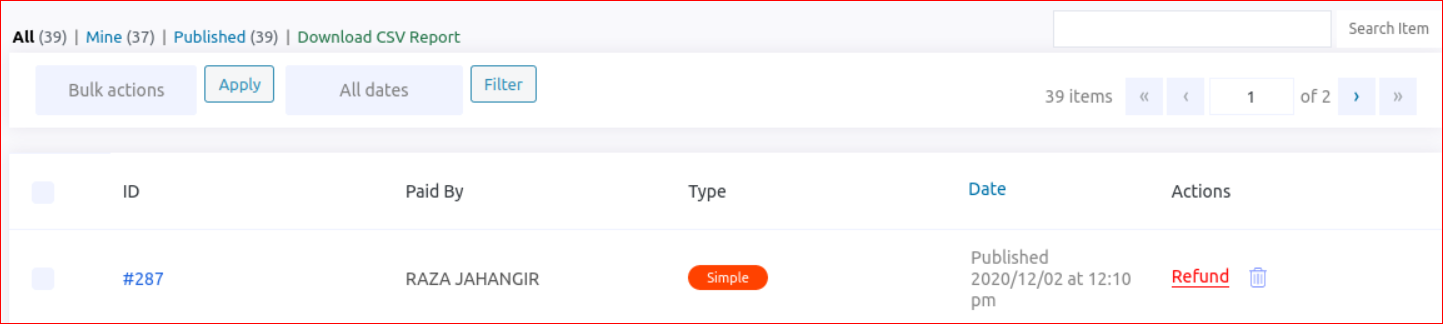
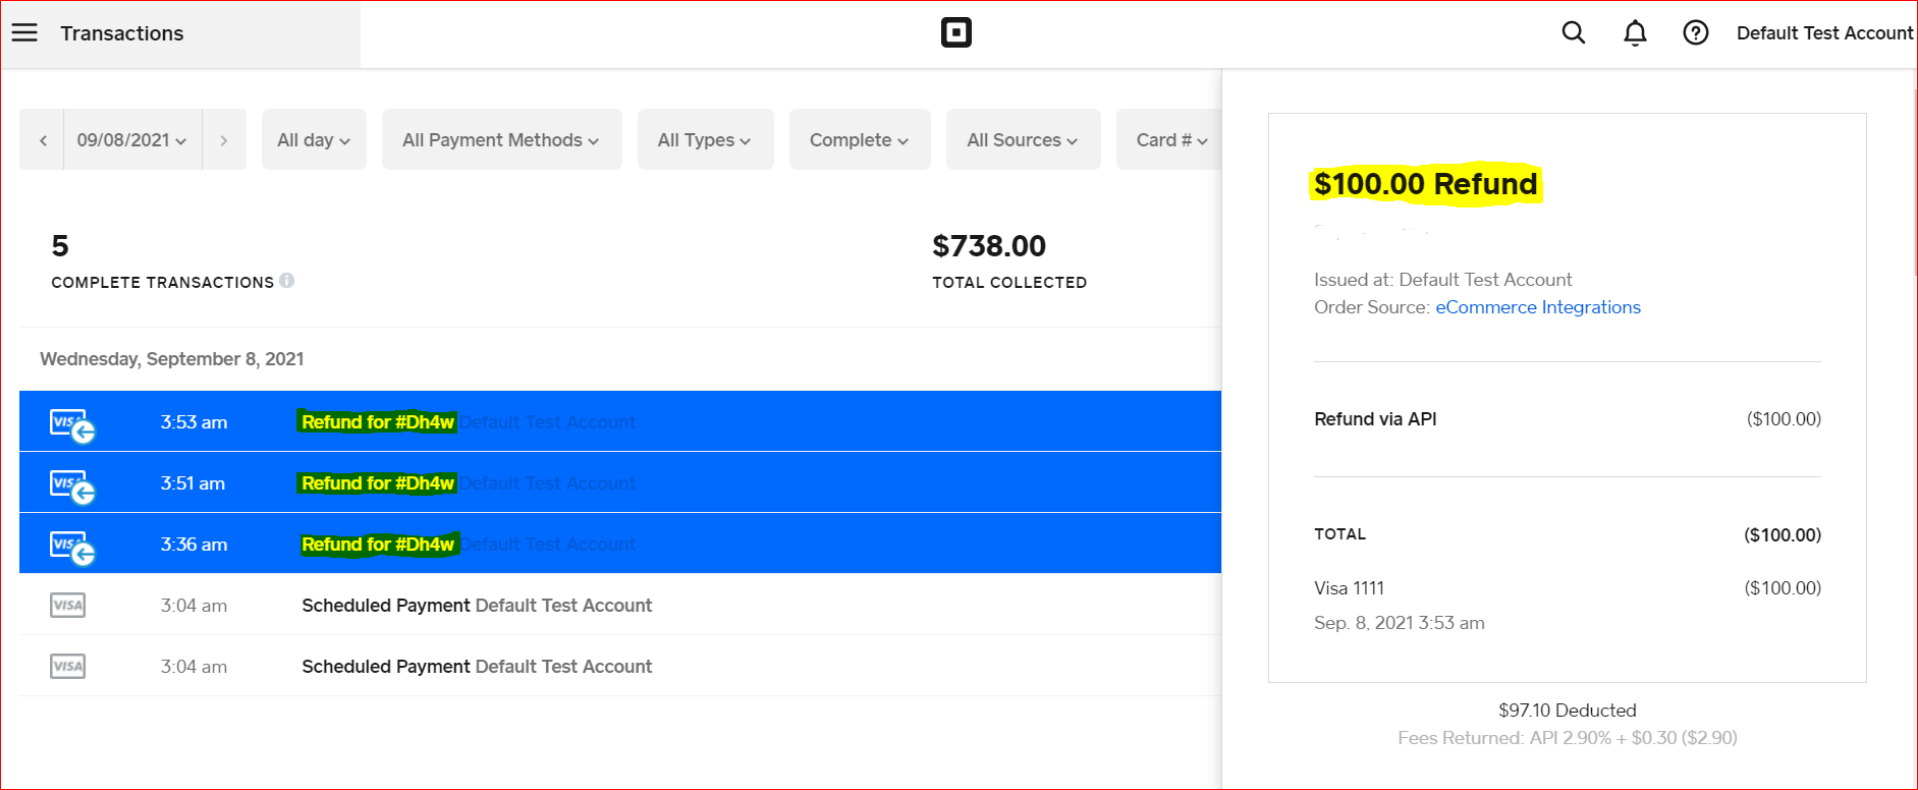
3- To issue a refund, navigate to WP Easy Pay → Reports → ID of Payment Transaction → ‘Refund Now.’ Enter the refund amount and confirm the refund request.
4- After the refund is processed, a Refund ID is generated, which can be tracked in your Square account.
With these steps, you’ve successfully integrated Cash App payments into your WordPress website using WP EasyPay. Now, you’re ready to offer your customers a new, convenient payment method and tap into the growing user base of Cash App.
Cash App Configurations for WooCommerce
After integrating the WooSquare Plus extension into your WooCommerce, follow the below step-by-step instructions to set up the Cash App payment gateway on your WooCommerce checkout page.
Step #1: Connect Your Square (Sandbox) Account with Checkout
Firstly, to facilitate Cash App payments, you need to establish a connection between your Square account and the WooCommerce website. Here’s how you can do it:
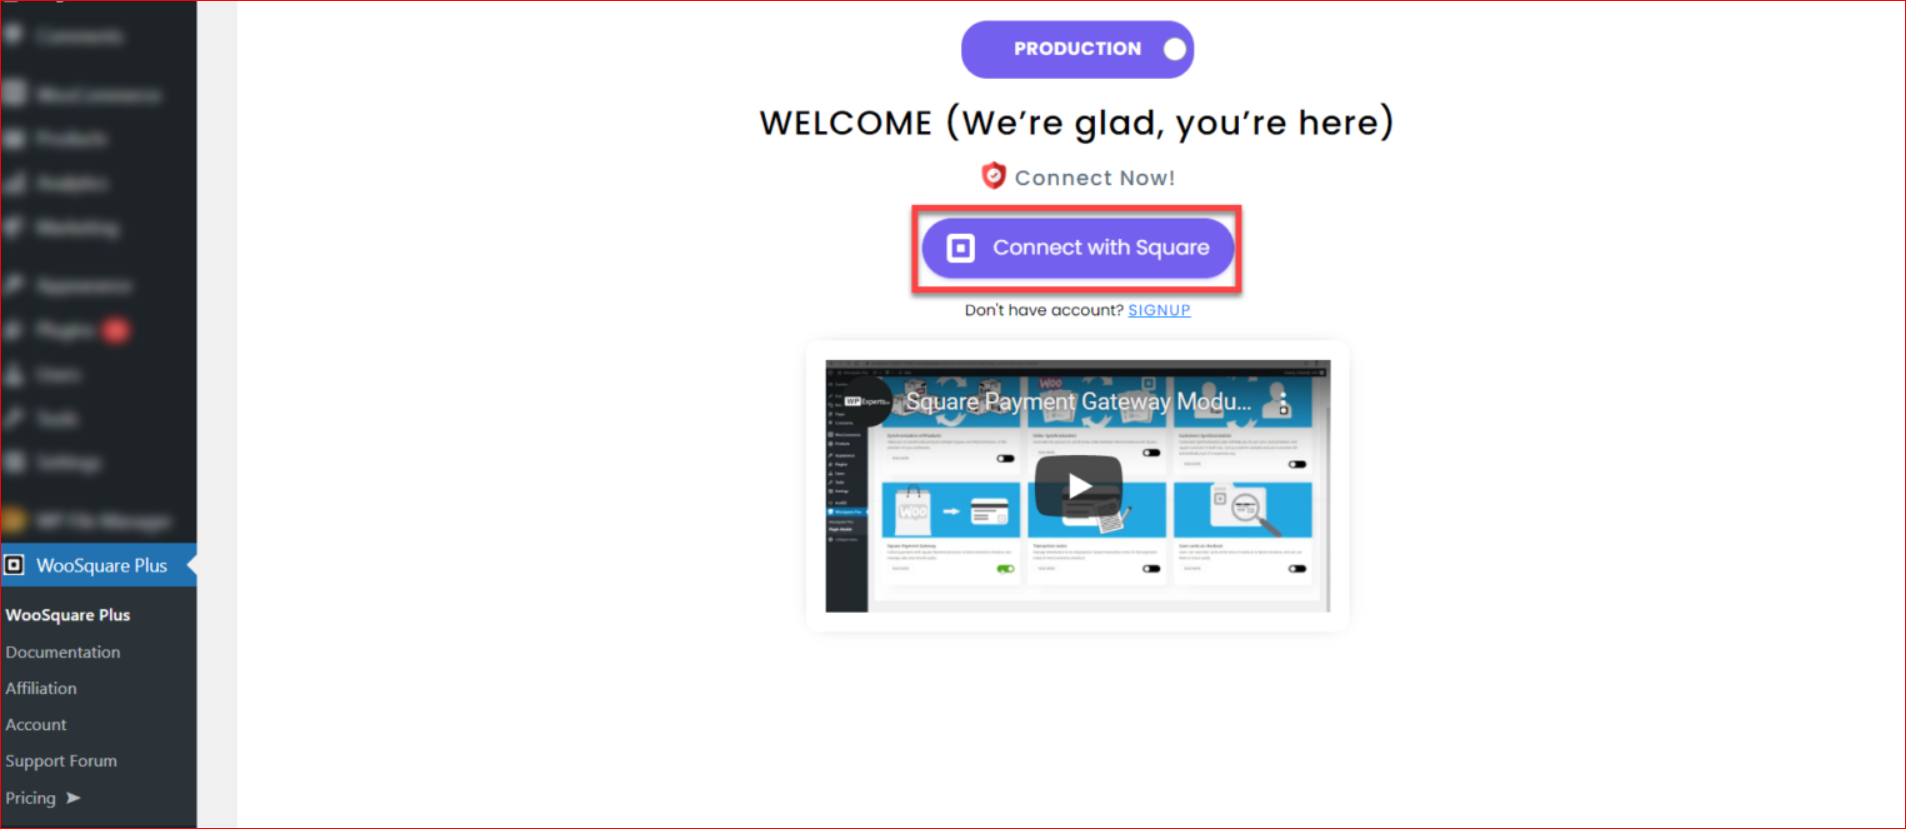
1- Go to your WooSquare Plus tab on the dashboard menu.
2- Click the ‘Connect with Square’ button to link your Square account.
3- You’ll be redirected to the login page if you’re not already logged in to your Square account.
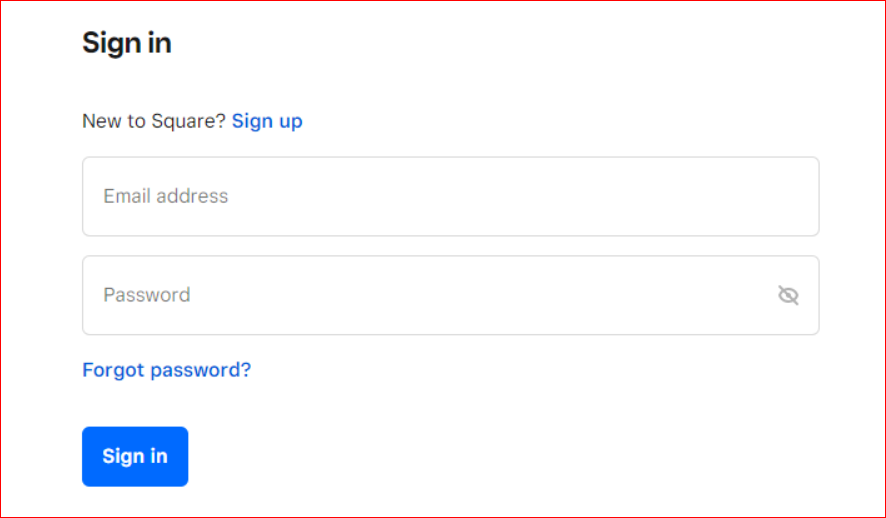
4- After logging in, an authentication page will appear; ‘Allow’ (approve) the requested permissions and then click the “THAT’S MY SITE – REDIRECT ME” button.

5- Choose your location from the dropdown menu, then click ‘Save Changes.’

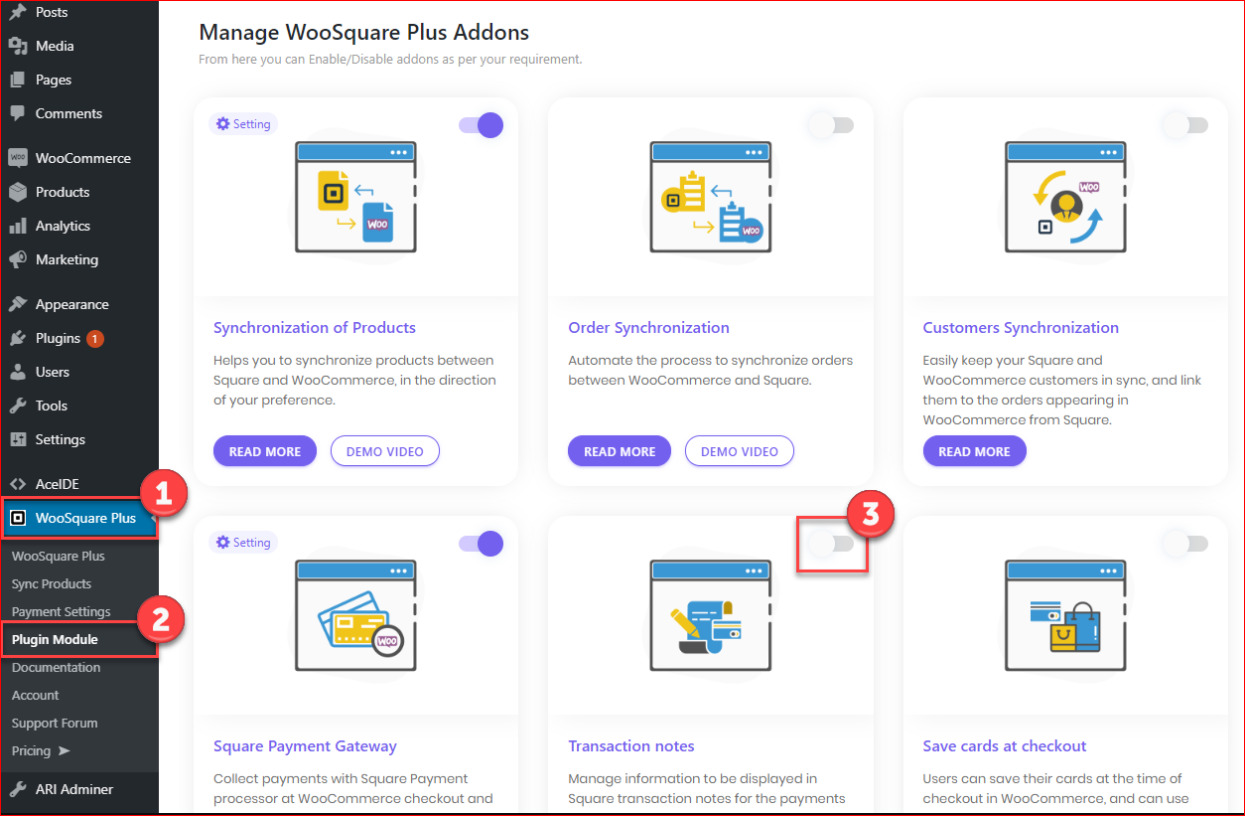
6- Now, navigate to the plugin module tab, then activate the toggled button to enable Square Payment Gateway, as shown in the screenshot below.
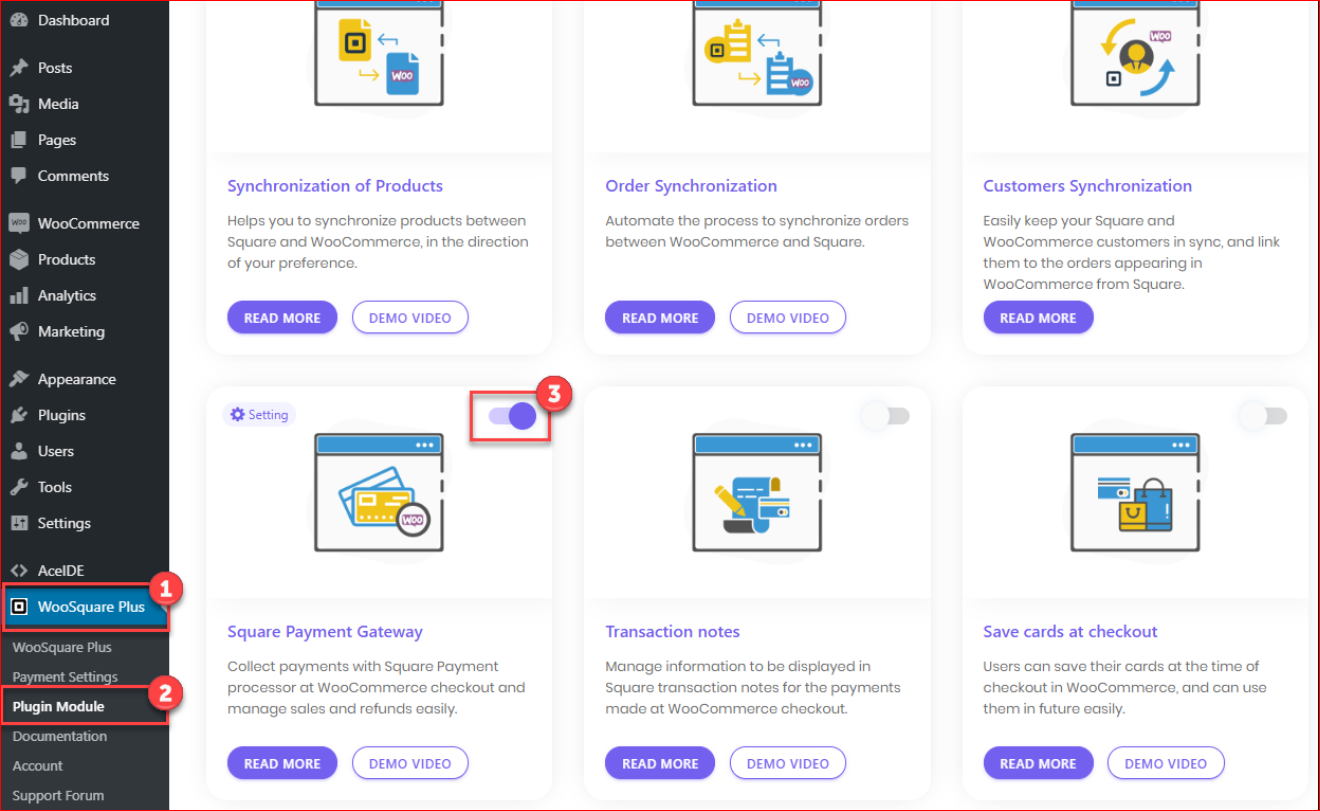
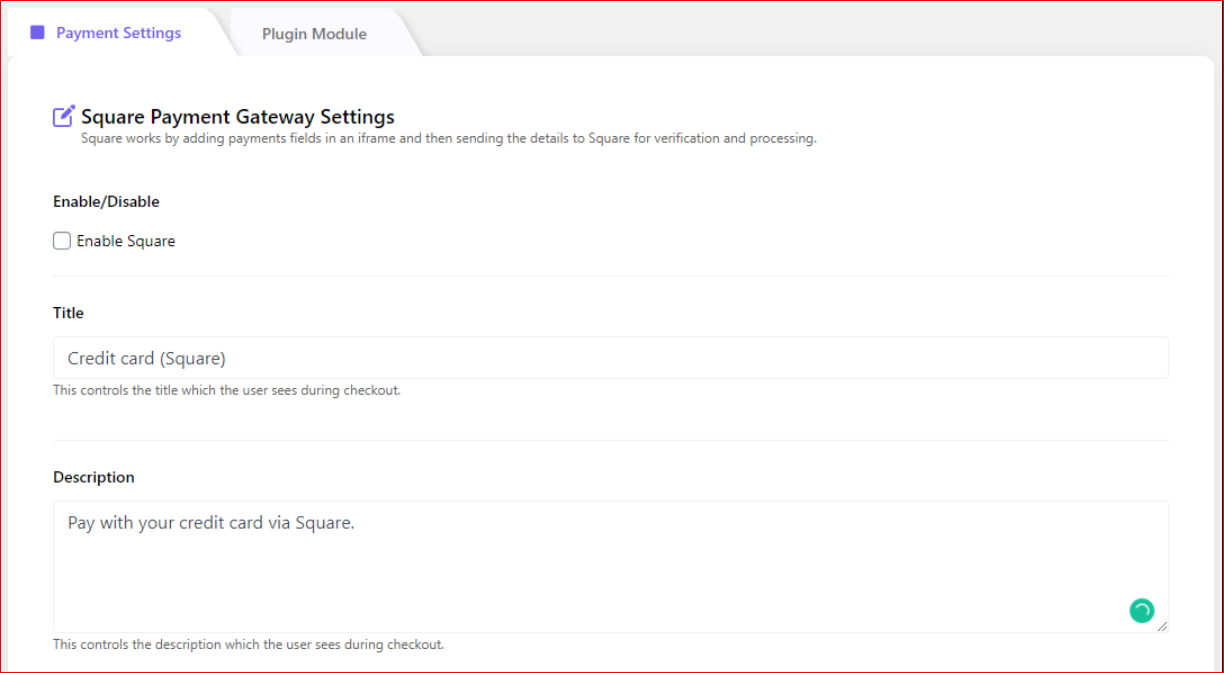
7- Once you enable it, the sub-tab for Payment Settings will appear, where you need to tick the ‘Enable Square option. Also, you can customize the title and description, which will provide versatility in customizing the payment process for your customers.
Step #2: Add Cash App Payment Option
Next, follow the below steps to enable Cash App as a payment option on your WooCommerce website.
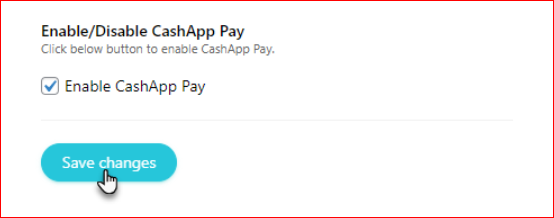
1- Locate and enable the CashApp Pay option on the Payment Settings page.
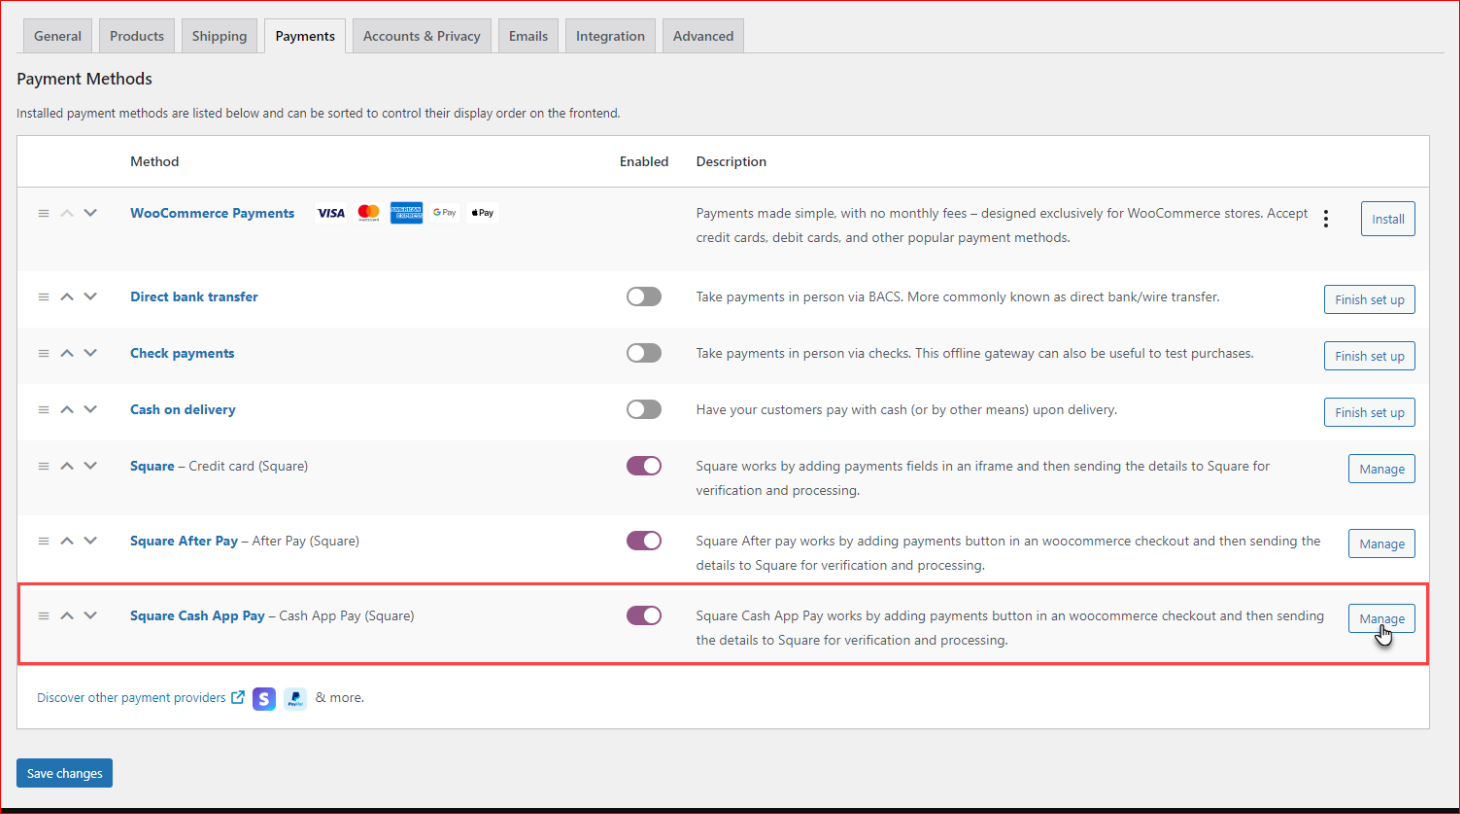
2- Navigate to WordPress Admin Dashboard → WooCommerce → Settings.
3- Access the Payments tab, then click ‘Square Cash App Pay’ or the ‘Manage/ Setup’ button.
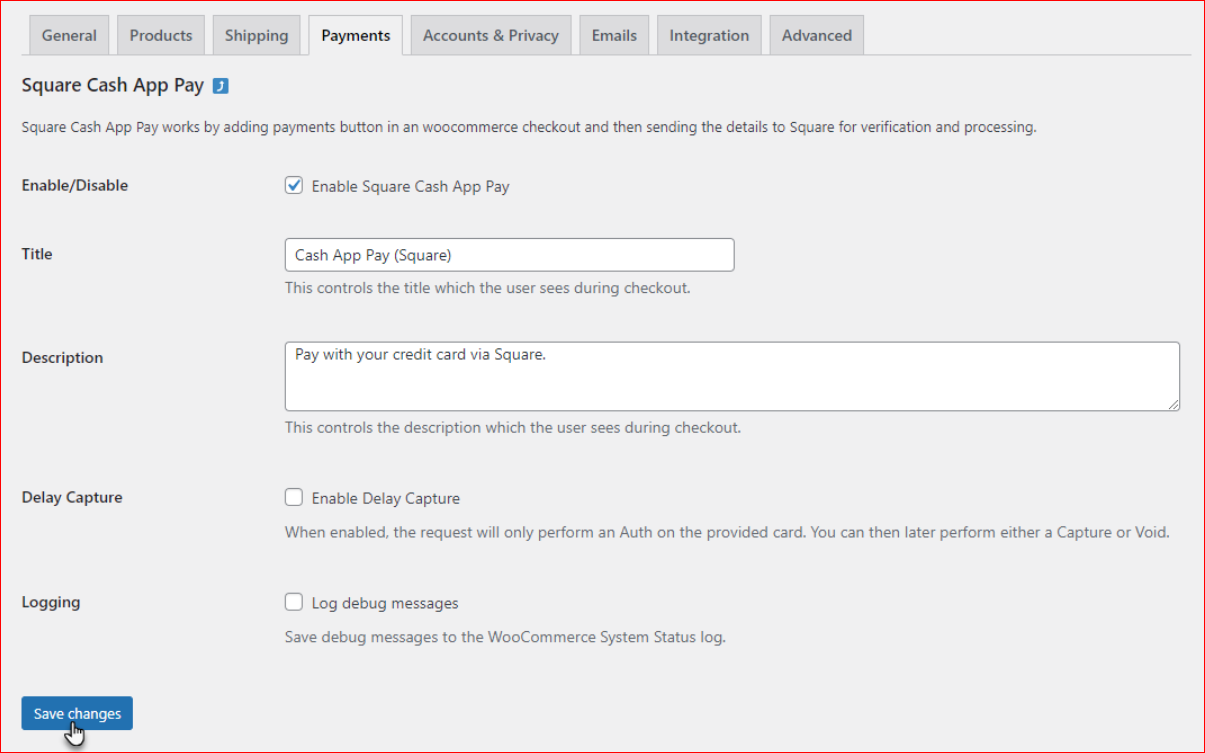
4- Fill in the necessary details, like the Title and Description.
5- If needed, enable the Delay Capture and Logging option.
6- Click ‘Save Changes’ to finalize the settings.
Step #3: Test Cash App Payments for WooCommerce
Before you can accept live payments, make sure to test the Cash App payment process for smooth operation. Follow these steps to test Cash App payments:
1- Visit your online store and select a product.
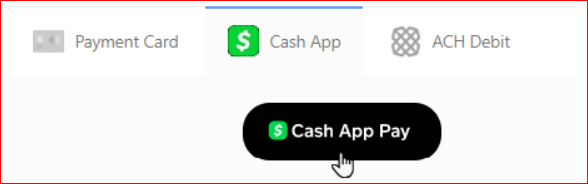
2- Proceed to the checkout page and select ‘Cash App Pay’ as your payment method.
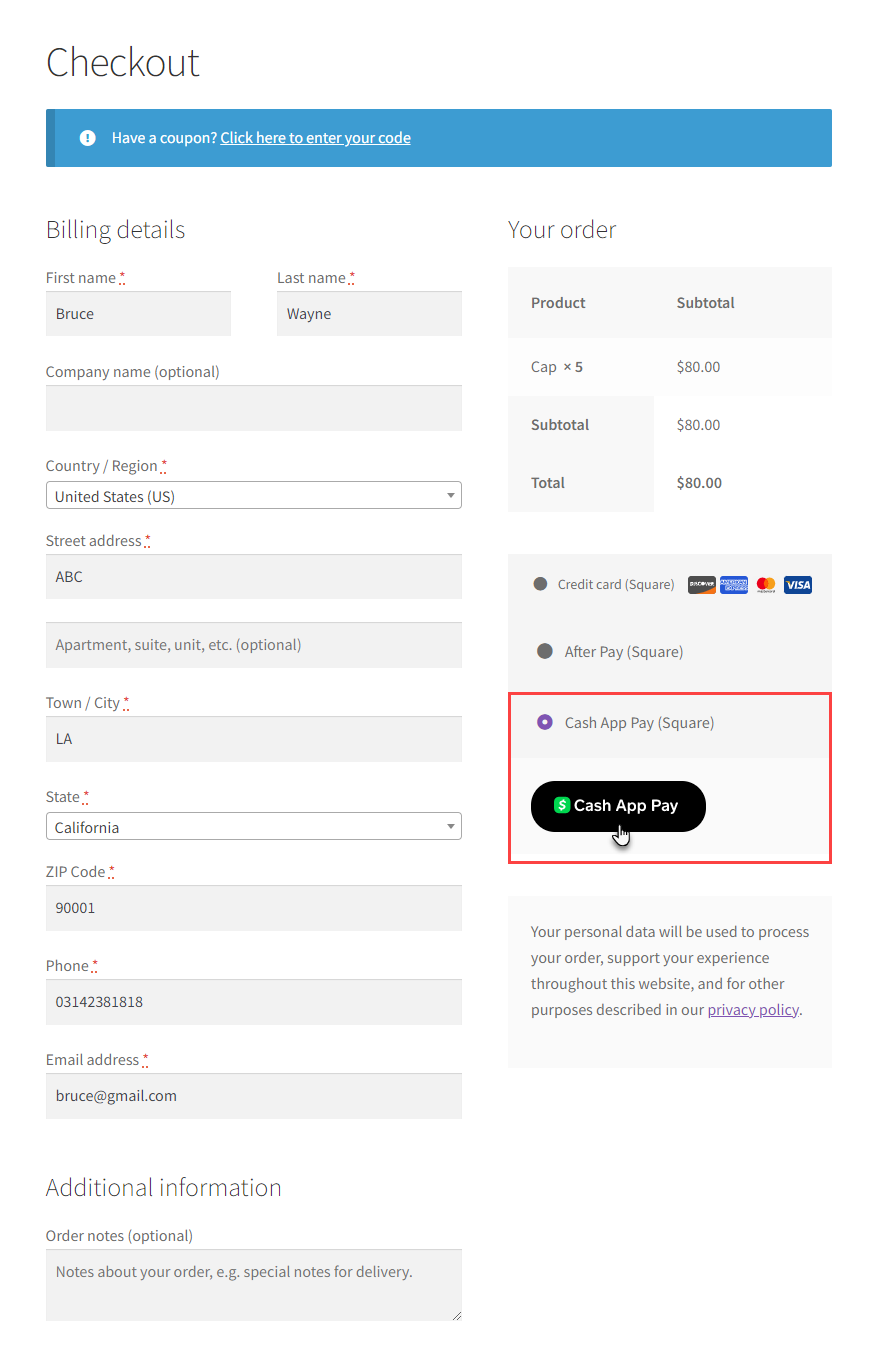
3- Click the ‘Cash App Pay’ button to reveal a QR Code.

4- Scan the QR Code with your smartphone.
5- Click the appearing link to view the transaction status.
6- If asked for approval, click ‘Approve.’
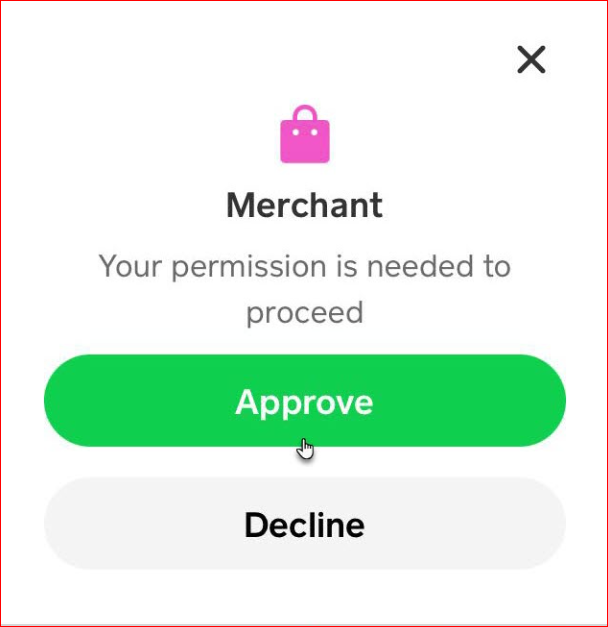
7- Once approved, the transaction will proceed to the sandbox for processing.
Step #4: Set Custom Transaction Notes
Finally, you can enhance your Cash App transactions in WooCommerce by setting custom transaction notes. The steps are as follows:
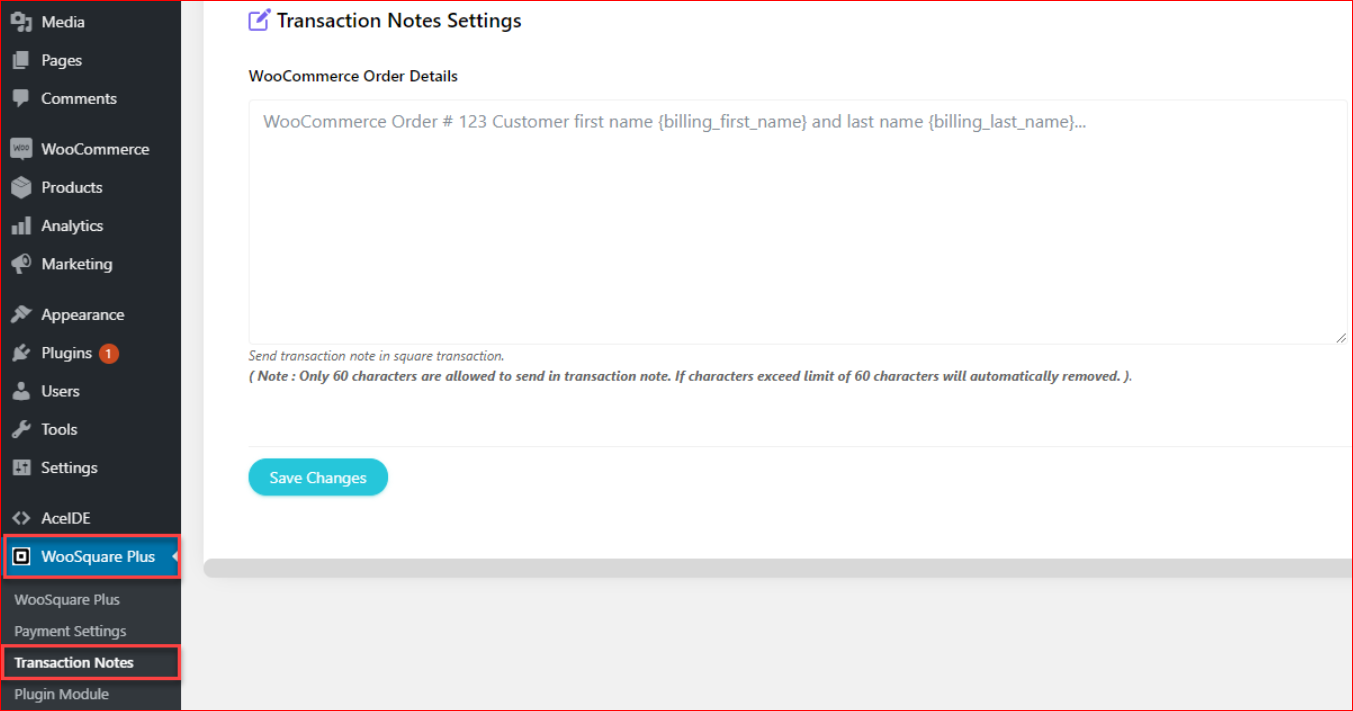
1- Navigate to the Woosquare Plus tab, then select the plugin module tab.
2- Enable the Transaction Notes module.
3- Design your template for transaction notes using available tags like {order_id} or {billing_first_name}.
4- Click ‘Save changes’ to store the transaction note.
Congratulations! By completing the above procedure, you have now successfully set up the Cash App payment method for your WooCommerce site.
To Sum It Up
Integrating Cash App with WordPress and WooCommerce provides a versatile, secure, and instant payment solution, allowing you to tap into a growing user base.
Utilizing plugins like WP EasyPay and WooSquare Plus, you can provide Cash App as a payment avenue on your website, enabling fluid transactions and enriching customer experience.
We hope this guide has provided a clear pathway to integrating Cash App into your online store, empowering you to align with evolving consumer preferences and capitalize on the benefits of this popular peer-to-peer money transfer service.
Frequently Asked Questions
- What is Cash App?
Cash App is a mobile payment service developed by Block Inc., enabling peer-to-peer money transfer. Users can send and receive money instantly using a unique username called a $Cashtag or by scanning a QR code. Cash App also offers additional services like stock trading, Bitcoin transactions, exclusive discounts, and basic banking services.
- Why should I consider accepting payments through the Cash App?
Accepting payments through Cash App can provide numerous benefits for your business. It gives you access to a growing user base, enabling you to reach more potential customers. The transactions are quick and seamless, providing a convenient payment method for mobile shoppers. Additionally, Cash App offers security features like encryption and fraud detection to ensure safe transactions.
- How can I view and manage Cash App transactions in WordPress/WooCommerce?
You can manage Cash App transactions in WordPress and WooCommerce using plugins like WP EasyPay and WooSquare Plus. These plugins allow you to view transaction reports, manage subscriptions, and even handle refunds. You can access detailed transaction information and download it as a CSV file, and you can track refunds in your Square account using the generated Refund ID.
- Is it safe to accept Cash App payments?
Yes, it is safe to accept Cash App payments. Cash App uses encryption and fraud detection technologies to secure your financial information. Additionally, you can enable security features like PIN code, Touch ID, Face ID, or two-factor authentication on your account to further reduce the likelihood of fraudulent transactions.
- Can I link my Afterpay account to a Cash Card?
No, Afterpay does not provide a physical payment card like the Cash Card offered by CashApp. Afterpay operates as a payment service within participating merchants’ websites or apps, and the payments are deducted from your linked payment card.


