

E-commerce success depends on offering users easy payment alternatives. One well-liked payment method enabling customers to purchase today and pay later in interest-free installments is AfterPay. This thorough guide will help you through the process of incorporating AfterPay into your WooCommerce store using the WooSquare Plus plugin, ensuring a flawless purchasing experience for your consumers.
What is AfterPay?
The “Buy Now, Pay Later” business concept was founded by AfterPay in Australia and is now a global trend. Customers can divide their purchase price into four equal, interest-free installments every two weeks. More clients will complete their purchases because it offers a convenient and affordable payment alternative.
Advantages of using AfterPay
AfterPay provides many advantages that benefit both customers and retailers, including:
- Interest-Free Installments: Customers may divide their payments across four installments without being charged interest.
- Instant Approval: AfterPay’s swift approval procedure enables clients to purchase immediately.
- Increased Conversion Rate: AfterPay can greatly increase your store’s conversion rate by offering a convenient payment alternative.
- Nominal risk: As an online retailer, AfterPay pays you in full upfront, which lowers the danger of non-payment.
Introducing the WooSquare Plus Plugin
A powerful WooSquare Plus plugin connects WooCommerce and Square, a famous payment processor. It enables AfterPay to seamlessly integrate into your WooCommerce store, giving consumers a quick and easy payment experience.
Setting up AfterPay in WooCommerce with WooSquare Plus
Step 1: Install and Activate WooSquare Plus Plugin
- Go to the WordPress Admin Dashboard and log in.
- Go to the ” Plugins ” area and click “Add New.”
- Look for the “WooSquare Plus” plugin and click “Install Now” next to it.
- After installing the app, click “Activate” to turn it on.
Step 2: Configure AfterPay Payment Option in WooCommerce Settings
- Go to WooCommerce > Settings in the Admin Dashboard of your WordPress site.
- Click the “Payments” tab to see how you can pay.
- Look for the “AfterPay” option and check the “Enable AfterPay” box to give your customers this payment choice.
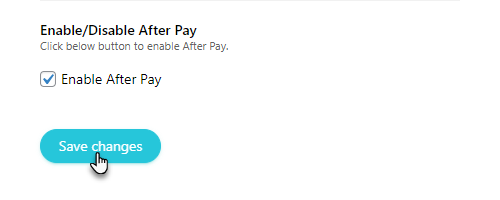
Click on the “Save Changes” button at the bottom of the page to apply the settings.
Integrating AfterPay API Credentials with WooSquare Plus
For AfterPay to function correctly with your WooCommerce store, you must connect the AfterPay API credentials with the WooSquare Plus plugin. The procedure is as follows:
Step 1: Obtain AfterPay API Credentials
Visit the official AfterPay website and sign in to your AfterPay Business account.
Once logged in, navigate to the Developer Dashboard or API section to access your API credentials.
Generate the required credentials, including the AfterPay Merchant ID, Secret Key, and other relevant details.
Step 2: Integrate API Credentials with WooSquare Plus
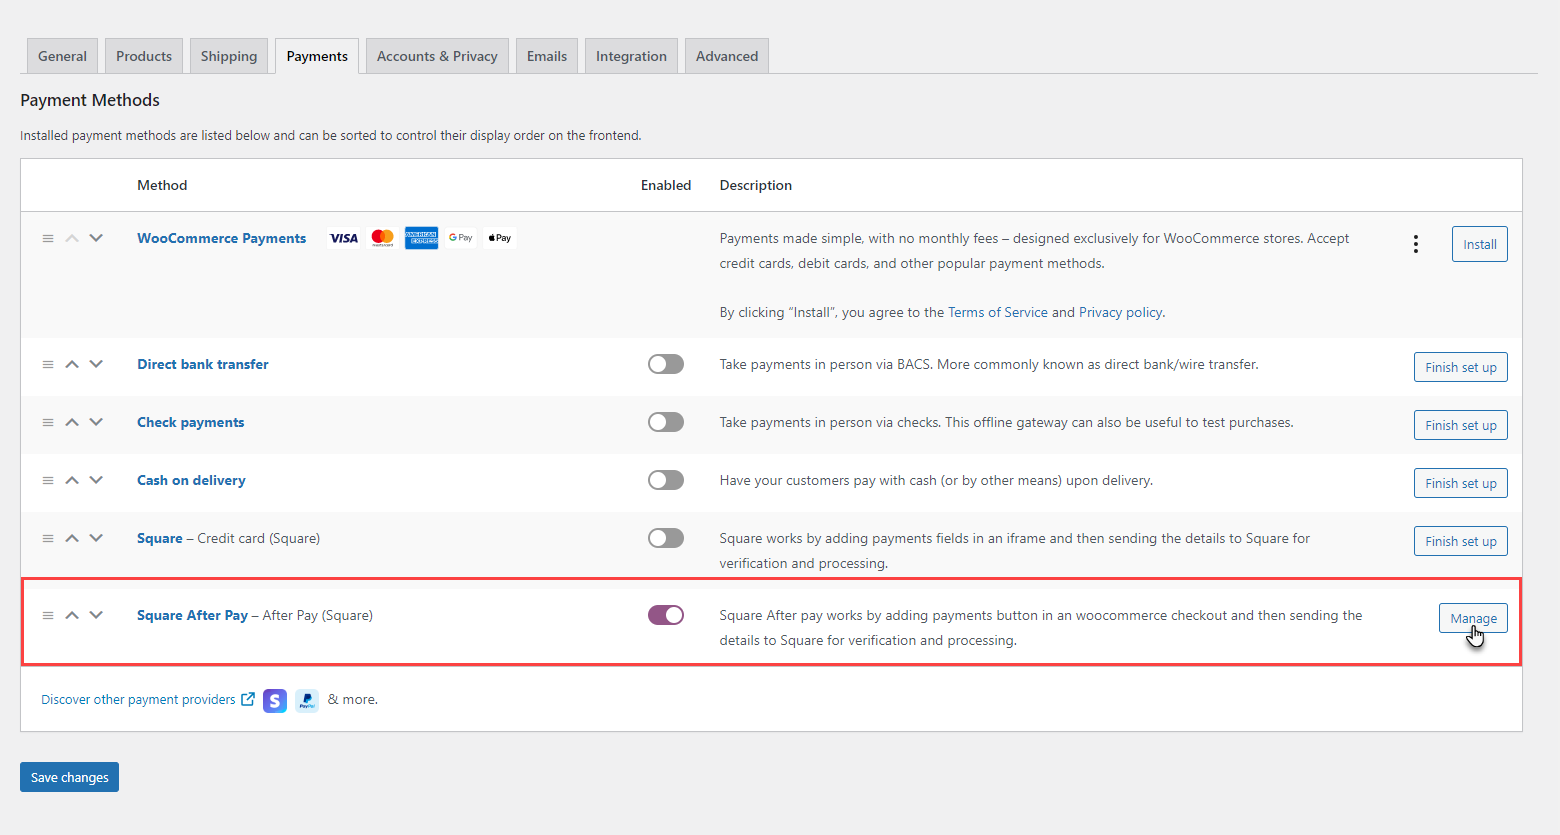
In your WordPress Admin Dashboard, go to WooCommerce → Settings → Payments.
Scroll down to find the “Square AfterPay” option, and click the “Manage/Setup” button on the right side of the payment option.
Now that you have navigated to the Square AfterPay settings page.
Enter the “Title” and “Description” for the AfterPay payment option as you want it to appear to your customers during checkout.
Enter the AfterPay API credentials you obtained earlier, including the Merchant ID and Secret Key, into the respective fields.
You may also enable additional options such as “Delay Capture” and “Logging” according to your specific requirements.
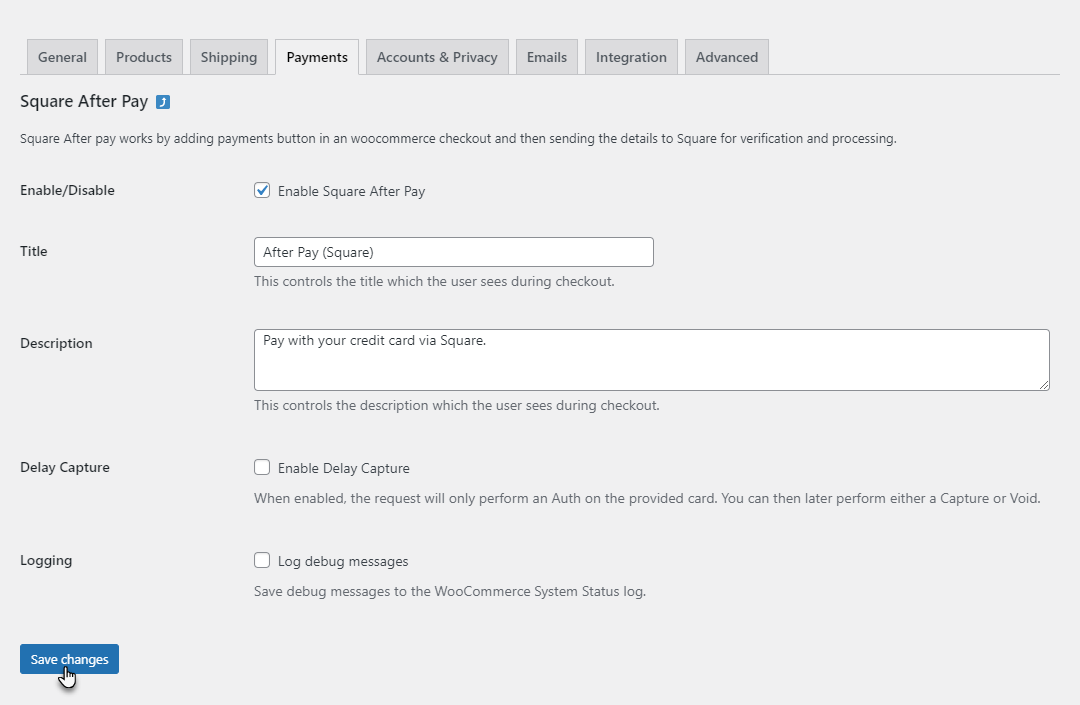
Once you’ve entered all the necessary information, click the “Save Changes” button to save your AfterPay settings.
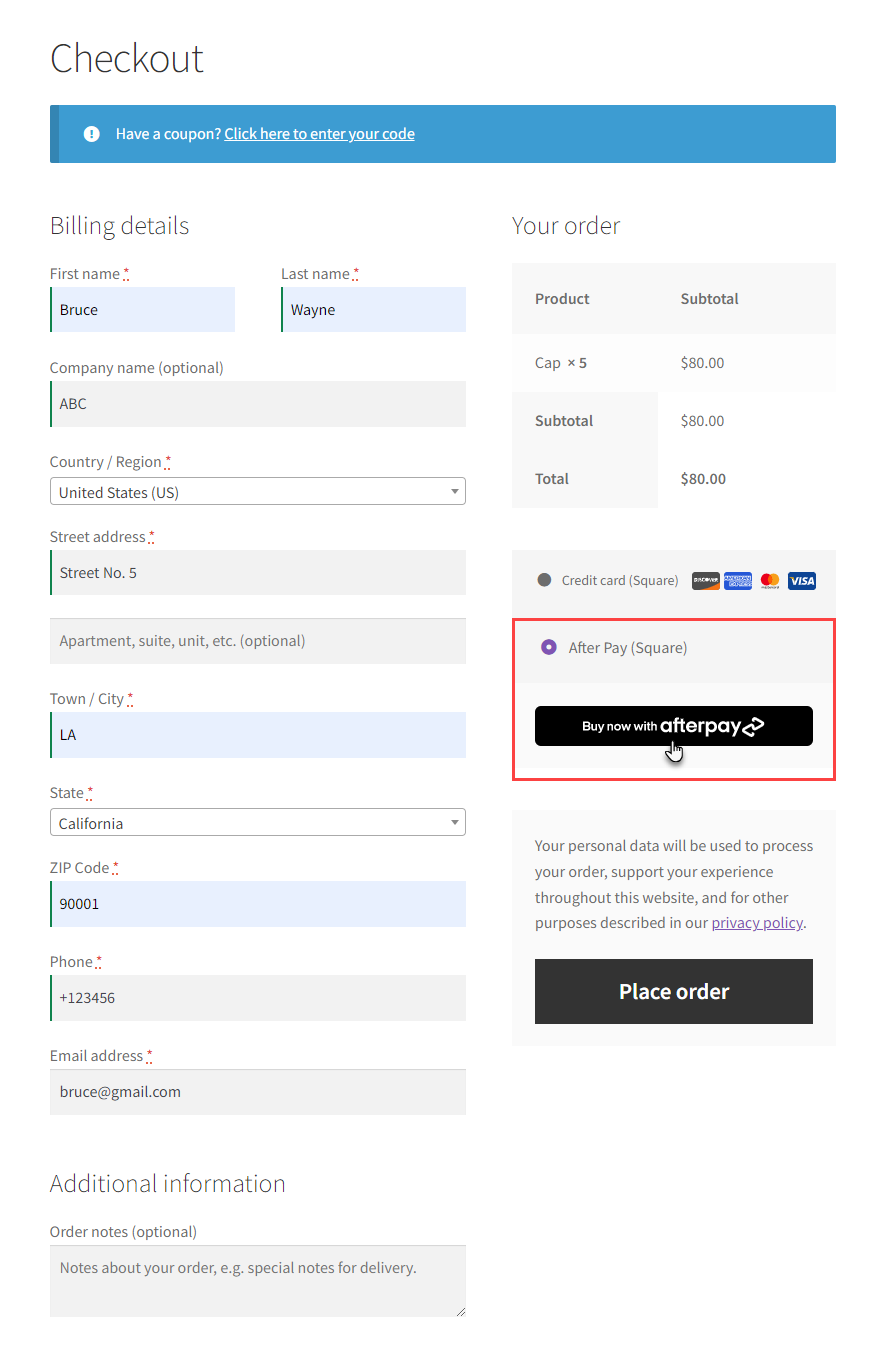
On the Checkout page of your WooCommerce store, select the items you wish to purchase.
Proceed to the payment options section.
Choose “AfterPay” as your payment method.
Enter your email address or mobile number associated with your AfterPay account.
Enter the required information and click on the “Continue” button.

After entering your email address or mobile number, you will be redirected to the AfterPay login page.
Now, enter your AfterPay account password.
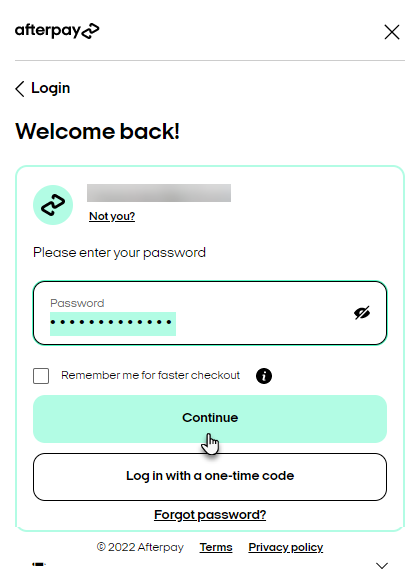
Once you’ve entered the password, click the “Continue” button to log in to your AfterPay account.
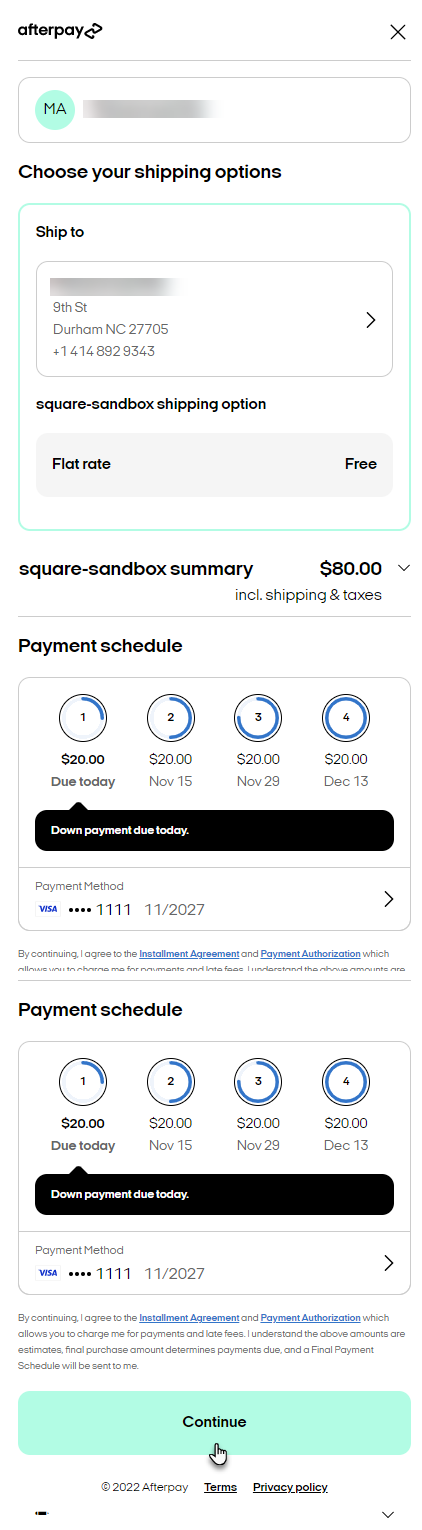
After successfully logging in to your AfterPay account, you will be navigated to the WooCommerce Checkout page.
Click on the “Continue” button to proceed with the transaction.
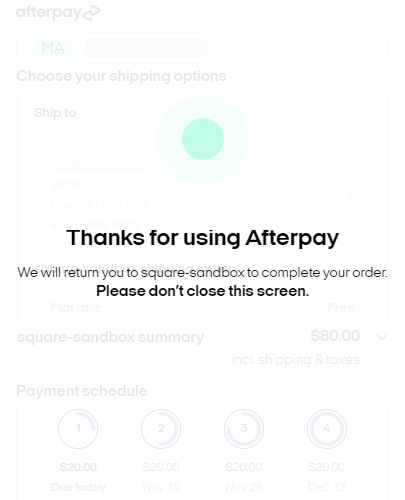
At this moment, the transaction is being processed.
Do not close the screen until the process is completed.
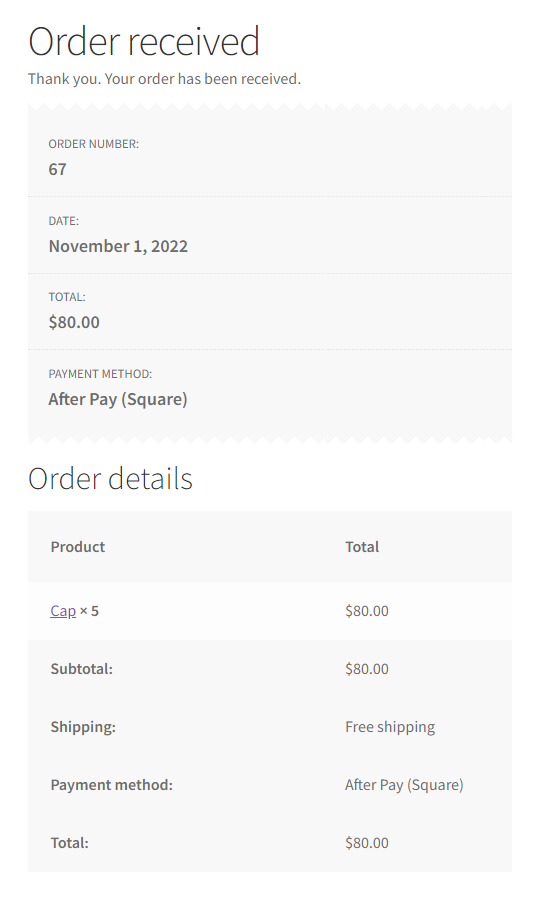
Once the transaction is complete, you’ll receive a confirmation that your order has been placed successfully.
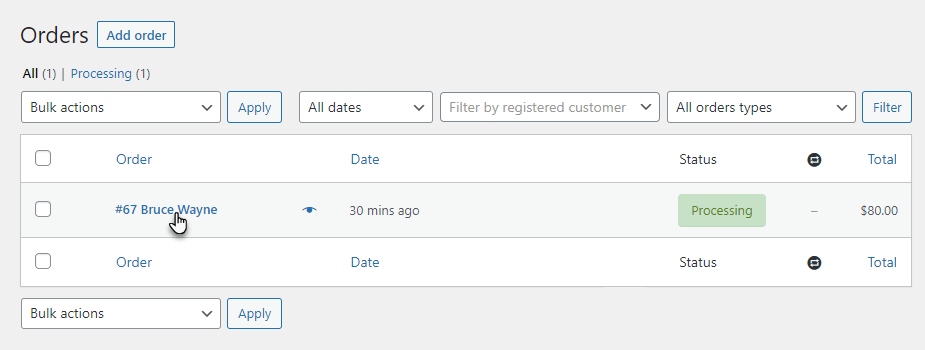
To view the details of the placed order, navigate to your WordPress Admin Dashboard.
Go to WooCommerce → Orders from the side menu.
On the Orders page, a list of recent orders will be displayed.
Find the recently submitted order and click on it to view its details.
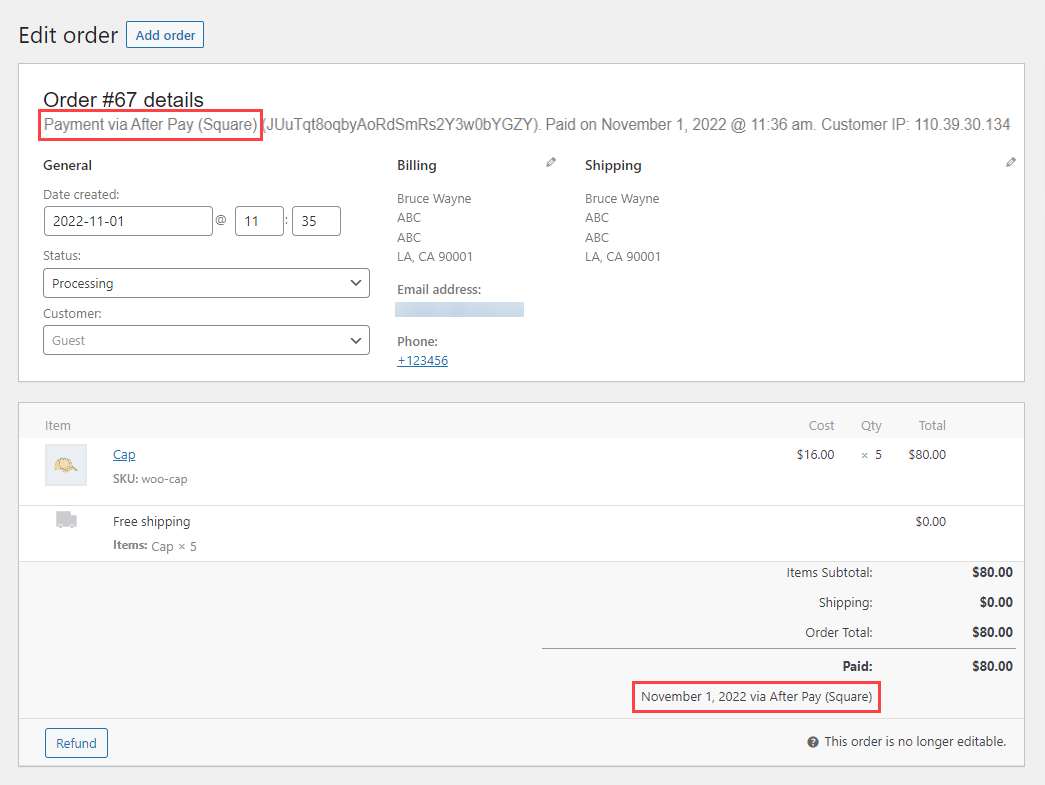
The Edit Order page is accessed by clicking on the order.
Now, you can view relevant transaction details, including customer information, order items, and shipping information.
On the Edit Order page, you can verify the Payment Method used for this order, confirming that the customer used AfterPay to purchase.
Conclusion
Using the WooSquare Plus plugin to integrate AfterPay into your WooCommerce store will improve both the shopping experience for your consumers and your store’s conversion rate. You may access a wider audience and increase client loyalty and satisfaction by providing a convenient “Buy Now, Pay Later” option. Accept AfterPay as a payment option, and witness your e-commerce company flourish in the modest online industry.
This blog post defines how to set up AfterPay in WooCommerce using the WooSquare Plus plugin step-by-step. You now understand how to give your clients an easy-to-use AfterPay payment experience, from installing and activating the plugin to integrating the AfterPay API credentials and customizing payment settings.
Frequently Asked Questions
- How does AfterPay work?
AfterPay allows customers to split their purchase amount into four equal, interest-free installments, paid every two weeks. Customers can complete their purchase at checkout and make subsequent payments in the following weeks.
- Is AfterPay safe?
Yes, AfterPay is a secure payment method. It does not charge interest or fees for on-time payments, making it a safe and transparent option for customers.
- What are the benefits of using AfterPay?
AfterPay offers several benefits, such as interest-free payments, instant approval, increased conversion rates, and reduced risk for merchants.
- Why should you use AfterPay for business?
Integrating AfterPay into your e-commerce store can attract more customers, increase sales, and improve customer loyalty due to its flexible and convenient payment options.
- Can I enable or disable AfterPay for specific products or categories?
Yes, with the WooSquare Plus plugin, you can easily turn AfterPay on or off for specific products or categories, giving you greater control over its usage in your store.
- Can I transfer money from CashApp to my Afterpay account?
No, you cannot transfer funds from CashApp to your Afterpay account. CashApp is a payment app that allows you to send money to other users or make purchases, whereas Afterpay is a service for paying for purchases in installments.


